Abstract
In this project you'll learn how to make a piezoelectric pickup for acoustic guitar using inexpensive components. You can then connect your acoustic guitar to an amplifier, and record your own music. If you are interested in electronics and like playing acoustic guitar, this could be the perfect project for you.Summary
Sources
The procedure from this project is from a webpage by Adam Kumpf, a former masters student in Media Arts and Sciences at the MIT Media Lab:
- Kumpf, A. (n.d.). Make Your Own Acoustic Guitar Pickup. Retrieved June 25, 2014.
Edited by Andrew Olson, Ph.D., Science Buddies

Objective
The goal of this project is to make an acoustic guitar pickup using the piezoelectric transducer from a simple electronic buzzer.
Introduction
Back in the day, before any of us had computers at home, we listened to music on vinyl records. The audio signal was recorded in grooves cut into the records. To play the signal back and hear the music, the record was spun on a turntable, and a diamond stylus on the end of the tone arm would ride through the groove. The sides of the groove exerted pressure on the stylus, causing it to move a lever which is attached to a second crystal. The pressure transferred to this second crystal creates tiny electric currents due to the piezoelectric effect. A preamplifier in the phono cartridge of the turntable amplified these tiny currents, which were then further amplified by the stereo amplifier so that we could hear the music through speakers.
The piezoelectric effect can also be used in electronic pickup devices for recording acoustic instruments. With a pickup, the vibrations of the instrument are transduced into an electric current, which is then amplified and recorded. Unlike a microphone, with a pickup you will not record extraneous sounds from elsewhere in the room, just the sound of the acoustic instrument in which the pickup is mounted. In this project, you'll learn how to make a piezoelectric pickup for an acoustic guitar, using inexpensive components that you can find at your local Radio Shack store.
There are several different experiments you could try with this project. For example, you could purchase several different piezoelectric elements with different specifications, and compare their performance as pickup devices. You could also compare the performance of your homemade pickup with the performance of a professionally-designed piezoelectric pickup. Or you could build a single pickup and compare the performance of the pickup when it is placed in different locations on the underside of the bridge, or with or without foam.
If you're interested in electronics and like to play acoustic guitar, this could be the perfect project for you.
Terms and Concepts
To do this project, you should do research that enables you to understand the following terms and concepts:
- Piezoelectric effect
-
Parts of a guitar
- Bridge
- Soundhole
- Soundboard
- Strings
- Sound
- Physics of vibrating strings
- Sound frequencies
- Hertz (cycles per second)
Questions
- How does a piezoelectric device transduce mechanical strain into an electric current?
Bibliography
- This project is based on a website by Adam Kumpf, a former student in Media Arts and Sciences at the MIT Media Lab:
Kumpf, A. (n.d.). Make Your Own Acoustic Guitar Pickup. Retrieved June 25, 2014. - These references have information on piezoelectricity and piezoelectric sensors:
- Wikipedia Contributors. (2014, June 8). Piezoelectricity. Wikipedia: The Free Encyclopedia. Retrieved June 25, 2014.
- Wikipedia Contributors. (2014, May 19). Piezoelectric Sensors. Wikipedia: The Free Encyclopedia. Retrieved June 25, 2014.
- Nave, C.R. (2006). Piezoelectric Effect. HyperPhysics, Department of Physics and Astronomy, Georgia State University. Retrieved September 27, 2007.
Materials and Equipment
To do this experiment you will need the following materials and equipment:
-
Acoustic guitar
- Tip: we highly recommend using an inexpensive acoustic guitar for this project, since you'll be gluing the pickup in place, and possibly even drilling a hole for mounting the audio cable jack.
-
Guitar amplifier (to hear the results)
- Depending on your amplifier, you may also need a preamplifier, since the output of the piezoelectric pickup is low amplitude.
- Guitar cable (1/4" male at both ends, to connect guitar to amplifier)
-
Piezo buzzer element, with specifications similar to the following:
- Transducer Type: Piezo-electric
- Transducer Size: 1.1 in
- Audio Range: 106 dB
- Noise Level: less than -111 dB
- Shielded audio cable, approx. 25 cm length
-
1/4" audio jack
- If you don't mind drilling a hole in your guitar, you can mount this on the guitar body.
- There are also end-pin audio jacks that can be installed in the end pin hole on the guitar. You will probably need to drill this hole larger. End pin jacks are more expensive than regular 1/4 in audio jacks.
- If you don't want to drill a hole in the guitar, you can also pass the wires from the pickup out through the end pin hole, and attach them to the audio jack outside the guitar. This would be a temporary installation, just for this experiment.
- Small piece of medium density foam (just a couple square inches)
- Soldering iron
- Solder
- Wire strippers
- Hot glue gun
- Hot glue stick
- Optional: power drill and 3/8 in spade bit for making hole for audio jack.
Experimental Procedure
Do your background research so that you are knowledgeable about the terms, concepts, and questions, above.
Making the Pickup Note: this procedure is from a webpage by Adam Kumpf (Kumpf, date unknown).
- The heart of the pickup is a piezo buzzer element. You can find these for just a couple dollars at your local parts store (Radio Shack). Sometimes the Piezo Buzzer packages don't have that much information on them, but you want to find things as close as possible to the information listed above in the Materials and Equipment section. In other words, they are pretty cheap so go for a good one. Also note that you do not need a fully functional buzzer device, just the piezo element.
- A word about Piezo Elements. Piezo elements are made from two conductors separated by a layer of piezo crystals. When a voltage is applied across the crystal layer, the crystals pull on one side and push on the other. This in turn bends the metal conductor layers. When a sinusoidal signal (audio) is applied, the conductors are pushed and pulled very quickly, creating sound waves. The beauty of the Piezo element is that it also works in reverse. If sound waves push and pull on the conductors, an electrical signal is created and can be output to an amplifier or recording device. This is exactly how we will use the Piezo Buzzer element in this project. It will be attached to the inside of the guitar body, and, as the body vibrates, the sound will be turned into an electric signal by the Piezo buzzer element.
- Now that you have the Piezo Buzzer, you need to carefully break it open and get out the piezo element. Be careful not to hurt the metal device inside. Bending the element may cause it to break or lose some of its sensitivity.
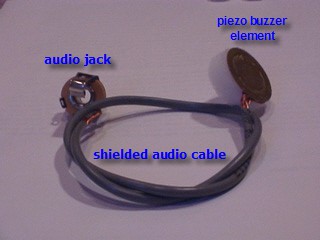
- You are now ready to solder the device together. Strip the ends of the shielded audio cable. On one end connect the signal wire to the center of the Piezo element and the ground/shielding to the metal/brass surface of the piezo element. On the other end of the shielded wire, connect the signal wire to the signal tab on the 1/4 in audio jack and connect the shielding to the ground tab.
- Optional: We [the original author, Adam Kumpf] have found that a small piece of medium density foam improves the performance of the pickup over a large number of frequencies. Cut a piece of foam the same size of your piezo element and about 3/8" tall. Place a large drop of hot glue on the back side of the piezo element (where the wires connect) and then press the foam on until the glue cools.
-
Your piezo pickup device should now be ready to install. You may want to make sure it is working by plugging it into an amp (with a guitar cable) and lightly tapping on it. Here is a picture of the finished device, ready for installation (Kumpf, date unknown):
-
Installing the Pickup
Mark where the hole will be in the body of the guitar. Unless you are handy with a soldering iron and have an endpin-jack on-hand, do not place your hole in the end of the guitar. This is where the pin that holds the strap is located. There is a block of wood there and the provided jack will not work in this position. I recommend marking the hole about halfway through the curve on the end of the guitar. It is, however, up to you where you choose to put it. Be creative! You will probably want to mark the spot with pencil first, then take the tip of the drill bit and twist on the mark by hand (not in the drill) to make a small indentation in the wood, as seen in Figure 1. Endpin jacks are a stronger and more professional solution, but will also probably double the cost of this project for you.
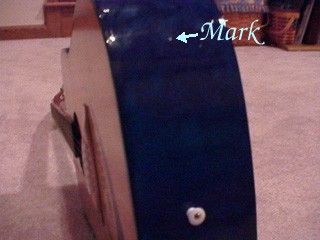
Figure 1. Mark the hole before drilling the guitar. Use the point of the drill bit to make an indentation in the wood (by hand) so the bit won't slip when you start drilling (Kumpf, date unknown).
-
Next we must drill the hole. This is the most difficult part of the installation process. It is in your best interest to take the tension off of the strings to get rid of forces that may be pulling on the wood. You may want to practice drilling holes on a scrap piece of wood if available to get a feel for the drill. Using a good sharp 3/8" spade bit, as seen in Figure 2, very slowly (fast drill speed, very little pressure) and carefully drill the hole in the body. Be steady and smooth or you may cause the body of the guitar to splinter around the hole.
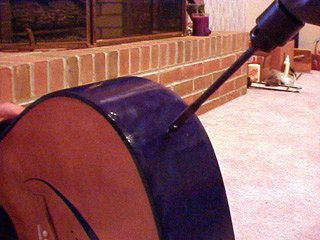
Figure 2. Drill the hole with light, steady pressure so as not to splinter the wood around the hole (Kumpf, date unknown).
-
Carefully clean the edges of the hole, shown in Figure 3. Take the washer and nut off of the 1/4" jack. You must now feed the jack into the guitar body and direct it towards the hole you just drilled. Depending on the size of your hand, you may need to take the strings completely off to get your hand in far enough to guide the jack towards the hole. I usually just loosen the strings, (very loose) and squeeze my hand in as far as it will go. It is almost certain that you will not be able to reach the drilled hole. This is okay. Just be patient and keep fishing for it. You may find it helpful to use something such as a paper clip or a pencil to help guide you through the hole. Once it is through, put the washer and nut back onto the jack to hold it in place. Do not overtighten the nut. Make it too loose and it will come off. Make it too tight and you will have a guitar with a crack in it. A little loose is better than too tight! If you are worried about the strength of the jack in the side of the guitar, you can easily make a sheet-metal washer for the inside of the guitar to help support it.
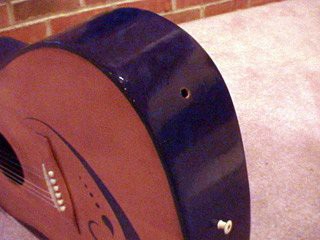
Figure 3. This photo shows the completed hole, after clean-up (Kumpf, date unknown).
-
You are now going to mount the piezo element. This step is a very important part if you want your guitar to have a nice sound. Be careful with the element. Piezo pickups can be broken if you bend them. Although it may seem odd, your pickup will produce a much better sound if you mount it hanging off of the guitar, 50-50. In other words, half of the element (brass side) is taped to the bridge (or a brace), and the other half is hanging out in mid-air. The best place to mount the piezo element is on the back side of the bridge. (the side towards the endpin) To apply the pickup, take a piece of double-stick tape, just enough to cover half of the element, and place it on the element. You may also want to use hot glue once you have found the best place on the guitar, as this improves the 0.4k–1.0 kHz range of the pickup. A lot of people also use a sticky-putty, available at a local office supply store. The half of the pickup with tape (or glue or putty) will be the part that sticks to wood on the inside of the guitar (see Figure 4). The other half will be hanging off. Try to keep the adhesive (tape/hot glue/putty) as thin as possible as this will help overall performance. It is also important to note that the placement of the piezo element can also be used to boost frequencies from 0.25–3.0 kHz depending on how much of the device hangs in mid-air. Play around with different placements if you want your guitar to have a unique sound. Typically, the closer the pickup is to the bridge, the warmer the sound.
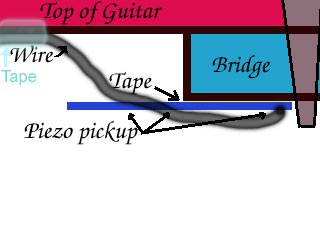
The piezo element is mounted inside the guitar under the bridge. The wire is taped to the topside of the guitar while the pickup is taped to the underside of the bridge.
Figure 4. Mount the piezo element to the underside of the bridge, inside the guitar. You may want to experiment with different mounting positions to see how they affect the sound. You may also want to try with and without medium density foam (Kumpf, date unknown).
-
The hard part of the installation is over. Now for the finishing touches. First, you must secure the loose wire that runs from the pickup to the jack so that it does not flop back-and-forth when someone you the guitar. Go in through the sound-hole and place generous pieces of masking tape to secure the wire. Next you may want to snug the nut on the jack to finalize its placement. Then tighten up the strings and plug it in! That's it. You just made your acoustic guitar into an acoustic/electric!
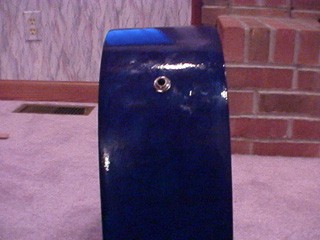
Figure 5. This photo shows the completed installation of the audio jack (Kumpf, date unknown).
Ask an Expert
Global Connections
The United Nations Sustainable Development Goals (UNSDGs) are a blueprint to achieve a better and more sustainable future for all.
Variations
- Investigate how placement of the piezoelectric transducer affects the sound quality. For example, do you really get better sound quality with the piezo element hanging partially in air?
- Investigate how the sound quality changes when the piezoelectric transducer is mounted with medium-density foam between it and the underside of the bridge, vs. when the transducer is attached directly to the underside of the bridge.
- More advanced students can use sound analysis software to measure the response of the piezoelectric transducer as a function of sound frequency (power spectrum plot).
- For an experiment on making electric guitar pickups, see the Science Buddies project Make Your Own Electric Guitar Pickup.
Careers
If you like this project, you might enjoy exploring these related careers:


