Abstract
Did you know that your guitar has a secret? Yes, that's right—hidden along each string are special places where you can play harmonics and make your guitar sound like a bell! In this music science fair project, you'll find out where the main harmonics are located on a guitar, and then see how those locations are related to the length of the strings. So get out your guitar—it's time to ring in a science fair project!Summary
Kristin Strong, Science Buddies

Objective
To identify the locations of harmonics on an acoustic guitar and relate them to guitar string lengths.
Introduction
Have you ever watched little babies play with sound? They "blow raspberries," shriek, and squeal as they experiment with their voices. As they grow older, they blow bubbles in their milk with a straw and laugh at the funny sound it makes, or beat on pots and pans to see what kinds of clinks and clanks they can get out of them. Older still, they put cards in the spokes of their bikes, just to enjoy the rat-a-tat sounds as the wheels go round.
Like most children, musicians love to play with sounds, too. No matter what instruments they play, musicians love to "push the limits" to see what new strange or beautiful sounds they can get their instrument to make. Most instruments are held or played in a "standard way," but by varying the way an instrument is held, plucked, strummed, bowed, or breathed into, or by adding accessories, an instrument is often capable of a new sound—a new voice. This increases the richness and variety of the musical experience.
Guitars are no exception to this musical variety. Most people are familiar with watching someone strum a guitar, or play a wild solo at rock concert, but a guitar has a greater range of musical expression than this. For instance, the body of the guitar can be thumped or tapped, while playing the strings, to imitate drums, or to accompany the clicks from dancing shoes (flamenco style). A finger placed on the fretboard of the guitar, to play a note, can be pushed up slightly. This bends or stretches the note, giving the impression of crying or yearning (as in country or blues styles). Or, a finger from the left hand on the fretboard of the guitar can be vibrated rapidly from side to side, causing the pitch to change slightly, up and down, which gives the note a classical, singing style (called vibrato).
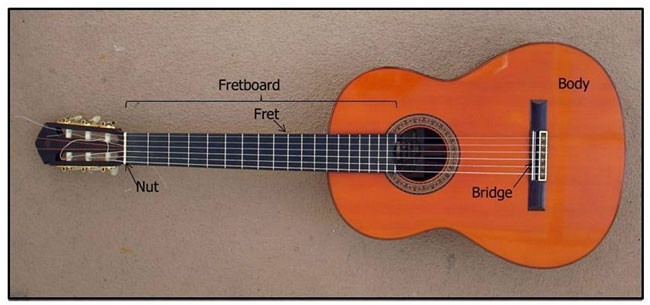 Image Credit: Kristin Strong, Science Buddies / Science Buddies
Nuts on a guitar secure the strings near the top end of the neck. Frets are ridges on the neck that help with finger placement and the fretboard is the entire part of the neck which has frets placed along it. The bridge sits near the bottom on the body of a guitar and secures the opposite end of the strings as the nuts.
Figure 1. This photo shows some of an acoustic guitar's parts.
Examples of variety exist on the plucking side (the right-hand side), too. Notes can be strummed; finger-picked with shaped nails; picked with a plectrum; made crisp or more round-sounding, depending on positioning; or even made mesmerizing. Nowhere is this more true than in the beautiful tremolo. With tremolo, the same note is plucked rapidly with three different fingers. It is magical to listen to and creates a shimmering, longing sound.
In this music science fair project, you'll explore how to make a guitar produce special bell-like sounds, called harmonics. Harmonics sound different from plucked notes, because they are much simpler in terms of their frequency content. To picture this, imagine that you are holding one end of a long jump rope and a friend is holding the other end just a few feet away from you, so that the rope is hanging down between you. What happens when your friend holds the rope still, and you shake the rope up and down slowly? What happens when you shake the rope up and down more quickly? The standing waves that you imagine seeing in the rope are similar to what happens in a plucked string, only in a string, these slow-moving and fast-moving waves happen all at the same time.
When you pluck a string, you hear a fundamental frequency, resulting from the slowest up-and-down motion. You also hear overtones, resulting from faster up-and-down motion. These overtones are called harmonics because they happen at two times, three times, four times, five times, etc. the fundamental frequency. For instance, if the fundamental frequency is 440 hertz (Hz) (this happens when you pluck the A-string "open," with no fingers down on the fretboard), then the harmonics will occur at 880 Hz (two times 440), 1320 Hz (three times 440), 1760 Hz (four times 440), etc. Your ear hears all of these harmonics together, as a single tone. There are an infinite number of harmonics (they go on forever), but the amplitude or loudness of the higher harmonics is much smaller than that of the fundamental or first few harmonics, and your ear can't hear the highest harmonics once they get beyond the highest frequency that your ear can hear.
 Image Credit: Kristin Strong, Science Buddies / Science Buddies
Diagram of the first three harmonics. The oval represents the fundamental or first harmonic and the circles represent nodes. Beneath that are two thin ovals hooked together with a circle in the middle and one on each end. Each oval is half the size of the one on top. This represents the second harmonic. Beneath the second harmonic are three thin ovals on their sides hooked together with two circles and circles on each end. This represents the third harmonic.
Figure 2. This drawing shows the first three harmonics on a string that is plucked "open," without any fingers from the left hand place down on the fretboard.
The motionless places on the string—where the string is attached on each end and where the string does not vibrate at various places along the middle—are called nodes. You can see these nodes for the fourth harmonic as red dots in the animation below.
 Image Credit: Wikipedia / Creative Commons license
The animation of the standing wave length of the fourth harmonic has red dots to indicate the nodes.
Figure 3. This animation shows a standing wave for a fourth harmonic, with the red dots representing nodes. One wavelength is the distance between repeating parts of the wave. For example, between dots 1 and 3 is one wavelength, as is the distance between dots 2 and 4; in other words, the distance between two peaks or two valleys. (Wikipedia, 2009.)
To "play a harmonic" and coax a bell-like tone out of guitar, a finger on the left hand is placed lightly at a node, and then the string is plucked. This lightly placed finger damps or quiets all overtones that do not have a node near the location that has been touched. That is why playing a harmonic produces a sound with a frequency content that is simpler than the sound produced when plucking an open string. With the other overtones damped, the lowest-pitched overtone or harmonic takes over and rings the strongest, resulting in a bell-like sound.
Now you're ready to start your music science fair project and find out where these special places for bell-like sounds are located on a guitar string. It's a musical mystery!
Terms and Concepts
- Body
- Fretboard
- Pitch
- Plectrum
- Tremolo
- Harmonic
- Frequency
- Standing wave
- Fundamental frequency
- Overtone
- Fretboard
- Node
- Wavelength
- Damp
- Fret
- Guitar nut
- Bridge
Questions
- What are the main parts of an acoustic guitar?
- When a guitar is held in the standard position, what are some ways the left hand can influence the sound that a guitar makes? What about the right hand?
- Why do a harmonic and a plucked open string sound so different?
- How would you play a harmonic on a guitar?
Bibliography
These sources describe what guitar harmonics are:
- Wikipedia Contributors. (2009, February 6). Guitar harmonics. Wikipedia: The Free Encyclopedia. Retrieved March 3, 2009.
- Macfarlane, P. (2007). Lesson 46: Harmonics. Retrieved March 3, 2009.
This source discusses overtones:
- Wikipedia Contributors. (2009, January 14). Overtone. Wikipedia: The Free Encyclopedia. Retrieved March 8, 2009.
This video shows the technique for playing harmonics:
- Lorange, K. (2008). Natural harmonics. Retrieved March 8, 2009.
This link provides free open-source software that can help you study sound signals:
- Audacity Developer Team. (2000, May). The Free, Cross-Platform Sound Editor. Retrieved March 19, 2009.
For help creating graphs, try this website:
- National Center for Education Statistics (n.d.). Create a Graph. Retrieved March 19, 2009.
Materials and Equipment
- Acoustic guitar, adult or child-size
- Cloth tape measure, metric
- Adult helper
- Lab notebook
Experimental Procedure
Note: If you are using an adult-sized guitar, your hands might be too small to wrap around the neck and play harmonics easily. An adult helper can help you by playing the harmonics while you listen and make all the observations.
Preparing for Testing
-
Practice playing harmonics at the twelfth fret, on multiple strings, until you can consistently achieve a bell-like sound in the twelfth fret. To find the twelfth fret, start counting frets from the nut (the nut is like zero), which is shown in Figure 5, below. Use Kirk Lorange's video, referenced in the Bibliography, to help you learn the technique for playing harmonics. Remember to place the ring finger on your left hand lightly above the 12th fret. Do not push your finger down onto the fretboard. Do not place the ring finger to one side of the fret (as is typically done when you play a note). Your ring finger needs to be above the fret, as shown in Figure 4, below.
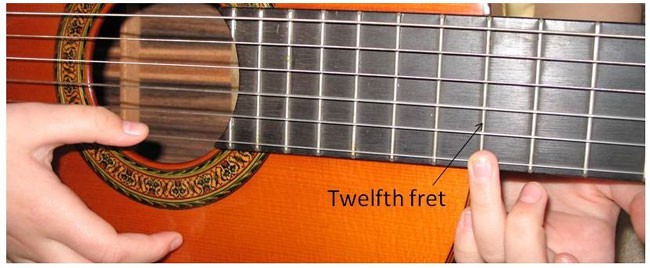 Image Credit: Kristin Strong, Science Buddies / Science Buddies
Figure 4. This photo shows where to practice playing harmonics, and how to put your ring finger lightly above the twelfth fret as you pluck. Do not press all the way down.
Also, as shown in the video, after you pluck the string with your right hand, remove your left hand from the string. This will take some practice, so be patient, and keep trying.
-
Make a data table in your lab notebook that looks like the fretboard of your guitar:
Sample Data Table
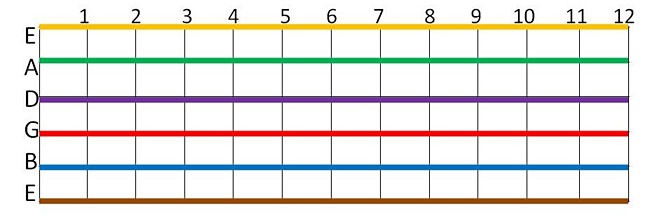 Image Credit: Kristin Strong, Science Buddies / Science Buddies
The numbers across the top mark the frets, the ridges across the fretboard of your guitar. In the data table, you can see frets as vertical black lines. The colored lines represent the strings on your guitar, with the lower-pitched strings (G, B, and E) on the bottom, and the higher-pitched strings (E, A, and D) on the top.
Figure 5. This drawing shows a data table that looks like the fretboard of a guitar.
- The numbers across the top mark the frets, the ridges across the fretboard of your guitar. In the data table, you can see frets as vertical black lines.
- The colored lines represent the strings on your guitar, with the lower-pitched strings (G, B, and E) on the bottom, and the higher-pitched strings (E, A, and D) on the top.
Finding Harmonics on Your Guitar
-
Select a string and starting at the twelfth fret, try to play a harmonic in that fret by lightly damping the string above the twelfth fret.
- If a harmonic is heard (and you hear a ringing, bell-like tone), then mark that location in your data table with a filled-in black circle.
- If a harmonic is not heard (if the string sounds dead or dull or makes no sound at all when plucked), then mark that location in your data table with an open circle.
- Continuing on with the same string, repeat step 1 for all frets, from fret 11 down to fret 1.
- Repeat steps 1–2 for two additional strings.
Relating the Location of the Harmonics to the Length of the Strings
-
Measure the length of one string, from the nut to the bridge, with the tape measure. (All strings are the same length on a guitar, so it does not matter which one you choose.) You will probably need a helper to take this measurement accurately. Write down your measurement in your lab notebook.
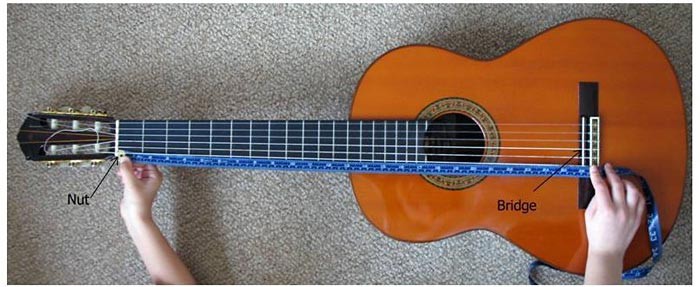 Image Credit: Kristin Strong, Science Buddies / Science Buddies
Figure 6. This photo shows how to measure the string length from the nut to the bridge.
-
Make a data table for each string tested, like the one below. The first entry in the data table is an example, so the numbers in your data table may look different. Continue reading the rest of the steps to understand the information you'll record and calculate. You will be calculating at what fraction of the string's length each of the harmonics were heard. As an example, row 1 in the data table shows you that the 2nd harmonic (as seen in the 5th column) was found at one-half the string's length (as seen in the 3rd column).
String 1 Data Table
Fret number where a harmonic was heard Distance from the nut to the fret where a harmonic was heard (cm) Fraction of the total string length (Distance from the nut to the fret, divided by the string's length) Reciprocal of the fraction Closest whole integer (harmonic number) 12 33 (example) 33/66 = ½ 2/1=2.0 2 - Using the data table that looks like your fretboard, list all of the fret numbers where a harmonic was heard (all the filled-in circles) in the first column of the first string's data table.
- Measure the distance from the nut to the fret where each harmonic was heard with the tape measure and record this value in the second column of your data table.
- Calculate the fraction of the total string length by dividing the distance from the nut to the fret by the string length, and enter your calculation in the third column of the data table. In the example entry in the data table, the total string length is 66 cm, and the distance from the nut to the twelfth fret is 33 cm. Dividing 33 by 66 gives a fraction of the total string length as ½.
- Obtain the reciprocal of the fraction and enter that in the fourth column of the data table. In the example entry, the reciprocal of ½ is 2/1. 2 divided by 1 equals 2.
- Figure out the closest whole number to the reciprocal to obtain the harmonic number for the fifth column. In the data table example, the integer is 2. However, if your data produces a reciprocal that is not a whole number, such as 2.9, the closest whole integer to 2.9 is 3. If the reciprocal turned out to be 3.1, the closest whole number to 3.1 is also 3. This rounding process takes care of errors that occurred in measuring the string.
- Repeat steps 3–7 for the other two strings that you tested.
Analyzing Your Data Tables
- Make a scatter plot for each tested string, with the location where the harmonic was found (the fraction of the total string length) on the x-axis and the harmonic number on the y-axis. You can make the plot by hand or use a website like Create a Graph to make the graph on the computer and print it.
- Looking at your scatter plot and the data table, do you notice that the second harmonic occurs at ½ the string length? What do you notice about the third harmonic and the fourth? Did this pattern hold true for all strings? If you could not find a fifth harmonic right above a fret, where do you predict that you would find one? Give it a try and see!
Ask an Expert
Variations
- Extend the experimental procedure above to include fret numbers greater than 12. How do harmonics found at fret numbers greater than 12 relate to harmonics found at fret number less than 12? Hint: Think about what fraction of the string length each harmonic has. Where are the fractions the same?
- Use a guitar tuner or open-source software, like Audacity, to determine the frequency of an open string (the fundamental) and its harmonics. Plot the harmonic number on the x-axis and the frequency on the y-axis. Do you see a relationship between the frequency of a harmonic and the fundamental frequency?
Careers
If you like this project, you might enjoy exploring these related careers: