Abstract
Here is a riddle for you: name an instrument that you play with your hands but never actually touch. Have you guessed the answer? It is a theremin! This unusual instrument makes sound without anyone touching it. How does a theremin work? It has an antenna that can detect the player's hand nearby, and as they move their hand around the theremin, the sound it makes changes based on the hand's position. In this music science project, you will get to use your own mini theremin to investigate how the distance between the theremin's antenna and the player's hand affects the pitch (or frequency) the theremin produces. You are sure to enjoy playing with this fascinating, electronic musical instrument!Summary
Teisha Rowland, PhD, Science Buddies
Thanks to Bob Rowland, ColdQuanta Inc.; Andrew Bonham, PhD, Metropolitan State University of Denver; and Ben Finio, PhD, and Howard Eglowstein, Science Buddies, for feedback with testing this science project.

Objective
Determine how the distance between the theremin's antenna and the player's hand affects the frequency the theremin produces.
Introduction
The theremin is an amazing musical instrument that never ceases to impress audiences because of its unique ability to be played without physically touching it. If you have not seen a theremin in action before, take a look at the video to get an idea of how it works.
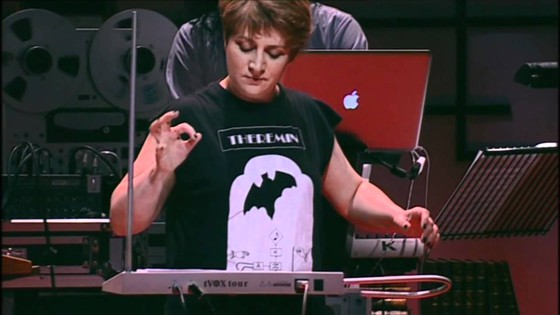
As you can see, the woman playing the theremin does not need to physically touch the theremin to make it play different notes or pitches. All she has to do is move her hand closer to, or farther away from, the theremin's antenna to change the pitch it makes. Changing the shape of her hand also affects the sound it makes. Some theremins, like the one shown in the video, have two antennae—one that controls volume and one that controls the pitch—and the player's hands must interact with both antennae at the same time. Many newer theremins only have one antenna, which controls the pitch, and the volume is manually adjusted and set before playing.
How does the theremin work? To understand this, it is important to understand what the theremin itself really is. The theremin is an electrical musical instrument—which is impressive, considering how long it has been around—and was invented in 1920 by and named after the Russian inventor Lev Sergeyevich Termen (known as Léon Theremin outside of Russia). Most electrical musical instruments did not make their way to the musical scene until decades after this.
The theremin contains a specific type of electronic device called a capacitor. A capacitor is something that can store, or hold onto, an electric charge, which is a form of energy. In this way, a capacitor is like a battery. But unlike a battery, a capacitor has the ability to dump all of its electric charge in a small amount of time (batteries usually take minutes to completely discharge). This is why capacitors are used when we want something powered instantly; for example, a camera that has an electronic flash usually uses a capacitor that is charged over time, and then discharged almost instantly to make a bright flash. There are actually capacitors being used around us all the time. For example, some touch screens—like the ones on many cell phones—use capacitors to tell when and where your finger is touching the screen without you actually putting pressure on the screen with your finger.
A simplified diagram of a capacitor is shown in Figure 1. A capacitor usually has two "plates" that can conduct electricity, which means they easily let electricity flow through them. Materials that can conduct electricity are called conductors, and many materials can be conductors, including metals and even your own body! The plates in a capacitor are separated by something that does not conduct electricity, which is called an insulator. Examples of insulators include glass, paper, and air. In a capacitor, the insulator has a special name: the dielectric. So, for example, a piece of paper sandwiched between two sheets of aluminum foil could act like a simple capacitor. The pieces of aluminum foil form the (conducting) plates and the paper is the (insulating) dielectric. When the aluminum foil is connected with metal wires to a source of electricity—like a battery—electric charges want to flow between the two sheets of foil, but the dielectric prevents them from doing this. So, electric charges build up on the aluminum foil and stay there. This is how a capacitor stores an electric charge.
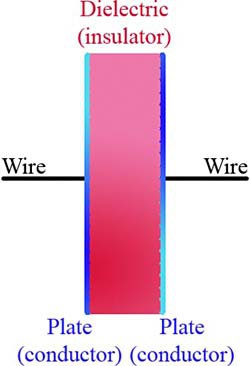 Image Credit: Teisha Rowland, Science Buddies / Science Buddies
Figure 1. This is a simplified diagram of a capacitor. A typical capacitor has two plates (which conduct electricity) with a dielectric (an insulator) separating them. If a capacitor is being used or charged, it is connected to other electrical components (like a battery) using wires, as shown here.
So what makes up the capacitor in the theremin, and how does it work? The antenna on the theremin actually acts as one of the two plates in the capacitor. The other plate is the hand you use to play the theremin. The dielectric is the air that is between the antenna and your hand. (Remember that your body—including your hand—can conduct electricity, and air can be an insulator!) This means that when you move your hand around the theremin's antenna, you are actually affecting the capacitor in the theremin. Specifically, by changing the distance between the plates, you are affecting the capacitance of the capacitor, or the theremin's ability to store an electric charge. The electronics in the theremin can measure capacitance and convert that to a sound it plays.
The sounds the theremin makes—and actually all sounds we hear—are made by waves that go through the air and that we can hear as different pitches. These waves can be identified and distinguished by their frequency, which can be measured in hertz (Hz), meaning the number of cycles the wave makes in one second. The larger the frequency, the higher the pitch, or note. For example, on a piano, middle C has a frequency of 261.6 Hz, and the next C (one octave higher than middle C) has a frequency of 523.2 Hz. (Do you see a pattern?) Sound waves and frequency are complex topics, and since you will not need to understand them in-depth for this science project, they will not be discussed further here, but you can explore them more (and get refreshed on what middle C is, if needed) in the Bibliography resources.
In this music science project, you will determine how the distance between the theremin's antenna and the player's hand affects the frequency the theremin emits. What do you think the relationship will be? Here is a hint: if you look at the video or have ever played with a theremin, it is obvious that the pitch, or frequency, increases as the player's hand is closer to the antenna. Likewise, the frequency decreases as the hand is moved farther away. But what is the exact relationship? In other words, does the frequency steadily increase as the hand moves closer to the antenna, making it a linear relationship, like the one shown in Figure 2? Or is the relationship something else; are there places (such as closer to or farther away from the antenna) where the frequency changes a lot more over the same change in distance compared to other places?
 Image Credit: Teisha Rowland, Science Buddies / Science Buddies
Figure 2. If the theremin has a linear relationship between distance and the frequency it makes, your results may look like this graph. (The distance being measured is the distance between the plates of the capacitor - the plates are the antenna and the player's hand.)
You can make your hypothesis based on any previous experience you have had with a theremin, or, after you assemble the theremin for this science project, you can play with the theremin and make a hypothesis right then. Alternatively, you could make your hypothesis based on how capacitance works; to do this, see the Technical Note. Get ready to solve the mysteries of a fascinating musical instrument!
For parallel plate capacitors (like the aluminum foil and paper example), there is a simple equation that determines the capacitance. While the equation for capacitance between your hand and the antenna is actually more complicated, this equation can still give you an idea about how distance between plates affects capacitance:
Equation 1:
- ε is the dielectric constant (in farads per meter, or F/m)
- A is the area of the plates (in meters squared, or m2)
- d is the distance between the two plates (in meters, or m)
Based on Equation 1, what happens to capacitance if distance increases (or decreases) while area and ε remain the same? What, therefore, happens to capacitance as you move your hand farther from (or closer to) the antenna? How do you think moving your hand (and therefore, changing capacitance) will affect the theremin's frequency?
Note: How the theremin converts capacitance to frequency also involves an oscillator, so there is not necessarily a direct correlation between capacitance and frequency; some other variables are also involved. To learn more about how theremins work in detail, see the advanced references in the Bibliography.
Terms and Concepts
- Theremin
- Capacitor
- Electric charge
- Conducting electricity
- Conductors
- Insulators
- Dielectric
- Capacitance
- Frequency
- Hertz (Hz)
Questions
- What is a capacitor? How is it similar to, or different from, a battery?
- How does the capacitor in the theremin function?
- What is a linear relationship? What are other types of mathematical relationships?
- In a capacitor, what is a dielectric? What is the dielectric for the theremin?
- How do you think the frequency of the theremin's sounds will change as you move you hand closer to, or farther away from, its antenna?
Bibliography
To find out more about frequency, hertz, and pitch in musical instruments, check out the following resources:
- Interactive Mathematics. (2013, February 6). What are the frequencies of music notes?. Retrieved September 19, 2013.
- Wikipedia contributors. (2013, August 16). Piano key frequencies. Wikipedia, the Free Encyclopedia. Retrieved September 19, 2013.
To learn more about capacitors and capacitance, check out this resource:
- HowStuffWorks. (n.d.). How Capacitors Work. Retrieved September 18, 2013.
Here are instructions for assembling the theremin used in this science project, although instructions are also provided within the Procedure:
- Otona no Kagaku. (n.d.). Instructions for Assembling and Operating Theremin mini. Retrieved August 20, 2013.
Here is a video of a band using a theremin to play the theme from Doctor Who:
- Kavina, L. and Radio Science. (2012, January 29). Theremin Doctor Who Theme, Lydia Kavina and Radio Science. Retrieved September 19, 2013.
For advanced information on how different types of theremins work, you may want to see these resources:
- Koga, A. (2006, December 12). Study of a Theremin. Physics 475. Retrieved September 12, 2013.
- Nachbaur, F. (2000, October). On Theremin Sensitivity. Retrieved September 12, 2013.
Materials and Equipment
- Theremin Mini Kit. This kit can be purchased online at ThinkGeek or Amazon.com.
- Small Phillips screwdriver, #1
- AA batteries, new (4). They must be alkaline or manganese.
- An empty, flat, wooden, plastic, or glass desk or table to play the theremin on. The surface should not be metal, and should not have metal objects nearby, as this can interfere with the theremin.
- Cardboard (flat piece measuring approximately 10 cm x 10 cm)
- Scissors
- Empty cardboard tube from a paper towel roll
- Tape; normal transparent tape should work well.
- Ruler, metric
- Aluminum foil
- Pencil or pen
- Sheet of paper
- A cell phone with a spectrum analyzer application that works using the phone's microphone.
- There are free, and some relatively inexpensive, spectrum analyzer applications that can be downloaded onto cell phones and used for this science project. The application needs to be able to tell you the dominant frequency (in hertz [Hz]) of a sound received by the microphone in your cell phone, either as a recording or in real time.
- One such free application that can be used with an iPhone is AKLite. You should be able to find similar applications by searching for a "spectrum analyzer" in your phone's application store.
- Alternatively, you can do this science project using an oscilloscope. Directions are not given in this science project on using an oscilloscope, so if you want to use one you will need to have someone who is experienced with using an oscilloscope help you do this science project.
- A helper to record your results as you test the theremin, because your hands will be busy playing the theremin!
- Lab notebook
Disclaimer: Science Buddies participates in affiliate programs with Home Science Tools, Amazon.com, Carolina Biological, and Jameco Electronics. Proceeds from the affiliate programs help support Science Buddies, a 501(c)(3) public charity, and keep our resources free for everyone. Our top priority is student learning. If you have any comments (positive or negative) related to purchases you've made for science projects from recommendations on our site, please let us know. Write to us at scibuddy@sciencebuddies.org.
Experimental Procedure
Assembling the Theremin
- First, assemble the theremin. Take the tray of parts out of the theremin mini kit's box and then watch the video to assemble the theremin. You can also read assembly instructions online.
- Tip: You may need to watch the video a few times, and pause it in places, while you assemble the theremin.
- After assembling the theremin, you will need to tune it. You can do this by going through the steps on pages 4 and 5 of the assembly instructions online and by going through the following steps:
- Go to the place where you plan on playing the theremin. An empty, flat, wooden, plastic, or glass desk or table is ideal for this.
- Playing the theremin on a metal desk or other surface with metal objects nearby will interfere with the theremin (since metal conducts electricity).
- Objects—especially metal ones—should not be moved around the theremin while you are tuning or playing it, as they could affect the sound the theremin produces.
- If you have not done so already, remove the black plastic tuning stick from the battery cartridge lid.
- Arrange the theremin so that you are looking at the front (the side opposite of the speaker).
- Gently pull out the black lever on the side of the theremin to turn it on.
- There are two different positions that you can pull the lever out to. One position makes a quiet sound and one makes a relatively loud sound. You may need to play with the theremin to figure out which position is which for your theremin.
- Note: When you are tuning and playing the theremin, if the sound coming from the theremin does not seem stable, try letting the theremin stay on for a few minutes before you start to tune and play it.
- Place your left hand on the left side of the theremin, as shown in Figure 3.
- Put your left hand's pointer finger (index finger) on the top of the back left leg of the theremin (along with other fingers, if desired).
- Put your left hand's thumb on the front left leg of the theremin.
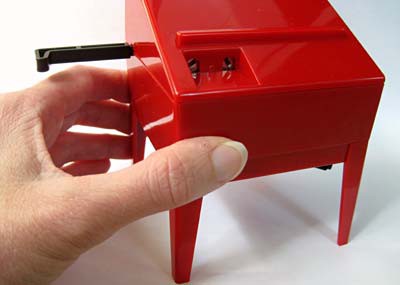 Image Credit: Teisha Rowland, Science Buddies / Science Buddies
Figure 3. To tune and play the theremin, place your left hand on the side of the theremin, as shown here.
- Find the two small slits that sit in the depression on the front of the theremin, as shown above the thumb in Figure 3. These are the dials.
- Firmly place the tip of the tuning stick into the slit on the right, as shown in Figure 4. Turn the dial either clockwise or counterclockwise, until the sound from the theremin is loud.
- You may not need to adjust it much, or at all.
- You can turn the dial a lot—either clockwise or counterclockwise—but do not force it to turn if you feel resistance or you could break it!
- Tip: The dial on the right may end up in the position shown in Figure 4. The dial in the picture has been turned completely counterclockwise until it met resistance, but this desired setting may not be exactly the same for your theremin.
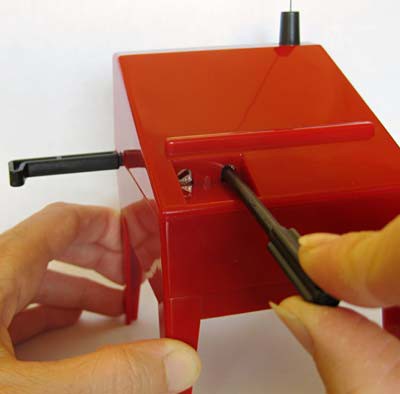
Figure 4. Place the tip of the tuning stick in the right dial.
- Once you are happy with the volume of the sound, take the tuning stick out of the dial on the right and firmly put it in the dial on the left.
- Now tune the left dial so that the theremin makes a very low-pitch sound by doing the following:
- Turn the tuning stick in the left dial in the clockwise direction. Turn it until you meet resistance and cannot turn the dial anymore.
- Then, turn the dial counterclockwise, a little bit at a time. The pitch of the sound should become lower. Eventually, you will reach a point where the theremin makes no sound, and if you continue turning the dial, the pitch will increase. Stop turning the dial when the theremin becomes silent.
- When you are at the silent point, very slightly turn the tuning stick in the counterclockwise direction. You want the sound coming from the theremin to be as quiet, and low in pitch, as possible, without actually being silent. To do this, you may not even really need to move the tuning stick, but just gently push it in the counterclockwise direction.
- Now, without moving your left hand, identify a point that is about 20 centimeters (cm) away from the theremin's antenna (but at the same height as the middle of the antenna).
- You can have your helper identify this point, or you can identify it in advance.
- You will be adjusting your setup so that this point is where the theremin becomes soundless.
- Note: It is easiest to pre-measure this distance and mark it somehow, such as by marking it on a piece of paper and placing the theremin on the paper. Using a ruler may interfere with the sound produced from the theremin.
- Hold your right hand up at the 20 cm-away point you identified. Again, make sure not to move your left hand while doing this!
- Slowly move your left hand down, so it is moving down the legs of the theremin. Stop moving your left hand as soon as the theremin becomes silent.
- While you do this, make sure to keep your right hand in place, at the 20 cm point.
- If you move your left hand too far down, you can always move it back up a little and re-adjust it until it is where the theremin just becomes silent.
- If the theremin does not become silent even if you move your left hand off of it, use the tuning stick to turn the left dial in the clockwise direction a little bit.
- Go to the place where you plan on playing the theremin. An empty, flat, wooden, plastic, or glass desk or table is ideal for this.
- Your theremin has now been tuned and is ready to play! Keep your left hand in the position you left it in at the end of the tuning process. Take a few minutes to play the theremin so that you get used to what it sounds like.
- Does the theremin sound different from what you expected? Why?
- How do the pitches sound when your hand is far away from it compared to when your hand is very close?
- If you have not yet made a hypothesis about how the distance between the theremin's antenna and the player's hand affects the frequency the theremin emits, make your hypothesis now.
- Does the sound consistently stop when you move your right hand 20 cm away from the antenna, or is there some variation in the consistency?
- You can repeat parts of step 2 if you want to try tuning the theremin more, such as by measuring exactly where 20 cm away from the antenna is, and adjusting the left dial, or your left hand, for the setup to work correctly.
- When you are done trying out the theremin, you can turn it off (by pushing the black lever all the way in) and set it aside for now.
- Note: Each time you turn on and use the theremin, you will need to re-tune it, as you did in step 2.
Assembling the Theremin's "Playing Wand"
You will now construct a "playing wand" so you can more accurately measure the change in frequency of the sound coming from the theremin as you change the distance between the antenna and the other plate in the theremin's capacitor (which was previously your right hand).
- The reason why you are constructing the playing wand is that if you just used your hand for these measurements, there are many variables that are hard to control.
- For example, you may slightly change the shape of your hand, which can affect the sound produced by the theremin. Additionally, it is difficult to measure the distance between your hand and the antenna since your hand is up in the air.
- First, make the top part of the playing wand from cardboard and aluminum foil.
- Use scissors to cut a square piece of cardboard that is about 10 cm long on each side.
- Next, cut a rectangular piece of aluminum foil that is about 23 cm on one side and 13 cm on the other. The aluminum foil just needs to be large enough to cover the cardboard square in one layer of aluminum foil, on all sides.
- Why do you think you are using aluminum foil for this? Hint: Think about capacitors and electrical conductivity.
- Place the cardboard square on top of the aluminum foil rectangle, as shown in Figure 5.
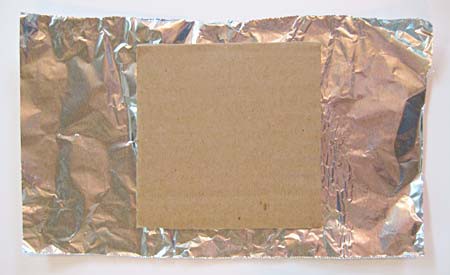 Image Credit: Teisha Rowland, Science Buddies / Science Buddies
Figure 5. Place the cardboard square on top of the aluminum foil you cut out, as shown here.
- Carefully fold the aluminum foil over the cardboard square so that most of the square is covered by only one layer of aluminum foil.
- If there are places where two layers overlap, try to keep them on the same side of the cardboard. This side will be the back, as shown in Figure 6.
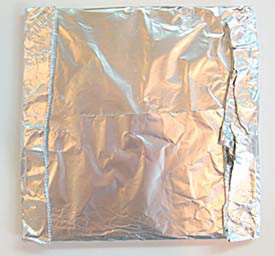 Image Credit: Teisha Rowland, Science Buddies / Science Buddies
Figure 6. Fold the aluminum foil sheet around the cardboard square so that any overlapping aluminum foil is on one side (the back) of the square.
- Now make the playing wand's "stand" using a paper towel cardboard tube.
- Take your cardboard tube and use scissors to cut a slit about 2– 3 cm deep on one end of the tube. Make the slit parallel with the length of the tube. Make a second slit on the same end of the tube, but on the opposite side of the first slit. Make both slits the same length.
- Place the aluminum foil-covered square in the slits on the top of the cardboard tube, as shown in Figure 7. Make sure the square sits well in the slits, and make adjustments if needed (such as making the slits a little deeper and/or folding the sides of the slits inward). But do not worry if the square is a little wobbly; you will be securing it in place in a moment.
- Once you are done making any adjustments, take the aluminum foil-covered square out of the tube slits and set the square aside for now.
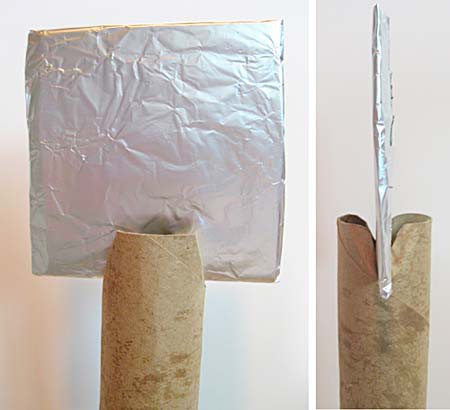 Image Credit: Teisha Rowland, Science Buddies / Science Buddies
Figure 7. Place the aluminum foil-covered square in the slits you made on one end of the cardboard tube. (Left) The playing wand from the front. (Right) The wand from the side.
- Next, connect a long "rope" of aluminum foil to the aluminum foil square.
- Make another sheet of aluminum foil that is at least 28 cm long (a little longer than the cardboard tube) and about 8–10 cm wide.
- Roll and/or fold the aluminum foil into a long, thin, rope-like shape, as shown in Figure 8.
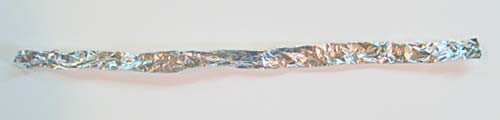 Image Credit: Teisha Rowland, Science Buddies / Science Buddies
Figure 8. Make a rope-like shape from aluminum foil, at least as long as the cardboard tube.
- Tape the aluminum foil "rope" to the bottom back (the side where the layers are folded together) of the aluminum foil-covered square, as shown in Figure 9.
- Make sure the rope is taped on well, and is clearly making contact with the aluminum foil on the square, or the theremin may not play well.
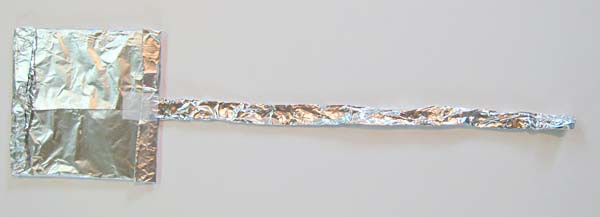 Image Credit: Teisha Rowland, Science Buddies / Science Buddies
Figure 9. Attach the aluminum foil "rope" to the bottom back part of the aluminum foil-covered square.
- Place the square on the top of the cardboard tube, fitting it in the slits again, as you did in step 3.g., but this time carefully run the rope part down the inside of the tube.
- At the bottom of the tube, there should be a small amount of aluminum foil rope sticking out. Cut a slit at the bottom of the tube that lines up with one of the slits at the top of the tube and then fold the end of the rope up through the slit, as shown in Figure 10.
 Image Credit: Teisha Rowland, Science Buddies / Science Buddies
Figure 10. Fold the bottom of the aluminum foil rope up through a slit at the bottom of the cardboard tube.
- Lastly, secure the aluminum foil-covered square in place with a few pieces of tape, on the front and back, as shown in Figure 11.
- Make sure the square is now firmly held in place on the playing wand.
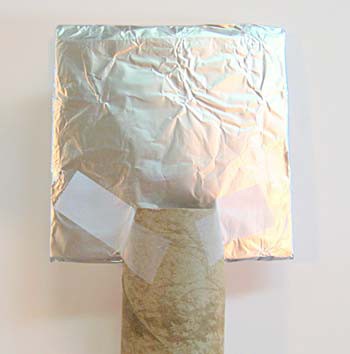 Image Credit: Teisha Rowland, Science Buddies / Science Buddies
Figure 11. Secure the aluminum foil-covered square to the cardboard tube using a few pieces of tape (on the back and front of the square).
- Your playing wand is now finished! Give it a try with the theremin to see how it works.
- Turn the theremin on and tune it by repeating step 2, but instead of using your right hand, use the playing wand.
- To use the playing wand, grasp the bottom of the tube so that either your thumb or your other finger(s) are touching the aluminum foil rope that comes out the bottom of the tube. See Figure 12.
- Stand the playing wand upright, so that the aluminum foil square is directly facing the side of the theremin, as shown in Figure 12.
- How well does your playing wand work compared to using your right hand? Make adjustments to your playing wand, if needed.
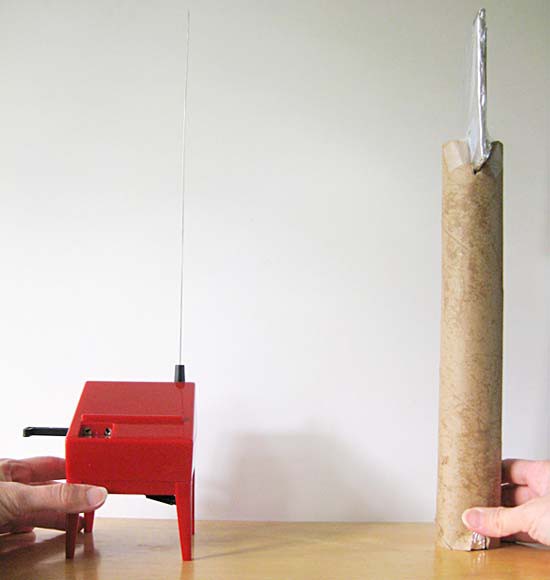 Image Credit: Teisha Rowland, Science Buddies / Science Buddies
Figure 12. When playing the theremin with the playing wand, you should use a setup similar to this one.
Testing the Theremin
- Take a blank sheet of paper and, using a ruler, make a mark along the edge of the paper every centimeter for 20 cm. Label the 5 cm, 10 cm, 15 cm, and 20 cm marks and make them darker so they are easier to see.
- You will be using a sheet of paper instead of a ruler to measure distances, because a ruler may interfere with the sound produced from the theremin.
- Get everything that you will need to test the theremin ready and have it nearby.
- This includes the theremin, your playing wand, the paper you just prepared with centimeter marks, a cell phone with a spectrum analyzer application that works using the phone's microphone or an oscilloscope and someone who is familiar with using it, and a helper to record your results as you test the theremin.
- If you are using an oscilloscope, you will need to have a person who is experienced at using the oscilloscope help you determine the frequency of the sound the theremin emits as you move the playing wand different distances from the antenna, as described in the steps. Directions for using an oscilloscope are not provided in this science project.
- Note: While you are testing the theremin, try to keep the position of the cell phone, oscilloscope, your helper, and your own body the same so that moving these objects does not interfere with your results.
- Also, make sure the surface you are playing the theremin on (which should be a wooden, plastic, or glass table or desk) is empty except for the items you are using in testing. If other objects are nearby, or get moved near the theremin while you are testing it, it can interfere with your results.
- In your lab notebook, make a data table like Table 1 to record your results in.
- This includes the theremin, your playing wand, the paper you just prepared with centimeter marks, a cell phone with a spectrum analyzer application that works using the phone's microphone or an oscilloscope and someone who is familiar with using it, and a helper to record your results as you test the theremin.
| Frequency (Hz) | |||
| Distance from the Antenna | Trial 1 | Trial 2 | Trial 3 |
| 20 cm | |||
| 17.5 cm | |||
| 15 cm | |||
| 12.5 cm | |||
| 7.5 cm | |||
| 5 cm | |||
| 2.5 cm | |||
Table 1. In your lab notebook, make a data table like this one to record your results in.
- Place the theremin on top of the measuring paper you made so that its antenna is right above the 0 cm point.
- Tip: It will be helpful to tape the paper to the surface you are working on so that it does not get moved around as you move the playing wand.
- Tune the theremin, as you did in step 2 of the "Assembling the Theremin and its Playing Wand" section, but this time use the playing wand instead of your right hand.
- Position the playing wand so that the aluminum square is facing the theremin. While you are testing the theremin and moving the playing wand, keep the orientation of the playing wand the same. In other words, it should always be facing the theremin.
- Be sure to keep your left hand on the theremin when you are done tuning it with the playing wand. Each time you move or take your left hand off of the theremin, you will need to re-tune it for it to work in your trials.
- Get your spectrum analyzer application (or oscilloscope) and helper ready to start recording data. Make sure you and your helper are familiar with using the spectrum analyzer application, and that your helper is close enough to accurately pick up the sounds made by the theremin.
- Test the theremin using the playing wand by starting at 20 cm away from the antenna and gradually moving the playing wand closer to the antenna.
- Be sure to grasp the bottom of the tube so that your thumb or other finger(s) on your right hand are touching the aluminum foil rope that comes out the bottom of the tube, as you did before.
- Move the playing wand along the centimeter marks you drew on the paper so you know how far the wand is from the theremin's antenna.
- In the data table in your lab notebook, record the frequency emitted by the theremin at 20 cm, 17.5 cm, 15 cm, 12.5 cm, 10 cm, 7.5 cm, 5 cm, 2.5 cm, and as close as you can get the wand to the theremin without having any part of the wand actually touch the theremin.
- Even if you tuned the theremin correctly, you may still hear a sound at 20 cm away from the antenna. If you hear a sound, record the frequency, but do not worry if you do not hear a sound.
- Do not change the position of your body (such as leaning in a different direction, or moving your legs) while testing the theremin, since this can affect the sound it makes. (Also make sure your helper does not move the position of his or her body.)
- Record the most intense frequency at each distance. For most spectrum analyzers, the intensity is on the y-axis (the vertical axis) and the frequency of the sound(s) is on the x-axis (the horizontal axis). The most intense frequency would be the peak with the highest value on the y-axis.
- For example, see Figure 13, which shows a spectrum for the AKLite iPhone application. The most intense frequency would be 691 Hz.
- If there are two peaks that are both at the highest intensity, record both frequencies for that distance.
- How exactly you do this will depend on the spectrum analyzer application you are using. Some applications have a "data cursor" that will let you look at the values for each point on the spectrum. Others, like AKLite, will automatically label the most intense frequency. It is preferable that you use one of these types of applications instead of one that just requires you to read values off the x-axis, which can be less accurate.
- Have your helper record the data as quickly as possible while testing the theremin. Small changes around the theremin can change its sound, so it is better to record the data set as quickly as possible so that other factors do not affect the sound the theremin makes.
- You should hear a fairly smooth change in the sound of the theremin as you move the wand closer to it. If the sound seems to jump around a bit, try starting over with the playing wand at 20 cm and see if any adjustments need to be made.
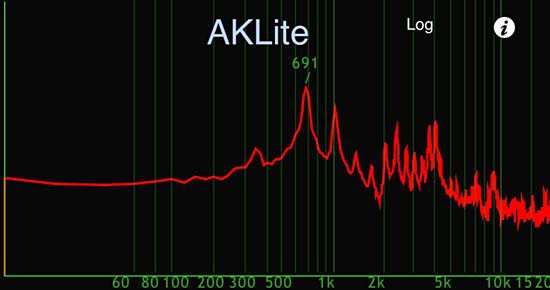 Image Credit: Teisha Rowland, Science Buddies / Science Buddies
The frequency of a soundwave made from a homemade theremin is recording in AKLite. A frequency graph is generated and the program automatically labels the highest frequency recorded which is 691 Hertz.
Figure 13. This spectrum analyzer program, AKLite, is showing that the most intense frequency is at 691 Hz.
- Repeat steps 3–6 at least two more times so that you have tested the theremin in at least three separate trials.
- The first time you did these steps was Trial 1. The second and third repeats will be Trials 2 and 3, respectively.
- If you notice some variation in your results, you may want to check to make sure you are tuning the theremin correctly and everything is set up as described each time. Also, make sure nothing is moving around the theremin while you test it, including the cell phone that is being used to record the data, the helper who is collecting the data, and the oscilloscope (and its wires) if you are using one.
- If, in a trial, you ever recorded two frequencies for the same distance (meaning they both had the same, highest intensity), then average those two frequencies.
- You can record the average in your original data table or create a new data table that includes the averages.
- Make a line graph of your data.
- On the x-axis, put the distance from the theremin's antenna (in cm) and on the y-axis put the frequency (in Hz).
- Make a separate line for each trial you did.
- Look at the data in your graphs. How do the lines look?
- In other words, does it look like the lines in the graphs are linear or something else?
- Do your results support your hypothesis? Why or why not?
- Optional: If you want some advanced help with understanding how the theremin works, see the variations in the Make It Your Own section.
- Do your results seem to agree with what you heard when you played the theremin?
Ask an Expert
Global Connections
The United Nations Sustainable Development Goals (UNSDGs) are a blueprint to achieve a better and more sustainable future for all.

Variations
- You can take the frequencies you recorded in this science project and convert them to actual musical notes. A tool you can use to do this is Wolfram Alpha Widgets' Find the Musical Note. What is the range of the theremin? Does the range make sense to you? How does its range compare to other musical instruments?
- When you were adjusting the left dial on the front of the theremin, you should have noticed that this changed the frequency of the sound the theremin makes. You could measure how moving the dial changes the frequency the theremin makes. Is the relationship linear, or is it something else? Hint: To do this, you could try attaching something large and flat to the end of the tuning stick to more accurately measure the angle by which you are turning the dial.
- In this science project, you set the "zero point" (the point at which the theremin makes no sound) to 20 cm, as this is recommended in the theremin mini kit instructions. But what happens if you set the zero point somewhere else, such as at 10 cm or 40 cm? How does this change the sound that it makes? Does the theremin still work?
- People have developed different ways to make musical instruments play themselves, such as with the player piano. Can you devise a way to play the theremin without having a person involved? To do this, you may want to re-read the Introduction and think about capacitance and conductors. Can you make a system or device to play the theremin for you? Can you even make it play an entire song?
- As was mentioned in the Introduction, capacitors are used in many devices around us, such as touch screens on some cell phones. You could investigate capacitors in different devices and see how they work differently from, and similarly to, the capacitor in the theremin.
- If the results of this science project surprised you and you would like an advanced challenge to try and explain your results, check out the resources in the Bibliography on how different types of theremins work (the articles by Koga and Nachbaur). There is actually a lot of complicated physics and math that goes into how a theremin works. After looking into it some more, can you better explain your results? Also keep in mind that the idealized equations may be different from the reality of how the theremin works.
- Does the theremin work if you are wearing different types of gloves? You could try a variety of gloves (with varying amounts of insulation, such as thin latex gloves versus thick leather gloves or winter gloves) and see how they affect the sound from the theremin. Alternatively, or in addition, you could try covering the playing wand you used in insulating material, such as a paper towel, plastic wrap, or completely covering it in tape. How does adding insulation affect the sounds the theremin emits?
- Try changing the size of the playing wand. How does varying its size affect the theremin's sounds?
- If you want to investigate the physics of the theremin more, you can use an oscilloscope, along with the help of someone who is familiar with using an oscilloscope. You could try analyzing the sound coming out of the speakers, as well as carefully hooking up an oscilloscope to the wires on the inside of the speaker. If you want to hook the oscilloscope up to the wires, you will want to have someone help you who is experienced with electronics and stripping wires (and you may want access to a soldering iron in case the wires get cut!). How does the sound coming out of the speaker compare to what is going to the speaker from the inside of the theremin? Do the types of sound waves change? Why do you think this is? You will likely need to do additional research to understand your findings.
- Another type of theremin is an optical theremin. You could build an optical theremin using instructions from Jameco and compare it to the theremin used in this science project. How are they different and how are they similar?
Careers
If you like this project, you might enjoy exploring these related careers: