Abstract
You may have seen movies or read books where armies in medieval times catapulted large rocks or other objects at castles (or each other!). These armies used different types of catapults to accomplish different goals — for example, launching things over or into castle walls to knock them down. In this experiment, you will use a ping-pong ball catapult to lay siege to a "castle" and find the right settings to hit your targets.Summary
- WIFFLE® is a registered trademark of The Wiffle Ball, Inc.
Objective
Using a ping-pong ball catapult, find the right settings to launch a ball either directly into a castle wall or over it.
Introduction
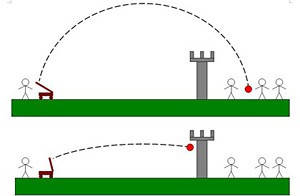
In medieval warfare (hundreds and hundreds of years ago, before guns were invented), catapults were often used as weapons. A catapult is a device that can hurl large objects like rocks very far, using an energy source like gravity or a tightly twisted rope, which would unwind when let go (just like twisting up a rubber band and then releasing it). Catapults were not very good at attacking fast-moving, mobile armies, but they were effective for attacking structures that stood still, like castles. Catapults could be used to accomplish different goals — for example, launching a big rock directly into a wall to knock it down, or launching something over a wall to hit the people or buildings behind it. These different goals require different trajectories. A trajectory is the path the rock (or ping-pong ball) follows as it flies through the air. Figure 1 below shows two different trajectories for the same catapult and the same castle.
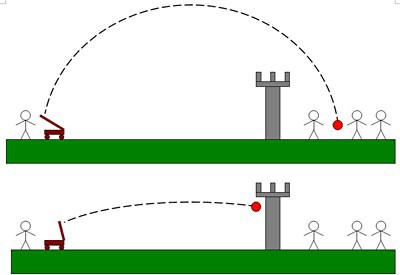 Image Credit: Ben Finio, Science Buddies / Science Buddies
Figure 1. A catapult can be used to make a ball follow different trajectories. In the top picture, the ball follows a high trajectory to go over the castle wall. In the bottom picture, it follows a low trajectory to go into the castle wall. Both of these are bad news for the people inside the castle!
In this project you will use a rubber-band-powered catapult to "attack" a castle wall that you build yourself, and find the right settings to accomplish two different goals:
- Launch the ball into the castle wall and try to knock it over.
- Launch the ball over the castle wall — getting it to land as close as possible to the other side of the wall without actually touching it.
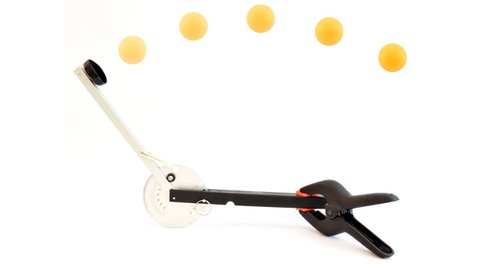
The catapult is designed to launch ping-pong balls (but it can also launch other objects) and let you easily adjust several things to change the trajectory of the ball. Figure 2 below shows a labeled picture of the catapult kit (the parts are listed in italics here). It consists of three main pieces: the base, the disk, and the launch arm. The base is attached to a table (or other surface) with a clamp. A cup at the end of the launch arm holds the ping-pong ball. A pin attaches the disk to the base. Finally, rubber bands provide the energy to launch the ball. Make sure you can identify all of these parts in your catapult kit and in Figure 2.
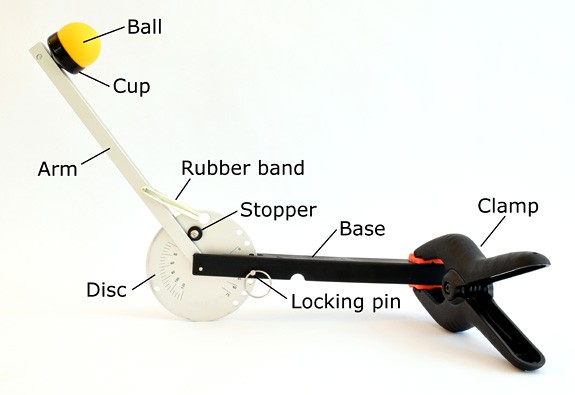 Image Credit: Ben Finio, Science Buddies / Science Buddies
The catapult kit is made up of 3 main parts which include the base, disc and arm. The base is secured to a flat surface using an included clamp. The base and arm are both connected to a rotating disc that allows the arm to swing back and forth freely. A locking pin is inserted into the base and disc so only the arm may move freely. A rubber band connects the base of the arm to the disc so when the arm is pulled back the rubber band will launch it forward. At the end of the arm a small cup holds a ping pong ball that will be launched when the catapult is completely assembled.
Figure 2. The catapult kit, with labels showing the parts. Here we have included a paper towel between the base and the table to prevent the metal catapult from scratching the wooden table.
You may have noticed markings on the metal disk of the catapult. These markings let you measure the launch angle and pull-back angle for the catapult in degrees. We'll define these terms in case you haven't heard them before:
- A degree is a unit used to measure angles. There are 360 degrees in one complete circle.
- The launch angle is the direction the ball is going (relative to the ground) when it is launched. A launch angle of 90 degrees means the ball is going straight up, and a launch angle of 0 degrees means the ball is going straight out, horizontally.
- The pull-back angle is how far back you pull the launch arm before you launch the ball. A pull-back angle of 0 degrees means you have not pulled the launch arm back at all. A pull-back angle of 120 degrees means you have pulled the launch arm back all the way (as high as you can go with this catapult).
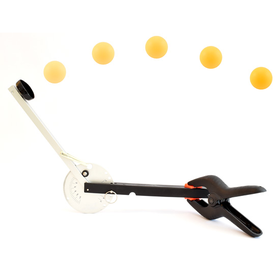
Figure 3 below shows a picture to help you understand the launch angle and pull-back angle.
 Image Credit: Ben Finio, Science Buddies / Science Buddies
When the arm of the ping pong catapult is pulled back the arc distance it travels is called the pull back angle. When the arm springs forward and launches a ping pong ball the angle it leaves the cup is the launch angle. The launch angle is measured from an imaginary line parallel to the ground at the center point of the ping pong ball just before it is launched.
Figure 3. The pull-back angle is how far back you pull the launch arm before you launch the ball. The launch angle is the direction the ball is going when it leaves the catapult.
There are a total of four things you can adjust with the catapult to change the ball's trajectory:
- The type of ball (the kit comes with an orange ping-pong ball and a white WIFFLE® ball, the size of a golf ball)
- The number of rubber bands (the kit comes with three — we do not recommend more than that for safety reasons)
- The launch angle
- The pull-back angle.
Think about how changing these things will change the ball's trajectory — and what you need to do to launch the ball into and over the castle walls.
Terms and Concepts
Make sure you understand the following terms before you continue with the project. It might help to re-read the introduction and look at the figures.
- Catapult
- Trajectory
- Degree
- Angle
- Launch angle
- Pull-back angle
- Variable
Questions
- What are the parts of a catapult and how does it work? What kind of medieval catapult is this catapult most similar to?
- How will changing the number of rubber bands affect the ball's trajectory? Will more rubber bands make the ball go higher or lower? Farther or less far?
- Ask the same question about the other settings. What happens if you change the launch angle or the pull-back angle?
- Do you think the two different balls will behave differently?
Bibliography
Want to learn more about different types of catapults and the physics involved? You can check out the following references.
- Normani, F. (n.d.). Catapult Physics. Retrieved Sept. 27, 2012.
- The Physics Classroom. (n.d.). Characteristics of a Projectile's Trajectory. Projectile Motion. Retrieved Sept. 27, 2012.
Materials and Equipment 
Recommended Project Supplies
- Ping Pong Catapult Kit, available from our partner
Home Science Tools.
You will need these items from the kit:
- Catapult, disk, and locking pin
- Three rubber bands (1/8 x 3 inches)
- Table tennis ball
- Plastic WIFFLE® ball with holes
- Clamp for attaching the catapult to a surface
- You will also need to gather these items, not included in the kit:
- Surface for mounting catapult (piece of wood on the floor, tabletop, etc.)
- Optional: paper towels, dish towel, or other padding for protecting the mounting surface from being scratched by the attachment clamp
- Open area for launching balls
- Cereal box or similarly sized cardboard box to use as a castle wall, or construction paper/cardboard and tape to make your own
- Tape measure (12 ft. minimum)
- Lab notebook
Disclaimer: Science Buddies participates in affiliate programs with Home Science Tools, Amazon.com, Carolina Biological, and Jameco Electronics. Proceeds from the affiliate programs help support Science Buddies, a 501(c)(3) public charity, and keep our resources free for everyone. Our top priority is student learning. If you have any comments (positive or negative) related to purchases you've made for science projects from recommendations on our site, please let us know. Write to us at scibuddy@sciencebuddies.org.
Experimental Procedure
Setting up your Catapult and Castle
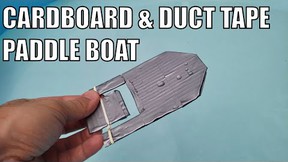
- The first thing you will need is a castle wall. Empty cereal boxes work great, but if you are feeling creative, you can also make your own wall from cardboard, tape, and construction paper. Feel free to decorate the wall to look more like a real castle, but that isn't required to complete the project. Figure 4 shows several different castle wall ideas.
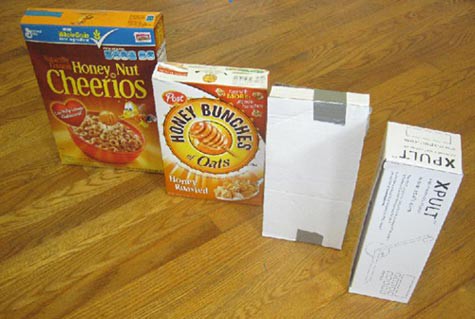 Image Credit: Ben Finio, Science Buddies / Science Buddies
Figure 4. Several different possible castle walls — a large or small cereal box, a homemade wall with cardboard and duct tape, and in a pinch, even the catapult kit box itself will do!
- Watch this video to learn how to set up your catapult.
- Set up the catapult and your castle wall as shown in Figure 5.
- The recommended distance from the middle of the catapult disk to the middle of the wall is 8 feet (ft.).
- The catapult may scratch furniture, so you might want to use padding, such as a paper towel.
- Make sure the catapult and the wall are at roughly the same height.
 Image Credit: Ben Finio, Science Buddies / Science Buddies
Figure 5. Using a tape measure, set up the catapult and the target 8 ft. apart. Make sure they are at about the same height.
- Now you need to set up the catapult so it is actually ready to launch balls. Make sure you have already clamped it to a sturdy surface like a table. Next, insert the locking pin with the ring attached through the hole in the catapult base, lined up with a hole in the disk. This sets the launch angle (don't worry, you can always change this angle later). Figure 6 shows you how to do this in steps A through D. Refer back to the Introduction if you need help identifying the parts.
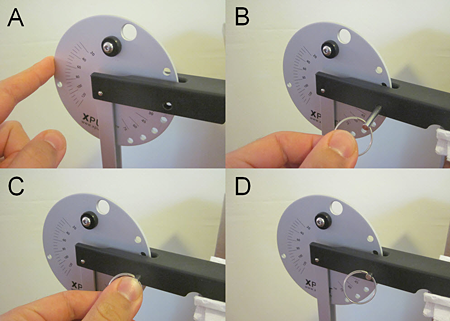 Image Credit: Ben Finio, Science Buddies / Science Buddies
Figure 6. How to insert the locking pin into the catapult base to set the launch angle. Make sure the hole in the catapult base is lined up with a hole in the disk.
- Attach at least one rubber band (and for safety reasons, no more than three) to the short pins on opposite sides of the launch arm by threading the rubber band through the large hole on the catapult's disk. Figure 7 shows you how to do this - ask an adult if you need help.
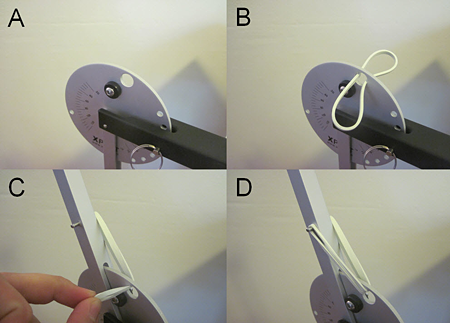 Image Credit: Ben Finio, Science Buddies / Science Buddies
Figure 7. How to attach the rubber bands to the catapult. Each rubber band goes through the large hole at the top of the disk, and then attaches to short pins on opposite sides of the launch arm.
Launching and Testing the Catapult
- You are almost ready to launch! First, you will need to understand how to measure the launch angle and pull-back angle from the markings on the catapult disk. Remember that the pull-back angle is how far back you pull the launch arm before you let go and launch the ball, and the launch angle is the direction the ball is going when it is launched. Refer to Figure 3 in the Introduction if you need to review the angles. Figure 8 shows you how to measure them on the catapult.
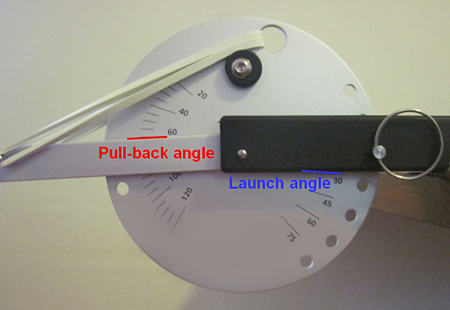 Image Credit: Ben Finio, Science Buddies / Science Buddies
Figure 8. Measure the pull-back angle by reading the tick mark that lines up with the launch arm (on the left). In this picture, the pull-back angle is about 60 degrees. Measure the launch angle by reading the tick mark that lines up with the catapult base (on the right). In this picture the launch angle is 30 degrees. Note: Some older versions of the catapult may require that you read the pull-back angle from the bottom of the launch arm. You can tell by looking at which side of the launch arm (the top or the bottom) lines up nicely with the tick marks for the pull-back angle. In the picture of a newer catapult, notice how the bottom of the launch arm doesn't line up with a tick mark, but the top (where we drew a red line) does. This might be reversed for older catapults, so be sure to check.
- Now you are ready to start testing. Remember that for this project you have two different goals:
- Hit the front of the castle wall — can you knock it over?
- Launch the ball over the wall without hitting it. How close to the other side of the wall can you get the ball to land?
Can you find settings that will accomplish both of these goals? Can you use the same settings for both, or do you have to change something? As you adjust your aim, think back to the questions in the Introduction — what happens to the ball's trajectory as you adjust the ball type, number of rubber bands, launch angle, or pull-back angle?
Important: This can get very confusing if you start changing many things at once. We recommend keeping three things constant and only changing one at a time. For example, you could pick a number of rubber bands, a launch angle, and a pull-back angle, and then compare the two different balls with those settings.
- Do multiple tests. If you manage to knock the castle wall over once, can you repeat it with the same settings? Or was it just a lucky shot? Can you find settings that will reliably accomplish both of your goals? Try at least ten shots each time you change a variable (either the number of rubber bands, launch angle, pull-back angle, or ball type). That should give you a good idea of reliability.
- Be sure to write down your results in your lab notebook. It will be very hard to remember what settings worked best if you have done dozens of tests. Table 1 is just one example of how you could keep track of your results. If the ball goes over the wall, you'll need to decide whether it counts as "close" or if the ball went too far (in real life, it wouldn't do you much good if you shot a rock completely over a castle, would it?). This will be easier if you set up an area behind the castle (for example, using masking tape) that counts as "inside" the castle.
| Settings: WIFFLE® ball, 30 degree launch angle, 90 degree pull-back angle | |||
|---|---|---|---|
| Number of Shots Out of 10 | |||
| 1 Rubber Band | 2 Rubber Bands | 3 Rubber Bands | |
| Hit front of wall (didn't knock over) | |||
| Hit front of wall (knocked over) | |||
| Went over wall (close) | |||
| Went over wall (far) | |||
Analyzing Your Results
- What does your data tell you about how each of the variables (ball type, launch angle, pull-back angle, and number of rubber bands) affects the ball's trajectory? For example, what launch angle is better for getting a "shallow" trajectory to hit the wall, or a "high trajectory" to go over it? Did adding rubber bands make it easier or harder to knock the wall over? Go over the wall?
Troubleshooting
For troubleshooting tips, please read our FAQ: Under Siege! Use a Catapult to Storm Castle Walls.
Ask an Expert
Variations
- In Figure 4 of the Experimental Procedure we showed a picture of several different things that can be used for castles. What happens if you experiment with different wall dimensions? Are some harder to knock over? Do you have to change your catapult settings for taller or shorter walls?
- Does where you hit the front of the wall change how easy it is to knock it over? Which works better: hitting the wall at the bottom or at the top?
- This project can easily be turned into a fun engineering design project with two competing goals. First, you need to make sure you have found catapult settings that can reliably knock over your castle wall. Now you can repeat the following two steps:
- Can you make your castle wall sturdier so that it can't be knocked over? What do you need to change to make this happen? Can you use different materials, or change the shape?
- Can you change something about the catapult settings to knock over your new-and-improved castle wall? What about launching heavier objects? (Remember to be careful and never aim the catapult at a person!)
- Be realistic — the catapult is probably not powerful enough to knock over a wall made out of real bricks. So, limit yourself to reasonable construction materials for your wall, like cardboard and tape.
Frequently Asked Questions (FAQ)
The Science Buddies catapult kit is used in four projects:
- Bombs Away! A Ping Pong Catapult
- Under Siege! Use a Catapult to Storm Castle Walls
- Launch Time: The Physics of Catapult Projectile Motion
- Bet You Can't Hit Me! The Science of Catapult Statistics
The FAQs below are used for all four projects. General catapult questions are at the top of the FAQs list and project specific questions are at the bottom of the list.
| Image Credit: Ben Finio, Science Buddies / Science Buddies
|
| Image Credit: Ben Finio, Science Buddies / Science Buddies
|
| Image Credit: Ben Finio, Science Buddies / Science Buddies
|
Note: On older versions of the Xpult brand catapult, the pull-back angle may be read from the bottom edge of the launch arm. If you just ordered a new Science Buddies catapult kit for your project (as of October 2012), then you should follow the directions above.
Depending on your camera, you may also be able to manually adjust settings and decrease the exposure time. Consult your camera's manual to see if that is possible.
If your theoretical and experimental results are very different, there are a couple things you can check:
- Are your theoretical predictions reasonable? You should be able to launch the ball across an average-sized room in your house — meaning it should go a couple meters before it hits the ground, for typical catapult settings. If your predictions indicate that the ball will travel several kilometers, or only a couple millimeters, then odds are you made a mathematical mistake. Double-check your calculations, and be extra careful to look for typos if you entered equations into a spreadsheet program.
- Make sure you properly used a scale factor to convert the distances you measure on your computer screen to real-world distances for your experimental data. Again, make sure the distance the ball travels is reasonable — if your experimental data says that the ball traveled 100 meters, then you probably used the scale factor incorrectly.
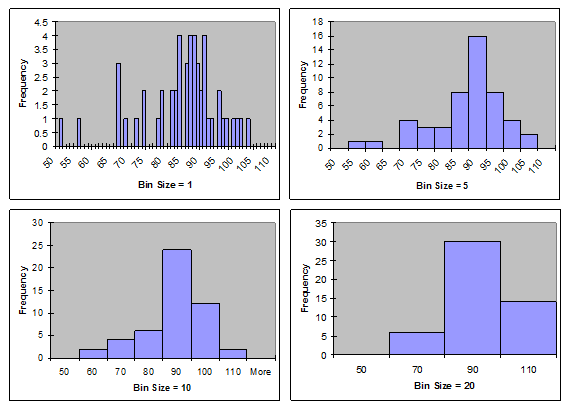 Image Credit: Science Buddies
Four example histograms display the same data with bin sizes of 1, 5, 10 and 20. As the bin sizes change, the distribution of data becomes too compact or spread out to determine whether or not the data is normally distributed from a glance. Bin sizes of 5 and 10 show a clearly normal distribution of data, but bin sizes of 1 and 20 are less obvious.
Notice how the shape of the distribution is evident with bin sizes of 5 or 10, but rather difficult to see with bin sizes of 1 or 20. As a general rule of thumb, more data will allow you to use a smaller bin size, which will give you a more accurate picture of the distribution — so if you have time, try to do more than 50 trials with the catapult.
For the person recording distances, we recommend watching where the ball lands and immediately marking the location with your finger. Then take a reading from the tape measure. Trying to watch where the ball lands and simultaneously read the tape measure will be very difficult.
Also, you probably won't be able to get fraction-of-an-inch accuracy on your readings — getting the closest one-inch increment will be good enough.
Careers
If you like this project, you might enjoy exploring these related careers:


Contact Us
If you have purchased a kit for this project from Science Buddies, we are pleased to answer any question not addressed by the FAQ above.In your email, please follow these instructions:
- What is your Science Buddies kit order number?
- Please describe how you need help as thoroughly as possible:
Examples
Good Question I'm trying to do Experimental Procedure step #5, "Scrape the insulation from the wire. . ." How do I know when I've scraped enough?
Good Question I'm at Experimental Procedure step #7, "Move the magnet back and forth . . ." and the LED is not lighting up.
Bad Question I don't understand the instructions. Help!
Good Question I am purchasing my materials. Can I substitute a 1N34 diode for the 1N25 diode called for in the material list?
Bad Question Can I use a different part?
Contact Us