Abstract
Have you ever seen a robot dance? In this project you will build your own simple flipping, tumbling robot that can dance around on the floor or a tabletop! If you have never made a robot before and would like to get started with a fun, easy project, this is a great place to begin. You will follow directions to make a basic robot, and then make your own additions to make it even better!Summary

Objective
Build a dancing robot and improve its design to make it sturdier.Introduction
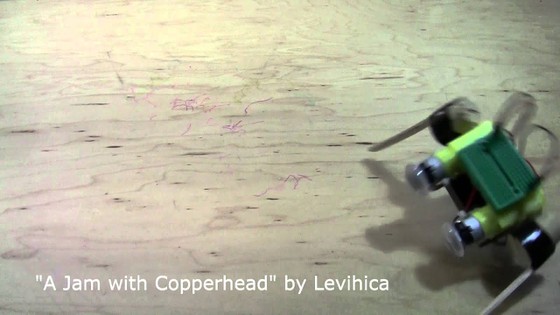
Imagine inviting your friends over for a dance party. You've got delicious snacks and some great music on, but when they walk in the door it's not you they see dancing around, but a dancing robot! In this project you will build a robot, like Flippy the dancing robot, shown in Figure 1, that can dance, flip, and tumble around the floor. The video after Figure 1 shows the robot in action.
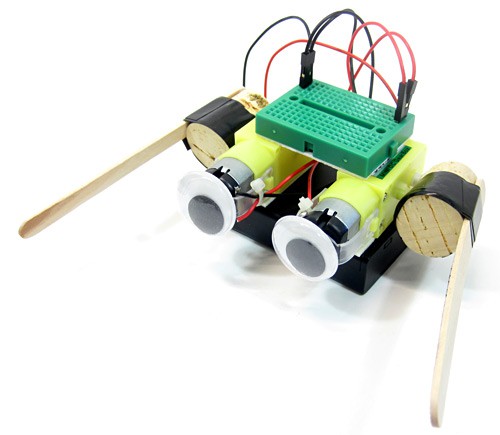
Figure 1. Flippy the dancing robot (Note: We decided to name this robot Flippy, but you can name your robot whatever you want).
The robot uses two small motors in order to move. Each motor spins around when it is turned on, and has a popsicle stick attached to it as a "leg," which pushes the robot around when it moves. In order to power the motors, the robot also needs a battery, which provides electricity to the motors. Electricity powers battery-operated devices that you use every day, like toys or television remotes, and also powers things that plug into wall outlets like lamps. When you connect the motors to the battery, you complete an electrical circuit, which allows electricity to flow and make the motors spin. Electricity cannot flow to the motor without a complete circuit. If you want to learn more about electricity, you can read the Electricity, Magnetism, & Electromagnetism Tutorial.
In this project, you will use a breadboard (the green rectangular piece in Figure 1) to make it easier to connect the wires in your circuit. Breadboards make it very easy for beginners to make circuits, because the wire connections are not permanent. You can just pull the wires out if you make a mistake. You can learn how to use a breadboard in the Science Buddies reference How to Use a Breadboard for Electronics and Circuits.
There is just one problem—all that flipping and tumbling around can be pretty hard on the robot. If you are not careful, it could even cause some of the pieces to fall off! In this project, you will put your engineering skills to the test to see if you can design and build a sturdier dancing robot.
Terms and Concepts
- Robot
- Motor
- Battery
- Electricity
- Circuit
- Breadboard
- Row
- Column
Questions
- Why is a battery required to make the motors spin?
- What is a breadboard, and what is it useful for?
- If your robot falls apart, how do you think you could re-connect the pieces to make it stronger?
Bibliography
- Woodford, C. (2014, May 14). Electricity. Retrieved August 22, 2014.
- Grusin, M. (n.d.). What is a Circuit? SparkFun Electronics. Retrieved July 31, 2014.
- Science Buddies. (n.d.). How to Use a Breadboard. Retrieved September 25, 2015.
Materials and Equipment
The following electronic components can be purchased from Jameco Electronics:
- Geared DC motors with leads (2), part #2260834. Note that the motors are sold in a two-pack.
- 3xAA battery holder with cover and switch, part #216144
- Mini breadboard, part #2155452
- AA batteries (must be ordered in multiples of 4, but this project only requires 3), part #198707
You will also need the following tools and supplies:
- Corks (2)
- Popsicle sticks (2)
- Double-sided foam tape
- Electrical tape or duct tape
- Scissors
- Small Phillips head screwdriver
- Hot glue gun or super glue
- Other materials you could use to help attach parts of your robot together. Here are some suggestions:
- Rubber bands
- Twist ties
- String
- Modeling clay
- Lab notebook
- Optional: Arts and crafts materials to decorate your robot (pipe cleaners, googly eyes, etc.)
- Optional: Camera to take pictures of your robot
Disclaimer: Science Buddies participates in affiliate programs with Home Science Tools, Amazon.com, Carolina Biological, and Jameco Electronics. Proceeds from the affiliate programs help support Science Buddies, a 501(c)(3) public charity, and keep our resources free for everyone. Our top priority is student learning. If you have any comments (positive or negative) related to purchases you've made for science projects from recommendations on our site, please let us know. Write to us at scibuddy@sciencebuddies.org.
Experimental Procedure
Building Your Robot
- Gather all the materials you need to build your dancing robot (see the Materials list). Figure 2 shows the main parts of the robot.
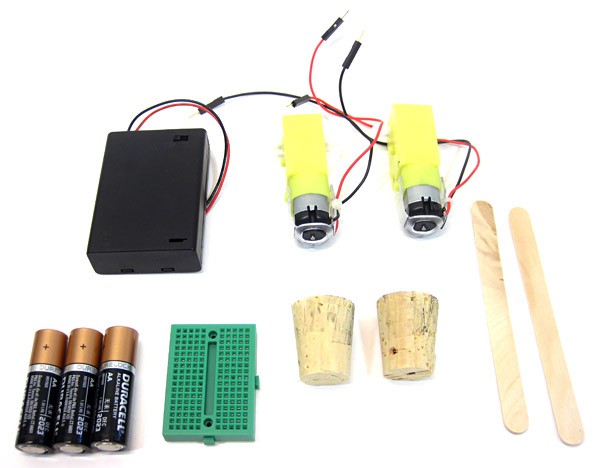 Image Credit: Ben Finio, Science Buddies / Science Buddies
Figure 2. Some of the materials to build your dancing robot (note: some materials and tools, like scissors and tape, are not shown).
- Put the batteries in the battery holder as follows, and as shown in Figure 3.
- Use a small Phillips head screwdriver to remove the screw that holds the cover on the battery holder.
- Press down on the cover and slide it off the battery holder.
- Place the batteries into the battery holder. Make sure the "+" symbols on the batteries line up with the "+" symbols inside the battery holder.
- Slide the cover back onto the battery holder. It should click into place. You do not need to replace the screw.
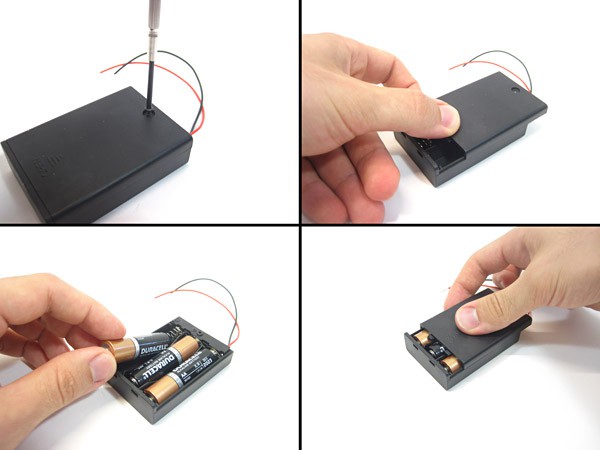 Image Credit: Ben Finio, Science Buddies / Science Buddies
Figure 3. Put the batteries in the battery holder.
- Press corks onto the motor shafts as follows, and as shown in Figure 4.
- Carefully use the Phillips head screwdriver (or another pointy object, like a pen) to poke a hole in one side of the cork.
- Find the motor's shaft (the white part sticking out from the side), which is on the opposite side from the motor's wires. Firmly press the motor's shaft into the hole you made in the cork.
- Repeat steps 3.a.–3.b. for the second cork and motor.
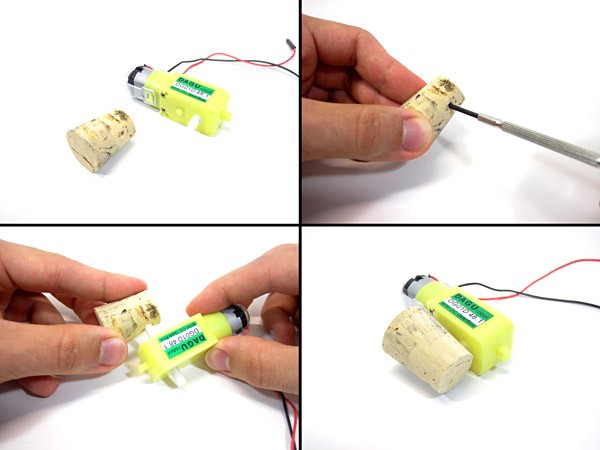 Image Credit: Ben Finio, Science Buddies / Science Buddies
Figure 4. Mount the cork to the motor shaft.
- Use electrical tape or duct tape to tape a popsicle stick to the cork, as shown in Figure 5. One end of the popsicle stick should be flush with the bottom of the cork and motor. Do this for both motors.
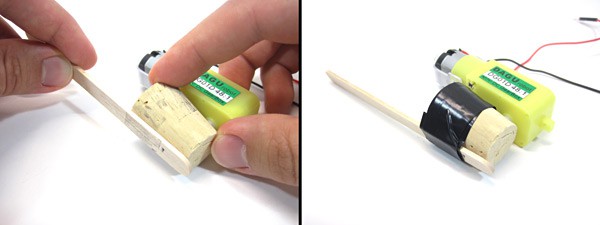 Image Credit: Ben Finio, Science Buddies / Science Buddies
Figure 5. Tape a popsicle stick to the cork.
- Use double-sided foam tape to tape the motors to the battery holder, as shown in Figure 6.
- Cut two pieces of double-sided foam tape and place them on opposite ends of the back side of the battery holder (the side without the power switch).
- Firmly press the motors onto the double-sided tape so the corks are suspended from the sides (both left and right), as shown in Figure 6. The motors should be pointing in the same direction.
 Image Credit: Ben Finio, Science Buddies / Science Buddies
Figure 6. Tape the motors to the battery holder.
- Mount the breadboard on top of the motors, as shown in Figure 7.
- Peel the paper backing off the bottom of the breadboard, exposing the sticky adhesive.
- Firmly press the adhesive part of the breadboard onto the top of the motors.
 Image Credit: Ben Finio, Science Buddies / Science Buddies
Figure 7. Mount the breadboard to the motors.
Connecting the Circuit
Before you connect your circuit, remember to check out the Science Buddies reference How to Use a Breadboard for Electronics and Circuits to learn more about breadboards. To connect the circuit for your robot, follow these steps:
- Connect the battery holder to the breadboard, as shown in Figure 8.
- Orient the robot so the black and silver parts of the motors are pointing to the left, as shown in Figure 9.
- Plug the battery holder's black wire into the upper-right hole of the breadboard (where the first row and the far right column meet).
- Plug the battery holder's red wire into the lower-right hole of the breadboard (where the last row and the far right column meet).
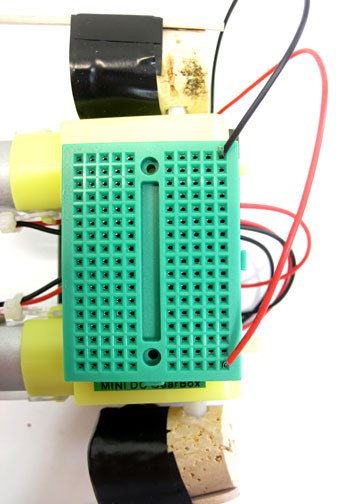 Image Credit: Ben Finio, Science Buddies / Science Buddies
Figure 8. Connect the battery holder's wires to the breadboard.
- Connect one motor's wires to the breadboard, as shown in Figure 9.
- Make sure your battery holder's switch is in the OFF position.
- Pick one motor (it does not matter which one).
- Plug the motor's black wire into the first row of the breadboard, next to the battery holder's black wire.
- Plug the motor's red wire into the last row of the breadboard, next to the battery holder's red wire.
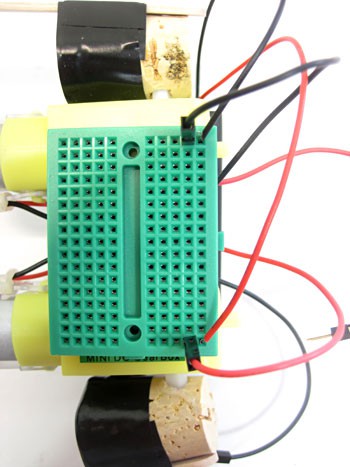 Image Credit: Ben Finio, Science Buddies / Science Buddies
Figure 9. Connect the first motor's wires to the breadboard.
- Now it is time to test your first circuit.
- Hold your robot carefully in one hand, so your fingers and arm will be out of the way of the popsicle sticks when they spin.
- Use your other hand to turn the battery holder's switch to ON. Just one of the motors (the one you connected to the breadboard) should start spinning.
- If the motor does not spin, make sure you have the wires firmly pushed into the breadboard, and that they are arranged as shown in Figure 9.
- Remember, you need a complete circuit in order for the motors to work. If even one wire is disconnected, the motors will not spin.
- If you accidentally pushed a wire into the wrong hole, you can just pull it out and re-insert it into a different hole. This is the nice thing about breadboards; they make it very easy to fix mistakes when you are building a circuit.
- If the motor still does not spin, open up your battery pack and double-check to make sure the "+" symbols on the batteries line up with the "+" symbols inside the battery pack.
- If the motor still does not spin, try using fresh batteries.
- Once the motor is working, turn the battery holder's switch back to the OFF position.
- Connect the second motor's wires to the breadboard, as shown in Figure 10.
- Note: You will plug this motor's wires in "backwards" (compared to how you plugged in the other motor's wires). This will make the motor spin in the opposite direction of the first one, causing the robot to "dance" instead of just rolling in a straight line.
- Plug the motor's red wire into the first row of the breadboard (next to the black wires from the battery holder and other motor). From left to right, the wires in the top row of the breadboard should now be red, black, black.
- Plug the motor's black wire into the last row of the breadboard (next to the red wires from the battery hold and other motor). From left to right, the wires in the bottom row of the breadboard should now be black, red, red.
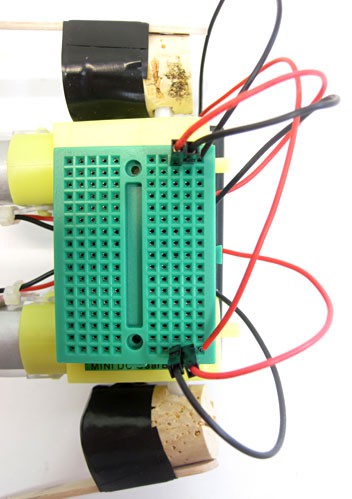 Image Credit: Ben Finio, Science Buddies / Science Buddies
Figure 10. Connect the second motor's wires to the breadboard.
- Now, test your circuit again.
- Carefully hold the robot in one hand and turn the power switch to the ON position.
- The motors should spin in opposite directions. If one motor does not spin at all, or the motors spin in the same direction, double-check that your wiring matches what is shown in Figure 10.
- Congratulations, you just built your first robot! Spend some time admiring your creation, and start thinking about how you might want to decorate it or make it sturdier. Move on to the next section when you have some ideas.
Building a Better Robot
Now you are ready to follow the engineering design process to test and redesign your robot.
- First, you might want to spice your robot up by adding some decorations like googly eyes, as shown in Figure 11. How you decorate your robot is entirely up to you. You could add stickers, pipe cleaners, use markers to draw on the robot, or do anything else you want; googly eyes are just one idea to help you get started!
Image Credit: Ben Finio, Science Buddies / Science Buddies
Figure 11. Decorated robot with googly eyes.
- Next, try to figure out how you can test and redesign your robot. Start by turning your robot on and putting it in the middle of an open space on the floor. Watch as the robot dances and tumbles around. Does the robot's "dancing" seem similar to any real-life style of dancing?
- Note: your robot might work better on carpet than on a slippery surface like tile or wood. Try the robot on different surfaces if possible.
- If you use the robot on a table, be very careful and be ready to catch the robot before it falls off the edge.
- Keep watching until something breaks on the robot (you may want to set an upper time limit on how long you will wait, for example, 10 minutes; you do not want to sit there and watch your robot all day!). Here are some examples of things that could go wrong:
- One of the wires might come loose from the breadboard.
- One of the corks could pop off a motor shaft.
- The double-sided tape holding the motors to the battery pack might peel off.
- Some of your decorations, like the googly eyes in Figure 11, might fall off.
- If something breaks, turn the robot off and investigate what happened.
- Which part(s) broke?
- Why do you think they broke or fell off?
- Write down your findings in your lab notebook. If you have a camera, use it to take pictures of the broken parts of your robot.
- You wouldn't want your robot to literally "break a leg" in the middle of a dance performance. What could you do to fix the problem and prevent it from happening again?
- For example, what construction materials could you use to make the robot stronger?
- What about using more tape or rubber bands to secure parts together?
- What about using a hot glue gun or super glue instead of tape? Caution: Adult supervision is required when using super glue or a hot glue gun!
- What about bundling the wires together or attaching them flat up against the robot's body, so they are not sticking out and easily able to get caught on things?
- Could you build a "case" for the robot's body out of cardboard, that encloses the battery pack, motors, breadboard, and wires; but lets the corks stick out of the sides so they can spin?
- Important: One thing to keep in mind is that eventually, you will need to change your robot's batteries. So, you should be careful not to permanently glue the battery pack shut or design a case that cannot be opened again to access the battery pack. Make sure you can still slide the top and bottom halves of the battery pack apart so you can change the batteries.
- Write down some of your ideas in your lab notebook. If you want, you can also make sketches of your redesigns or changes you want to make.
- If you need to keep a formal design notebook for a science fair project, refer to the Science Buddies resource on Engineering Design Notebooks.
- Now, repair your broken robot using some of the ideas you came up with in step 4. Write down how you repaired the robot in your lab notebook, and remember to take pictures of the repairs if you have a camera.
- Repeat steps 2–6 until your robot no longer breaks after a certain period of time, and until you are satisfied with your robot's performance. This is a very important part of the engineering design process. Engineers very rarely get something right on the first try!
- Remember to document in your lab notebook what breaks and the fixes you make each time.
- If you will be entering your project in a science fair, you can use this information and your pictures as part of your report or display board.
- When you are finally done, enjoy playing with your dancing robot! Have it put on a dance performance for your family and friends!
Explore More!
Looking for more robot fun? Explore the World of Robotics with This Suite of Projects!
Ask an Expert
Global Connections
The United Nations Sustainable Development Goals (UNSDGs) are a blueprint to achieve a better and more sustainable future for all.

Variations
- Investigate how the robot's movement changes if you make different attachments for the "legs." For example, what happens if you glue multiple popsicle sticks together to form a "T" or "X" shape, instead of using a single popsicle stick on each cork?
- Use a stopwatch to time how long it takes for your robot to break for each new test, and make a graph of the data. Does the robot last longer with each new redesign? Do you reach a point of diminishing returns, where the time does not increase much, if at all, between tests?
- Try building a new robot body where the motors are not lined up with each other (for example, mount them at 90 degree angles to each other). Does this change how the robot moves?
- Order another robot kit and try building a new robot with three or even four motors. How does it compare to your original dancing robot?
- Try using different size battery holders (for example, 2xAA or 4xAA instead of 3xAA; but do not use 9 volt (V) batteries with these motors, the voltage will be too high). Do they change the speed of the motors?
- Reverse the connection of one motor's wires to make both motors spin in the same direction. Instead of a dancing robot, make a racing robot. Can you make the robot go faster by altering the popsicle stick attachments? For example, mount the popsicle sticks so they are centered on the cork instead of sticking out, or use two popsicle sticks to make an "X."
- Add light-emitting diodes (LEDs) to your circuit, so your robot also lights up when it dances. If you have not worked with LEDs in circuits before, check out our Electric Play Dough projects. Note that you will also need to add resistors to this circuit to prevent the LEDs from burning out. The Science Buddies LED Traffic Glove: Build a Safety Device to Direct Traffic and LED Dance Glove: Get the Party Started with Your Own Interactive Light Show projects explain more about LEDs and resistors.
- Are you ready to build a more advanced robot? Check out these Science Buddies robotics projects:
Explore More!
Looking for more robot fun? Explore the World of Robotics with This Suite of Projects!
Careers
If you like this project, you might enjoy exploring these related careers: