Abstract
Vibrobots are fun little robots built from common household supplies, that are powered by vibrating motors. In this engineering project, you will design and built your own vibrobot. Would you rather have a robot that skitters quickly across a table or one that spins wildly in circles? How about a sumo-wrestling bot that can push others out of its way? The choice is up to you!Summary
Recommended Project Supplies
Objective
Use the engineering design process to design, build, and test your own vibrobot.
Introduction
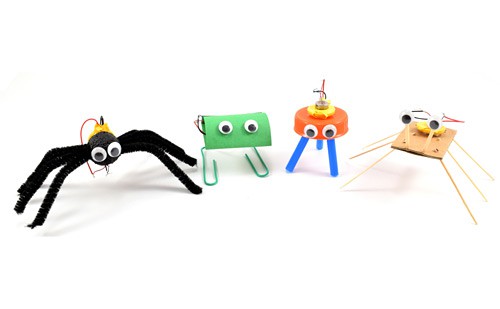
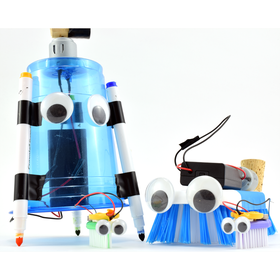
Have you ever noticed that if you leave a cell phone sitting on a table in "vibrate" mode and it rings, it will move around (and maybe even fall off the table)? The cell phone has a tiny vibrating motor inside that makes it buzz. The same motors are used inside video game controllers to make them rumble. You can use these motors, along with tiny batteries, to make vibrobots, or tiny robots powered by vibrations (Figure 1).
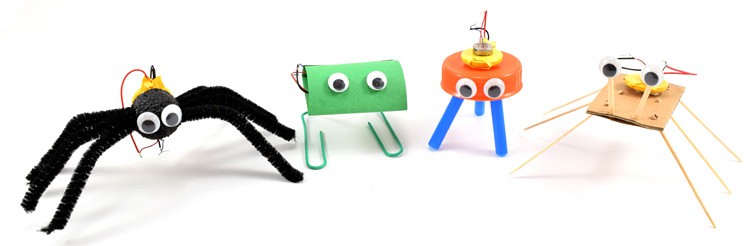 Image Credit: Ben Finio, Science Buddies / Science Buddies
Vibrobots can be made from a wide variety of materials such as pipe cleaners, paper, paperclips, toothpicks and bottle caps.
Figure 1. Examples of some different vibrobot designs.
Since they are powered by a single vibrating motor, vibrobots are not very easy to steer. They tend to bounce around randomly. However, how you design and build the robot's body can have a big impact on how it moves. You can build fast robots and slow robots, robots that go straight and robots that spin in place. A fast robot that goes in a straight line might be better for racing against other robots, but a heavy one that spins in circles might be better for "sumo wrestling" and pushing other robots out of the way. In this project you will use the engineering design process to decide what type of robot you want to build, then experiment with the design until you get the behavior you want.
If you are just building your robot for fun, you can move on to the procedure. If you are doing a science project, there are many physics and engineering concepts you can apply to building your robot. Here are a few terms you might find useful:
- Friction is the amount of resistance to movement between your robot and the surface it rests on. If there is too much friction, your robot might move slowly or not at all. Certain items, like a toothbrush with slanted bristles, can have directional friction (more friction in one direction than another), and can help your robot move more easily in one direction.
- Mass is how heavy your robot is. If your robot is too heavy, the motor might not be strong enough to make it move. However, heavier robots might be better at sumo wrestling since they are harder to push around.
- Center of mass is the middle of your robot, or the point where all the mass is effectively concentrated. If a robot's center of mass is too high off the ground, it may tip over easily. The motor and battery are both heavy, so where you put them can have a big impact on the center of mass.
- Moment of inertia is how spread out your robot's mass is. Robots with a small moment of inertia tend to spin rapidly (think about how ice skaters tuck in their arms when they want to spin quickly—this decreases their moment of inertia).
- Stiffness is how rigid your robot's body is. Robots with very loose, floppy bodies might not move very quickly, because all the energy from the vibrating motor gets absorbed by the robot's body. Stiffer robots will tend to move faster.
Terms and Concepts
- Motor
- Battery
- Vibrobot
- Engineering design process
- Friction
- Mass
- Center of mass
- Moment of inertia
- Stiffness
- Circuit
- Short circuit
- Prototype
- Iterative
Questions
- What makes vibrobots move?
- What common household materials could you use to build a vibrobot?
- Do you think your robot would move faster on a smooth surface or a rough surface?
- What do you think would move faster, a heavy robot or a light robot?
- What do you think would tip over more easily, a very tall robot or one that is low to the ground?
- What do you think would spin in circles faster, a robot whose body is tightly bundled up, or one that has long legs sticking out in all directions?
- What do you think would move faster, a very stiff robot made of paper clips, or a very soft robot made of cotton balls?
Bibliography
- Evil Mad Scientist Laboratories. (2007). Bristlebot: A tiny directional vibrobot. Retrieved October 5, 2016.
- Henderson, T. (n.d.). Vibrational Motion. The Physics Classroom. Retrieved October 5, 2016.
- Grusin, M. (n.d.). What is a Circuit? SparkFun Electronics. Retrieved October 5, 2016.
- Stith, D. (n.d.). Race Tiny RumbleBots with a Hand-Cranked Raceway. Makezine.com. Retrieved October 5, 2016.
- Science Buddies Staff (n.d.). The Engineering Design Process. Science Buddies. Retrieved October 5, 2016.
Materials and Equipment 
Recommended Project Supplies
- Bristlebot Robotics Kit, available from our partner
Home Science Tools.
You will need these parts from the kit:
- Coin cell battery
- Mini vibration motor
- Assorted household, office, and craft supplies to build your robot. Since this is an engineering design project, there is not a specific list of materials you must use, but here are some suggestions:
- Cardboard
- Construction paper
- Straws
- Styrofoam™
- Toothpicks
- Pipe cleaners
- Plastic bottle caps
- Paper clips
- Cutting tools (scissors, hobby knife)
- Tape or glue
- Decorations like googly eyes
- Lab notebook
Disclaimer: Science Buddies participates in affiliate programs with Home Science Tools, Amazon.com, Carolina Biological, and Jameco Electronics. Proceeds from the affiliate programs help support Science Buddies, a 501(c)(3) public charity, and keep our resources free for everyone. Our top priority is student learning. If you have any comments (positive or negative) related to purchases you've made for science projects from recommendations on our site, please let us know. Write to us at scibuddy@sciencebuddies.org.
Experimental Procedure
Assembling Your Circuit
Before you design and build your vibrobot, you need to learn how to connect the motor and battery wires to create a circuit so electricity flows through the motor and causes it to vibrate. To connect them, twist together the exposed metal parts of the wires, as shown in Figure 2. The motor should start vibrating. Do not let the battery's red and black wires touch each other—this will create a short circuit and drain the battery very quickly.
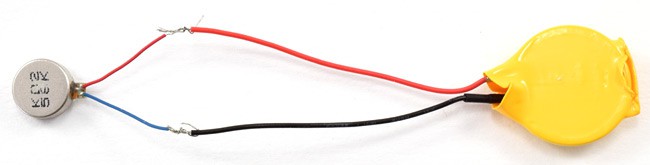 Image Credit: Ben Finio, Science Buddies / Science Buddies
Figure 2. Motor (the gray circle on the left) and battery (the yellow circle on the right) wires connected to form a circuit.
You will need to attach the battery and motor to the body of your robot once it is built. The motor has a built-in sticky backing (peel off the protective paper first), but you will need to use tape or glue to attach the battery. For now, disconnect one set of wires to turn your motor off and save battery power.
Designing Your Robot
Remember that this section will follow the engineering design process, so there is not an exact step-by-step procedure for you to follow. In general, you will need to build a body for your robot using household and craft materials, and then attach the motor and battery. However, there is no single right way to build a vibrobot.
- Define your problem. What type of vibrobot do you want to build? Do you want to build a fast racing robot? Do you want to build a sumo wrestling robot? Do you want to build a robot that bounces off obstacles without getting stuck? What you decide to build is up to you!
- Do background research about vibrobots. The information in the background section should help you think about some of the design factors that will affect your robot's performance.
- Specify requirements for your robot. These requirements will depend on the type of robot you want to build and what you want it to do. For example, for a racing robot you could say, "The robot should be able to go straight over a distance of at least 30 centimeters."
- Brainstorm different designs for your robot. Look around your house for materials you could use. Figure 1 in the background section will give you some ideas for different designs, but use your imagination and come up with your own! What will you use for your robot's body? Will your robot have legs? How will you connect the motor and battery to the robot's body? Use your design notebook to sketch out different ideas before you start building anything.
- Build a prototype, or initial version, of the design you think will work best. It is OK if your design does not work out exactly like you thought it would. You might realize as you start to build that there is a problem with your design. The engineering design process is iterative, meaning sometimes you go back and do the steps more than once. Engineers rarely get things right on the first try!
- Test your robot! Connect both sets of wires to complete the circuit and make the motor vibrate. Then, put your robot down on a smooth surface and watch it go! Remember that your robot might not work like you want it to the first time. It might fall apart, it might fall over, it might not move at all! This is OK—now you can redesign and improve your robot.
- Does your robot meet the requirements you set in step 3? If not, keep going back through steps 4–6 until you have a robot that meets all your requirements. For example, maybe you wanted to build a racing robot that goes straight, but your robot always curves off to one side. You will need to figure out how to adjust your design to make it go straight. You might decide to make small changes to your existing design, or start again with a totally new design. Remember that the engineering design process is iterative, and you might go through the steps multiple times. If you need to present your project (see next step), it will help to use your lab notebook to document changes you make to your robot or take pictures of each new design.
- Communicate your results. Once you have a working robot, you are ready to present your project. If possible, bring your robot to demonstrate it in your classroom or at your science fair. You can also make a display board documenting your design process. Keep in mind that the display board for an engineering design project will be slightly different than one for a scientific method project. You can see a comparision of the engineering design process and the scientific method on this page.
Ask an Expert
Global Connections
The United Nations Sustainable Development Goals (UNSDGs) are a blueprint to achieve a better and more sustainable future for all.

Variations
There are several other science projects and fun activities you can do with the parts in your Science Buddies Bristlebot Kit:
Careers
If you like this project, you might enjoy exploring these related careers:


Contact Us
If you have purchased a kit for this project from Science Buddies, we are pleased to answer your questions.In your email, please follow these instructions:
- What is your Science Buddies kit order number?
- Please describe how you need help as thoroughly as possible:
Examples
Good Question I'm trying to do Experimental Procedure step #5, "Scrape the insulation from the wire. . ." How do I know when I've scraped enough?
Good Question I'm at Experimental Procedure step #7, "Move the magnet back and forth . . ." and the LED is not lighting up.
Bad Question I don't understand the instructions. Help!
Good Question I am purchasing my materials. Can I substitute a 1N34 diode for the 1N25 diode called for in the material list?
Bad Question Can I use a different part?
Contact Us