Scratch User Guide: Adding Images & Sprites to a Scratch Program
Introduction
One fun feature of Scratch is that you can easily add any images and text that you want to your program. Do you want to draw a new Scratch cartoon character directly on the computer? Or add real photos of you and your friends to a Scratch dance animation you're making? Or maybe create a rainbow-colored set of instructions for your Scratch game? You can do all of these things and much more with just a few clicks of the mouse. This page contains instructions for adding sprites in the browser-based version of Scratch 3 as well as the older, downloadable version of Scratch 1.4. See our Installing & Getting Started with Scratch page to get started with Scratch.
Adding Sprites in Scratch 3
At the bottom right of the sprites display area is an icon of a cat with a plus sign next to it; it is circled in red in Figure 1.
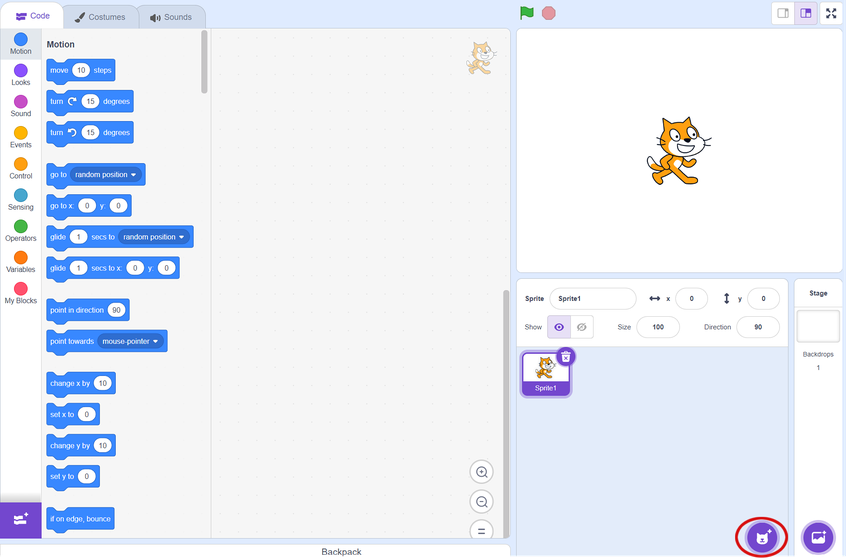 Image Credit: Scratch, Science Buddies / Science Buddies
Scratch program screen.
Figure 1. You can add a sprite by hovering above the icon of a cat with a plus sign next to it, circled in red. It will expand into a menu of options to create sprites.
If you hover above the cat icon, it expands into a menu as shown in Figure 2. From the menu, you can select to upload an existing picture from your computer into the Scratch environment as a sprite, get a pre-made surprise sprite, create your own sprite, or search for a sprite. Table 1 shows exactly which icon needs to be clicked for each of these tasks.
Scratch program with four buttons highlighted. There are four buttons for new sprites. From top to bottom, they are: Upload Sprite, Surprise, Paint, and Choose a Sprite.
Figure 2. New sprites. There are four buttons for new sprites. From top to bottom, they are: Upload Sprite, Surprise, Paint, and Choose a Sprite.
| Task | Icon to Click | Comments |
|---|---|---|
| Choose a sprite from your computer's hard drive to import into your Scratch project. | 
|
Clicking on the Upload Sprite icon will allow you to pick any image on your computer's hard drive to import as a Scratch sprite. |
| Get a pre-made surprise sprite. | 
|
Clicking on the Surprise icon will make one of the pre-made sprites that comes packaged with Scratch appear in your project. You can choose to keep it or delete it. |
| Draw your own sprites (pictures or text) using the Scratch editor. | 
|
Clicking the Paint icon opens up the Scratch drawing editor where you can draw anything you want. You can also make text sprites. |
| Search for a pre-made sprite. | 
|
Clicking on the Choose a Sprite icon will allow you to search for a pre-made sprite that comes packaged with Scratch. |
Table 1. The four ways of adding sprites to a Scratch 3 program.
When adding new sprites to a Scratch project, it is always a good idea to give them descriptive names. This allows you to easily figure out which sprite you're referring to in the scripts. See Figure 3 for directions on where to enter sprite names.
A partyhat is chosen as a costume for a sprite in the Scratch program.
Figure 3. Sprites can be renamed using the text box circled in red.
Existing sprites can be modified by clicking on the Costumes tab.
Adding Sprites in Scratch 1.4
Just above the sprites display area are three icons; they are circled in red below in Figure 4. The icons allow you to create your own sprite, import an existing Scratch sprite or an existing picture from your computer into the Scratch environment as a sprite, or get a surprise, pre-made Scratch sprite. Table 2 shows exactly which icon needs to be clicked for each of these tasks.
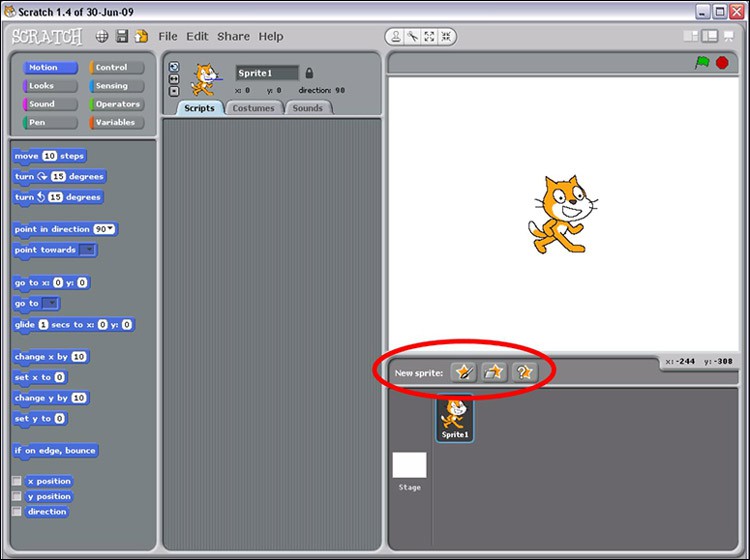 Image Credit: Sandra Slutz, Science Buddies, using Scratch, MIT Media Lab / General Public LIcense
A screenshot of the program Scratch shows three new sprite buttons under the viewer window on the right side of the program. New sprites can be drawn by the user, uploaded from a file or randomly generated by Scratch.
Figure 4. The sprite icons, shown here circled in red, are used to create new sprites, import either a pre-made Scratch sprite or an existing picture from your computer into the Scratch program, or get a surprise, pre-made Scratch sprite.
| Task | Icon to Click | Comments |
|---|---|---|
| Draw your own sprites (pictures or text) using the Scratch editor. |  Image Credit: Sandra Slutz, Science Buddies, using Scratch, MIT Media Lab / General Public License Image Credit: Sandra Slutz, Science Buddies, using Scratch, MIT Media Lab / General Public License
|
Clicking the paint new sprite icon opens up the Scratch drawing editor where you can draw anything you want. You can also make text sprites. |
| Choose a sprite from your computer's hard drive to import into your Scratch project. |  Image Credit: Sandra Slutz, Science Buddies, using Scratch, MIT Media Lab / General Public License Image Credit: Sandra Slutz, Science Buddies, using Scratch, MIT Media Lab / General Public License
|
Clicking on the choose a new sprite from file icon will allow you to pick any image on your computer's hard drive (including the pre-made sprites that come packaged with Scratch) to import as a Scratch sprite. |
| Get a pre-made surprise sprite. |  Image Credit: Sandra Slutz, Science Buddies, using Scratch, MIT Media Lab / General Public License Image Credit: Sandra Slutz, Science Buddies, using Scratch, MIT Media Lab / General Public License
|
Clicking on the get a surprise sprite icon will make one of the pre-made sprites that comes packaged with Scratch appear in your project. You can choose to keep it or delete it. |
Table 2. The three ways of adding sprites to a Scratch 1.4 program.
When adding new sprites to a Scratch project, it is always a good idea to give them descriptive names. This allows you to easily figure out which sprite you're referring to in the scripts. See Figure 5 for directions on where to enter sprite names.
A cropped screenshot of the sprite settings window in the program Scratch shows a textbox to rename sprites. The sprite textbox to rename a sprite is above the scripts, costumes and sounds tabs when a sprite is selected.
Figure 5. Sprites can be renamed using the text box circled in red, above.
Existing sprites can be modified by clicking on the Costumes tab.
Science Buddies Scratch Resources
- Scratch User Guide: Introduction
- Scratch User Guide: Installing and Getting Started with Scratch
- Scratch User Guide: Adding Images and Sprites to a Scratch Program
- Scratch User Guide: Connecting and Using a Picoboard with Scratch
- Scratch User Guide: Help, I'm Stuck! Troubleshooting a Program in Scratch