Scratch User Guide: Installing & Getting Started with Scratch
Overview
Scratch is a free, easy-to-use programming language from MIT that you can use to make all sorts of animated stories, art, music, and even interactive games. The modern version of Scratch runs directly in a web browser, so you do not need to download or install anything to use it. You can access it at Scratch. If you want to use Scratch without an internet connection, you can download the offline editor.
Older versions of Scratch are still available for download. The instructions below were originally written for Scratch version 1.4. We have kept them here for those who might need to reference them for older projects. If you are just getting started with Scratch, we recommend using a newer resource, like this Getting Started with Scratch guide from the Raspberry Pi foundation.
Installing Scratch 1.4
Remember that if you are just getting started with Scratch, you should use the latest version in a web browswer at scratch.mit.edu. If you need to use Scratch without an internet connection, then you can download the offline editor. If you choose to install Scratch 1.4, you can install it from the Scratch 1.4 download page. Note that programs written in Scratch 1.4 can still be uploaded to the Scratch website, but programs written in newer versions of Scratch cannot be opened in Scratch 1.4.
Getting Started with Scratch 1.4
- In addition to our own user guide, the Getting Started with Scratch guide and Scratch Reference Guide contain a lot of useful information. However, you do not have to sit down and read all this material in advance. It might be more fun to open up Scratch and just start playing around! Then, you can refer back to the reference materials when you need help or get stuck.
- Scratch has a very simple programming environment, made up of five main areas. Figure 1 shows where each of those areas is located, and Table 1 provides more details about each area.
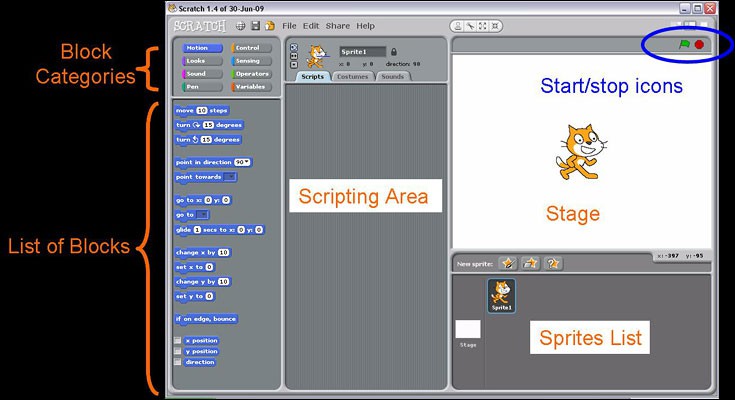 Image Credit: Sandra Slutz, Science Buddies, using Scratch, MIT Media Lab / General Public License
Screenshot of the program Scratch showing block categories, block list, scripting area, stage, and sprites list. The block categories appear in the top-left of the program window, while the list of blocks sidebar appears directly underneath. In the center of the page is a scripting area where blocks can be placed. The right side of the page includes a large display area to see how programs run and a sprites list area underneath it.
Figure 1. Labeled in orange are the five areas of the Scratch programming environment. Also notice the green flag and red octagon icons, circled in blue. When the green flag is clicked, the program you've created runs in the stage window. Clicking the red octagon stops the program.
| Area | Function |
|---|---|
| Scripting Area | Within the scripting area, there are three tabs:
|
| Block Categories | There are eight block categories. Notice that the blocks have different shapes. This gives you a clue about which blocks can be snapped together and which blocks can't be snapped together. If the shapes fit together, then they will work together.
|
| List of Blocks | Once you click on one of the categories listed, the different blocks that are included in this category are listed. |
| Stage | This is the area where the sprites execute or run the script that you built in the scripting area. Clicking on the green flag allows you to start executing the script (if you set up your script to do so) and the red button will make the script stop. |
| Sprite List | There are three buttons here that you can use to create a variety of sprites and backgrounds.
|
Table 1. This table lists all the functions available in each of the five Scratch programming environment areas.
- Scratch programs, also called projects, are created by dragging, dropping, and snapping together different blocks. All blocks that are joined together are called a script. Simple programs may have just one or two scripts, whereas more complex programs have many scripts.
- You now have enough information to get started writing scripts and experimenting with Scratch. Open up the Scratch programming environment and start playing around.
- For example, click on one of the menus in the upper left of your screen, like the Motion menu. In the screen below it, you will see all the commands that are available under that menu. Try clicking on one of the commands, like "Move" or "Turn" to see what happens to the cat sprite. Then change numbers inside the commands (for example, change "Move 10 steps" to "Move 30 steps") and click again on the command to see what happens to the sprite.
- If you'd like a more complete description of what each block does, read MIT's Scratch Reference Guide. This guide is very detailed and helpful once you have had a chance to play with Scratch a bit.
- If you have a specific question about how to do something in Scratch (like change colors, make a sprite jump, or keep score in a video game), try a Google search for "how to __________ in Scratch" (and fill in the blank with what you want to do). Many times, you will be able to find example code online, or forum posts discussing the same topic.
More Scratch Resources
One of the nice things about using Scratch is that there are a lot of people and places to turn to for help. If you get stuck programming, or are confused about how to start a specific project, consult the Science Buddies Help, I'm Stuck! Troubleshooting a Program in Scratch page. Table 2 also lists some additional options for learning more about Scratch or asking questions.
| Type of Resource | Citation |
|---|---|
| Official Scratch getting started resources | https://scratch.mit.edu/ideas |
| Scratch wiki with more information about Scratch | https://wiki.scratch.mit.edu/wiki/Scratch_Wiki_Home |
| Scratch forum where you can ask questions | https://scratch.mit.edu/discuss/ |
Table 2. Resources with step-by-step help for learning to program with Scratch.
Science Buddies Scratch Resources
- Scratch User Guide: Introduction
- Scratch User Guide: Installing and Getting Started with Scratch
- Scratch User Guide: Adding Images and Sprites to a Scratch Program
- Scratch User Guide: Connecting and Using a Picoboard with Scratch
- Scratch User Guide: Help, I'm Stuck! Troubleshooting a Program in Scratch