Summary
Introduction
Building "junkbots" is a fun activity where you can turn recycled materials—like plastic bottles and cardboard tubes—into robots! This is a great activity for a classroom or a group of friends, because you can race your robots against each other and even make them sumo wrestle. You do not need any previous experience with robotics to build junkbots. A Science Buddies kit is available with all the electronic parts you need, including motors, batteries, and clear instructions for how to connect them. Gather up some recycled materials and get started!
Materials
- Bristlebot Robotics Kit, available from our partner Home Science Tools. The kit contains enough parts to build two junkbots, as well as two smaller robots, called bristlebots. To build one junkbot, you will need these parts from the kit:
- AA batteries (2)
- AA battery holder
- Large motor
- You will also need the following supplies. These are just suggestions; you do not need to use all of them, and you can pick other materials not listed here:
- Recycled construction materials, like plastic bottles, cardboard tubes, etcetera
- Other construction materials, like popsicle sticks and straws
- Various adhesives and attachment mechanisms, like clear tape, duct tape, rubber bands, zip ties, glue (a hot glue gun is helpful, but adult supervision is recommended)
- Decorative items, like googly eyes, pipe cleaners, construction paper, glitter, crayons and markers, etcetera
- Corks (these are pressed on to the motor shafts to make the motors vibrate)
- Scissors (older students can use hobby knives, adult supervision recommended)
- Small Phillips-head screwdriver
Disclaimer: Science Buddies participates in affiliate programs with Home Science Tools, Amazon.com, Carolina Biological, and Jameco Electronics. Proceeds from the affiliate programs help support Science Buddies, a 501(c)(3) public charity, and keep our resources free for everyone. Our top priority is student learning. If you have any comments (positive or negative) related to purchases you've made for science projects from recommendations on our site, please let us know. Write to us at scibuddy@sciencebuddies.org.
Instructions
- Make sure your battery holder's switch is in the OFF position.
- Use a small Phillips-head screwdriver to remove the screw, then slide off the battery holder's cover.
- Insert two AA batteries into the holder. The flat ends of the batteries should be against the metal springs.
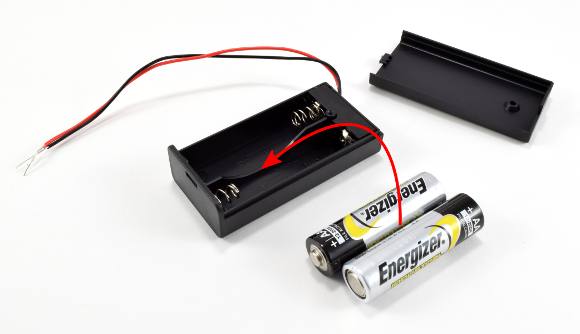 Image Credit: Ben Finio, Science Buddies / Science Buddies
- Slide the cover back on until it clicks into place. You do not need to replace the screw.
- Twist together the red and black wires from the motor and battery holder.
- Wrap the exposed metal parts of the wires in tape to help prevent short circuits.
- Firmly press a cork onto the motor's shaft.
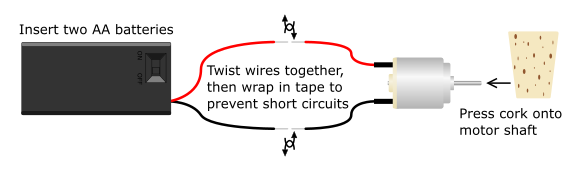 Image Credit: Ben Finio, Science Buddies / Science Buddies
- Turn the battery holder's switch to ON. The cork should spin, causing the motor to vibrate. If not, see the Troubleshooting section. Then turn the switch off again.
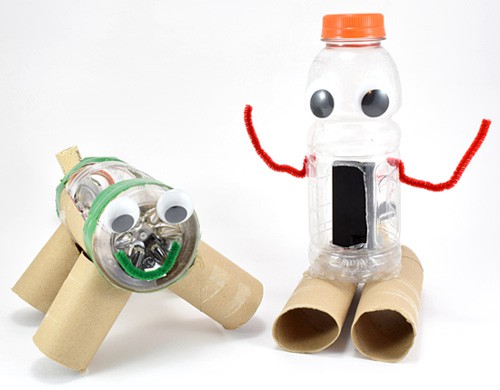
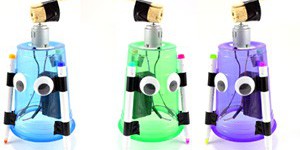
- Build a "body" for your robot out of recycled and craft materials. There is no right or wrong way to do this step—what you build is up to you! See the picture in the Summary section if you need some ideas to get you started. Do not forget to decorate your robot!
- Attach the battery pack and motor to your robot's body. Pay attention to these tips:
- Make sure you do not glue or tape the battery pack shut, or make it difficult to access. Eventually you will need to slide it open to replace the batteries.
- Make sure the cork can rotate completely without getting stuck against the robot's body.
- Make sure the wires will not get tangled in the cork when the robot moves.
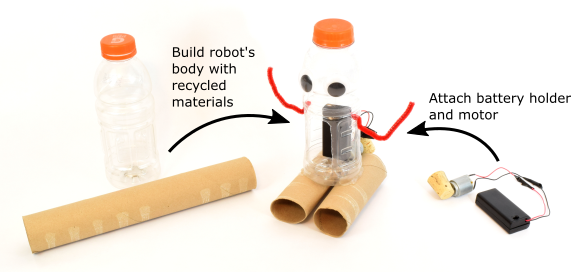 Image Credit: Ben Finio, Science Buddies / Science Buddies
- Turn your battery pack on, put your robot on the floor, and watch it go! Your robot might not work perfectly on the first try, and it might not work at all. This is okay; fixing and improving your robot is part of the engineering design process. See the Troubleshooting section if your robot does not work.
- If you are doing this activity with a friend, try racing your robots against each other or making them "sumo wrestle" by pushing each other out of a ring.
-
Troubleshooting
My cork does not spin when I turn my battery pack on.- Make sure you inserted your AA batteries properly. The flat ends of the batteries should be against the metal springs in the battery holder, and the "+" signs on the batteries should line up with the "+ signs inside the battery holder.
- Make sure you do not have a short circuit. This can occur if the red and black wires bump into each other and you did not securely wrap the exposed metal parts with tape. Short circuits will prevent the motor from spinning and quickly drain the battery.
- Make sure the cork can spin freely and is not jammed against the robot's body, held in place with glue, etcetera.
- Press the cork further onto the motor shaft using a new hole.
- Optionally, a small dab of hot glue placed in the hole can help hold the cork in place.
- Remove the tape from your wires and make sure the metal parts are still twisted together. The motor's vibrations can cause the wires to come apart if they are not twisted tightly enough.
- If you have access to a soldering iron, you can ask an adult to help you solder the wires together. That will help keep them connected.
Several things can prevent your robot from moving or make it slow:
- There is too much friction between your robot and the ground. Try putting your robot on a smoother surface or using a different material for its "feet."
- Your robot is too heavy. Try removing some materials from your robot or using lighter materials.
- Your motor is not firmly attached to the robot's body. This means the vibrations will not transfer from the motor to the robot's body. Try using more glue or tape to securely attach the motor to the robot, but make sure the cork can still spin.
- Your robot's body is not stiff enough (for example, cardboard pieces held loosely together by tape). This can cause all the vibrations from the motor to be absorbed by the robot's body, instead of transferring to the ground and causing the robot to move. Make sure all the different parts of your robot's body are tightly taped or glued together.
- This is very common—since your robot is powered by vibrations, it is actually very difficult to make one that goes perfectly straight. So, do not consider this a problem—consider it an engineering challenge!
Cleanup
- Make sure you turn the battery pack off to avoid draining the battery.
- For long-term storage, remove the batteries from the battery pack.
What Happened?
When you turn the battery pack on, it completes an electrical circuit with the motor. This causes electricity to flow in a loop from the batteries through the motor, making the motor spin. Because the motor has a weight attached to its spinning shaft, it wobbles and makes the entire robot's body vibrate, causing it to move. This is the same concept that makes video game controllers and cell phones buzz—they have tiny vibrating motors inside them!
If you built multiple robots with friends or classmates, you probably noticed that everyone's robot behaved differently. How your robot moves (for example, quickly or slowly; in a straight line or spinning) depends entirely on how you build it. There is no single "best" design, and some designs may perform better than others for specific tasks like racing or sumo wrestling.
Digging Deeper
What causes your robot to vibrate and move around when you turn the battery pack on? Here's a hint: try removing the cork. Does the robot still vibrate and move? Probably not. The cork forms an off-center weight on the motor's shaft. The cork's center of mass rapidly moves from side to side as it rotates, causing the entire robot to vibrate with it. Normally in engineering, such vibrations are considered a bad thing because they can cause machines to fall apart eventually (imagine riding a bike with off-center wheels that vibrated like your robot's cork). However, they can also be used on purpose to make things buzz (like cell phones), or in this case, to make your robot move around.
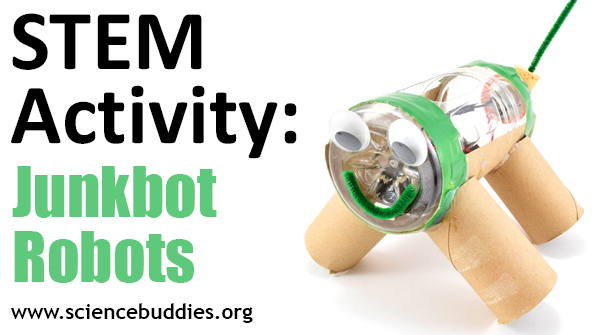 Image Credit: Science Buddies
Ask an Expert
For Further Exploration
- Try experimenting with different designs for your robot. What happens if you use different materials or change the body's shape? What happens if you mount the motor vertically instead of horizontally, or tape a popsicle stick to the cork? What if you move the heavy battery pack to a different location, or change the robot's "feet" (the parts that touch the floor) to a different material?
- What happens if you reverse the connections of the red and black wires from your motor and battery pack (meaning, connect the battery pack's black wire to the motor's red wire, and vice versa)? Normally in electronics, red is used for positive and black is used for negative, and it is important not to get the wires mixed up. In this case, however, if you reverse the wires, the motor still works, it just spins in the opposite direction.
Related Resources
Project Ideas
Links
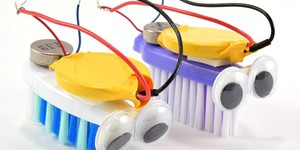
- Blog Post: Building Bristlebots: Basic Toothbrush Robotics
- Blog Post: Bot Building for Kids and Their Parents: Celebrating Student Robotics