Summary
Styrofoam® is a registered trademark of The Dow Chemical Company.
Introduction
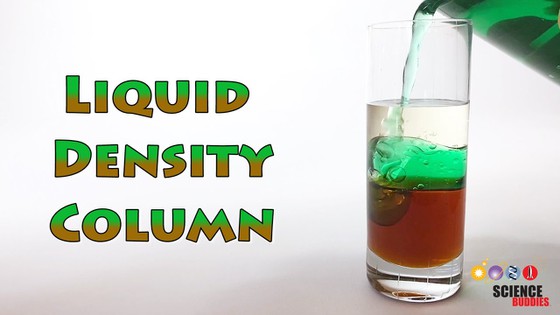
Did you know that not only can solid objects sink or float, but liquids can, too? It is actually possible to stack different liquids on top of each other in layers. The key is that all the different layers must have different densities. You can stack them by either picking several liquids with a range of densities, or by varying the density of one liquid by adding chemicals like sugar or salt to it. If you choose colored liquids, or add food coloring to each layer, you can even create a whole rainbow of colors in one single glass! Want to see for yourself? In this science activity, you will stack several liquids, one by one, and create a colorful density column.
Materials
- Glass or cup
- Tap water
- Food coloring
- Scissors
- Ruler
- Rubber band (wide)
- Small piece of wax
- Craft stick
- Small, clear jars or transparent mini cups (2-oz) with lids (at least 2)
- Permanent marker
- Masking tape
- Small piece of Styrofoam®
- Tablespoons (3)
- Dark corn syrup
- Vegetable oil
- Penny
- Paper towels
- Optional: Rubbing alcohol, dish-washing soap, and other liquids
- Optional: Sugar or salt
- Optional: Digital scale
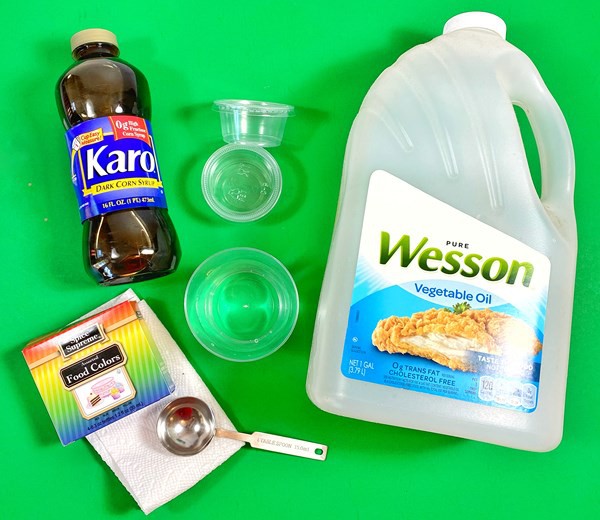 Image Credit: Svenja Lohner, Science Buddies / Science Buddies
Prep Work
- Gather all your materials at a workspace that can tolerate accidental spills of the liquids.
- Fill a cup with tap water and add a couple of drops of food coloring to the water.
- Ask an adult to help you cut and prepare small pieces (about 0.5 × 0.5 cm) of the rubber band, the Styrofoam, and the wax.
- Put the two empty cups in front of you (without the lids) and label them 1 and 2 with a piece of tape and the permanent marker.
Instructions
- Take a clean tablespoon and pour 1 tablespoon (Tbsp.) of dark corn syrup in Cup 1.
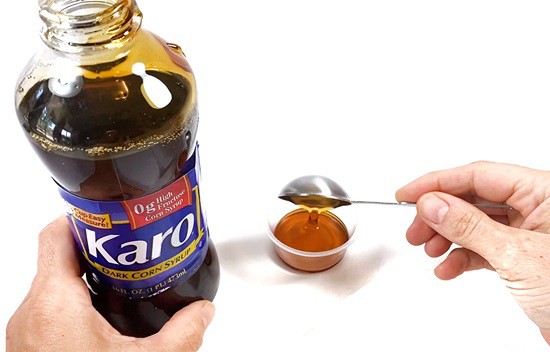 Image Credit: Svenja Lohner, Science Buddies / Science Buddies
- With the second tablespoon, carefully pour 2 Tbsp. of colored water into Cup 1 on top of the corn syrup.
 What happens to the water on top of the corn syrup? Does it mix or stay separate?
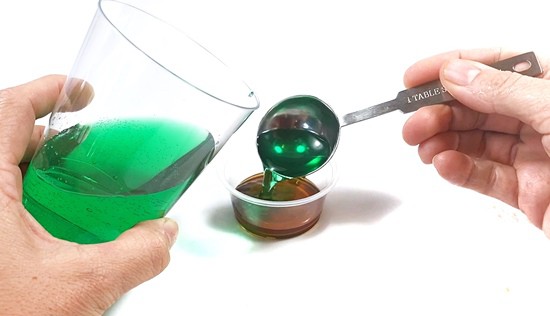 Image Credit: Svenja Lohner, Science Buddies / Science Buddies
- Use the third clean tablespoon to pour 2 Tbsp. of vegetable oil in Cup 1 on top of the colored water.
Do you see the liquids mixing? What happens to the oil; does it float on top or sink to the bottom?
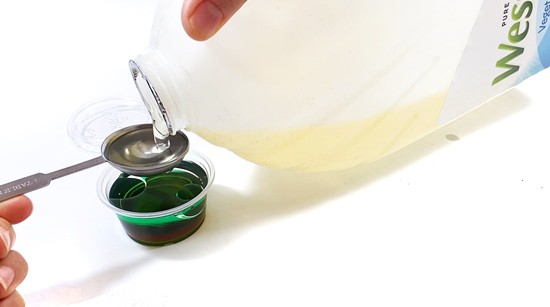 Image Credit: Svenja Lohner, Science Buddies / Science Buddies
- Now take empty Cup 2 and add the same liquids, but in reverse order. Start by pouring in 2 Tbsp. of vegetable oil.
- Next, add 2 Tbsp. of colored water on top.
What happens to the water this time? Does it stay on top or sink to the bottom?
- With a fresh tablespoon, carefully pour 1 Tbsp. of dark corn syrup into Cup 2, on top of the water.
Does the corn syrup float on top of the other liquids? Where does it settle compared to the water and oil?
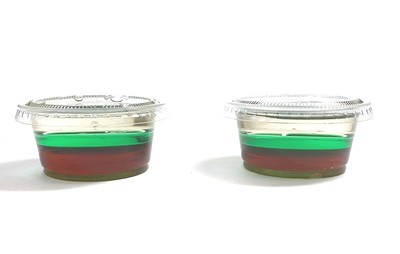
- Wait 1 or 2 minutes to let all the liquids settle in Cups 1 and 2. Then look at both cups and compare how the different liquids are layered.
Is there a difference between Cup 1 and Cup 2? Did you expect this result? Why do you think the layers turned out this way?
- Now take Cup 1 and close it with a lid. Carefully turn it upside down and set it on the table again. Observe the different liquids.
What is happening to each of the liquids? How are they layered once the cup is upside down? Did you know this would happen?
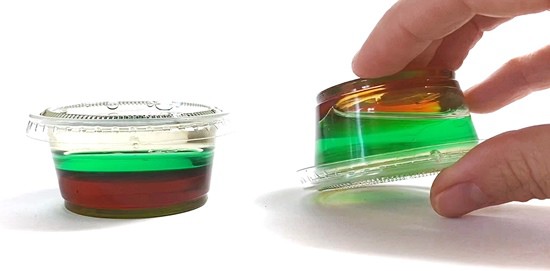 Image Credit: Svenja Lohner, Science Buddies / Science Buddies
- Compare the upside-down Cup 1 with Cup 2 after a couple of minutes.
Do you see any differences in layering now? What happened to each of the liquids?
- Get all your cut-up objects and your penny ready, and drop the penny into Cup 2.
What happens to the penny?
- Next, take the piece of rubber band and drop it into Cup 2. With the craft stick, push the rubber band piece all the way down to the bottom of the cup. Make sure it does not stick to the bottom and can float freely.
Where does the rubber band settle? Does it float on top, in the middle, or sit on the bottom?
 Image Credit: Svenja Lohner, Science Buddies / Science Buddies
- Now drop the piece of wax into Cup 2. Again, push the wax all the way down into the cup with the craft stick, but make sure it does not stick to the bottom or to the sides of the cup. It should be able to float freely.
What happens to the wax piece? Where does it settle compared to the rubber band piece?
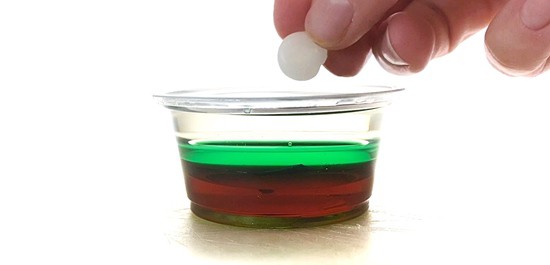 Image Credit: Svenja Lohner, Science Buddies / Science Buddies
- Last, take the piece of Styrofoam and drop it into Cup 2. Submerge it with the craft stick and wait for it to settle in one of the layers.
On top of which layer does the Styrofoam piece float?
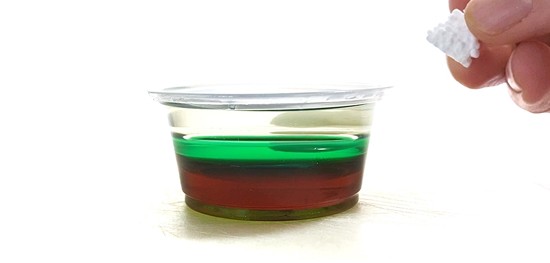 Image Credit: Svenja Lohner, Science Buddies / Science Buddies
- Look at all four objects that you dropped into Cup 2 and compare their locations.
Did they all settle in the same or in different liquid layers? If they are in different layers, why do you think this is the case?
- Finally, take Cup 1, which is still upside down, and shake it really hard. Be sure to hold the lid on tight! Then put it back on the table (this time, right-side up). Observe what happens for about 5–10 minutes.
Did any of the layers mix while you shook the cup? How does the layering look after 5–10 minutes?
Cleanup
What Happened?
Did you successfully stack all three liquids on top of each other to create a colorful density column? It actually does not matter in which order you add the three different liquids into your cup; the layers will always end up being the same: the corn syrup settles on the bottom, the colored water is in the middle, and the vegetable oil floats on the top. This is because corn syrup has the highest density of all the liquids, about 1.4 grams per cubic centimeter (g/cm³), whereas the density of water is about 1 g/cm³ at room temperature. Vegetable oil is lighter than water with a density of about 0.9 g/cm³ and thus floats on top of the water. Even if you turn the cup upside down, the layers rearrange to the original order due to their different densities. If you did the extra activity about weight described in the Further Exploration section, you should have found that corn syrup was the heaviest, followed by water, and then the vegetable oil.
The objects that you dropped into Cup 2 settled in the density column depending on their own densities. The rubber band piece probably settled on top of the corn syrup, whereas the penny fell all the way to the bottom of the cup. The wax should have rested on top of the water layer, and the Styrofoam should have floated all the way on top of the vegetable oil. Finally, if you shook Cup 1 really hard, you might have observed that the vegetable oil still separated and floated on top, but the corn syrup and the water layer started to mix and did not separate very easily anymore. This is due to the miscibility of the different liquids. If liquids have a very different chemical structure that makes one polar and the other one unipolar, they will not mix and will always stay separate. This is true for oil, which is an unpolar liquid, and water, which is a polar liquid. Corn syrup, on the other hand, has the ability to mix with water and thus, can dissolve in it. This is what happened when you shook the cup really hard.
You can experiment with many more objects and liquids to create even more layers; it is just a matter of density that will determine where they settle in your density column!
Digging Deeper
Whether an object sinks or floats depends on its density compared to the density of the liquid into which it is dropped. All types of matter—solids, as well as liquids—are made up of many different atoms. Depending on the mass of these atoms, their size, and the way they are arranged, different substances will have different densities. The density is different for each individual compound and defined as the mass of a compound divided by its volume. In other words, the more matter there is in a certain amount of volume, the denser a substance is. One cubic centimeter (cm³) of rock, for example, is much heavier than 1 cm³ of wood. This is because there is much more matter in the same volume of rock compared to the wood.
Liquids can also have different densities. Freshwater, for example, has a density of about 1 g/cm³ at room-temperature. Any substance—either liquid or solid—that has a higher density than water will sink, whereas substances with a lower density than that will float.
Ask an Expert
For Further Exploration
- With three liquids (vegetable oil, corn syrup, and colored water), there are six different combinations for adding the different layers on top of each other. Try all the combinations and change the order of adding the different liquids each time. Will you always end up with the same layering result?
- In this experiment, you had three layers of different liquids. Can you find other household liquids that might make a fourth or fifth layer? Some liquids to try are rubbing alcohol or dish-washing soap. Where do you think they will settle in your density column?
- You can even make a density column using the same liquid, such as water. You just have to change its density by adding different amounts of salt or sugar to it. Try three different layers of water (same volume of water, but one with 1 teaspoon (tsp.) of salt or sugar, one with 2 tsp. of salt or sugar, and one with 3 tsp. of salt or sugar). Add different colors to each liquid to see the layers more clearly. Which layer is on the top and which layer on the bottom? How does the amount of salt or sugar change the density of the water? What will happen this time if you shake the cup or turn it upside down?
- Try to find different objects that might sink or float in the different layers of your density column. In which layer will they settle?
- You can find out how much the densities of the three liquids vary by pouring the same volume of each liquid into a different cup and then weighing each of them. How much do the masses differ? Do these results agree with your findings of how the liquids are layered?
Related Resources
Project Ideas

Activities

Lesson Plans

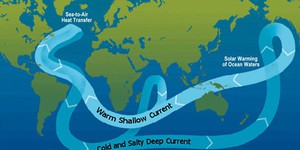
- MS-ESS2-6. Develop and use a model to describe how unequal heating and rotation of the Earth cause patterns of atmospheric and oceanic circulation that determine regional climates.