Summary
Introduction
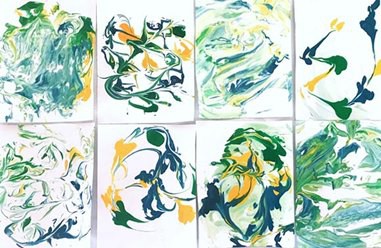
Do you like both, arts and science? Then this is the perfect activity for you! You will create beautiful marbled paper cards and practice science at the same time! The only materials you need are shaving cream, food coloring, and sheets of paper. It might get a bit messy, but that is part of the fun!
Materials
- Two large plates
- Shaving cream (not gel)
- Liquid food coloring (at least two different colors)
- White printer paper or cardstock paper
- Medical dropper
- Scissors
- Spoon
- Toothpick
- Jumbo craft stick
- Paper towels
- Spray bottle
- Water
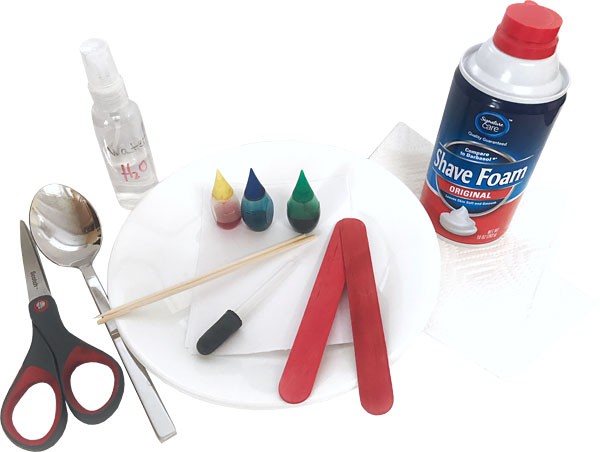 Image Credit: Svenja Lohner, Science Buddies / Science Buddies
Prep Work
- Place the two plates next to each other on a workspace that can tolerate shaving cream spills.
- Cut two letter-sized pieces of paper in half crosswise. Then fold each in half, creating four cards.
- Put water in the spray bottle and set it aside.
Instructions
- Put shaving cream on the two plates and spread it out with your hands or a spoon to create a layer with an area at least as large as your paper card and a depth of about half an inch thick.
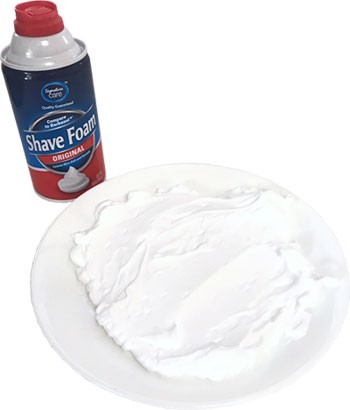 Image Credit: Svenja Lohner, Science Buddies / Science Buddies
- Take the first color of your food coloring and add several drops on top of the shaving cream using either a medical dropper or dripping it straight from the bottle. Do this with both plates.
 What happens to the food color once it drops on top of the shaving cream? Does it mix with the foam, sink into it, or stay on top?
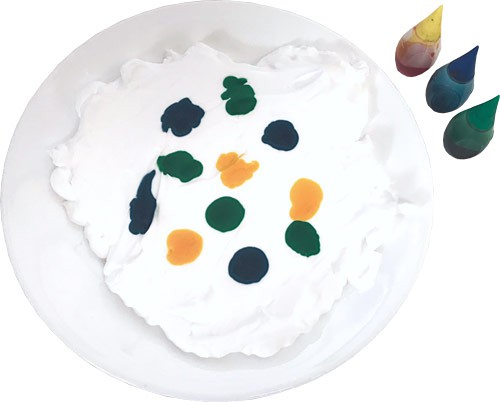 Image Credit: Svenja Lohner, Science Buddies / Science Buddies
- Repeat step two with all other food colors that you want to use.
- Next, take the toothpick and carefully swirl around the color in the shaving cream until you have created a color pattern that you like. Try not to overmix the colors.
What happens when you swirl the colors around? Do they mix with the shaving cream, or do they stay separate?
 Image Credit: Svenja Lohner, Science Buddies / Science Buddies
- Use the spray bottle to spray some water on top of the color pattern on one of the plates. Use at least 5-10 pumps of water. Then let the foam sit for about one minute.
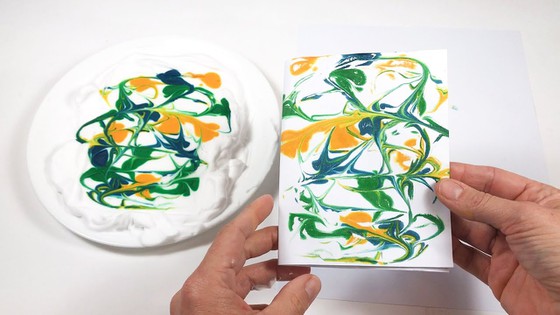
- Finally, place your first card with the front side facing down on top of the shaving cream and press it lightly so that the whole card is covered by the shaving cream.
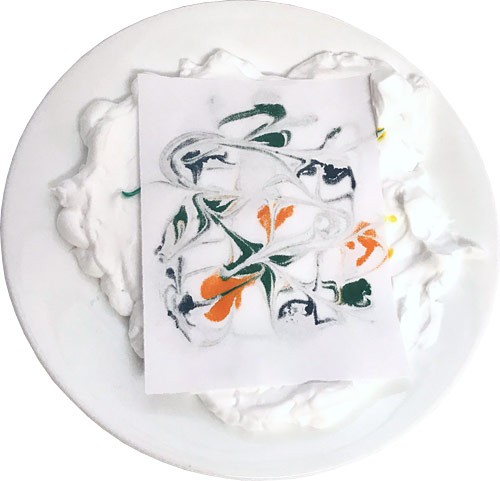 Image Credit: Svenja Lohner, Science Buddies / Science Buddies
- Repeat step six with the second card and the second plate.
- Carefully remove both cards from the shaving cream, turn them around and scrape the remaining shaving cream from the card's surface with a craft stick or remove it with a paper towel.
What do you see on the paper once the shaving cream is removed? Do you notice a difference between the two cards? Can you explain your results?
- Let the cards dry. If the paper wrinkles, you can ask an adult to iron it with an iron on the lowest heat setting and another sheet of paper between your card and the iron.
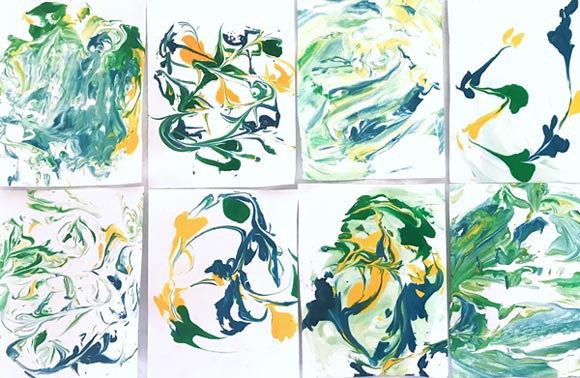 Image Credit: Svenja Lohner, Science Buddies / Science Buddies
Cleanup
- Use paper towels to remove the shaving cream from the plates and dispose of everything in the trash. After you rinse the plates with hot water and soap, you can reuse them. Don't throw away your cards—you might want to use them for your friends or family!
What Happened?
Were you able to make beautiful marbled paper cards? The shaving cream marbling methods works very similarly to the other paper marbling techniques methods described in the Explore More section. Shaving cream is made of a mixture of soap and water with a gas that can turn liquid into foam when you spray it out of the bottle. Soap is a surfactant, which means its molecule has a hydrophilic (water loving) and hydrophobic (water repelling) end. Liquid food coloring is a mixture of dye in water or alcohol, and therefore is hydrophilic. When you drop the food coloring on the shaving cream, it won't get soaked in, as it can only interact with the hydrophilic parts of the soap molecules and is repelled by the hydrophobic parts. Even if you swirl the colors with a toothpick, you still see a distinct separation between the color and the shaving cream.
When you put the paper on top of the color pattern, the food dye gets soaked into the paper, transferring the whole pattern onto its surface. This is because paper is made from wood pulp, which mainly consists of cellulose found in cell walls of green plants: a hydrophilic molecule. The hydrophilic food dye can spread easily across the paper, creating a beautiful marbled pattern. However, when you spray water on top of your pattern before you put the paper on top, the food dye mixes with the water and is carried into the deeper layers of the foam. You might have noticed that your color pattern looked washed out after adding the water. The pattern on the paper does look much more faint than the other one—but is it just as beautiful!
Digging Deeper
Paper marbling is an artistic method in which colors floating on a liquid surface are transferred onto paper to create a marbled pattern. The art of paper marbling dates back to the 10th century where Japanese artists developed a technique called "suminagashi," which means "floating ink." Oil-based ink is dropped into a shallow pan of water where it floats on the surface. Next, paper is laid on top of the floating ink and the color transfers to the paper's surface.
Another paper marbling method that originated in Turkey and Central Asia involves a thick liquid, called size, made from substances such as carrageenan or cornstarch. In this method, the liquid has to be thickened as the colors used are water-based and would otherwise not float. To make the colors float and spread even better, they are mixed with surfactants then dropped onto the size, which results in a pattern of floating color that can similarly be transferred onto paper.
Although they might not have known it then, this art technique involves a lot of science! The colors float because they are less dense than water. It is also important that the colors and the water do not mix. Whether a liquid mixes with another depends on their individual molecular structures. The molecules that make up a liquid can be either polar or nonpolar. The simple rule "like dissolves like" says that polar substances dissolve in polar liquids and nonpolar substances dissolve in nonpolar liquids. Water is a polar substance while oil is nonpolar, which is why they don't mix.
Substances that dissolve in water are called hydrophilic and substances that do not are called hydrophobic. Surfactants are added to the colors because they influence their spreading behavior. Surfactants are special molecules that have a hydrophilic and a hydrophobic end, allowing them to spread out better by decreasing the surface tension of water. Surface tension holds the water molecules together at the surface as water molecules are slightly attracted to one another; at the water's surface, they are more attracted to the other molecules around them than to the air above. This forms a thin "skin" of strongly attracted water molecules that are difficult to break through.
Ask an Expert
For Further Exploration
- As this is an art as well as a science activity, try to play around with more colors, different swirl patterns, and different sizes of paper. How many different patterns can you create?
- What happens if you spray oil or rubbing alcohol instead of water on top of your color pattern? Will your results differ? Get some vegetable oil and alcohol to find out!