Soil Science: Study Microorganisms in Winogradsky Columns
Summary

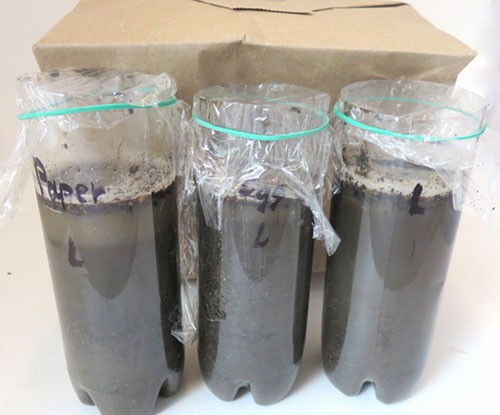 Image Credit: Sabine De Brabandere, Science Buddies / Science Buddies
Introduction
Our planet recycles and reuses everything on it that is needed to support life. It is an amazing, giant recycling system called the biogeochemical cycle. You can actually model this on a small scale by using a plastic bottle and mud to build what is called a Winogradsky column. In this activity, you will build your own Winogradsky columns and investigate how including different nutrients can affect which soil microorganisms flourish and which fail.
Materials
- Four clean plastic water bottles, 500 milliliters each. Bottles that have smooth sides (no ridges), and are taller and narrower in shape work best.
- Scissors
- Knife (optional)
- Permanent marker
- Ruler
- Rubber boots and old clothes that can get muddy (optional)
- Access to a muddy stream, pond, lake, or marsh
- Gloves
- Shovel or trowel
- Two buckets
- Newspaper (1/4 sheet) or an equal amount of plain paper shredded into tiny rectangles.
- An egg yolk
- Two large mixing bowls
- Measuring cup
- Wide stick, for packing mud into the bottles
- Measuring teaspoon
- Adjustable desk lamp with 13-watt compact fluorescent bulb (optional)
- An empty surface, such as on a desk or table, that is at a warm room temperature (about 72 to 78 degrees Fahrenheit). It should not receive any direct sunlight, but if you are not using a desk lamp, the area should be near a very sunny window.
- Plastic wrap
- Plastic trash bags or grocery bags
- Four rubber bands
- Cardboard box or brown paper bag
- Flashlight
 Image Credit: Sabine De Brabandere, Science Buddies / Science Buddies
Prep Work
- Note: You might get some raw egg or mud on your hands in this project. Remember to wash your hands well after handling these materials. Clean up your work area and tools as well.
- Remove any wrappers from the four water bottles as best you can.
- Carefully cut the tops off your bottles right where the bottle starts curving inward near the top. Save the cut off tops to use as funnels later. You may need to use scissors and a knife to do this, and an adult might need to help.
 Image Credit: Sabine De Brabandere, Science Buddies / Science Buddies
- Using a permanent marker, make a small mark where your bottle would be about 85% full. For example, if your bottle is six inches tall, you would make a mark at about five inches up from the bottom. You will fill the bottles to this level with mud.
- Label each bottle with what will be added to the mud. One will have shredded paper added, one will have egg yolk added, and two will only hold plain mud. One of the plain bottles will be kept in the dark, while the other three bottles will be exposed to light.
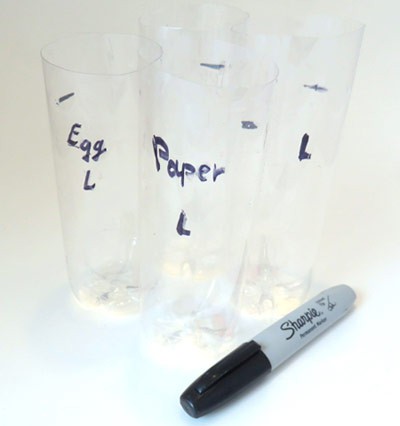 Image Credit: Sabine De Brabandere, Science Buddies / Science Buddies
- Go collect mud and water from a muddy stream, pond, lake, or marsh. Make sure to have adult supervision and use caution around the water. You may also want to first put on some rubber boots and clothes that can get muddy. Put on gloves and fill one bucket with about one-half to one gallon of mud, scooping it mostly from just below the water's surface. In the other bucket, collect a half gallon of water from the same location.
- Bring your buckets home and put them in the shade or a cool spot until you use them. Go wash up if needed!
Instructions
- Add one teaspoon (compacted) of shredded paper to a mixing bowl. This will be a source of carbon for the microbes in the mud.
 How do you think adding carbon will affect the microbes that grow in the Winogradsky column?
 - In the second bowl, add one third of an egg yolk (raw or hard-boiled). If it is hard-boiled, mash the yolk. If it is raw, be sure to wash your hands after handling it, as raw eggs may contain salmonella bacteria. The yolk will be a source of sulfur for the microbes in the mud.
How do you think adding sulfur will affect the microbes that grow in a Winogradsky column?
- Put on gloves and get your buckets with mud and water. While stirring, slowly add the water you collected to the mud until your mixture has the consistency of a milkshake. While stirring, be sure to pick out all sticks, leaves, and rocks from the mud.
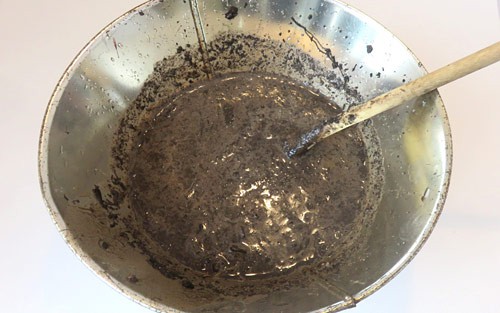 Image Credit: Sabine De Brabandere, Science Buddies / Science Buddies
- Take the two large mixing bowls, one with shredded paper and one with egg yolk, and scoop two cups of mud into each. Mix well.
- Using a cut off bottle top as a funnel, pour about one inch of the mud mixed with paper into the correctly labeled bottle. Tap the bottle on a hard surface to pack the mud down, and use a wide stick to pack the mud more. Continue adding about one inch of mud at a time and packing it down until you are at the 85% full mark you made. Set the bottle aside.
 Image Credit: Sabine De Brabandere, Science Buddies / Science Buddies
- Take the bowl with mud mixed with egg yolk. Remix the mud. Using a cut off bottle top as a funnel, pour and pack about one inch of this mud mixture at a time into the correctly labeled bottle until you are at the 85% mark. Set the bottle aside.
- Take the two remaining bottles, which should be labeled as having plain mud. Remix the remaining mud in the bucket, then funnel and pack this mud directly from the bucket into these two bottles until they are 85% full.
- After sitting about 30 minutes, a water layer of about 0.2 to 0.87 inches deep should be sitting on top of the mud in each bottle. Carefully add or remove water as needed. Leave at least 0.2 inches of empty space at the top.
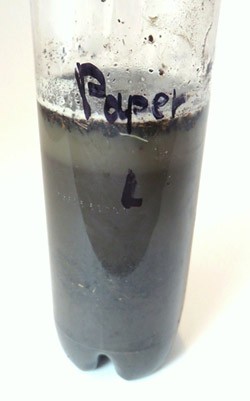 Image Credit: Sabine De Brabandere, Science Buddies / Science Buddies
- Cover each bottle with plastic wrap and secure with rubber bands.
- Find an empty flat surface, such as a desk or tabletop, that is at a warm room temperature (about 72 to 78° F). It should not receive any direct sunlight. If you are not using a desk lamp, the area should be near a very sunny window. Cover the surface with plastic bags to protect it.
- Move your bottles to the surface, being careful not to spill! Your Winogradsky columns are now ready for testing!
Image Credit: Sabine De Brabandere, Science Buddies / Science Buddies
- If you are not using a desk lamp, arrange the three Winogradsky columns (that will receive light) so that they will receive a lot of light, but they should not be exposed to direct sunlight. If you are using a lamp, arrange the three columns so that they are 20 inches away from the lightbulb. For those bottles that are being lit by lamp, turn these bottles so the indication "L" on the sides of the bottles face the lamp.
What do you think will happen on the sides facing the light?
- Set the Winogradsky column with plain mud that will not receive light on a surface at room temperature. Then, either place a cardboard box upside down over the column or put it in a brown paper bag so that no light reaches the bottle.
What do you think will happen in the column that does not receive any light?
- For the next six to eight weeks, leave the Winogradsky columns where you set them. If you are using one, keep the desk lamp on 24 hours a day. If a plastic wrap lid comes loose, reattach it with a rubber band. Observe the columns once a week, looking for color changes. To see the colors better, try turning off the lights and shining a bright flashlight at the columns.
What colors do you see appear in the columns? Where in the columns do they appear? How do the columns look different from one another? What could the colors indicate? Do you see any worms, shrimp, snails or other larger organisms in the columns?
- After one to two weeks, you should see some green coloring on some columns. You may need to look closely for it. If you do not see any green coloring, the columns may not be receiving enough light. You could try moving them closer to the light source.
- Each area of a particular color should be a group of the same type of microbes.
Do you see different colors appear in the columns? Where in the columns do they appear? How do the columns look different from one another? How do the columns change over time? What do you think your results have to do with what was added (or not added) to the columns? What happens to the column that was kept in the dark? Can you explain these observations?
Cleanup
What Happened?
Did the columns in the light show green areas on the sides facing the light, while the column in the dark remained dark brown? Did the three columns that were in the light create color patterns that were somewhat different from one another?
An ecosystem is a system with living and nonliving parts that interact together. The four Winogradsky columns each had their own ecosystem. The nutrients and/or the availability of light was different in each column, and as a result, different microbial species flourished in each column.
Over time, a gradual change in the availability of different nutrients should have formed in the Winogradsky columns. These differences affect where different microbes grow within the columns. For example, over time, there is more oxygen at the top of a column next to the air that at the bottom; this means that microbes that can tolerate or make oxygen will be at the top. Microbes that cannot tolerate free oxygen (called anaerobic bacteria) will be further down. Similarly, microbes that need light to make energy (via photosynthesis or a similar process) will need to live where they can get light in the column.
Digging Deeper
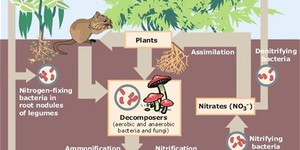
To live and grow, organisms need specific nutrients nearby for them to eat—just like we do. Most of these nutrients are continuously being moved through a biogeochemical cycle, which transports nutrients and other chemicals through the living and nonliving parts of Earth. For example, iron that was once in a rock might later enter the soil where it can be absorbed by a plant and then eaten by an animal. The biogeochemical cycle is a closed system, which means that the nutrients are not lost or created; they are continuously reused and recycled.
A given ecosystem might have several biogeochemical cycles going on within it. Some important nutrients that are recycled through an ecosystem are oxygen, carbon, and sulfur. Different soil microbes play key roles in recycling these and other nutrients. A tool that microbiologist Sergei Winogradsky invented to study these processes was a long, sealed column of muddy soil, now called a Winogradsky column. Within one of these, different gradients form. A gradient is a gradual change in concentration. For example, over time, there is more oxygen at the top of the column than at the bottom. A gradient in light exposure can exist too. These gradients affect where different microbes can live within the column.
After about one to two weeks, depending on how much light the columns receive, some green coloring should appear on the illuminated sides in the columns receiving light. This is mostly due to cyanobacteria and algae, which need light. The column in the dark should remain dark brown. In the column that had egg yolk, you may have seen areas of darker green, purple, and/or black coloring develop over time near the bottom—these colorings could be groups of certain anaerobic bacteria: green sulfur bacteria, purple sulfur bacteria, and sulfate-reducing bacteria, respectively. Sulfate-reducing bacteria actually eat sulfur and make hydrogen sulfide gas, which is eaten by the green and purple sulfur bacteria. In the column that had newspaper you may have seen some areas of brown, orange, red, or purple near the middle—these colorings could be groups of purple non-sulfur bacteria, which need a carbon source to thrive. You may have seen worms, snails, shrimp, or other small organisms in the water, but probably not many (if any) in the bottle with the egg yolk, because hydrogen sulfide is toxic to most organisms!
Ask an Expert
For Further Exploration
- Do this activity again, but this time, test multiple bottles for each condition. For example, test three Winogradsky columns with egg yolk. How reproducible are your results? Is there a lot of variation between the different columns that were set up the same way and are kept in the same conditions?
- Try testing several different sources of mud or soil to see if the microbial growth is different from location to location. You could even try some beach sand. What do you think your results tell you about the soil quality and microbes that live at each site you test?
- Test different kinds of additives or place them in different conditions to look for microbes that live in unique and challenging environments. For example, you could test increasing amounts of salt in a series of Winogradsky columns to test for salt lovers (called halophiles) or place columns at different temperatures to find microbes that like heat (near a heat vent) or cold (in the refrigerator). Can you select for microbes that live in more extreme conditions?