Build an Earthquake-Resistant House
Summary
Overview
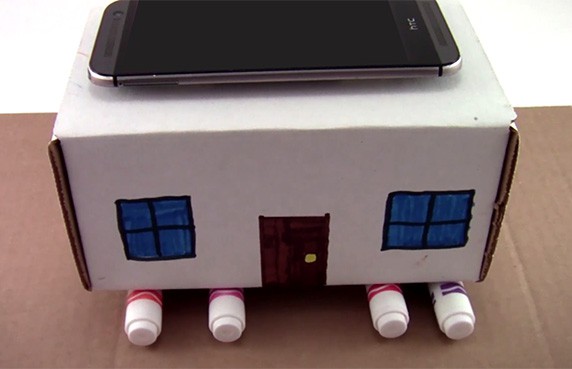
Explore how technology can save lives in this fun engineering lesson plan! Earthquakes can cause devastation and loss of life when they strike, but earthquake-resistant buildings can stay standing and keep people safe. In this project, your students will build model earthquake-resistant buildings and measure their movement during a simulated earthquake using a mobile phone and a sensor app. A French translation of this activity is available.Learning Objectives
- Analyze data from simulated earthquake tests to determine how well a base isolation system performed.
- Understand that technology can reduce the impact of natural disasters on humans.
- Compare the test data from two competing solutions and determine which solution was better.
NGSS Alignment
This lesson helps students prepare for these Next Generation Science Standards Performance Expectations:- MS-ESS3-2. Analyze and interpret data on natural hazards to forecast future catastrophic events and inform the development of technologies to mitigate their effects.
- MS-ETS1-2. Evaluate competing design solutions using a systematic process to determine how well they meet the criteria and constraints of the problem.
|
Science & Engineering Practices
Analyzing and Interpreting Data. Analyze and interpret data to determine similarities and differences in findings.
Constructing Explanations and Designing Solutions. Apply scientific principles to design an object, tool, process, or system. Engaging in Argument from Evidence. Evaluate competing design solutions based on jointly developed and agreed-upon design criteria. |
Disciplinary Core Ideas
ESS3.B: Natural Hazards. Mapping the history of natural hazards in a region, combined with an understanding of related geologic forces, can help forecast the locations and likelihoods of future events.
ETS1.B: Developing Possible Solutions. There are systematic processes for evaluating solutions with respect to how well they meet the criteria and constraints of a problem. |
Crosscutting Concepts
Patterns. Graphs, charts, and images can be used to identify patterns in data.
Stability and change. Stability might be disturbed either by sudden events or gradual changes that accumulate over time. |
Materials
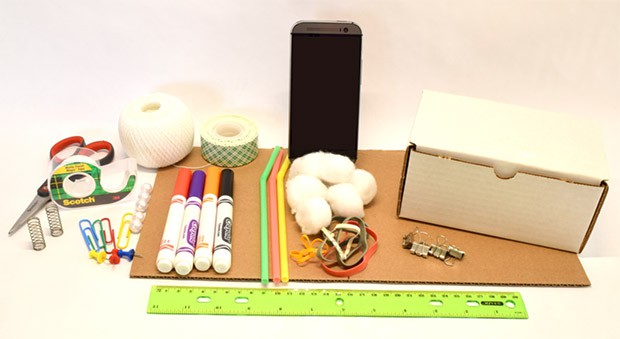 Image Credit: Ben Finio, Science Buddies / Science Buddies
A cardboard box is used to simulate a house. A sheet of cardboard that is larger than the cardboard box is used for the tabletop. Scissors, tape, yarn, springs, paperclips, thumb tacks, markers, straws, rubber bands, cotton balls and binder clips are used to construct the tabletop. A ruler and stopwatch app on a smartphone are used to measure the shaking of the tabletop.
Testing Station (at least 1 per class, more if you have multiple phones available)
- Smartphone with a sensor app such as phyphox, available for free on Google Play for Android devices (version 4.0 or newer) or from the App Store for iOS devices (iOS 9.0 or newer).
- Double-sided foam tape
- Stopwatch
- Ruler
For each group of 2–4 students:
- A standardized object to use as a "house." For example, small cardboard boxes or plastic food storage containers. See the Lesson Plan Variations section for ideas on how students can build their own houses.
- Piece of corrugated cardboard that is larger than the base of the "house"
- Materials to build an earthquake-resistant base:
- Corrugated cardboard
- Assorted round objects to use as rollers: markers, marbles, etc.
- Assorted shock-absorbing objects: rubber bands, cotton balls, erasers, springs (you can get springs at a hardware store or by disassembling ballpoint click pens), etc.
- Assorted attachment materials: pushpins, binder clips, paper clips, straws, string, stapler, etc.
- Object that is about the same weight as the phone (box of pencils, plastic baggie full of coins, etc.)
- Masking tape or Scotch® tape
- Scissors
- Ruler
- Stopwatch
Background Information for Teachers
This section contains a quick review for teachers of the science and concepts covered in this lesson.Earthquakes can cause loss of life and devastating damage to buildings, yet many of the world's most populous cities are in earthquake-prone regions. To save lives and reduce damage to buildings, engineers have developed various techniques to make buildings earthquake-resistant. One method involves putting a building's foundation on bearings that allow the whole building to move (technically called a base isolation system). There are several different kinds of earthquake-resistant bearings (see the Additional Background section for details), but in general, they have a few common features:
- They isolate the building's base from the movement of the ground, allowing the building and ground to move independently of each other.
- They have a restoring force (like a spring) that returns the building to its original position after an earthquake.
- They have damping (friction) that helps absorb energy from the earthquake and prevent the building from oscillating back and forth for a long time.
The bearings function very similarly to shock absorbers on a car. When you drive over a big speed bump or pothole, the shock absorbers help prevent the vibration from being transferred to the people riding in the car. Similarly, bearings help prevent sudden movements of the ground from transferring to the building itself.
Engineers test their earthquake-resistant designs using shake tables, special tables that simulate the effects of earthquakes on scaled models. Figure 1 shows two buildings on a shake table. The building on the left is attached directly to the ground, and the one on the right has a base isolation system. Notice how the building on the left wobbles significantly as the table shakes. However, the building on the right stays upright and appears to mostly stay in place as the table moves back and forth under it.
 Image Credit: Wikimedia commons, User: Valentin Shustov / Creative Commons Attribution-Share Alike 3.0 Unported
The buildings in this model are identical but they are built with different bases. The building on the left sways more violently because its base is built directly on the foundation. The building on the right has noticably less sway because there are rollers that separate the base of the building from the shaking foundation.
Figure 1. Shake table test of a building with a fixed base (left) and a building with a base isolation system (right). Image credit Wikimedia Commons user Valentin Shustov, 2011.
In this lesson, your students will design and build their own base isolation systems for standardized buildings (like equal-size cardboard boxes), and a simple hand-powered shake table (using a ruler and stopwatch to standardize how much and how fast they shake). One way to measure the effectiveness of a base isolation system (or any other type of earthquake-resistant modification) is to do destructive testing—keep shaking the table harder until the building collapses. However, for non-destructive testing, you can measure how much the building moves using an accelerometer, a device that measures acceleration in meters per second squared (m/s²). Your students will do this using their mobile phones and a sensor app, which allows you to record data using the phone's built-in accelerometer. A building that is attached directly to the ground will experience much larger peaks in acceleration (Figure 2, left) than a building with a successful base isolation system (Figure 2, right).
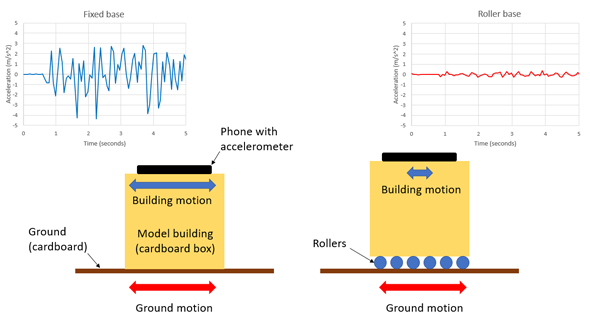 Image Credit: Ben Finio, Science Buddies / Science Buddies
Two diagrams showing acceleration of buildings with fixed and roller base configurations. The left diagram shows the acceleration of a fixed base building over time. Large variations in the acceleration of the fixed base building represent severe swaying during the shake table test. The right diagram shows the acceleration of a roller base building over time. The acceleration of the roller-base building has minimal variations representing less movement during the shake table test.
Figure 2. Example acceleration data recorded with a structure attached directly to the ground (left) and a structure on rollers that serve as a base isolation system (right).
In this project, your students will follow the engineering design process. The engineering design process is an iterative process where students design, build, and test their containers. It is important for students to understand that there is no single "right answer" to an engineering project. There are multiple possible solutions to the problem, and it is OK if their designs do not work very well on the first try. Part of the process is redesigning, rebuilding, and retesting your system based on what you learn from your initial tests.