Building Bristlebots: Basic Toothbrush Robotics
As this mom discovered, with a bag of toothbrushes and some basic electronics supplies, you can give a group of kids a fun introductory robotics experience—no prior robotics expertise necessary!
Since the BristleBots robotics project first appeared at Science Buddies, I have wanted to try these little toothbrush-head bots with my kids. The light-tracking robot project appeared shortly after the more ubiquitous brush bot. The light-tracking bot is more complicated, but I marked it, pinned it, and put it on my to-do list of hands-on science projects for my kids.
The regular BristleBots were first up.
Hacking for Parts
Initially, I thought I might be able to scrounge up motors from old phones for the BristleBots, giving our robotics exploration a healthy dose of recycling, upcycling, and reuse mentality. I was especially keen to do that when I realized the required motor wasn't readily available. (Note: Science Buddies is working to put in place a reliable source for these motors to make acquiring the parts easier.)
With the best of green intentions, I fished an old phone from the kitchen junk drawer to see if I could salvage a motor. Getting my old clamshell apart was far more complicated than I expected. As I started dismantling, I quickly realized I don't have the all-important Torx (star) tool! Given that, my methods were substantially more crude, but layer by layer, I got the phone apart. I finally unearthed the vibrating motor only to discover it had no wires. I needed wires, and I don't have a soldering iron (and wasn't planning to use one for the project with the kids).
After a surprising amount of brute force to break my old phone, I was back to square one with the motors and glad I had tackled the phone well in advance as I sorted out what I needed to order for our summer science.
I compiled a list of parts needed for the two robotics projects, ordered what I could, and stopped in at a local Radio Shack to pick up one final electronics piece (x3).
Shopping for Tootbrushes
Finding the toothbrushes ended up being almost as complicated as gathering the electronics supplies. I spent a lot of time scouring online sites and comments on blog posts to try and figure out what kind of angled brush heads were commonly used. For a full independent student science project, a student might explore the effectiveness of different types of heads and bristles. But as a parent coordinating two separate toothbrush-dependent, hands-on robotics activities for three kids, I needed nine toothbrushes. I was on a budget, and I wanted to try and get toothbrushes that would "work" so that the focus of our activity was on the electronics and basic wiring rather than on evaluating brush heads. I didn't want the type of brush to be an experimental variable. I went with slanted bristles.
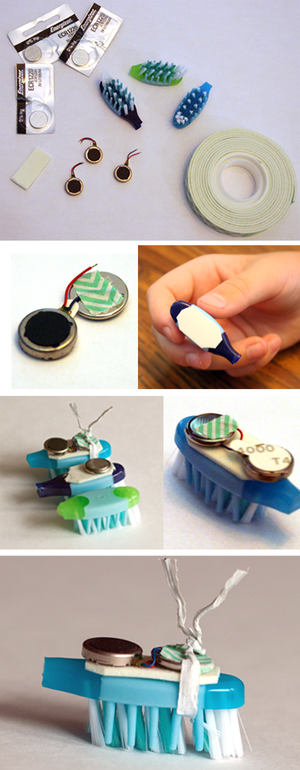
If you plan to make toothbrush bots with a bunch of kids, make sure you note ahead of time that angled brush heads are not the cheap ones! Angled brushes may run, on average, several dollars a piece, so while BristleBots can be fun for a sleepover or a birthday party, you may need to buy in bulk, or else experiment with other brush heads before you buy for a crowd. Will a straight head work well or well enough for your purpose? (If you look carefully at the photos above, you will see the slanted bristles and the row of rubber tips on the outer edge of our bots—pretty common BristleBot fare!)
Home Robotics 101
Parts in hand, we settled in to make BristleBots. Having read the Project Idea several times, written about it several times, and watched the Evil Mad Scientist Laboratories video, I fully expected this to be a project the kids would whiz through in about five minutes. Part of me was worried that it might be anticlimactic precisely because of the low-level of difficulty, but I wanted to do these BristleBot explorations back to back, the easiest one as a stepping stone into the more sophisticated light-tracking one.
I am not sure now what happened when I was ordering... but as we sat down to make the BristleBots, and I sorted out the supplies, I realized we had a pack of pancake motors but none of the oblong ones that the procedure specifies. This was definitely a parental "oops" moment on the supplies front, but working on a project like this with kids requires flexibility.
We plowed ahead.
Less than an hour later, we had three BristleBots that worked, on and off. We had to continually fidget with them to get them to stay on or come on. I was doing more of the tweaking than they were, but it gave us a chance to talk about what the problem was (not enough constant pressure on the battery with the wire on each side) and brainstorm ways to address it. We tried tape. We tried more tape. We tried pressing harder. We found that sometimes very light pressure worked best. These bots were a bit finicky. There was a lot of trial an error. We would get one working, let it loose on the table, and the next one would stop!
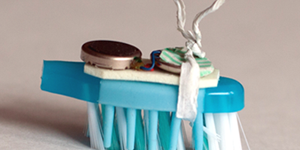
We finally tried something that worked wonders—a twist tie from a plastic bag. This helped us maintain consistent pressure on the contacts. Other solutions could also work, and finding your own is part of the challenge and the fun of a robotics or engineering project!
About the time we got our twisty ties solution in place, the first battery died. And then the second. Two brand new batteries died in under a half hour. Chalk that up as one less than happy parent with a bulk battery purchase!
But, the bots worked. The kids had fun. And, in the end, I was far more appreciative of the off-the-shelf bugs these bots simulate. I always thought they were overpriced, but there is a reality to the fact that when flipped on, they run!
Even so, making our own BristleBots was an awesome first-time, non-kit robotics experience with kids of differing ages and with varying levels of hands-on tinkering and electronics experience.
Tips for Your Own Robotics Activity
Here are a few pointers gleaned from our BristleBot building:
- Big scissors. Snipping off toothbrush heads isn't easy! We ended up using some rather giant hedge shears. Plan ahead. Be fearless.
- Trim with care. Be careful trimming your bristles. (Say this over and over to your young engineers, especially eager ones.) While some trimming can change the way your bot moves, you can trim too much and cause your bot to not be able to stand up.
- Get hands on. Experiment before taping anything in place to see how the vibrating motor works. This is the basic electronics lesson of your activity! Put one wire on each side and press. It should vibrate. Don't worry, it won't hurt or shock you! Feeling how the wires get pressed to the battery to make the motor work will help your students better understand what to tinker with to make the right "contact" when the battery is on the bot.
- Tinker. Test. Tinker again. If you are having trouble getting the motor to work on the bot, experiment with the placement of the wires on each side of the battery. You can tape and re-tape them as many times as you need to. You might also try securing them differently or more tightly. Just remember, to turn the bot "off," you will need to be able to "undo" the connection easily.
- Keep the conversation going. Talk about what the bot does as it moves around and why. This is a pretty low-key and not overly-smart bot. But when it runs into something, it does gradually adjust and work its way to a clear path. Talking about what you observe helps your students practice articulating what they see and encourages them to think about and apply what they know.
- Create a race path. How smart and how fast are your toothbrush-head bots? After the building is over, have the kids build a maze or race course to test and race the bots. Cardboard, recycled tubes taped together, wooden sticks, straws, even LEGO® can all be used to develop a cool pathway for the bots to navigate. As you and your students watch the bots move, you will find you have new things to talk about!
- Personalize and customize! Once your bot works, it is easy to personalize it and make it your own. Add eyes! Add antennae! Add this or that to give your BristleBot your own style.
Have fun!
Share Your Family Science or School Science Project
Categories:
You Might Also Enjoy These Related Posts:
- 15 STEM Gifts & Science Kits You'll Feel Good About Giving
- 13 Boat Science and Submarine Science Projects and Experiments
- July 4th STEM! Summer Science Picks for Independence Day!
- 12 Science Kits for Summer Science Experiments and Discovery
- 15 Science Projects to Make and Give for Father's Day
- Ready, Set, Go! (Awesome Summer Science Experiments)
- Awesome Summer Science Experiments
- 10 STEM Activities with Cardboard Tubes


