/-/https/www.sciencebuddies.org/cdn/Files/21464/5/sb-logo.png)
/-/https/www.sciencebuddies.org/cdn/Files/21464/5/sb-logo.png)
Summary
/-/https/i.ytimg.com/vi/l-VWX6ndGpA/hqdefault.jpg)
/-/https/www.sciencebuddies.org/cdn/Files/20511/4/google-classroom.png)
/-/https/www.sciencebuddies.org/cdn/Files/20512/4/ms-teams.png)
/-/https/www.sciencebuddies.org/cdn/Files/20469/4/Canvas_Bug_Color_RGB.png)
/-/https/www.sciencebuddies.org/cdn/Files/20470/5/Schoology-Logo.png)
/-/https/www.sciencebuddies.org/cdn/Files/20471/4/lms.png)
/-/https/www.sciencebuddies.org/cdn/Files/20469/4/Canvas_Bug_Color_RGB.png)
/-/https/www.sciencebuddies.org/cdn/Files/20470/5/Schoology-Logo.png)
/-/https/www.sciencebuddies.org/cdn/Files/20471/4/lms.png)
/-/https/www.sciencebuddies.org/cdn/Files/8872/10/junkbot.jpg)
Overview
Junkbots are easy-to-build robots that you can make using a simple circuit and some recyclable materials. In this lesson, your students will learn about engineering design as they compete to build the fastest robot. No previous robotics experience is required!Learning Objectives
- Understand the difference between open, closed, and short circuits.
- Apply the engineering design process to iteratively test and improve a robot.
NGSS Alignment
This lesson helps students prepare for these Next Generation Science Standards Performance Expectations:- MS-ETS1-4. Develop a model to generate data for iterative testing and modification of a proposed object, tool, or process such that an optimal design can be achieved.
|
Science & Engineering Practices
Engaging in Argument from Evidence. Evaluate competing design solutions based on jointly developed and agreed-upon design criteria.
|
Disciplinary Core Ideas
ETS1.B: Developing Possible Solutions. A solution needs to be tested, and then modified on the basis of the test results, in order to improve it.
|
Crosscutting Concepts
Cause and Effect. Cause and effect relationships may be used to predict phenomena in natural or designed systems.
Structure and Function. Structures can be designed to serve particular functions by taking into account properties of different materials, and how materials can be shaped and used. |
Materials
/-/https/www.sciencebuddies.org/cdn/Files/8873/10/junkbot-materials.jpg)
To build a junkbot you will need a motor, a battery pack, and two double A batteries. Other household items include a cardboard box, glue, rolls of tape, scissors, plastic cup, plastic bottle, cork, popsicle sticks, paper clips, plastic straws, metal cans, and a cardboard tube.
For each student or small group of students building a robot, you will need these items in the Art Bot Kit from our partner Home Science Tools® (also available as a 5-pack or 20-pack classroom kit):
- Motor (1)
- AA batteries (2)
- Battery pack (1)
For the entire class, you will need:
- Assorted recycled materials (cardboard, clean plastic bottles, etcetera)
- Assorted craft materials (pipe cleaners, googly eyes, etcetera)
- Corks
- Scissors
- Tape
- Glue
- Small Phillips head screwdrivers
- Optional: hot glue guns (adult supervision recommended for young students)
- Optional: hobby knives (adult supervision recommended for young students)
- Open floor space on a smooth surface (not carpet)
Disclaimer: Science Buddies participates in affiliate programs with Home Science Tools®, Amazon.com, Carolina Biological, and Jameco Electronics. Proceeds from the affiliate programs help support Science Buddies, a 501(c)(3) public charity, and keep our resources free for everyone. Our top priority is student learning. If you have any comments (positive or negative) related to purchases you've made for science projects from recommendations on our site, please let us know. Write to us at [email protected].
Background Information for Teachers
This section contains a quick review for teachers of the science and concepts covered in this lesson.In this project, your students will build a simple circuit by connecting a motor and a battery. When the motor and battery wires are connected as shown in Figure 1 (top), electrical current can flow in a complete loop, called a closed circuit, and the motor will spin. However, if one pair of wires becomes disconnected, the complete loop is broken and this creates an open circuit (Figure 1, middle), so the motor will stop spinning. Finally, if the exposed metal parts of the wires touch each other, this creates a short circuit, which will stop the motor and cause the battery pack to get hot (Figure 1, bottom). As the robots move and jostle around during class, wires can come loose or bump into each other, creating open or short circuits. This is the number one thing to look out for when students claim their robot is not working.
/-/https/www.sciencebuddies.org/cdn/Files/8874/10/open-closed-short-circuits-junkbot.png)
A battery must be correctly connected to a motor for both to function properly. In an open circuit, there is no connection between the wires of a battery and motor so the motor receives no power (motor does not spin). In a closed circuit, the positive and negative leads are connected and the motor receives power (motor spins). If the positive and negative leads between a battery and motor are crossed then a short circuit occurs and the motor receives no power (motor does not spin).
Figure 1. Open, closed, and short circuits.
Your students will attach an off-center weight (a cork) to the motor's spinning shaft. This makes the motor vibrate, causing the robot's entire body to wobble. This is the same concept used to make cell phones and video game controllers vibrate—they have tiny motors with off-center weights inside. However, without some careful design choices, junkbots will tend to move randomly or spin in circles. The key to making them move in a (relatively) straight line is directional friction, or making sure the parts of the robot that contact the ground have more friction in one direction than the other. Think about rubbing your finger along sandpaper—it will be rough in any direction. Now think about petting a dog or rubbing your finger along a toothbrush with slanted bristles—it will feel smooth in one direction but rough in the other direction. The same concept can be applied to junkbots by giving them slanted legs (Figure 2). Robots with slanted legs will tend to move more consistently in the direction with less friction.
/-/https/www.sciencebuddies.org/cdn/Files/8875/10/bristlebot-directional-friction.png)
When vibration based robots have legs that are perpendicular to the ground the motion of the robots will be random as horizontal friction forces are equal. However, robots with legs that are angled to the ground will experience lower friction in the direction the legs are angled and cause the robot to move in that direction.
Figure 2. Slanted legs can be used to give a robot directional friction so it moves forward.
There are many other design factors your students will have to consider when building their robots. They can identify cause and effect relationships between these elements and the robot's movement. For example:
- Robots that are too tall or skinny might fall over easily.
- Robots that are too heavy might move very slowly.
- Robots that are too flexible might move more slowly than stiffer robots.
- Robots that are not sturdy enough might fall apart due to the vibrations from the motor.
Your students will follow the engineering design process to build their robots and address these problems. The objective is to build a robot that can move forward to cross the finish line of a short race course (as opposed to spinning in circles or moving randomly). It is important for students to understand that there is no single "right answer" to an engineering project. There are many different robot designs that could meet the objective, and it is OK if their designs do not work very well on the first try. The process is iterative, meaning they might repeat the steps of designing, building, and testing multiple times until they get a working robot.
Additional Background Links
- Engineering Design Process, Science Buddies
- Comparing the Engineering Design Process and the Scientific Method, Science Buddies
Prep Work (5 minutes)
- Clear some open floor space students can use to test their robots. Remember that the robots will not work well on carpet.
- Use masking tape to mark start and finish lines for an official "race course" on the floor. The exact dimensions are not critical, but the lines should be parallel, a few feet wide (so at least two robots can race against each other at once), and a few feet apart.
Teacher Tool Box
Engage (5 minutes)
Show your students this introductory video:
Explain that they will follow the engineering design process to design, build, and test their robots. Their objective is to build a robot that can travel straight and cross the finish line of a short race course. There is no single "correct" design for the robot, and their robot will probably not work on the first try. They will need to iteratively modify and retest their robot to get it working.
Explore (50 minutes)
Assemble the Circuit
Walk the entire class through these steps together to assemble and test their circuits:
- Make sure the battery pack's switch is in the OFF position.
- Use a small screwdriver to remove the screw on the battery pack's cover, then slide off the cover.
- Insert two AA batteries into the battery pack, as shown in Figure 3. Make sure the "+" signs on the batteries line up with the "+" signs in the battery pack.
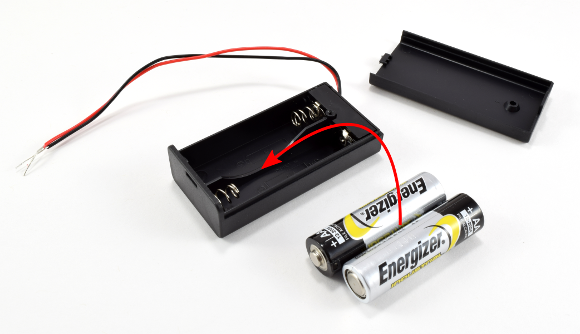
Figure 3. AA batteries and battery pack.
- Slide the cover back on until it clicks into place. You do not need to replace the screw.
- Tightly twist together the exposed metal parts of the red wires from the battery pack and motor, as shown in Figure 4. You should be able to gently tug on the wires without them coming apart.
- Repeat step 5 for the black wires, as shown in Figure 4.
- Firmly press a cork onto the motor's shaft, as shown in Figure 4. Make sure the cork is off-center so it will vibrate.
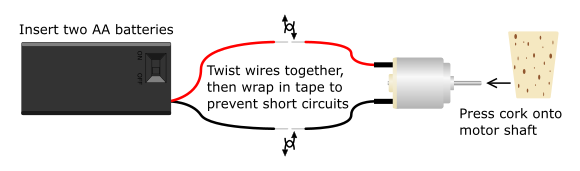
Figure 4. Circuit assembly diagram.
- Make sure the exposed metal parts of the red and black wires are not touching each other. Then, hold the motor with one hand and turn the battery pack's switch to ON. The cork should spin and make the motor vibrate. This is because you have formed a closed circuit, allowing electrical current to flow in a loop from the battery pack through the motor.
- Briefly touch the exposed metal parts of the red and black wires together. This creates a short circuit and the motor should stop spinning. Short circuits can cause the battery pack to get hot, and should always be avoided.
- Disconnect one set of the wires. This creates an open circuit and the motor stops spinning because there is no longer a complete path for electricity to flow.
- In order for your robot to function properly, you need to make sure you have a closed circuit. Turn the battery pack's switch off. Now, make sure the wires are tightly twisted together, to avoid open circuits from the wires coming loose. Then, wrap the exposed metal parts of the wires in tape, to avoid short circuits if the wires bump into each other.
/-/https/www.sciencebuddies.org/cdn/Files/8233/8/insert-batteries.png)
/-/https/www.sciencebuddies.org/cdn/Files/8230/12/junkbot-circuit-diagram-580px.png)
Build the Robot
Now let each group design, build, and test their robots.
- Use the student worksheet to sketch designs before they start building.
- Gather materials and build the body of the robot.
- Attach the motor and battery pack to the robot's body.
- Make sure you do not glue or tape the battery pack shut, since eventually you may need to replace the batteries.
- Make sure the cork can spin freely without getting stuck against the robot's body.
- Make sure the wires will not get tangled with the cork when it spins.
- Take the robot to the testing area, put it on the floor, and turn the battery pack on. Observe how the robot moves. Here are some questions your students can ask about their designs:
- Is it fast or slow?
- Does the robot spin in circles, move randomly, or go straight?
- Does the robot fall over or stay upright?
- Does the robot's body stay together or do any pieces fall off?
- Based on their observations in step 4, students can return to their desks and work on modifying and improving their designs.
- After each group has tested their robot at least once, bring the whole class together for a discussion.
 What have students observed about their robots so far? How do the robots move? Do certain designs or materials seem to work better than others? What changes can we make to the robots so they go straight?
 If your students struggle to build robots that do not just spin in circles, you may need to start providing hints about construction. In general, robots with light, stiff bodies and legs that are all slanted in one direction will work the best. Robots that are very heavy or very flexible will generally be slow because the body will absorb all the vibrations from the motor. Robots that have a flat surface contacting the ground or legs that point straight down (or in different directions) will tend to move randomly or spin in circles. Remind students that it is OK if their robot did not work on the first try. The engineering design process is iterative. They will need to test, modify, and retest their designs in order to improve them and meet the objective of building a robot that can go straight across the race course.
 - When students are ready (their robot at least moves forward a little bit instead of spinning in place), they can bring their robots to the race course. Place the robot behind the start line and turn the battery pack on. See if the robot can travel straight enough to cross the finish line before it turns too far to either side.
- Students should continue to iterate and modify their designs to try and get their robots to travel straight across the finish line of the race course.
- Teams can pair up to race their robots against each other to see who crosses the finish line first. If time allows, you can have a tournament or use a stopwatch to time all the robots and see which one is the fastest.
/-/https/www.sciencebuddies.org/cdn/Files/14175/24/conversation-bubbles-30.png)
Troubleshooting
Cork does not spin at all when battery pack is turned on.- Check that batteries were inserted properly. The "+" signs on the batteries should line up with the "+" signs in the battery pack.
- Check for short circuits. The exposed metal parts of the wires should be covered in tape.
- Check for open circuits. Sometimes the wires can come untwisted as the robot wobbles around.
- Make sure the cork can spin freely without getting stuck, and was not accidentally glued or taped in place.
- Press the cork further onto the motor shaft using a new hole.
- Optionally, a small dab of hot glue placed in the hole can help hold the cork in place.
Remember that solving this problem is part of the design challenge for your students. If your students get stuck, here are a few hints you can give them:
- Make sure the robot is not too heavy, or it will not move very fast.
- Make sure the motor is tightly attached to the robot's body, or the vibrations will not transfer from the motor to the body.
- Make sure the robot's body is not too flexible. In general, stiffer robots will move faster than more flexible robots.
- Robots with slanted legs will generally move faster and straighter than robots with straight legs or no legs at all (like a plastic bottle resting directly on the ground).
Reflect (5 minutes)
Discuss the following questions as a class.
/-/https/www.sciencebuddies.org/cdn/Files/14174/23/note-question-mark-30.png) | What problems did teams encounter when testing their robots? How did they modify their designs to overcome those problems? |
| Which designs were the fastest? Which designs traveled in the straightest lines? Did the best designs have any features in common? |
| If they had more time to keep working on their robots, what other changes or improvements would they make? |
Assess
You can use this quiz to assess student learning after the activity:
- Online quiz, assignable in any LMS
- Quiz (pdf) and answer key (PDF)
Make Career Connections
Discussing or reading about these careers can help students make important connections between the in-class lesson and STEM job opportunities in the real world.
/-/https/careerdiscovery.sciencebuddies.org/cdn/Files/1725/18/4161_Michelle_Easter_and_Curiousity_Clone.jpg)

/-/https/careerdiscovery.sciencebuddies.org/cdn/Files/1450/21/iStock-1227179796.jpg)
/-/https/careerdiscovery.sciencebuddies.org/cdn/Files/1223/17/iStock-971549326.jpg)
Lesson Plan Variations
- Instead of racing, make "sumo wrestling" robots. Mark a circular ring on the floor about two feet in diameter. Challenge students to build robots that can push other robots out of the ring. How does this change the design of their robots? Do robots that were designed to go fast on a race course also work well in sumo wrestling, or do different designs work best?
- Vibrobots are junkbots' smaller cousins that function based on the same principle but use a much smaller battery and motor (also included in your Bristlebot Kit). You can build them using common classroom and office supplies like toothpicks and paper clips. See the Design Your Own Vibrobots project for instructions that you can adapt to a lesson plan.
- Bristlebots are tiny vibrating robots built in the head of a toothbrush, great for younger students. See the Vibrobots Lesson Plan for instructions.
/-/https/img.youtube.com/vi/QGhpCU-96Ic/0.jpg)
/-/https/img.youtube.com/vi/JKCYcYp3ebQ/0.jpg)
/-/https/img.youtube.com/vi/ULkUK0Ro4Aw/0.jpg)