/-/https/www.sciencebuddies.org/Files/21464/5/sb-logo.png)
/-/https/www.sciencebuddies.org/Files/21464/5/sb-logo.png)
Fool Your Vision to Find Out How It Works
Summary
/-/https/www.sciencebuddies.org/Files/8966/7/hole-in-hand.jpg)
Overview
How is it possible that our eyes can see things that are not really there? In this fun lesson plan, your students will explore how our vision works with the help of two short experiments that involve some fascinating optical illusions. Let your students discuss why they see a hole in their hand, or why they see colors that were never there, and let them construct their own explanations.Learning Objectives
- Understand the main components of the visual system and how they work together.
- Formulate and defend a hypothesis based on experimental evidence for illusions created by fatigued sensory cells or for optical illusions created when the two eyes look at a different object.
NGSS Alignment
This lesson helps students prepare for these Next Generation Science Standards Performance Expectations:- MS-LS1-8. Gather and synthesize information that sensory receptors respond to stimuli by sending messages to the brain for immediate behavior or storage as memories.
|
Science & Engineering Practices
Planning and Carrying Out Investigations.
Conduct an investigation to produce data to serve as the basis for evidence that meet the goals of an investigation.
Engaging in Argument from Evidence. Use argument supported by evidence to support or refute an explanation or a model for a phenomenon. |
Disciplinary Core Ideas
LS1.D: Information Processing.
Each sense receptor responds to different inputs (electromagnetic, mechanical, chemical), transmitting them as signals that travel along nerve cells to the brain. The signals are then processed in the brain, resulting in immediate behaviors or memories.
|
Crosscutting Concepts
Cause and Effect.
Cause and effect relationships may be used to predict phenomena in natural systems.
Systems and System Models. Systems may interact with other systems; they may have sub-systems and be a part of larger complex systems. |
Materials
/-/https/www.sciencebuddies.org/Files/8967/7/materials-vision.jpg)
Materials per group of two students:
- Computer with internet access, or a color printout of the student version of Figure 4. As an alternative, a projector and white surface or smart board can also be used to project the image for the entire class.
- Stopwatch or clock that counts seconds
- Colored pencils (at least yellow, light blue or cyan and purple or magenta) or a basic computer graphics program
- White paper, 8.5 by 11 inches
- Clear tape
Background Information for Teachers
This section contains a quick review for teachers of the science and concepts covered in this lesson.We see with our eyes and our brain, as shown in Figure 1. Our eyes register incoming light; electrical pulses transport the information to the brain, which processes it and informs us of what we see.
/-/https/www.sciencebuddies.org/Files/8968/7/visual-system-picture.jpg)
Diagram showing the parts of an eyeball and brain that are used to see an object. Light from a tree on the left enter the eye through the cornea and move past the iris and lens. The lens focuses the light onto the back wall of the inner eye where the macula and retina process the light and send signals to the brain through the optic nerve at the back of the eyeball. The optic nerve connects to the visual cortex at the back of the brain where the signals sents by the optic nerve is interpreted as a tree by the brain.
Figure 1. Anatomy of the human visual system. Note the eye and brain are not depicted to scale.
Vision starts with visible light—electromagnetic waves with wavelengths between 400 and 700 nanometers—reflected by an object and falling into our eye. These waves are the visual stimulus picked up in the area at the back of our eye (the retina) by light-sensitive cells (the sensory receptors) that send electrical signals to the brain when triggered. There are two types of sensory receptors for vision: rods and cones. Rods are very sensitive to light and mainly register movement, shape, and light intensity changes, while cones are responsible for our color vision and suited for detail; they need bright light. We are also equipped with different types of brain cells that process visual information, each of which conduct their own special tasks.
Humans can perceive a continuous spectrum of colors (or wavelengths) because we are equipped with three types of color-sensitive cone cells, each responding to a spectrum of wavelengths centered around a certain color (roughly red, green, or blue). Once light reaches the eye, each type of cone cell is stimulated differently by different wavelengths. The variance in signals from each type of cone cell allows the brain to perceive a continuous range of colors. This requires blending colors in the brain to obtain the different hues.
You might be familiar with mixing primary colors of paint to create a huge range of colors. A similar thing can be done with light. Subtractive light mixing applies filters to a beam of light and combines colors like paint colors mix. You can also overlap (or add together) two or more beams of different-colored light to create new colors, a principle that is used in most electronic visual displays. The commonly used primary colors for additive light mixing are red, green, and blue. These are exactly the color ranges that your three different cone types are most sensitive to. Figure 2 shows how the primary colors of light (red, green, and blue) combine to create secondary colors.
/-/https/www.sciencebuddies.org/Files/8969/7/additive-color.png)
Figure 2. Combining colored light. Note how the three primary colors combined yield white light.
Cone cells, like many sensory receptor cells, can show fatigue after being exposed to a stimulus for an extended time, making them temporarily unresponsive. This can give rise to an afterimage—a perceived image that lingers after the real stimulus has disappeared. You might recall looking at a bright light, then seeing a dark, fading spot in your central vision once you have turned away. This was an afterimage. Light-sensitive cells in your central vision were fatigued and temporarily unresponsive. Afterimages have the same size and shape as the original image, but are in the complementary (opposite) color.
Humans have binocular vision, which means we use two eyes together to create one image. Each eye registers a slightly different image on the back of the eye as shown in Figure 3. The information of the two images is sent to the brain where it is processed. In a fraction of a second, our brain combines the information coming from the left and right eyes and brings one cohesive three-dimensional image to our awareness.
/-/https/www.sciencebuddies.org/Files/8970/7/binocular-vision.jpg)
Figure 3. With binocular vision, each eye registers a slightly different image, allowing us to see in three dimensions.
Our visual system has evolved to serve us well. It is good and fast because it makes some intuitive assumptions. These also makes the brain vulnerable to being tricked. For example, the brain assumes that your eyes are focused on the same object. This is almost always true, but what if it is not? When these suppositions fail, we can get visual perceptions that differ from what is really there. We call these optical illusions.
In this lesson plan, you and your students will explore how our visual system works with the help of two fascinating optical illusions. Students will come up with their own explanations for these optical phenomena, present them, and discuss their validity.
Additional Background Links
- Eyes: How We See. TeensHealth, The Nemours Foundation
- Additive and Subtractive Color Mixing. ColorBasics.com
- RGB Color Wheel. Colorspire
- Optical Illusions, How they Work and What They Reveal About The Brain. K. Cherry
- See Change: 2 Eyes, 1 Picture. Scientific American
Prep Work (5 minutes)
- Students will need to see a color version of Figure 4. Choose one of the following options:
- print the student version of Figure 4 using a color printer, making sure the colors look vivid,
- have the students look at the student version on a color computer screen, or
- display Slide 5 of the slideshow for the class with a large color projector on a white surface, or display it on a smart board.
- Plan to dim or turn off any lights in the vicinity of the printout, computer screen, or projected image. You do not need to make the room completely dark.
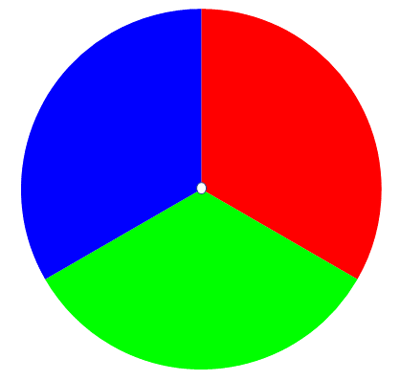
Figure 4. For this activity, students will need to see a color version of this image as a printout, on a computer monitor, or projected on a large white screen.
/-/https/www.sciencebuddies.org/Files/8971/7/color-wheel.png)
Teacher Tool Box
Engage (15 minutes)
- Tell your students that you are doing an experiment today about your vision in order learn how we are able to see. Before you start with the experiment, introduce your students to the visual system by asking following questions.
 When do our eyes work best? Are there any situations where we are not able or when it is difficult for us to see our surroundings? What do you think?
 Students might provide answers like: We see well with light but do not see well in the dark, we do not see well when we close our eyes or when we sleep, some people need glasses to see, etc.What do these answers tell us about what is essential for us to see?The most obvious answers are probably that we need light and our eyes to see. We also need our brain to process the information that is coming from our eyes. Not seeing in the dark suggests that light is needed, not seeing with closed eyes suggests that light needs to enter the eyes for you to see. Not seeing when you sleep might be because your eyes are closed or because specific processes in the brain are not active while you sleep. At the end of this question, you should have the following list of essential parts: light, the eyes, and the brain. If the brain is missing, ask, "What part of the body recognizes and informs us of what we see?"Can you figure out a process for how all these necessary components (the eye, the brain, and light) work together to make us see? What needs to happen for us to see an object like this piece of white paper (show the class a sheet of white paper)?Your goal is to help the students understand that they see the paper because light bounces off its surface and into your eyes where sensory receptor cells (cones and rods) convert the stimulus (the light) to electrical signals. This electrical signal is transmitted via the nerves (one for each eye) to the brain, which reconstructs an image based on the electrical signals.
The students might need help to piece this together. Remind students of the fact that light was necessary, and we need to have our eyes open to see. They will probably realize light needs to enter the eye. To help the students discover the next step, remind them the brain was in the list of body parts involved and ask for ideas on how the signal of light could travel from the eye to the brain. Students will probably know these signals travel along nerves. If there is doubt between electrical signals or light being sent, let them have a vote before you explain that sensory receptor cells in the eye convert light into electrical signals, which can then be sent along nerves. To find the last step in the process, remind students that they do not see electrical signals—they see something different instead. Ask them what exactly they see and how this can happen. They will probably answer that they see an image, and deduce that somewhere in the brain, an image gets reconstructed.
- Explain to the students that they just discovered the three steps involved in being able to see. Inform them you will call this the "visual system."
If I show you a piece of red paper, you notice it is red. How do you think we are able to see the color? Where in the process do you think we are able to distinguish the color of objects (show the class a sheet of red paper)?Students might know that visible light is an electromagnetic wave and that color is determined by its wavelength. White light contains all wavelengths (or colors) of visible light. They might be aware that a red piece of paper reflects mainly red light and absorbs the other colors. This is nice background knowledge, but not essential to this lesson. It is enough for them to understand how red light is reflected from the red object and falls into our eye. That is the first step in seeing a red object.
The second step in the visual process is very important for color vision. If students do not know, explain how not all sensory receptor cells sensitive to light are the same. There are two types: rods and cones. The cone cells are responsible for color vision. Humans have three types of cones, each most sensitive to a certain color: red, green, or blue. In other words, in the second step of the visual process, the conversion of light to electrical signals depends on the color of the light.
For the third step, the brain knows that if it receives mainly signals from red sensitive cones, red light fell into the eye and reconstructs a red image.
If we have cone cells mainly sensitive to red, green, and blue light, how can we see yellow?Your goal is to have the students understand that the visual system knows how to combine colors. They should understand that yellow is the combination of red and green light, so if red and green cones both send ample signals, while the blue cones are quiet, our brain can deduce that yellow light fell into our eye.If students lack ideas, ask them how they can create a wealth of colors from red, yellow, and blue paint.
You may want to point students to the fact that mixing light is different from mixing paint: the more light you add, the lighter the color becomes. The primary colors are also different. If students have access to it, refer them to an online color mixer like the one listed in the additional background section. It can be a valuable tool when building their arguments later in the lesson.
Note: Students might wonder how we see black objects, as black objects absorb all visible light. We see black as the absence of light. We see objects around the black object reflecting light.
- Tell students how our visual system has evolved to serve us well, but sometimes, it can fool us. In the interest of speed, it uses a few assumptions while processing information coming from the eyes. As these assumptions are not always accurate, we can see optical illusions, which are things that are not physically there. Let your students know that they will do two experiments that are examples where their vision is fooled. Their perceptions will not be what really is. It will be up to them to find out how their vision gets fooled and what goes wrong in the visual process. Tell the students they will have to develop their own explanations for why these illusions happen.
/-/https/www.sciencebuddies.org/Files/14174/23/note-question-mark-30.png)
/-/https/www.sciencebuddies.org/Files/14175/24/conversation-bubbles-30.png)
Explore (15 minutes)
- Divide the class into groups of two students.
- Walk the students through the experimental procedure described below. (A slideshow is available that you can use to guide your students through the experiments.)
- Provide each group with the colored image, or prepare to project this color printout on a screen or smart board. Give each student a sheet of white paper.
- Experiment 1: Afterimages
- Let one student use the stopwatch or clock to time the observer. The other student (the observer) will focus on the white spot in the center of the color wheel for 30 seconds, then immediately look at the center of the white space to the right of it.
- Have the observer draw what he or she saw (the afterimage) either on a piece of paper with colored pencils or with a basic computer graphics program. The student worksheet includes a blank figure where students can draw their observation.
- Let the students switch roles and repeat steps a–b.
- Experiment 2: Looking Through a Tube
- This activity works best in a well-lit area. If needed, turn on the lights.
- Roll the sheet of white paper along the longer side into a tube with roughly the diameter of a quarter. Use a piece of tape to hold the paper in place.
- Look at a non-white background like a wall, door, etc.
- Start with both eyes open, holding the paper tube with your left hand up to your left eye (being careful with any sharp paper edges) so that your left eye is looking through it as you would look in a telescope.
- Raise your right hand so that your palm faces toward you and place it against the tube so that the outside of your pinky finger is touching the tube as shown in Figure 5. The hand should be about halfway down the length of the tube. Look straight ahead with both eyes open.
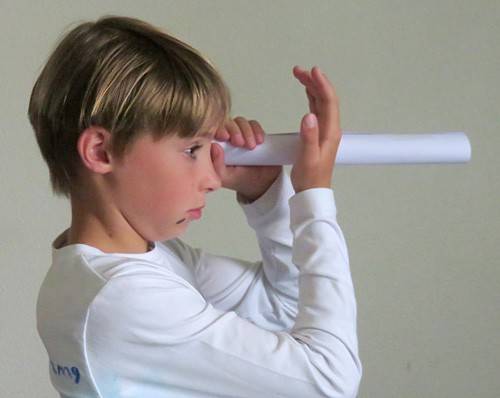
Figure 5. How to hold the tube and hand for the experiment.
- Make your first observation in this position.
- Then, continue with the next position, which is to look with one eye only, closing the other while keeping the tube and your right hand in place. Inform students that if they have difficulty closing just one eye, they can ask for help from a partner (the partner can cover one eye at the time with a hand or a piece of paper).
- Repeat the activity looking through the tube with the right eye and having their left hand up against the tube.
- Write down their observations on the student worksheet.
/-/https/www.sciencebuddies.org/Files/8972/7/hole-in-hand-illusion.jpg)
Reflect (30 minutes)
- Consolidate the observations as a group.
For the first experiment, did you see anything when you looked at a blank white area? If so, what?Most students should have seen an image looking like the right side of Figure 6. This image is called an afterimage, which is an impression kept after the stimulus has vanished. Color blind students will see different colors.
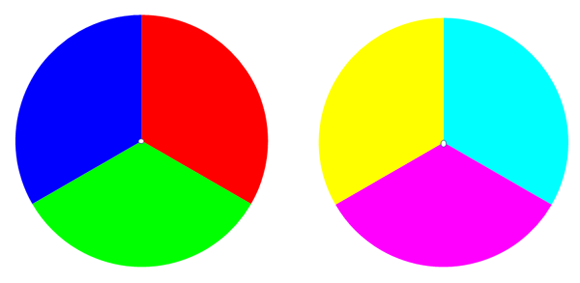
Figure 6. The afterimage of the image on the left should look like the image on the right.Why would you call what you saw an optical illusion?It is an illusion because the observed colors are not really there; you were looking at a white piece of paper or a white screen.For the second experiment, did you see anything unusual? If so, what?All students should have seen a hole in the hand pressed up against the tube. Some students might only see it when doing the experiment with the left or the right eye, whereas others might see it with either eye.Why would you call what you saw an optical illusion?It is an illusion because there is no hole in your hand; it only looked like there was one. - Explain that optical illusions occur when something goes wrong in the visual process. Let the students work in pairs to find plausible explanations for each of the two observed optical illusions. The student worksheet will guide the process.
- If students have access to an online additive light color wheel like the one referenced in the additional background section, encourage them to investigate what combinations of red, green, and blue created the observed colors in the afterimage.
- If students do not have a color wheel available, it might be helpful to provide them with a printout of Figure 2.
- Bring the group together and go over some of the hypotheses found by students. Show an open mind and let the class provide feedback. Explain to students that scientists regularly look at new ideas in a critical way, and evaluate ideas on evidence. Coming up with explanations as well as being able to evaluate them scientifically are essential skills for scientists.
The following questions will help evaluate hypotheses:
- Does the hypothesis explain the illusion?
- Is the hypothesis in line with what we know of the visual system? If it is not, is it likely that our background knowledge of how the visual system works is false or incomplete? What are some ways we could investigate?
- What are other ways we could test the hypothesis?
- After discussing different hypotheses, provide the students with the currently accepted scientific explanation of the observed optical illusion as stated below.
Why and how are afterimages created?Afterimages occur because cone cells in the eye tire out when stimulated for a long time. This is referred to as cone cell fatigue. Fatigued cells are temporarily unable to respond. When looking at a white area after staring at a red image for an extended time, you will see an image that is the same size and shape as the original image, but blue-green in color—the complement of red. This is because a white surface sends essentially equal doses of red, green, and blue light to your eyes. Since the red cones are fatigued and unavailable, only the blue and the green cones respond and tell your brain what you are seeing. You see the afterimage as blue-green. (Here is a gross fact: surgeons wear blue-green scrubs to minimize the afterimage of blood!)
The afterimage disappears after several seconds because the red cone cells recover from their fatigue and become active again. Afterimages thus occur because certain receptor cells temporarily fail to detect the stimulus: the light falling into the eye. In this illusion, the processing of signals in the brain happens flawlessly—the failure occurs in the sensing of the stimulus.
Sensory receptor fatigue does not only occur in vision. Has anyone experienced it in our other senses?Students might have several examples. They might mention touch, where, for example, cold or heat receptor fatigue leads to a fooled perception of temperature. They might mention olfactory fatigue or odor fatigue, remembering how the smell of fresh baked cookies can be very pronounced, but the perception of this smell fades quickly.Why and how do we see a hole in our hand?Whenever both eyes are open, your brain is working to combine the information coming from your left and right eyes into one image. In doing this, your brain assumes your eyes are looking at the same thing. In this experiment, however, you left and right eyes are seeing two different things! Your left eye is seeing a small circle of the world at the end of a tube, while your right eye is seeing your right hand. Your brain merges the information into an image of a small circle of the world going through your right hand!Some people have a "dominant eye," like how they have a dominant hand. If you have a dominant eye, information coming from the dominant eye will take precedence over data from the nondominant eye. In this case, the tube illusion will work better when the person is looking through the tube using their dominant eye.
In this illusion, the sensing of the stimuli occurs without failure. The hole in the hand occurs because of a processing error in the brain.
/-/https/www.sciencebuddies.org/Files/8973/8/color-wheels-before-and-after.png)
Assess
You can use this quiz to assess student learning after the activity:
- Online quiz, assignable in any LMS
- Quiz (pdf) and answer key (PDF)
Make Career Connections
Discussing or reading about these careers can help students make important connections between the in-class lesson and STEM job opportunities in the real world.
/-/https/careerdiscovery.sciencebuddies.org/cdn/Files/1570/17/iStock-930864180.jpg)

/-/https/careerdiscovery.sciencebuddies.org/cdn/Files/1522/17/unsplash-FVh_yqLR9eA.jpg)
Lesson Plan Variations
- Let students study other optical illusions, identify where in the visual process this illusion is created, and find evidence to prove the case.
- Let students study illusions occurring in other senses, like touch or sound, or combinations of senses like the combination of olfactory and taste, or sound and vision (e.g. the McGurk effect).
- Repeat the afterimage experiment, but have students pay attention to other details like how long it takes for the afterimage of each different color to disappear. Do some colors fade away faster? Does the time it takes to fade depend on the length of time you stared at the original image? Can students find out how to predict the color of the afterimage for other colors? What is the afterimage of the color wheel shown on the right side of Figure 6? Students can also study if the size of the afterimage depends on the distance at which you perceive the image, or if you can create an afterimage if you stared at the initial image only with one eye. What happens if you look at a colored piece of paper after having stared at the circle for an extended time? These tests can help refute or confirm the different hypothesis students stated.
- If you have color blind people in the class, examine their experience. Can you find out if their cone cells are different, or is it the brain that processed the information differently? How does that affect what they see?
- Try other variations for the hole in a hand illusion, and see how these observations support or refute possible explanations. What happens if you use a different diameter for the tube, or recreate the illusion and observe what happens if, without moving the hand one eye is looking at, you slowly move the tube away from your face as shown in Figure 7? How far away must the tube be before they stop seeing the illusion?
/-/https/www.sciencebuddies.org/Files/8974/7/hole-in-hand-illusion-away.jpg)
Figure 7. Move the tube away from your face to see when the illusion disappears.
/-/https/img.youtube.com/vi/aLYXJaEAJEE/0.jpg)
/-/https/img.youtube.com/vi/Xnf7pZMuL7I/0.jpg)
/-/https/img.youtube.com/vi/Sfu1UUmF2jA/0.jpg)