

Raspberry Pi FAQ
- Why won't my Raspberry Pi turn on?
- What is HDMI? How do I know if my television or monitor has HDMI?
- My television or monitor does not have HDMI. How can I connect my Raspberry Pi to a display?
- Can I use a laptop as a display and/or keyboard?
- My computer monitor does not have built-in speakers. How can I get sound?
- I have everything connected properly, why can't I hear any sound?
- Why is there a black border around the edge of my screen?
- Why are the edges of my screen cut off?
- How can I change the system time on my Raspberry Pi?
- How can I connect my Raspberry Pi to the Internet?
- I accidentally deleted a desktop icon! How do I launch the programs?
- My Raspberry Pi froze and is not responding to mouse or keyboard input. What should I do?
- My Raspberry Pi is acting strangely (it suddenly will not boot up properly, certain programs do not work, etcetera). What is wrong?
- I think I corrupted my Raspberry Pi's SD card. What should I do?
- I need help with a question not listed here. Who can I ask?
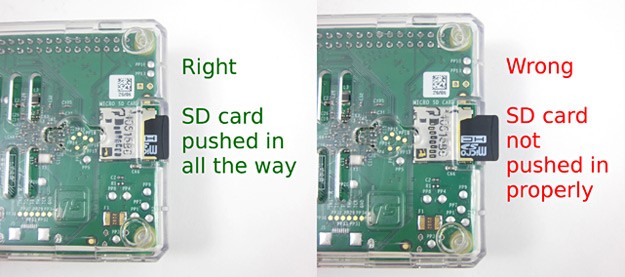
- Make sure your SD card is pushed in all the way. You should hear an audible "click" when it is pushed into the slot.
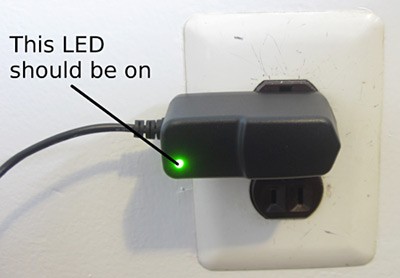
- Make sure the green LED on your micro-USB power adapter is lit up. This means the adapter is receiving power from the wall outlet. If the LED is not on, make sure the wall outlet is not controlled by a light switch. Try plugging a lamp or other appliance into the outlet to make sure the outlet works.
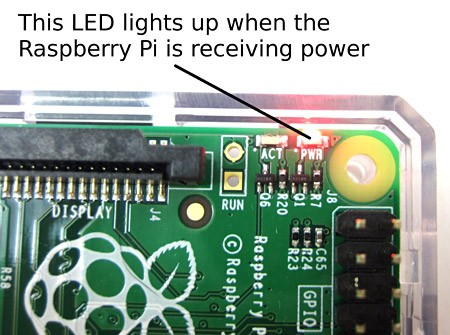
- Make sure the red power LED (labeled "PWR") on your Raspberry Pi is on. This means the Raspberry Pi is receiving power from the micro-USB port. If the LED is not on, make sure you pushed the micro-USB connector into the micro-USB port all the way.
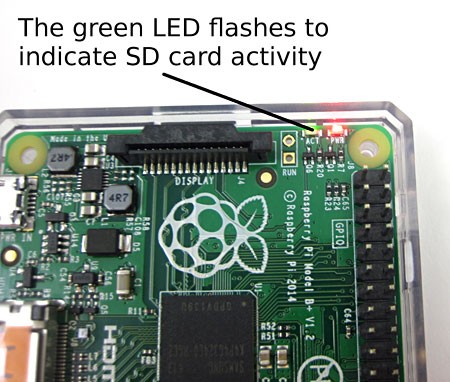
- When you first plug the micro-USB cable in, the green LED (labeled "ACT") should flash several times. This LED lights up when the Raspberry Pi reads data from the SD card. If it does not light up, your SD card might not be inserted properly. Go back to step 1.
- Make sure your display (television or monitor) is turned on. If your display is turned off, you will not see anything on the screen, even if the Raspberry Pi is on.
- Make sure your display is set to the correct input. Many modern televisions have more than one HDMI input, and some computer monitors have DVI or VGA inputs in addition to HDMI. Most displays have an "input" button that will let you cycle through different inputs.


The end of an HDMI cable looks like this:

It plugs into an HDMI port on your television or computer monitor. Virtually all modern high-definition televisions, and many computer monitors, have HDMI ports. An HDMI port looks like this:

Look for a port like this one on the back of your television or computer monitor. If you cannot find one, see the next question.

To connect your Raspberry Pi to a DVI port, you will need an HDMI to DVI adapter, available from an electronics store or Amazon.com.
However, DVI connections only send video, and not sound. If you have a DVI computer monitor, you will need external speakers to get sound out of your Raspberry Pi (see the next question).
If your monitor does not have a DVI port either, check to see if you are using an older monitor that only has a VGA port. VGA stands for Video Graphics Array, and VGA ports look like this:

To connect your Raspberry Pi to a VGA computer monitor, you will need an HDMI to VGA adapter, like this one, available from Adafruit.com, and a VGA cable, also available from Adafruit.com or Amazon.com. Caution: Not all HDMI to VGA adapters will work with the Raspberry Pi. Before you purchase an HDMI to VGA adapter, check the manufacturer's description or product reviews to see if it works with the Raspberry Pi. The description for the Adafruit adapter confirms that they have tested it with the Raspberry Pi, but Science Buddies has not tested this specific adapter, so we cannot vouch that it will work.
If you are using an older television without HDMI, check to see if it has RCA jacks (RCA stands for Radio Corporation of America, which invented this type of connector). RCA jacks and cables look like this:


The yellow plug is for video information, and the red and white plugs are for sound. To connect your Raspberry Pi to a television with RCA jacks, you will need a 3.5 mm to RCA A/V (audio-visual) cable, available from an electronics store or Amazon.com. Plug one end of the cable into your Raspberry Pi's 3.5 mm jack, which is right next to the HDMI port, and plug the three colored ends into your TV.


Plug the speakers or headphones into your Raspberry Pi's 3.5 mm jack, which is next to the HDMI port:
- Click the Menu button in the lower left corner of your screen. This opens a menu similar to the Windows start menu. Hover your mouse over Accessories, then click on Terminal. This opens a window where you can type in commands.
- At the command prompt, type sudo raspi-config and press "Enter."
- In the menu that pops up, use the down arrow to scroll down to Advanced Options and press "Enter."
- Use the down arrow to scroll down to Audio and press "Enter."
- Use the down arrow to scroll down and select either Force HDMI or Force 3.5mm ('headphone') jack, depending on which type of sound you have connected, and press "Enter."
- Use the right arrow to scroll to Finish and press "Enter."
Try to avoid other simple mistakes:
- If you are using external speakers, make sure they are powered on.
- If you are using a television or monitor with built-in speakers, make sure they are not muted and that the volume is turned up.
- Make sure that you are running a Scratch program that will actually play sounds. The simplest program you can write to test if your sound is working is:

- Click the Menu button in the lower left corner of your screen. This opens a menu similar to the Windows start menu. Hover your mouse over Accessories, then click on Terminal. This opens a window where you can type in commands.
- At the command prompt, type sudo raspi-config and press "Enter."
- In the menu that pops up, use the down arrow to scroll down to Advanced Options and press "Enter."
- Press "Enter" to select Overscan.
- Press "Enter" to select Disable.
- Use the right arrow to scroll to Finish and press "Enter."
- When prompted to reboot, press "Enter" to select Yes.
- Your Raspberry Pi should reboot, and the black borders around the edge of your screen should be gone.
- Click the Menu button in the lower left corner of your screen. This opens a menu similar to the Windows start menu. Hover your mouse over Accessories, then click on Terminal. This opens a window where you can type in commands.
- At the command prompt, type sudo raspi-config and press "Enter."
- In the menu that pops up, use the down arrow to scroll down to Advanced Options and press "Enter."
- Press "Enter" to select Overscan.
- Use the right arrow to select Enable and press "Enter."
- Use the right arrow to scroll to Finish and press "Enter."
- When prompted to reboot, press "Enter" to select Yes.
- Your Raspberry Pi should reboot, and your desktop should properly fill the monitor without spilling over the edges.
- Click the Menu button in the lower left corner of your screen. This opens a menu similar to the Windows start menu. Hover your mouse over Accessories, then click on Terminal. This opens a window where you can type in commands.
- At the command prompt, type sudo raspi-config and press "Enter."
- Use the down arrow to scroll down to Internationalisation Options and press "Enter."
- Use the down arrow to select Change Timezone and press "Enter."
- Use the arrow keys to select your geographic region (such as "US") and press "Enter."
- Use the arrow keys to select your time zone (such as "Central") and press "Enter."
You will need to shut down your Raspberry Pi, plug in the Ethernet cable, then turn it back on in order for it to connect to the Internet.
You can also purchase a USB WiFi adapter, available at electronics stores or Amazon.com. Again, you will need to shut down your Raspberry Pi, plug in the WiFi adapter, then turn the Raspberry Pi back on. After booting up, you will need to connect to your wireless network. Do this by clicking on the Menu icon in the lower-left corner of your desktop, which launches a menu similar to the Windows Start Menu. Hover your mouse over Preferences, and then select WiFi Configuration. This will launch a window where you can select from available wireless networks and enter the password, similar to what you would do on a Windows or Macintosh® computer.
Once you have connected to the Internet, you can use a web browser to browse, just like you would on a regular computer. To launch the web browser, click on the Menu icon, then select Internet and Web Browser.
Next, if you are using a wireless keyboard and mouse, make sure they have fresh batteries.
Finally, as a last resort, if your Raspberry Pi is not responding, unplug the micro-USB cable and plug it back in. In general, you want to avoid doing this, because suddenly cutting power to the Raspberry Pi without properly shutting it down first can corrupt the SD card, and prevent the Raspberry Pi from working properly.
- If you purchased the Science Buddies Raspberry Pi Projects Kit, send an email to [email protected]. Please be sure and include your order number from the Science Buddies Store.
- Science Buddies will send you a download link for the SD card image file. Save this file to your computer.
- Note: It is a large file (8 GB), so it may take some time to download.
- Make sure you have enough space for the file on your hard drive before beginning the download.
- If possible, properly shut down your Raspberry Pi and unplug the power cord.
- Remove the micro-SD card from your Raspberry Pi, and put it back into the full-size SD card adapter.
- Format your SD card using SD Formatter.
- Download SD Formatter for either Windows or Macintosh from the SD Association's website, https://www.sdcard.org/downloads/formatter_4/.
- Follow the instructions to install the software.
- Insert your SD card into your computer's SD card reader.
- Pay attention to the drive letter assigned to the SD card, for example "F:".
- In SD Formatter, select the drive letter for your SD card. Important! Selecting the wrong drive here can erase information on your computer's hard drive! Make sure you select the drive letter assigned to the SD card.
- Click "Format."
- To rewrite the SD card on a Windows computer, follow the directions at http://www.raspberrypi.org/documentation/installation/installing-images/windows.md, using the Science Buddies image file you downloaded in step 2.
- To rewrite the SD card on a Macintosh computer, follow the directions at http://www.raspberrypi.org/documentation/installation/installing-images/mac.md, using the Science Buddies image file you downloaded in step 2 of this question.
- Eject the SD card from your computer.
- Re-insert the micro SD card into the Raspberry Pi and plug the micro-USB power cable back in. Your Raspberry Pi should boot up normally.
- Open a command terminal by selecting Menu→Accessories→Terminal
- Type alsamixer and press "Enter"
- Use the up and down arrows to adjust the volume
- Press "Esc" to exit the volume control application.


