Summary
/-/https/www.sciencebuddies.org/cdn/Files/17382/6/bottle-centrifuge-thumbnail.jpg)
/-/https/i.ytimg.com/vi/2ymXk67MAcs/maxresdefault.jpg)
Introduction
Have you ever ridden a merry-go-round at a playground? Did you notice how you felt like you were being flung toward the outside, so you needed to hold on to stay in place? Scientists make use of this effect in a centrifuge, which is a machine that separates substances based on their density. They can, for example, use it to separate different substances within a blood sample. In this fun activity, you will build your own simple bottle centrifuge and test how it works. Are you ready for a spin?
Materials
- Plastic bottle with cap
- Wooden skewer
- Straw
- Thumbtack
- Hot glue gun
- Scissors
- Water (a couple of tablespoons)
- Food coloring (blue, red, or green are best)
- Tablespoon
- Piece of cardboard (1" x 1")
- 2-3 tablespoons soil or clay

/-/https/www.sciencebuddies.org/cdn/Files/17383/9/bottle-centrifuge-materials.jpg)
Prep Work
- Empty the plastic bottle and use the thumbtack to poke a hole into the middle of one side of the bottle. Poke another hole on the opposite side.
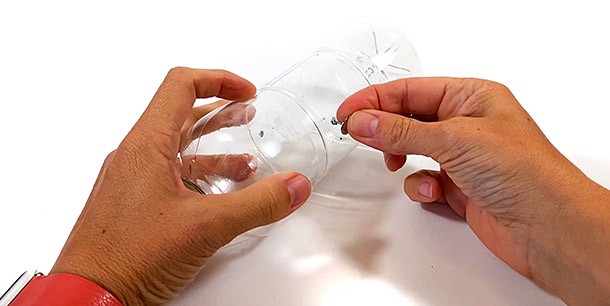
- Use the scissors to enlarge the two holes just enough so that the straw can fit through.

- Insert the straw into the holes so it goes through the inside of the bottle and sticks out on both ends. If you are using a bendable straw, cut off the bendable part.

- Use the hot glue gun to glue the straw into place and to seal the gaps around the holes. Be careful to not burn yourself with the hot glue!
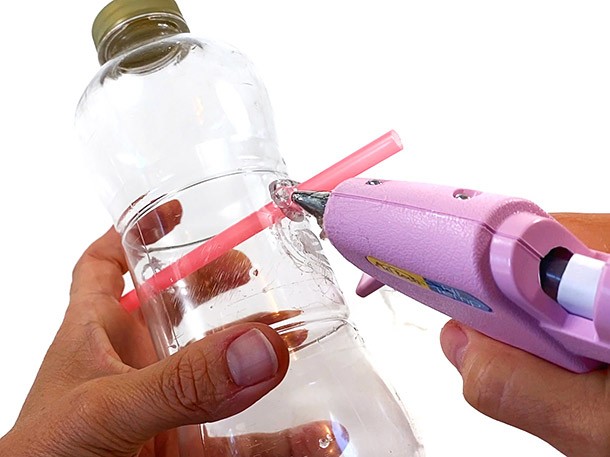
- Let the glue dry. Then pour a little water into the bottle and test if the seals are leaking or not. If they do leak, add some more hot glue to close the gaps until it is not leaking anymore.
- Empty the bottle again.
/-/https/www.sciencebuddies.org/cdn/Files/17384/6/thumbtack-holes.jpg)
/-/https/www.sciencebuddies.org/cdn/Files/17385/6/scissors-holes.jpg)
/-/https/www.sciencebuddies.org/cdn/Files/17386/6/straw-through-bottle.jpg)
/-/https/www.sciencebuddies.org/cdn/Files/17387/6/glue-gun-straw.jpg)
Instructions
- Pour a couple of tablespoons (Tbsp.) of water into the bottle. Add a few drops of food coloring to the water. Close the bottle tightly and mix.

- Place the wooden skewer through the straw. Then poke a hole through the middle of the little cardboard piece with the skewer and push the cardboard piece all the way up to the straw end.
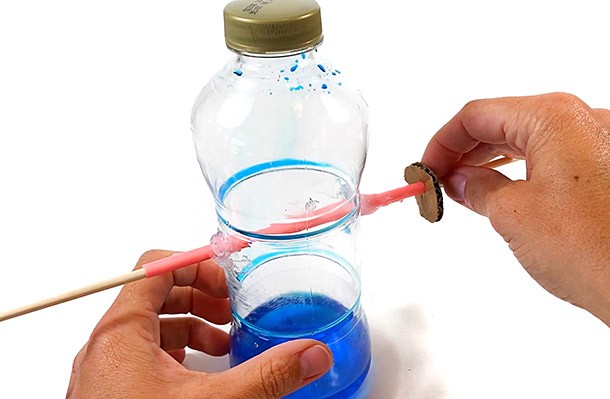
- Hold the skewer underneath the cardboard piece and lift up the bottle so that the skewer is perpendicular to the ground and the bottle is positioned horizontally in the air. The straw should rest on the cardboard piece.
 What do you notice happens with the colored water in the bottle when you hold it up in the air with the skewer?
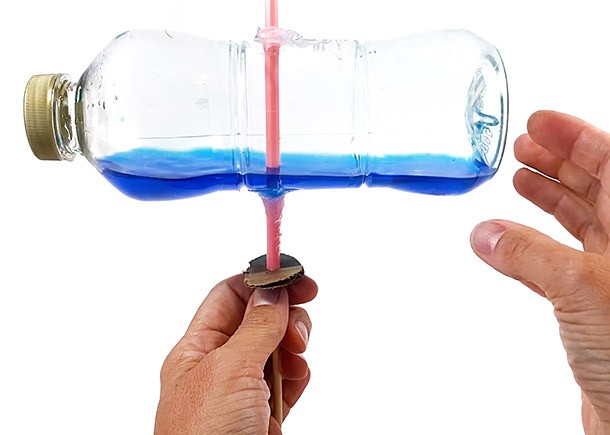
- While still holding onto the skewer with one hand, give the bottle a slight push with the other hand so it starts rotating around the skewer. Observe the water inside the bottle while it is spinning.What happens to the water inside the bottle?
- Stop the rotation of the bottle and then give the bottle a strong push. You can also give it several pushes in a row to make the bottle spin really fast.What changes when the bottle is rotating faster? Do you notice any differences compared to when you gave a slight push?
- Stop the bottle again. Then add a couple tablespoons of soil or clay to the water inside the bottle and mix it.What do you notice when you add the soil or clay to the water?
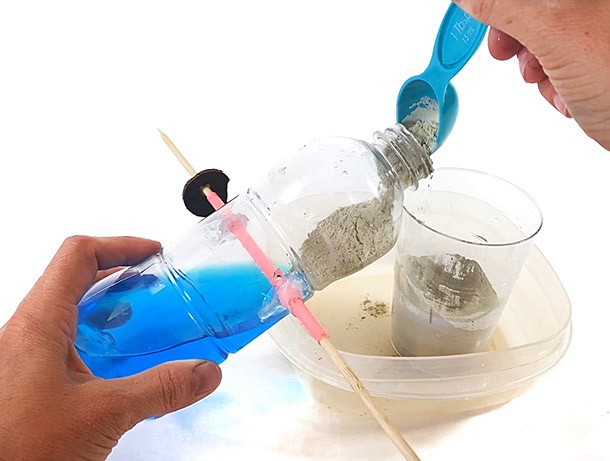
- Pick the bottle up again with the skewer, as you did before.What happens with the soil inside the bottle?
- Then push the bottle to make it rotate. Spin the bottle for at least 1-2 minutes. Observe what happens.Where is the soil or clay located inside the bottle after you spun it for 2 minutes? Can you explain your results?
/-/https/www.sciencebuddies.org/cdn/Files/17388/8/colored-water-in-bottle.jpg)
/-/https/www.sciencebuddies.org/cdn/Files/17389/9/bottle-skewer-cardboard.jpg)
/-/https/www.sciencebuddies.org/cdn/Files/17390/6/bottle-horizonally.jpg)
/-/https/www.sciencebuddies.org/cdn/Files/17391/6/put-soil-in-bottle.jpg)
Cleanup
What Happened?
When you lifted up the bottle with the colored water and held it horizontally, you should have noticed that the water formed a continuous and flat layer inside the bottle. As soon as you gave the bottle a slight push though, the water started moving toward the ends of the bottle. You might have seen that the water layer did not look flat anymore, but was curved like a parabola. This happened because you set the water into circular motion when you started to spin the bottle. As the water started moving in a circle, the water was flung outward, away from the center of the circle, similar to how your body moves to the outside of the car when the car makes a turn, away from the direction of the turn. When you pushed the bottle even more, the water should have been flung even farther to the sides of the bottle. As the speed of your bottle centrifuge decreased again, the curve of the liquid layer became flatter and flatter until the water layer was horizontal again when the centrifuge stopped.
When you added the soil to the water, you might have noticed that the soil mixed with the water to make it look turbid and dirty. When you spun the bottle with the soil and water inside, you might have noticed that the water and soil was flung outward towards the ends of the bottle. Even though you probably did not see a clear separation of the soil and water inside the bottle while spinning, the soil particles did start to separate from the water. You should have noticed that after spinning the bottle for a 1-2 minutes that soil accumulated at the ends of the bottle, forming a soil pellet. The soil pellet was formed because the soil particles were flung to the outside of the circular path harder than the less-dense water was. This is a great demonstration of how a centrifuge is able to separate a sample into layers, where each layer is made up of particles or liquids of the same density.
Digging Deeper
According to Newton's first law of motion, objects will either remain at rest, or continue moving in a straight line, unless acted upon by an outside force. In order for an object to move in a circular path, it must experience a force pointing toward the center of the circle, called the centripetal force. You have experienced this force if you have ever ridden in a car going around a tight turn. It "feels" like you are being flung toward the outside of the turn, but this is because your body wants to continue moving in a straight line. Your seat belt exerts a centripetal force that makes you move in a circle along with the car.
The fluid and particles in your plastic bottle experience the same effect when you spin the bottle. The heavier soil or clay molecules have more inertia (tendency to keep moving in a straight line), so it takes a bigger centripetal force to make them move in a circle. This results in them being "flung" toward the outside of the bottle, but the walls of the plastic bottle exert a centripetal force and make them move in a circle. The lighter water molecules have less inertia, so it is easier to make them move in a circle—they are not flung toward the outside as hard as the soil particles are. This results in a soil pellet or the separation of the soil and the water, with the soil on the outside and the water on the inside.
If you just mixed two substances with different densities together, eventually they would separate on their own due to the effect of gravity. However, this process can be very slow, especially if the densities of the two substances are similar. A centrifuge can speed up this process significantly. Scientists regularly use centrifuges in laboratories to separate one chemical compound or biological substance from another.
You might have also heard about the term centrifugal force. Sometimes people get the words "centripetal" and "centrifugal" mixed up or use them interchangeably. Be careful! The words have very different meanings. Centripetal force is the real, physical force exerted on an object that makes it move in a circle. It points toward the center of the circle. Centrifugal force is an "imaginary force" that only exists in the reference frame of an observer rotating along with the rotating object. Rotating reference frames are an advanced topic in physics. If you are curious about this, you can find more information in this Mathematics of Circular Motion reference.
Ask an Expert
For Further Exploration
- Try to use your bottle centrifuge to separate liquids that have different densities. Give your bottle a good spin and observe what happens. Where do the different liquids go when you spin the bottle? Can you separate the liquids?
- What other mixtures (liquid or solid) can you separate in your bottle centrifuge?
- If you want to build a more-advanced centrifuge, try Science Buddies' Separating Butter with a Salad Spinner Centrifuge or Separating Glitter with a Homemade Centrifuge project.
/-/https/www.sciencebuddies.org/cdn/Files/4359/5/BioChem_img063.jpg)
/-/https/www.sciencebuddies.org/cdn/Files/7021/5/salad-spinner-snow-globe.jpg)
/-/https/img.youtube.com/vi/mabHwDuuLfU/0.jpg)
/-/https/img.youtube.com/vi/T36Th5UPb3I/0.jpg)
/-/https/img.youtube.com/vi/s7bopU_N_fQ/0.jpg)