Summary
/-/https/www.sciencebuddies.org/cdn/Files/15723/9/bottle-rocket-in-action-thumbnail.jpg)
/-/https/i.ytimg.com/vi/c4Iu_-jqegw/maxresdefault.jpg)
Introduction
Soda bottle rockets are a safe and fun way to get into rocketry. If you want to discover what makes rockets fly, this is an activity for you. You can even add different features, like fins, a nose cone, and a parachute to find out how these alter the flight! Try it out!
Materials
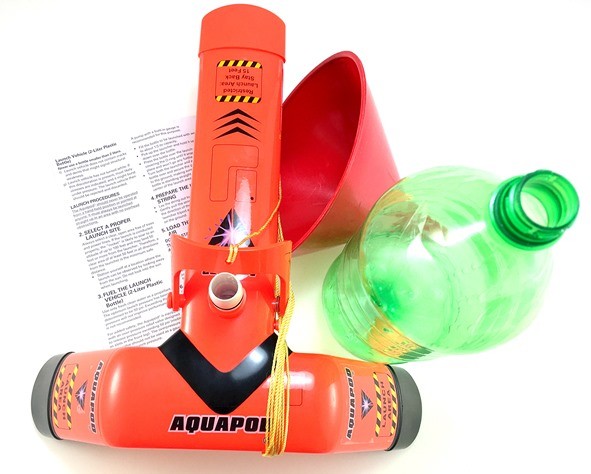
- Aquapod® bottle launcher, like the water bottle launcher available from Amazon.com.
- Open outdoor space in which to launch your rocket
- Dimensions: At least 40 m (130 ft) long and 40 m wide
- Ground cover: Soft ground so the U peg to secure the launcher can be pushed into the ground.
- Soda bottle (2-L), emptied and cleaned
- Choose a bottle of a carbonated beverage or iced tea, as other bottles might not be strong enough.
- Water (2 gallons)
- Funnel (to fill the 2-L bottle)
- Petroleum jelly (to lubricate the 0-ring)
- Bicycle pump with pressure meter
- Adult supervision recommended for grades 1-5
/-/https/www.sciencebuddies.org/cdn/Files/15724/8/bottle-rocket-materials.jpg)
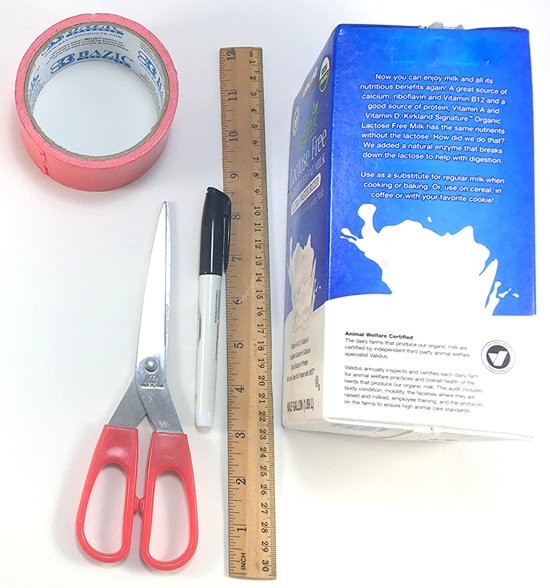
- Milk or juice carton, emptied and cleaned
- Ruler
- Scissors
- Duct tape
- Permanent marker
- Short piece of string (for the nose cone only)
/-/https/www.sciencebuddies.org/cdn/Files/15725/8/bottle-rocket-fins-materials.jpg)
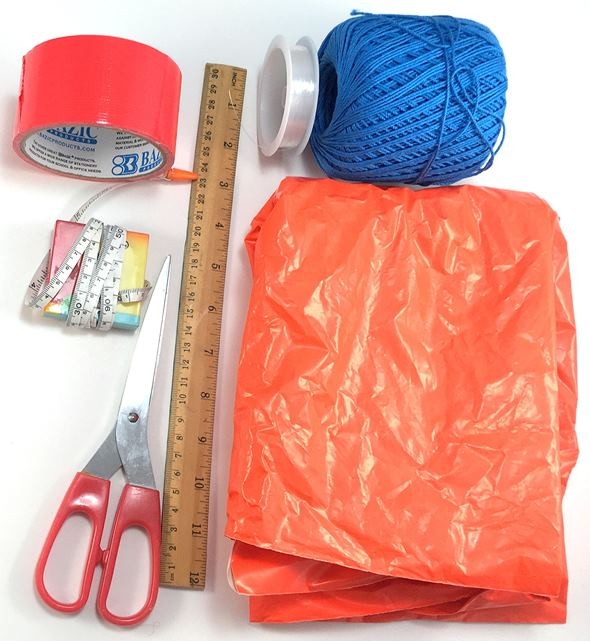
- Plastic bag (at least 40 by 40 cm square)
- Measuring tape or ruler
- String (at least 5 m); should be thin and lightweight, but strong. Fishing line, beading string, or cotton string work well.
- Scissors
- Duct tape
/-/https/www.sciencebuddies.org/cdn/Files/15726/11/rocket-bottle-parachute-materials.jpg)
Disclaimer: Science Buddies participates in affiliate programs with Home Science Tools®, Amazon.com, Carolina Biological, and Jameco Electronics. Proceeds from the affiliate programs help support Science Buddies, a 501(c)(3) public charity, and keep our resources free for everyone. Our top priority is student learning. If you have any comments (positive or negative) related to purchases you've made for science projects from recommendations on our site, please let us know. Write to us at [email protected].
Prep Work
- Make sure the soda bottle fits the launcher:
- Put your empty bottle on the launcher. Push the bottle down so it goes over the thin black ring, as illustrated in the figure.
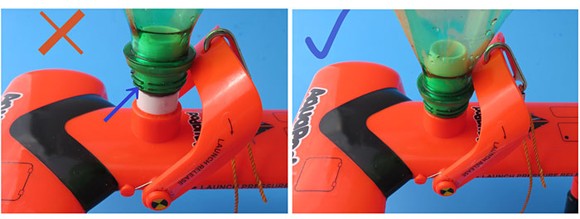
- Pull the bottle back up as far as you can. The launch release latch should hold it in place, as shown in the figure. You might have to move the metal clip attaching the launch cord to the release handle out of the way.
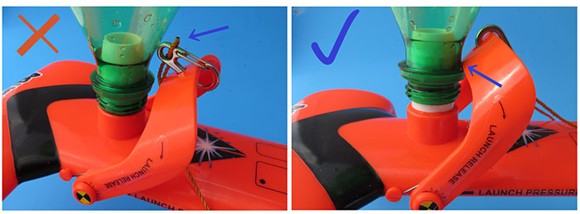
- Put your empty bottle on the launcher. Push the bottle down so it goes over the thin black ring, as illustrated in the figure.
- Find a launch area. A clear space of 40 m (130 ft) long and 40 m wide works well.
- Search for a good launch location. The launcher needs to rest on a flat area, and the ground should be soft so the U peg to secure the launcher can be pushed into the ground.
/-/https/www.sciencebuddies.org/cdn/Files/6715/10/rocket-mounting-under-ring.jpg)
/-/https/www.sciencebuddies.org/cdn/Files/6716/10/rocket-mounting-latch.jpg)
Instructions
- Keep the pressure in the launch bottle below 50 psi at all times.
- Never lean over the bottle rocket while it is under pressure.
- Always use the U peg to secure the bottle rocket launcher to the ground before launching so the bottle does not launch in an unsafe direction.
- Give the launch string a gentle, quick tug; a powerful yank might cause the launcher to come loose and launch in an unsafe direction.
- Select your observation spot such that you do not look toward the sun as you observe your launch. Looking into the sun can damage your eyes.
- Keep a safety zone of 4.5 m (about 15 ft) around the launcher clear of bystanders before each launch.
- Important: If a launch fails, ask an adult to help you remove the bottle by following the Launch Failure Procedure described in the bottle rocket launcher manual.
- You are all set to go outside and prepare for launching! If your location does not have access to clean water, take about 2 gallons of water with you. Check the Materials list for other objects you need to bring.
- Secure your launcher to the ground with the U peg, as indicated in the manual. The figure illustrates a well-secured launcher.

- Ready to have a blast? It is time to give your rocket a try!
- Fill one fourth to half of the bottle rocket with clean water.
- Put your bottle on the launcher. You will need to do this in a fast movement in order to spill only a little water. If this is too difficult, you can also:
- Loosen the U peg so you can pick up the launcher.
- Place it upside down on the bottle, as shown in the figure.
- Flip the launcher and bottle back over and secure the launcher to the ground with the U peg.

- Lay out your launch string.
- Attach the bicycle pump to the launcher.
- Add air to the bottle rocket. Pump until your pressure meter indicates 20 psi.
- Clear the area of spectators.
- Launch the rocket by giving a quick, gentle tug on the launch string.
 Did your rocket fly? If not, go to the FAQ section and perform a new test run as soon as you identify and fix the issue.
 - Real rocket launches come with launch procedures, including a long list of safety checks.Can you create a launch procedure for your launches? Be sure to include all of the safety tips listed in the Caution section.
- For your test run, you pumped air in the bottle rocket until the pressure inside was 20 psi.What do you think will happen when you add more air to the bottle during setup?
- Repeat steps 4–10, but pump air into the bottle until your pressure meter indicates 40 psi.Was your prediction correct? Can you explain why or why not?
- The following three steps describe how to add features like fins, a nose cone, or a parachute to your rocket. These are optional, but can be beneficial.What do you think are the benefits of each of these additions?
- Adding fins will stabilize the rocket in flight, helping it to take a straight path up to its highest point, called the apogee. Milk or juice carton cardboard works well for fins, as it is strong, lightweight, and water-resistant. You can use regular cardboard, too, but cover it with water-repellent paint to increase the lifespan. Add three or four fins.
Important: Make sure your rocket will still fit in the rocket launcher before permanently attaching the fins to the bottle. As you modify your rocket, also consider that the propulsion chamber of your bottle rocket will expand slightly as you load the rocket with air before liftoff.
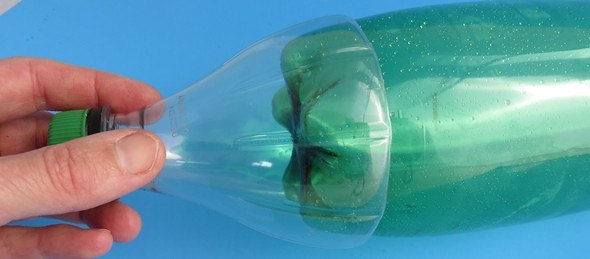
Compare the flight of a rocket with and without fins. How do the fins alter the flight? - Make your bottle rocket more aerodynamic by adding a top (also called a nose cone). Generally, aerodynamic rockets have a more stable flight track and can reach a higher apogee. The corner of a milk carton, a tip made from milk carton cardboard and tape, or the upper part of a second soda bottle can all serve as nose cone for your basic water bottle rocket, as shown in the figures. You can also make a nose cone from painted cardboard or foam. No matter what you use, keep it light so it does not add much weight to the rocket, and select something smooth so the air can pass easily over it.
Important: If you want to add a parachute later, be sure not to tape the nose cone to the bottle, as you will want to pack the parachute inside the nose cone. Instead, prepare to attach it with a string so it can fall off when the rocket starts its descent, but stays connected to the main body of the rocket for easy recovery.
 Compare the flight of a rocket with and without a nose cone. How does the nose cone alter the flight?
 - Add a landing mechanism, like a parachute, to prevent a hard touchdown after a flight. Following is a description of how to create an octagonal parachute from a plastic bag and cotton string. This is just one example. You can try your own design, too. Important: As you design your own parachute, be sure to keep it rather small so when folded, it fits nicely on top of your rocket (or in the nose cone if you attach one) and keep the lines relatively short so they can unwind quickly and the parachute can deploy before the rocket reaches the ground.
-
If you encounter problems, first identify what might have caused the issue, then try to find a solution.
Can you make changes that result in better rocket performance? Try getting the bottle rocket to reach a higher altitude, to fly a straighter path, to land more softly, etc.
-
If you encounter problems, first identify what might have caused the issue, then try to find a solution.
/-/https/www.sciencebuddies.org/cdn/Files/6721/10/rocket-launcher-upeg.jpg)
/-/https/www.sciencebuddies.org/cdn/Files/6722/10/push-launcher-in-rocket.jpg)
/-/https/www.sciencebuddies.org/cdn/Files/15727/10/aerodynamic-rocket-with-fins-activity.jpg)
/-/https/www.sciencebuddies.org/cdn/Files/15728/10/bottle-rocket-with-small-fins.jpg)
/-/https/www.sciencebuddies.org/cdn/Files/15729/8/add-nose-to-bottle-rocket.jpg)
/-/https/www.sciencebuddies.org/cdn/Files/15730/8/bottle-rocket-parachute-nose-cone-fins-text.jpg)
/-/https/www.sciencebuddies.org/cdn/Files/15731/8/bottle-rocket-with-parachute.jpg)
/-/https/www.sciencebuddies.org/cdn/Files/15732/9/bottle-rocket-with-folded-parachute.jpg)
/-/https/i.ytimg.com/vi/qfelBhJPQ1o/maxresdefault.jpg)
Making an Octagonal Canopy
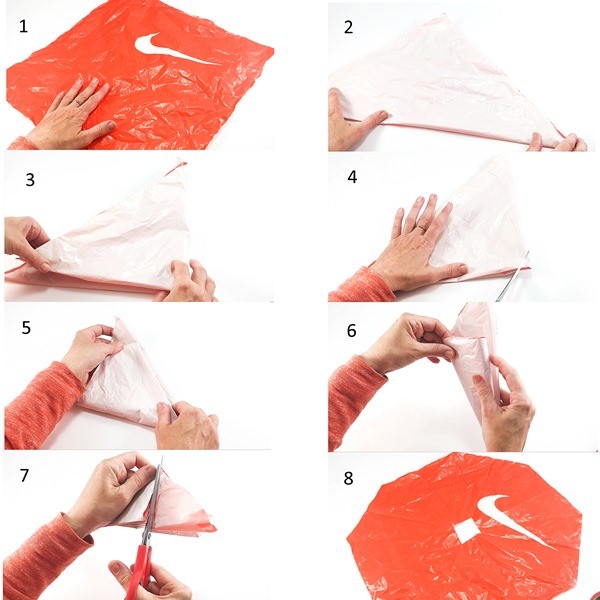
- Cut a large 40- by 40-cm square (16-inch square) from the plastic bag. Lay it flat in front of you so it forms a diamond shape, and smooth out the plastic.
- Fold the corner closest to you to its opposite corner.
- Now fold the right corner on the left corner. You now have a right triangle. Smooth out the plastic after each fold.
- The 90° corner will be the center of the canopy. Cut a small triangle off of this corner. This hole in the center of the canopy will make the parachute more stable.
- Fold the triangle, bottom to top, with the cut-away corner at the right so you get a small wedge.
- Fold it the same way a second time. You now have a wedge of about 22° with an extra triangular flap of plastic on the top.
- Smooth the plastic and cut off the triangular section of excess material.
- Unfold the canopy.
/-/https/www.sciencebuddies.org/cdn/Files/15733/8/steps-to-create-octagon-parachute-canvas.jpg)
Adding Suspension Lines
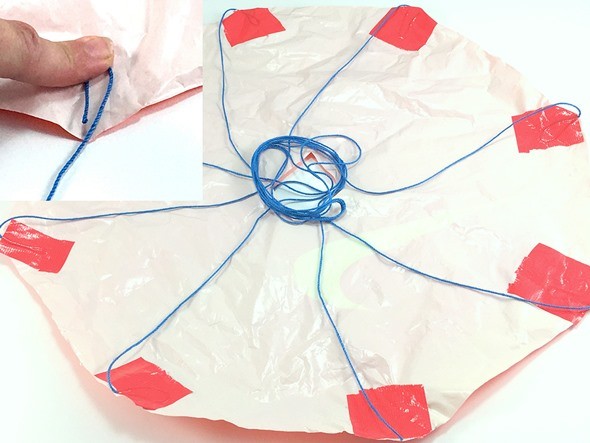
- Cut four 120-cm (47-inch) suspension lines (sometimes call shroud lines) from a thin and lightweight, but strong, string. Fishing line, beading string, or cotton string work well.
- Measure 5 cm (2 inches) from the end of one string to tape to the canopy; this will ensure all the lines are identical in length. Fold it in a U-shape, and tape this U to the canopy at one of the corners.
- Repeat step 2 at the other end of the string, and tape it to the opposite corner.
- Repeat steps 2–3 for the remaining three strings.
/-/https/www.sciencebuddies.org/cdn/Files/15734/8/attaching-suspension-lines-to-canopy.jpg)
Attaching the Parachute to the Rocket
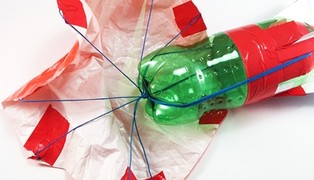
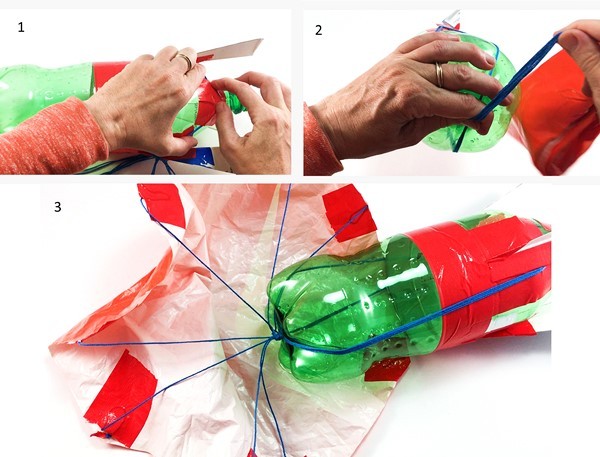
- De-tangle the suspension lines and hook one finger under all of the lines, so the parachute is suspended evenly below your hand. Using duct tape, attach the point where the lines intersect to a spot near the top of the bottle rocket.
- Hold the bottle vertically so the lines are hanging down along the bottle's sides. Spread the lines out evenly in two or more groups spread out along the sides of the bottle and collect the lines at the center of the bottom of the bottle. Knot them together.
/-/https/www.sciencebuddies.org/cdn/Files/15735/8/attach-parachute-to-bottle.jpg)
Folding the Parachute
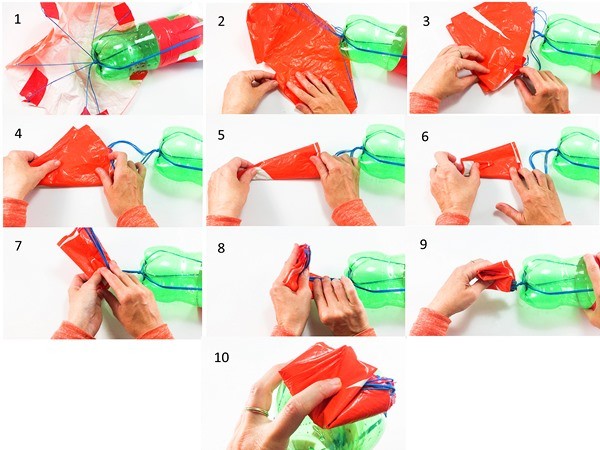
- Unravel the suspension lines.
- Fold the octagon in half so the cut-out square hole forms a rectangle.
- Fold again in half.
- Repeat step 3, folding again and again, until all suspension lines are on top of one another. Be careful not to tangle the lines in the process.
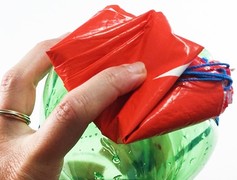
- Fold the pointed top third of the canopy toward the bottle.
- Fold the suspension lines over the canopy.
- Fold the canopy in half toward the bottle one more time so the lines are tucked within the folded canopy.
- If you have leftover string, roll the canopy over it until it all packs on top of the rocket. If your parachute tends to unfold, roll the folded canopy over the suspension lines instead of tucking the suspension lines within the folded canopy.Compare the flight of a rocket with and without a parachute. How does the parachute alter the flight?
/-/https/www.sciencebuddies.org/cdn/Files/15736/8/steps-to-fold-parachute.jpg)
What Happened?
When you cranked up the pressure inside the bottle from 20 psi to 40 psi, your rocket probably reached a higher altitude.
By adding fins—even small fins—you probably noticed the rocket took a straighter path to its highest point (the apogee), and no longer tumbled down, but flew straight down.
By adding a pointy, sleek nose cone, you made the rocket more aerodynamic. A rocket with a nose cone has an easier time pushing the air aside and making itself a path through the air, and thus, it usually reaches a higher altitude. Unfortunately, a nose cone adds some mass to be pushed up. If the nose cone was heavy compared to the mass of the rocket, you might have observed a decrease in altitude.
Adding a parachute adds some mass, but it considerably increases the chance to recover the rocket undamaged. The additional mass, and the change in the rocket's aerodynamics will slightly change the maximum altitude the rocket can reach.
A bottle rocket does not have a parachute ejection system like real rockets, so the air has to push off the nose cone if there is one, allowing the suspension lines to unwind and the parachute to unfold. This all needs to happen before the parachute touches the ground. To keep the deployment time short, pack the parachute neatly and keep the suspension lines short. If you pack the parachute in a nose cone, make it lightweight so it blows off easily. You should have been able to deploy a parachute, even when packed in a nose cone, when using 40 psi pressure at launch.
Digging Deeper
Rockets are vehicles that obtain their forward thrust—the force that pushes the rocket forward—from a reaction engine. In other words, rockets push themselves forward by ejecting mass (that shoots backward) at high speed from their rear end. This mechanism does not rely on the atmosphere and works very well in space.
/-/https/www.sciencebuddies.org/cdn/Files/6712/10/rocket-action-reaction-easy.jpg)
Did a firefighter ever let you squirt water out of his fire hose? If so, you probably experienced the same thing. As the water squirts out at a high speed, the hose (and the person holding it) experience a strong push backwards. In physics, this is referred to as Newton's third law of motion, which means for every action (water squirting out), there is an equal and opposite reaction (the hose being pushed back). Note that the push (the reaction) is in the opposite direction of the water flow (the action). The more pressure that is put on the water (from its source, such as a water tank or a pump), the faster the water comes out and the stronger the backward push gets. At full force, two firefighters are needed to hold the hose.
/-/https/www.sciencebuddies.org/cdn/Files/6713/11/rocket-hose-analogy.jpg)
You use this push to your advantage to launch a bottle rocket. Your rocket is partially filled with water, which it squirts out at its rear end to lift itself up in the air. The faster the water comes out (at higher acceleration), the higher the rocket gets lifted. The special water bottle launcher allows you to add air to your bottle rocket. The more air you add, the more this air pushes on the water. Air pressure, or how hard the air presses outward on the inside of the bottle, builds up in the bottle and you might even see the bottle bulge out a little.
/-/https/www.sciencebuddies.org/cdn/Files/6714/15/bottle-air-pressure.jpg)
Just like with the fire hose, the more pressure that is put on the water, the faster the water comes out and the bigger the push on your bottle rocket. Scientists use several units to quantify pressure, but it is mostly commonly expressed in pounds per square inch (psi) on your bicycle pump.
In rocketry, the force that pushes the rocket forward is called thrust, and the air resistance is called drag. The highest point of the flight path is often called the apogee. Creating more pressure in the bottle before launch will increase the thrust, and thus lead to a higher apogee. A more aerodynamic shape reduces drag, which means less force slowing the rocket down, which results in a higher apogee. More mass leads to a larger force pulling the rocket down, resulting in a lower apogee.
Parachutes are used to slow down the fall of a rocket to reduce the risk of damaging the rocket as it touches the ground. Some rockets eject the parachute. For a bottle rocket, air resistance has to knock off the nose cone, causing the suspension lines to unravel and the parachute to unfold. This takes time, so if your rocket does not reach enough altitude, your parachute might not have enough time to open up and do its job. Some design changes, like shorter suspension lines, lightweight material, and neat folding techniques, can help speed up the deployment of your parachute.
Ask an Expert
For Further Exploration
- Find out how the flight changes when you change the ratio of water to air in the propulsion chamber.
- Find other ways to make the rocket more aerodynamic.
- Use an altimeter to measure the maximum altitude your rocket reaches with different launching criteria. What criteria make it reach the highest apogee?
Related Resources
Project Ideas
/-/https/www.sciencebuddies.org/cdn/Files/18103/7/water-bottle-rocket-payload-thumbnail.jpg)
/-/https/www.sciencebuddies.org/cdn/Files/15651/10/model-rockets-three.jpg)
/-/https/www.sciencebuddies.org/cdn/Files/15676/11/model-rocket-aerodynamics-stability.jpg)
Activities
/-/https/www.sciencebuddies.org/cdn/Files/6040/6/baking-soda-vinegar-rocket-decorated.jpg)
/-/https/www.sciencebuddies.org/cdn/Files/15377/6/match-rockets-ready-to-go-off-thumbnail.jpg)
/-/https/www.sciencebuddies.org/cdn/Files/15246/4/paper-rocket-thumbnail2.jpg)
/-/https/www.sciencebuddies.org/cdn/Files/12820/5/sls_booster_sep.jpg)
Lesson Plans
/-/https/www.sciencebuddies.org/cdn/Files/8834/16/balloon-rocket-thumbnail.jpg)
- MS-PS2-2. Plan an investigation to provide evidence that the change in an object's motion depends on the sum of the forces on the object and the mass of the object.
- MS-ETS1-3. Analyze data from tests to determine similarities and differences among several design solutions to identify the best characteristics of each that can be combined into a new solution to better meet the criteria for success.
/-/https/careerdiscovery.sciencebuddies.org/cdn/Files/835/18/msfc-202000343.jpg)
/-/https/careerdiscovery.sciencebuddies.org/cdn/Files/842/17/unsplash-Bt9HIKC0Nus.jpg)
/-/https/careerdiscovery.sciencebuddies.org/cdn/Files/933/17/iStock-1022905102.jpg)
/-/https/img.youtube.com/vi/ETtdNMbRwL4/0.jpg)
/-/https/img.youtube.com/vi/nhOyKdeRPXA/0.jpg)
/-/https/img.youtube.com/vi/lLASgvqAddI/0.jpg)