Summary
/-/https/www.sciencebuddies.org/cdn/Files/12530/19/bath-bomb-activity-thumbnail.jpg)
/-/https/i.ytimg.com/vi/Ar78O1hl7TE/maxresdefault.jpg)
Introduction
Have you ever had a refreshing bath using a bath bomb? It can be quite the relaxing experience, especially if your bath bomb has a nice fragrance or includes some bath salts. Have you ever wondered what causes a bath bomb to become so fizzy when it touches the water in the bathtub? It is due to a chemical reaction taking place between different ingredients within the bath bomb. In this activity, you will get to make your own homemade bath bombs and explore how changing the amounts of the different ingredients affects how fizzy the bath bombs end up being when you toss them in the bath. You can use your perfected method to create some super satisfying bath bombs!Materials
- Bath Bomb Science Kit, available from our partner Home Science Tools®. Includes:
- Spherical bath bomb molds (6 spheres)
- Cornstarch (1 lb)
- Baking soda (1 lb)
- Epsom salt (1 lb)
- Citric acid (8 ounces)
- Food colors (red, blue, green, yellow)
- Fragrance (1/2 oz. raspberry, 1/2 oz. vanilla)
- Waterproof thermometer
- You will also need to gather these items:
- Large bowls (4)
- Masking tape or painter's tape
- Pen or permanent marker
- Metric measuring cup
- Water
- Vegetable oil
- Medicine dropper
- Measuring spoons
- Forks and spoons for mixing
- Stopwatch or timer
- Optional: Helper to help you time the reaction times.
- Optional, but recommended: Oven
Note: If you live in a very humid environment, use the oven to dry the bath bombs after making them to get satisfying results. Note that you can use the plastic molds in the oven at 170°F.
Disclaimer: Science Buddies participates in affiliate programs with Home Science Tools®, Amazon.com, Carolina Biological, and Jameco Electronics. Proceeds from the affiliate programs help support Science Buddies, a 501(c)(3) public charity, and keep our resources free for everyone. Our top priority is student learning. If you have any comments (positive or negative) related to purchases you've made for science projects from recommendations on our site, please let us know. Write to us at [email protected].
Prep Work
- Preheat the oven to 170 degrees Fahrenheit (or its lowest setting). Adult assistance is required for using the oven.
- Note that the recipe amounts given in this activity are for approximately filling three halves of the provided spherical bath bomb molds, using each recipe. If you want to make additional bath bombs, you can double or triple the recipes.
Instructions
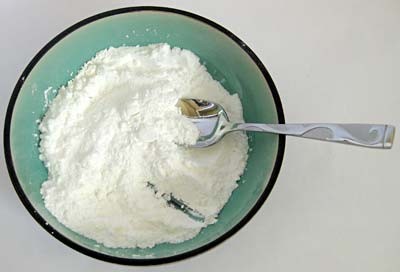
- In one bowl, mix together:
- 3 tablespoons (tbsp.) citric acid
- 6 tbsp. baking soda
- 4.5 tbsp. cornstarch
- 1.5 tbsp. Epsom salt
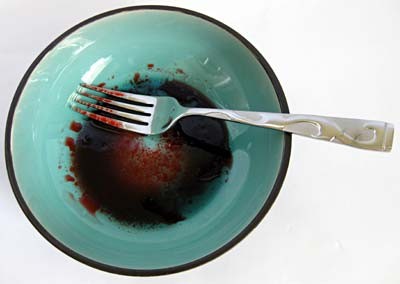
- In a second bowl, mix together:
- 2.25 teaspoons (tsp.) vegetable oil
- 2.25 tsp. water
- 5 drops of food coloring (green, yellow, red or blue)
- 30 drops of fragrance (vanilla or raspberry)
- Using a clean medicine dropper, add a few drops of the wet mixture to the dry ingredients in the first bowl. What happens when you add a drop of the wet mixture? You should see it fizz — this is the bath bomb reaction taking place! Because you do not want the bath bombs to react yet, quickly press down on the fizzy spot with the back of a clean spoon. This should stop the fizziness. Mix in the damp spot with the rest of the ingredients in the bowl. Repeat this process until you your bath bomb mixture has the right consistency. The perfect mixture should be damp enough so that it holds shape when you press together small pieces with your fingers.
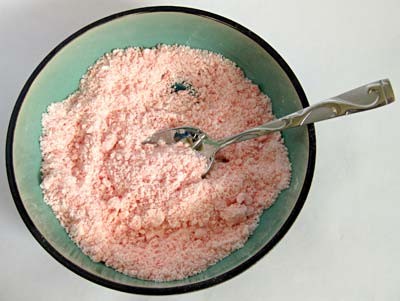
- Note: Part of the challenge of making homemade bath bombs is adding the right amount of wet ingredients. If you live in a humid environment, you may not need to add all of the wet ingredients.
- If the bath bomb mixture appears to continue to puff up even after you have thoroughly mixed in some wet ingredients, then the mixture may be too wet. If this happens, start over making the bath bombs from the beginning, but this time use less water in the recipe.
- If the bath bombs are very crumbly, the bath bomb mixture may not have enough water in it. If the bath bombs are too dry, they will fall apart after they have dried. In that case, start over making the bath bombs from the beginning, but this time use more water in the recipe.
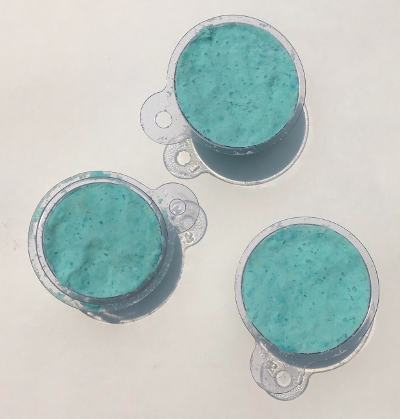
- Use a clean medicine dropper to drop one drop of vegetable oil into as many halves of the spherical bath bomb molds as you are using. Then use a finger to spread the oil all around the mold's surface.
- Fill one of the molds with the bath bomb mixture. Add a spoonful at a time and use the back of the spoon and/or the palm of your hand to press the mixture down into the mold continually as the mixture is added. If you are filling multiple molds, evenly divide up the mixture between them.
- In a third bowl, mix together:
- 2 tbsp. citric acid
- 4 tbsp. baking soda
- 7.5 tbsp. cornstarch
- 1.5 tbsp. Epsom salt
- In a fourth bowl, mix together:
- 2.25 tsp. vegetable oil
- 5.5 tsp. water
- 5 drops of a different food coloring
- 30 drops of fragrance (vanilla or raspberry)
- Use a clean medicine dropper to slowly mix the wet mixture with the dry ingredients in the third bowl, one drop at a time, as you did before, using the spoon to press down on fizzy spots and continually stirring the mixture. Again, make sure the bath bomb mixture is not too dry or too wet. Fill the molds as similar as possible to how you filled them for the first bath bomb recipe.
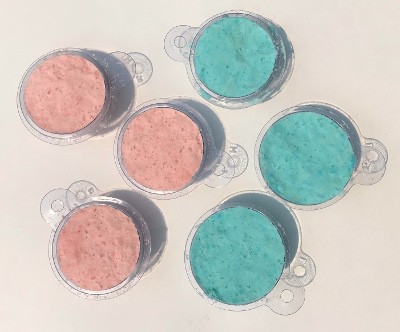
- Let the bath bombs dry. Turn off the oven (which was preheated to 170 degrees Fahrenheit), put the molds inside, and let them stay in the (turned off) oven for 45 minutes. Once the bath bombs have dried, carefully remove them from the molds.
- Reminder: If the bath bombs are very crumbly, the recipes may not have had enough water in them. To fix this, you can re-make the bath bombs but try using a little more water.
- Get ready to use the bath bombs in a bath! Fill a tub with hot water. Then place the bath bombs in the tub.
 What happens when the bath bombs are placed in the water? Is one of the bombs fizzier than the other one? Does one take longer to dissolve than the other one? Make sure to check with your fingers under water if the bath bomb has fully dissolved. Can you explain what happens?
/-/https/www.sciencebuddies.org/cdn/Files/5966/11/cornstarch-citric-acid-baking-soda.jpg)
/-/https/www.sciencebuddies.org/cdn/Files/5967/11/water-food-coloring-mixed.jpg)
/-/https/www.sciencebuddies.org/cdn/Files/5968/12/bath-bombs-mixture.jpg)
/-/https/www.sciencebuddies.org/cdn/Files/5969/26/bath-bombs-in-molds-scaled.png)
/-/https/www.sciencebuddies.org/cdn/Files/12479/9/all-bath-bombs-in-molds-scaled.jpg)
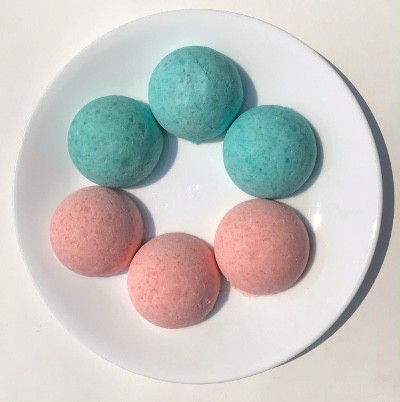
/-/https/www.sciencebuddies.org/cdn/Files/12470/21/dried-bath-bombs-scaled.jpg)
Cleanup
- If you have extra bath bombs and want to save them for later, put them in a sealable plastic bag.
What Happened?
When a bath bomb comes in contact with water, the baking soda and citric acid react to make carbon dioxide bubbles. The cornstarch acts as a "filler" to control the reaction between the baking soda and citric acid. In this activity, the second recipe used more cornstarch, and less baking soda and less citric acid, compared to the first recipe. Consequently, you should have seen that a bath bomb made using the first recipe produced much more vigorous bubbles and impressive fizzing, and dissolved much faster, compared to a bath bomb made using the second recipe. (The exact size of the bath bombs also affects how long it takes them to dissolve, since larger bath bombs will take longer than smaller bath bombs to dissolve, but since the bath bombs should all have been the same size, this factor should not have affected the comparisons.)Digging Deeper
Bath bombs can have a wide range of ingredients, including bath salts, different food coloring, various fragrances, and other components. That said, there are a few key ingredients that most simple recipes have and these include baking soda and citric acid. Why is this? When baking soda and citric acid are mixed together with some water, they undergo a chemical reaction. (It is specifically an acid-base reaction, since the baking soda, also known as sodium bicarbonate, is a weak base and citric acid is a weak acid.) The reaction produces lots of bubbles, which you see as the bath bomb dissolves in the water. These bubbles that make the water get so fizzy are made of carbon dioxide gas.
Another ingredient that is often used in homemade bath bombs in cornstarch. This ingredient can act as a dry "filler" that gets mixed in with the reactive baking soda and citric acid components in the bombs. In this activity, you explore how changing the amount of cornstarch filler affects how fizzy the bombs turn out. The amount of filler can affect how quickly a bomb dissolves and how likely the reactive particles of baking soda and citric acid are to find each other and cause a bubbly chemical reaction. This is a fun and interesting thing to think about when coming up with the ideal ratios for creating a luxury like a bath bomb, but the same concepts apply to other parts of life too, such as some medications. For example, fillers are sometimes used in pills of medicine to control when and how the pill dissolves after a person swallows it, making sure it has the right effect in the body.
Ask an Expert
For Further Exploration
- Try making a two-colored bath bomb by combining bath bomb mixtures made following different recipes. Can you make a bath bomb where part of it dissolves faster than the other part? Can you make it move or spin around in a certain way by doing this?
- In this activity, you tested your bath bombs in a hot bath, but they might behave differently in colder water. You could use a stopwatch or timer to see how long they take to dissolve in hot water and then compare it to placing them in cold water. Do the bath bombs take a different amount of time to dissolve depending on the temperature of the water?
- Instead of citric acid, you could experiment with making bath bombs using citric acid substitutes, such as cream of tartar or lemon juice. How do bath bombs made using a citric acid substitute compare to bath bombs made using citric acid?
- In this activity you tried varying the amount of cornstarch, but you could try making bath bombs without any cornstarch. If bath bombs are made that do not have cornstarch, how do they compare to bath bombs made with cornstarch? Are they very different?
/-/https/www.sciencebuddies.org/cdn/Files/4078/5/FoodSci_img073.jpg)
/-/https/careerdiscovery.sciencebuddies.org/cdn/Files/20209/5/chemical-engineer-citgo.jpg)
/-/https/careerdiscovery.sciencebuddies.org/cdn/Files/1429/17/unsplash-4pM4nhHyo9M.jpg)
/-/https/careerdiscovery.sciencebuddies.org/cdn/Files/1107/19/pexels-photo-3938023.jpg)
/-/https/careerdiscovery.sciencebuddies.org/cdn/Files/1100/18/unsplash-NP6JLl_2C-c.jpg)
/-/https/careerdiscovery.sciencebuddies.org/cdn/Files/20167/5/IndustrialProdManager_KeyPhoto.jpg)
/-/https/img.youtube.com/vi/gmeCY7ANrog/0.jpg)
/-/https/img.youtube.com/vi/g0Y6yKlDNdM/0.jpg)
/-/https/img.youtube.com/vi/8h7UZ8pE_Q0/0.jpg)