If you have wondered how rockets are propelled forward or if you enjoy the excitement of launching a rocket, this is an activity for you! You will learn how to make tiny rockets from aluminum foil and matchsticks, and how to ignite them safely. Soon, you will be launching one rocket after the other! Your challenge will be to find the most reliable launching mechanism.
This activity is not recommended for use as a science fair project. Good science fair projects have a stronger focus on controlling variables, taking accurate measurements, and analyzing data. To find a science fair project that is just right for you, browse our library of over 1,200 Science Fair Project Ideas or use the Topic Selection Wizard to get a personalized project recommendation.
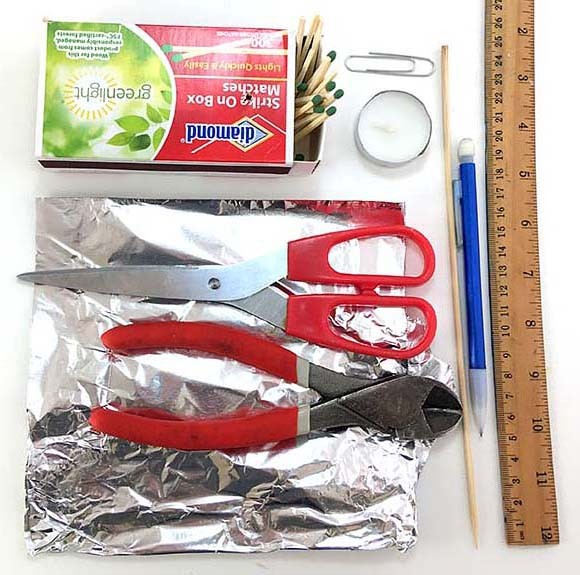
Materials
Aluminum foil
Skewer
Scissors
Pencil
Matchsticks, at least 20
Pliers
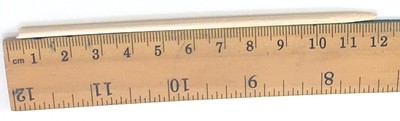
Ruler
Large matchbox or another box that is less than an inch high
Paper clip (without plastic cover)
Tea light candle with a candle holder or other surface that can support wax drippings, or a multipurpose lighter
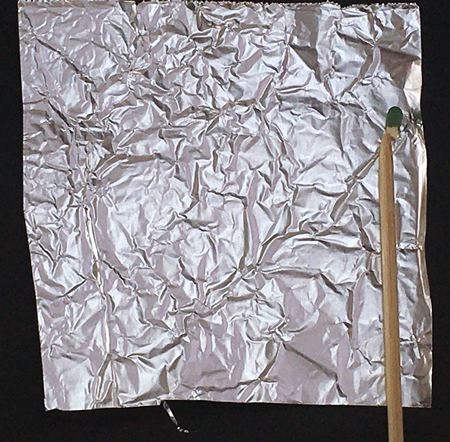
Cut three 6 cm by 6 cm square pieces of aluminum foil.
Clip the flammable tips off three matchsticks.
To make one rocket, align the skewer with the edge of one piece of aluminum foil.
Place the skewer 2.5 cm from the top of the aluminum foil, leaving the space above empty.
Place one matchstick tip just above the skewer, pointing away from the skewer.
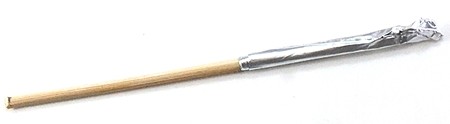
Carefully roll the foil around the skewer. It should be tightly wrapped, but not so tight that you cannot pull the skewer out.
Pinch the top of the roll — the area without the skewer or matchstick tip — and fold it at least two times, pinching hard to make sure there is an airtight seal.
Slide the rocket (the aluminum foil roll) off the skewer.
Repeat steps 4–7 two times, for a total of three rockets. Leave the third rocket on the skewer.
If you accidentally forget to keep one rocket on the skewer, do not try to slide one back on, it is almost certainly going to get damaged in the process. Instead, prepare another rocket that stays on the skewer. You can launch the rockets that are no longer on a skewer with the paperclip launcher.
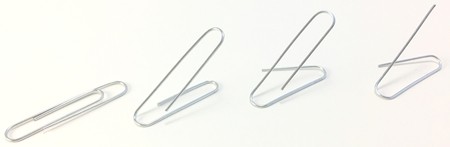
Make a Paperclip Launcher:
Lay a paperclip flat.
Fold the outer loop up so it points about 45 degrees up.
Bend the free arm of the inner loop to the side so the paperclip can stand up, resting on that loop.
Use the pliers to clip off a piece of the outer loop of the paperclip so you are left with a straight section pointing about 45 degrees up. This is your launcher.
Point the rocket launcher away from people and pets. Expect the rockets to fly several meters.
Have water or a fire extinguisher ready nearby.
Everyone should wear safety glasses, including spectators.
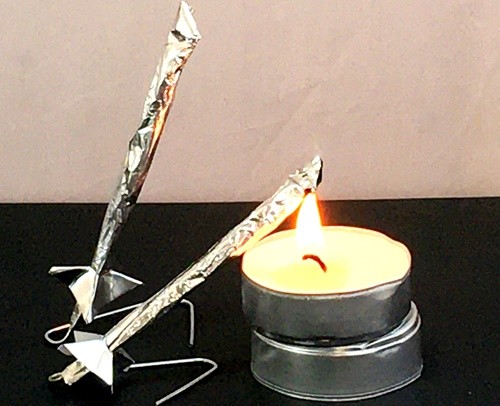
Take the box launcher, skewer, and rocket.
What do you think will happen if you heat the tip of this rocket?
Place your launcher, with the rocket inside the hole, on a surface that is safe for wax drippings.
Point the rocket so it has plenty of space to fly, and point it away from people or pets. Put on your safety glasses and ask your spectators to put them on, too.
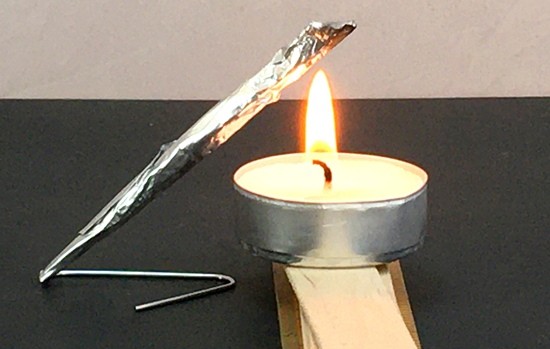
Make a small platform to put the candle on. Once the candle is lit, its flame should reach the tip of the rocket. You can also use a multipurpose lighter to heat the tip of the rocket.
If smoke appeared from the tip of your rocket, the tip was not sealed tightly enough. Make a new rocket and make sure to pinch the top closed tightly.
After letting your rocket cool, see if it was stuck on the skewer. If so, make a new rocket but roll it up a little less tightly on the skewer.
If smoke gradually came out from the bottom of the rocket, make a new rocket but roll it up a little more tightly so there is less space for smoke to escape.
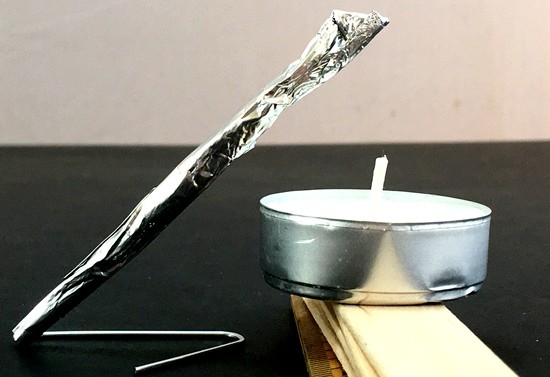
Replace the box launcher with the paperclip launcher and, if it is not loaded yet, load it with a rocket.
What do you think will happen if you heat the tip of this rocket?
If the rocket is still on the launcher, turn over the launcher to slide the rocket off. Do not touch the rocket, it will be hot.
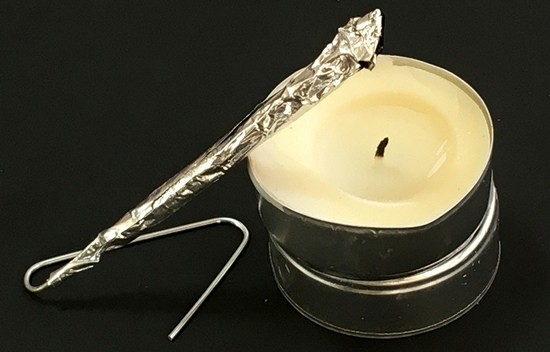
Slide the third rocket onto the paperclip launcher. Carefully pinch or twist the bottom end of the rocket so it becomes just a little wider than the paperclip. Do not press or twist too much because the rocket needs to slide easily off the launcher.
If smoke appeared from the tip of your rocket, the tip was not sealed tightly enough. Make a new rocket and make sure to pinch the top closed tightly.
After letting your rocket cool, see if it was stuck on the paperclip. If so, make a new rocket and pinch it very carefully. Test if it easily slides along the paperclip, but do not slide it off as it will be hard to get it back on.
If smoke gradually came out from the bottom of the rocket, make a new rocket but pinch or twist the bottom of the rocket a little more tightly so there is less space for smoke to escape.
Try to launch a new rocket from the paperclip launcher, again following steps 2–5.
Rockets do not launch if smoke can gradually escape from the top or bottom of the rocket.
Why would that be? Where does the force that launches the rockets come from?
Make more rockets and repeat the experiment.
Can your results be reproduced? Can you explain your results?
What Happened?
The rocket was probably successfully launched using the box launcher. The first trial with the paperclip launcher probably caused a lot of promising smoke but no launch, but the second trial was likely successful.
When the matchstick tip heats, it ignites and creates gases. When the gases cannot escape fast enough, pressure builds up inside the cylinder of your rocket and this pressure eventually pushes the rocket off. The paperclip is very thin. When the cylinder of the rocket is not pinched, there is plenty of room for gases to escape. This prevents pressure from building up, and thus there is no launch. If you pinch the rocket so it becomes only a little wider than the paperclip, gases can no longer easily escape and the rocket launches.
These rockets can still be improved. Fins can stabilize the flight of your rocket, and more fuel can shoot the rocket farther or higher. Increasing the launch angle (pointing the rocket up higher before launch) will make the rocket go higher.
Digging Deeper
Rockets (and jet engines) propel themselves by letting out exhaust gases. It is a nice example of Newton's third law of motion which states that for every action, there is an equal and opposite reaction. You might have seen this law working when you let a balloon go without tying the neck: air escapes through the neck of the balloon (the action) and the balloon is pushed in the opposite direction (the reaction). Rockets are propelled in the same way.
Rockets create pressurized gases by burning propellants. Your matchstick rockets use the chemicals in the matchstick tip as fuel. The heat from the candle ignites the fuel and starts the production of gases and smoke. Did you notice that for a successful launch, the release of these gases (the action) coincided with the launch of the rocket in the opposite direction (the reaction)? The body of your aluminum foil rocket acts like the combustion chamber of your rocket. It also confines the gases and smoke. When the pressure becomes large enough, the gases and smoke suddenly stream out (the action) and the reaction launches the rocket.
The size of the hole through which the gases and smoke escape is crucial for a successful launch. If the hole is too large—as you probably noticed with your first launch on the paperclip launcher—the smoke and gases gradually escape. No pressure builds up and the rocket does not launch. If you reduce the size of this hole, more pressure will build up before the gases and smoke escape. Newton's second law states that the size of the action—and thus also the size of the reaction or the thrust on the rocket—is equal to the mass flow rate (mass per unit time) of the gases that escape multiplied by the speed at which these escape. Does a smaller hole mainly allow the gases to escape with more speed or is the reduction of flow rate the dominant factor? When more fuel is ignited, more gasses (and thus more mass) will accumulate. Does this propel the rocket farther and higher? Try it out!
Ask an Expert
Curious about the science? Post your question for our scientists.
Try to improve your rockets. You might want to add small pieces of tape or aluminum foil tape to the side of the rocket to act as fins, or try using two matchstick tips for fuel. Always predict what you think will happen, test it, and try to explain your observations.
3... 2... 1... 0— blastoff! In this science project, you will use a bottle rocket launcher to launch your own bottle rocket. You will load it with water and pressurized air, make several launches, and find out what makes your rocket soar the highest.
Read more
If you have ever watched a rocket launch on TV, you might have noticed that rockets have multiple stages. Some parts of the rocket fall off and burn up in the atmosphere whereas the rest of the rocket keeps going. Why does this happen? Try this activity to find out and build your own two-stage rocket using balloons!
Read more
Blast off! Have you ever played with a model or toy rocket, or seen a real rocket launch on TV? In this project you will make simple rockets out of paper and launch them by blowing into a drinking straw. Can you make the rocket that flies the farthest?
Read more
This lesson will introduce your students to the scientific method using a fun, hands-on activity.
A middle school version of this lesson plan is also available.
Read more
Do you need a fun, easy way to teach your students about the scientific method? Try this lesson that uses rockets made from nothing but paper, tape, and straws.
An elementary school version of this lesson plan is also available.
Read more
Learn about real space flight and Newton's laws of motion with this fun lesson! This new twist on a classic project lets your students build a multi-stage balloon rocket that they can launch across the classroom.
Read more
NGSS Performance Expectations:
MS-PS2-2. Plan an investigation to provide evidence that the change in an object's motion depends on the sum of the forces on the object and the mass of the object.
MS-ETS1-3. Analyze data from tests to determine similarities and differences among several design solutions to identify the best characteristics of each that can be combined into a new solution to better meet the criteria for success.
Humans have always longed to fly and to make other things fly, both through the air and into outer space—aerospace engineers are the people that make those dreams come true. They design, build, and test vehicles like airplanes, helicopters, balloons, rockets, missiles, satellites, and spacecraft.
Read more
Aerospace engineering and operations technicians are essential to the development of new aircraft and space vehicles. They build, test, and maintain parts for air and spacecraft, and assemble, test, and maintain the vehicles as well. They are key members of a flight readiness team, preparing space vehicles for launch in clean rooms, and on the launch pad. They also help troubleshoot launch or flight failures by testing suspect parts.
Read more
/-/https/www.sciencebuddies.org/cdn/Files/15377/6/match-rockets-ready-to-go-off-thumbnail.jpg)
/-/https/i.ytimg.com/vi/0ZdGgbMZCeM/maxresdefault.jpg)
/-/https/www.sciencebuddies.org/cdn/Files/15381/9/match-rockets-materials.jpg)
/-/https/www.sciencebuddies.org/cdn/Files/15382/6/make-match-rocket-launching-stick.jpg)
/-/https/www.sciencebuddies.org/cdn/Files/15383/6/roll-aluminum-foil-into-match-rocket-on-black.jpg)
/-/https/www.sciencebuddies.org/cdn/Files/15384/6/match-rocket-on-stick.jpg)
/-/https/www.sciencebuddies.org/cdn/Files/15385/6/make-paperclip-launcher.jpg)

/-/https/www.sciencebuddies.org/cdn/Files/15386/6/match-rockets-matchbox-launcher.jpg)

/-/https/www.sciencebuddies.org/cdn/Files/8658/15/warning-purple-40.png)
 What do you think will happen if you heat the tip of this rocket?
/-/https/www.sciencebuddies.org/cdn/Files/15387/8/box-launcher-with-rocket-and-candle.jpg)
/-/https/www.sciencebuddies.org/cdn/Files/15388/7/rocket-on-paper-clip-with-candle.jpg)
/-/https/www.sciencebuddies.org/cdn/Files/15389/6/paperclip-launcher-with-rocket-ready-to-go.jpg)
/-/https/www.sciencebuddies.org/cdn/Files/15390/6/pinched-rocket-on-paperclip-launcher-with-candle.jpg)
/-/https/www.sciencebuddies.org/cdn/Files/15379/6/balloon-action-reaction-drawing.jpg)
/-/https/www.sciencebuddies.org/cdn/Files/15380/6/match-rockets-action-reaction-forces.jpg)
/-/https/www.sciencebuddies.org/cdn/Files/15378/6/two-match-rockets-ready-to-go-off.jpg)
/-/https/www.sciencebuddies.org/cdn/Files/15722/4/rocket-blastoff-thumbnail.jpg)
/-/https/www.sciencebuddies.org/cdn/Files/12820/5/sls_booster_sep.jpg)
/-/https/www.sciencebuddies.org/cdn/Files/15246/4/paper-rocket-thumbnail2.jpg)
/-/https/www.sciencebuddies.org/cdn/Files/12462/5/paper-rocket-thumbnail-elementary.jpg)
/-/https/www.sciencebuddies.org/cdn/Files/12422/5/paper-rocket-thumbnail.jpg)
/-/https/www.sciencebuddies.org/cdn/Files/8834/16/balloon-rocket-thumbnail.jpg)
/-/https/careerdiscovery.sciencebuddies.org/cdn/Files/835/18/msfc-202000343.jpg)
/-/https/careerdiscovery.sciencebuddies.org/cdn/Files/842/17/unsplash-Bt9HIKC0Nus.jpg)
/-/https/img.youtube.com/vi/dxC_GuLNiAs/0.jpg)
/-/https/img.youtube.com/vi/vOlYMDGff5Y/0.jpg)
/-/https/img.youtube.com/vi/zpV7ac3ecl4/0.jpg)