Summary
/-/https/www.sciencebuddies.org/cdn/Files/14659/7/remove-rock-candy-thumbnail.jpg)
/-/https/i.ytimg.com/vi/ajrNj7JcCpQ/maxresdefault.jpg)
Introduction
Did you know you can grow your own lollipop? In this activity, you'll learn how to grow your very own rock candy. It is an easy process and not labor-intensive. So, what are you waiting for? See how large you can grow your sugar crystals before temptation takes over.
Materials
- Yarn or cotton string
- Glass jar (a 14 oz jar works well)
- Water
- Tablespoon
- Large plate
- Granulated white sugar
- Screw, or other small nontoxic object to use as weight
- Wooden skewer, Popsicle® stick, or pencil
- Tape
- Saucepan
- Stove
- Measuring cups
- Wooden mixing spoon
- Potholders
- Paper towel
- Adult supervision
- Optional: Food coloring
- Optional: Concentrated food flavoring

/-/https/www.sciencebuddies.org/cdn/Files/14660/7/rock-candy-activity-materials.jpg)
Prep Work
- Cut a string approximately two inch longer than the height of the glass jar.
- Soak the string in a cup of water for 5 minutes.
- Use your hand to squeeze the excess water from the string.
- Roll the string in one tablespoon of sugar on a plate. The string will be coated with sugar.
- Lay your sugar-coated string on a clean, dry plate overnight.
/-/https/www.sciencebuddies.org/cdn/Files/14661/8/sugar-coated-string.jpg)
Instructions
- Tie one end of your sugar-coated string to a screw or other small object that can serve as a weight. This weight prevents the string from floating in sugar water. It is ok if some of the sugar falls off while you are tying the string to the weight.
- Tie the other end of the string to a skewer, Popsicle® stick, or pencil. This stick will rest across the mouth of the jar and keep the string up.
- To adjust the length of the string, lower the weighted end of the string into the jar and rest the skewer across the mouth of the jar. Roll the skewer to wind the string until the weight is hanging approximately one centimeter (cm) from the bottom of the jar. Tape the string to the skewer so that the length of the string is fixed.
 Why do you think the string should not touch the bottom of the jar?

- Take the skewer with string attached out of the jar and set it aside.
- Caution: Be sure to do steps 6-25 under adult supervision or with adult help!
- Heat enough water to fill the jar. When the water is boiling, carefully pour it into the jar. You might want to use a funnel to avoid spilling too much water.
- Let the jar full of hot water sit until your sugar-water solution is ready.Why do you think it is important to preheat the jar?
- You will now make the sugar-water solution. Be extra careful; the sugar-water solution will get extremely hot and can cause a bad burn if spilled.
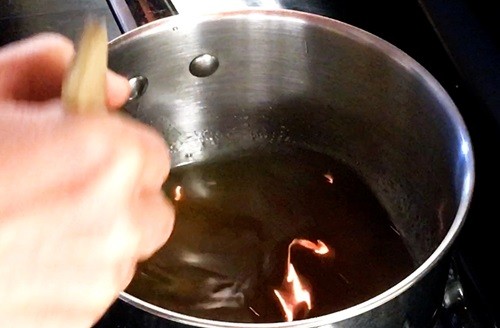
- Warm up ½ cup of water in a pot. (Note: if you are using jars that are larger than 14 oz, use ¾ cup of water, or, for even larger jars, 1 cup of water.)
- Turn the heat on to low.
- Add 1 cup of sugar to the water. (Note: add 1½ cups of sugar if you used ¾ cup of water in step 9, or 2 cups of sugar if you added 1 cup of water in step 9.)
- Mix with a wooden mixing spoon.Why is it not advised to use a plastic or metal spoon?
- Stir the solution until you no longer see sugar crystals floating around in the water.What do you think happens to the sugar?
- Turn the heat back up and wait until the sugar-water solution returns to a rolling boil. Make sure to keep stirring so the temperature is consistent throughout the solution. Caution: Be careful not to splatter! This sugar water is extremely hot and will burn if spilled on your skin.
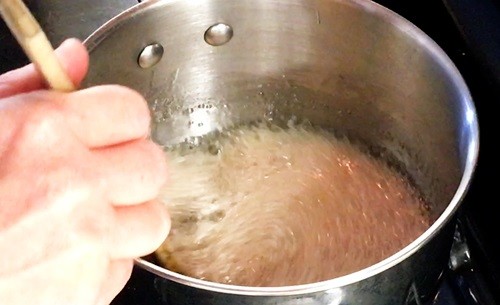
- Remove the boiling sugar-water solution from the stove.
- Continue to add sugar 1 tablespoon at a time. Stir thoroughly after each added spoonful, making sure that the sugar is completely dissolved before adding another spoonful. The sugar is completely dissolved when you no longer see sugar crystals in the solution. To distinguish between the tiny little bubbles in the solution and undissolved sugar, you can stop stirring for a moment; the undissolved sugar crystals will settle to the bottom of the pan, but the bubbles will remain suspended throughout the solution.Why do you think we need to have that much sugar dissolved into the solution?
- Keep adding sugar until no more will dissolve in the solution. If you think you have added too much sugar to your solution, do not worry. Keep stirring and if, even after a full 2 minutes of stirring, you have undissolved sugar at the bottom of your pot, return the pot to the stove. Heat the solution until it just begins to boil, then remove it from the stove. This should help you to get that last bit of sugar into the solution.Why do you think we need to have all sugar dissolved into the solution?
- Optional: If you would like to explore what happens when you add a few drops of food coloring or flavoring (vanilla, mint, etc.) to your sugar-water solution, do that now.Do you think you will end up with colorful or flavorful candy, or do you think these additives will stay in the water?
- Allow the sugar-water solution to cool for 5 minutes. Meanwhile, pour the hot water out of the glass jar. Caution: The jar will be hot, so use oven mitts or potholders to handle the jar.
- While you wait, choose a place to leave your jar undisturbed for a week. As large fluctuations in temperature can interfere with the crystallization process, avoid places that get direct sunlight or are near a heating or cooling vent. Also, remember that you will want to see what happens in the jar without moving it.
- After the sugar-water solution has cooled for about 5 minutes, pour the solution into the preheated glass jar. Caution: Be extremely careful when pouring the sugar-water solution; it is hot and will burn if spilled on your skin.
- Using potholders, move the hot jar to the place where you will leave it undisturbed for one week.
- Gently lower the weighted string into the jar.

- Securely tape the skewer holding the string to the edges of the jar to prevent the string from being accidentally jostled.Why do you think it is important that the string does not move around in the jar?
- Loosely cover the jar with a paper towel to prevent dust and debris from flying in, while still allowing evaporation to occur.Why would it be important to allow water to evaporate out of the water solution?
/-/https/www.sciencebuddies.org/cdn/Files/14662/9/rock-candy-seeded-string-in-jar.jpg)
/-/https/www.sciencebuddies.org/cdn/Files/14663/7/dissolved-sugar.jpg)
/-/https/www.sciencebuddies.org/cdn/Files/14664/8/vigorously-cooking-sugar-water.jpg)
/-/https/www.sciencebuddies.org/cdn/Files/14665/6/lower-string-in-solution.jpg)
Days 3 to 6: Observe crystal growth
- Look at your jar once a day but try not to move the jar or the string while you observe. Shining a flashlight through the jar can help see the growing crystals.What do you see? Are there any crystals growing? Where on the string are the crystals? Are there crystals on places other than the string?

/-/https/www.sciencebuddies.org/cdn/Files/14666/7/rock-candy-growth.jpg)
Day 7: Enjoy the candy
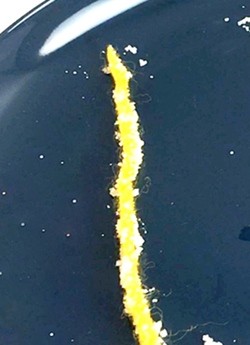
- After up to a week of growth, remove the string from the jar. If there is a layer of hardened sugar syrup coating the top of your jar, you can use a spoon to gently break that layer before pulling out your sugar crystal.

- Briefly rinse the rock candy crystal in cold water, then leave it on a paper towel for 30 minutes to dry.

- Observe your rock candy.What does the rock look like? Does it remind you of something you have seen in nature, and if so, what? Is the rock thicker in certain places? Why would it form that way?
- Enjoy your rock candy!
/-/https/www.sciencebuddies.org/cdn/Files/14667/6/remove-rock-candy-from-jar.jpg)
/-/https/www.sciencebuddies.org/cdn/Files/14668/6/rock-candy-results.jpg)
Cleanup
What Happened?
After a day or two, you probably saw crystals forming on the string; these crystals probably grew larger day after day.
When you stirred sugar into hot water, the sugar seemed to disappear. You could no longer see the sugar because it broke down into the tiniest sugar particles; the sugar dissolved in the hot water. These tiny sugar particles are so tiny that you cannot see them.
When this sugar-water solution cools, the dissolved sugar particles, which are continuously bumping into each other, start to occasionally stick together; this is the beginning of the crystallization process. Once several sugar particles are stuck together, they actively attract other sugar particles to join them. This is how the crystal "grows."
You lowered a sugar-coated string into the solution. The little pieces of sugar on the sugar-coated string are meant to act as seeds; they attract other sugar particles to join them, so the sugar crystals grow on them.
You preheated the jars before adding the sugar solution. Adding your very hot sugar-water solution to a cold jar would result in a dramatic temperature change of the sugar solution. This sudden cooling might initiate the formation of small crystals along the glass. The small crystals would then act as seeds and that could disrupt the growth of your rock candy formation. To prevent this disruption, you warmed the jar before you added the hot sugar-water solution.
It is advised to use a wooden spoon to stir, not a plastic or metal one because a plastic spoon might melt in the sugar-water solution while a metal spoon might burn you when it gets hot.
Digging Deeper
Rock candy is a collection of large sugar crystals that are "grown" from a sugar-water solution. Sugar, like many other materials, can come in many different physical states. As a solid, it can either be amorphous, without shape, like when it forms cotton candy, or crystalline, with a highly ordered structure and shape, like when it forms rock candy crystals.
Crystals form when the smallest particles of a substance, the molecules, arrange themselves in an orderly and repetitive pattern. Molecules are too small for us to see moving around and arranging themselves, but you can get a rough idea of what this would look like by taking a small shallow tray and filling it with marbles, ball bearings, or other spheres. As you add more spheres, the bottom of the tray becomes covered, then the spheres must form layers on top of one another, and a structure or pattern emerges.
So how do the molecules of a substance get together to form a crystal? First, there have to be enough molecules in one area that they have a high chance of bumping into one another. This happens when a solution, which is made up of a liquid and the substance that will be crystallized, is saturated. In the rock candy, the liquid is water and the substance is sugar. A solution is saturated when the liquid holds as much of the substance dissolved in it as possible. For example, when making rock candy, you dissolve as much sugar as possible in water to make a saturated solution. If you add more substance than can dissolve in the liquid, the undissolved bits remain as solids in the liquid. In a saturated solution, the molecules bump into one another frequently because there are so many of them. Occasionally when they bump into each other, the molecules end up sticking together; this is the beginning of the crystallization process and is called nucleation. Once several molecules are already stuck together, they actively attract other molecules to join them. This slow process is how the crystal "grows."
In this activity, you make a saturated solution of sugar and water and grow rock candy sugar crystals. To speed up the process, you jump-start the nucleation process by adding sugar crystals, called seed crystals, to the string first. These actively attract other molecules to join them, so sugar crystals tend to grow on those seed crystals.
Ask an Expert
For Further Exploration
- Can you find out how big your rock candy can grow? This will take a little more patience but, instead of stopping your experiment on Day 7, keep going!
- Find out what happens when you do not seed (sugar coat) your string. Or, is it better to start with one large seed crystal versus many small seed crystals? This website gives directions on how to make a single large seed crystal.
- Experiment with speeding up or slowing down the rock candy growth. What happens to the rate of growth if you rapidly cool your sugar-water solution? What happens if you start with a lower sugar-water concentration?
- Try making crystals from other substances. Try starting with materials you already know come as mini crystals, such as salt. You can also try substances that have a lot of sugar in them, such as maple syrup.
/-/https/www.sciencebuddies.org/cdn/Files/4635/5/make_grow_crystals_step4_img.jpg)
/-/https/www.sciencebuddies.org/cdn/Files/18172/4/maple-candy-thumbnail.jpg)
/-/https/www.sciencebuddies.org/cdn/Files/12735/4/crystal-growing-thumbnail.jpg)
/-/https/www.sciencebuddies.org/cdn/Files/5895/5/homemade-ice-cream-easy-bag.jpg)
/-/https/www.sciencebuddies.org/cdn/Files/12892/5/stack-homemade-maple.candy.jpg)
/-/https/www.sciencebuddies.org/cdn/Files/3970/17/making-marshmallows.jpg)
/-/https/www.sciencebuddies.org/cdn/Files/13016/9/science-activity-slushies-new-thumbnail.jpg)
/-/https/www.sciencebuddies.org/cdn/Files/14162/5/edible-paper-applications-thumbnail.jpg)
/-/https/www.sciencebuddies.org/cdn/blog/graphics/thumb/2017-food-science-thumb.png)
/-/https/careerdiscovery.sciencebuddies.org/cdn/Files/1316/17/unsplash-ePJQise0OkQ.jpg)
/-/https/careerdiscovery.sciencebuddies.org/cdn/Files/1107/19/pexels-photo-3938023.jpg)
/-/https/careerdiscovery.sciencebuddies.org/cdn/Files/1309/18/unsplash-vGA1ei1yxos.jpg)
/-/https/img.youtube.com/vi/fAt5B29lzqI/0.jpg)
/-/https/img.youtube.com/vi/jGvnRxCpRRs/0.jpg)
/-/https/img.youtube.com/vi/QGhpCU-96Ic/0.jpg)