Summary
/-/https/www.sciencebuddies.org/cdn/Files/14764/4/self-starting-siphon.jpg)
/-/https/i.ytimg.com/vi/SjNR8mQKDqo/maxresdefault.jpg)
Introduction
If you have ever seen someone use a siphon in a movie, they probably sucked on the tube to get it started. That can be dangerous with liquids like gasoline! Can you make a siphon that will start on its own? Try this activity to find out!
Materials
- Flexible drinking straws
- Scissors
- Electrical tape or modeling clay
- Tall glass or container
- Shorter glass or container
- Water
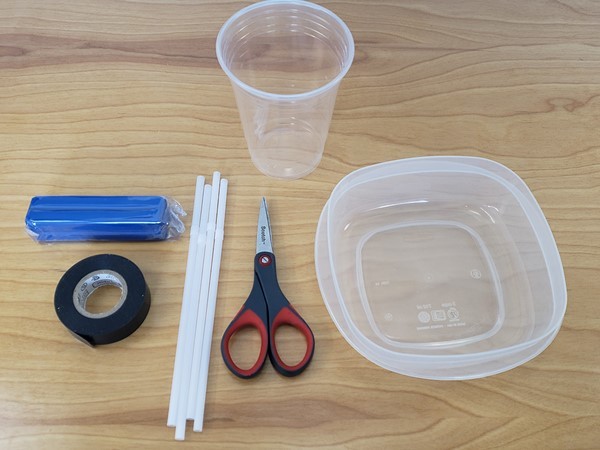
/-/https/www.sciencebuddies.org/cdn/Files/14737/6/straw-siphon-materials.jpg)
Prep Work
Instructions
- Fill your tall container to the brim with water and place it next to your small container.
- If needed, cut the long end of a straw so it fits into your tall container, with the flexible part resting on the lip.
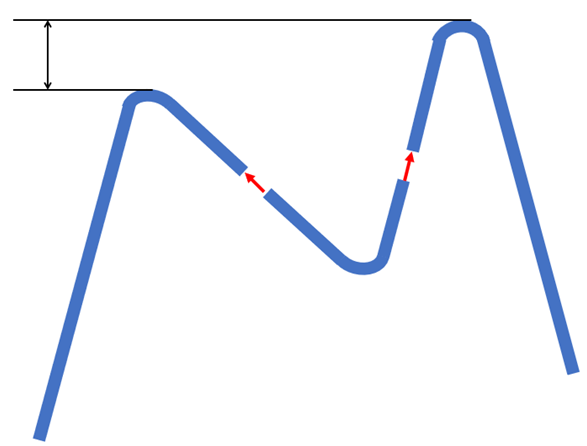
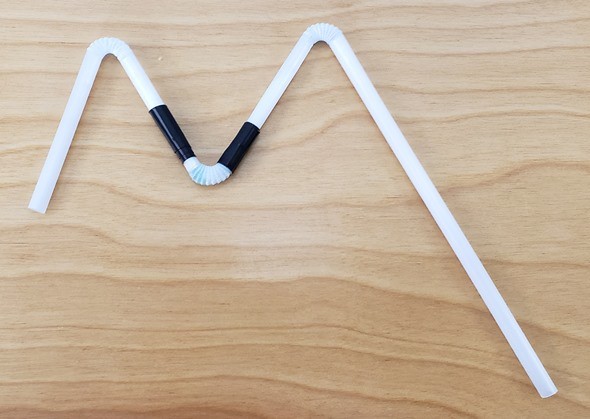
- Make an "M" shape from three straws. Make sure there is a height different between the two peaks of the M as shown.
- To connect two straws, cut the end of one straw to make a point.
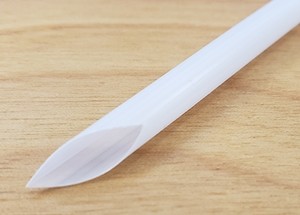
- Push the point into the end of another straw.
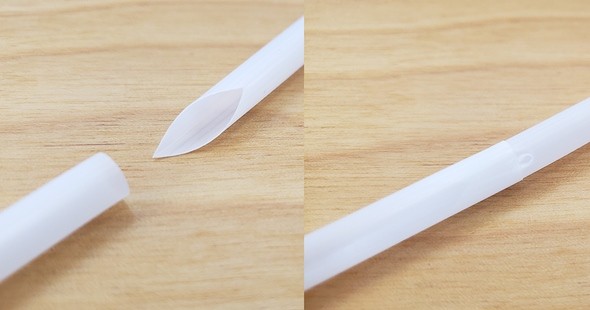
- Seal around the connections with tape or modeling clay.
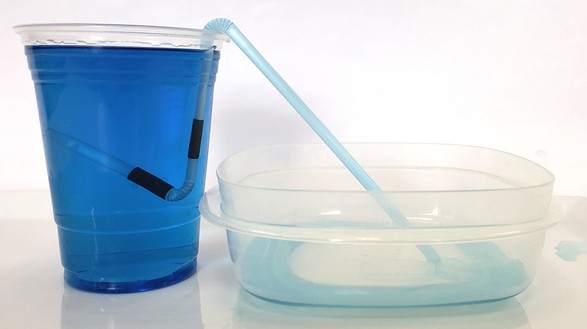
- Now, quickly place the lower side of the siphon into the tall container of water, with the other end of the siphon resting in the short container.
 What happens?
- If water does not start flowing, remove your siphon, let the water drain out, and try again. Make sure you put the siphon into the tall container quickly.
- If water still does not start flowing, you might not have good seals with your tape. Try re-applying the tape or using modeling clay.Once your siphon is started, when does the water stop flowing?
- If the water stops flowing when the water level in the tall container reaches the tape, you still do not have a good seal. Try fixing the seal as described in step 9.
/-/https/www.sciencebuddies.org/cdn/Files/14765/4/straw-M-shape.png)
/-/https/www.sciencebuddies.org/cdn/Files/14739/6/straw-point.jpg)
/-/https/www.sciencebuddies.org/cdn/Files/14740/5/straws-connected.jpg)
/-/https/www.sciencebuddies.org/cdn/Files/14766/4/M-straws.jpg)
/-/https/www.sciencebuddies.org/cdn/Files/14767/4/self-starting-siphon-start.jpg)
Cleanup
What Happened?
When you quickly place the siphon into the tall container, water flows up over the first hump of the M and down the other side. It gets going fast enough that it can just barely make it over the next hump of the M, and then flow downhill into the lower container. This is enough to get the siphon started, so you do not need to suck on the straw. Once the siphon has started, water should keep flowing until the water levels in the two containers are equal (assuming both ends of the straws are underwater).
Digging Deeper
The physics of a siphon can seem confusing and even counterintuitive at first. We all know that water flows downhill. It would be no surprise if you just poked a hole in the side of the taller container and water spilled out into the lower container. But a siphon requires water to go uphill first, going against gravity, before flowing down into the lower container. Because of this, the siphon needs a little help to get started. One way to do this is to suck the liquid through the straw. That is OK with water, but it is certainly a bad idea with a poisonous liquid like gasoline (so if you ever see someone do that in a movie or on TV—it is not safe!). Instead, in this activity, you made an M-shaped siphon. When you quickly put the siphon in the water, the water shoots up and over the first hump of the M, down, and them up again. If you do it fast enough, the water will just barely make it over the second hump of the M. Once the water starts flowing, it will keep going until the water levels in the two containers are equal (or, if the siphon's exit is above water, until the water level in the tall container is at the same height as the exit—this is explained by something called Bernoulli's Equation). The water in the second container can never get higher than the first container, because this would violate conservation of energy. That would be like a ball rolling up a hill all by itself!
Ask an Expert
For Further Exploration
- Does the height of the siphon's inlet matter? Try changing the length of the straw on the shorter side of the M.
- Try making a simpler siphon that is just an upside-down V shape. See the Additional Resources section below.
/-/https/www.sciencebuddies.org/cdn/Files/14736/5/straw-siphon.jpg)
/-/https/www.sciencebuddies.org/cdn/Files/12813/8/colorful-long-straws-STEM-activity.jpg)
/-/https/www.sciencebuddies.org/cdn/Files/5838/7/musical-straws.jpg)
/-/https/careerdiscovery.sciencebuddies.org/cdn/Files/1876/20/iStock-1188858196.jpg)
/-/https/careerdiscovery.sciencebuddies.org/cdn/Files/1640/26/Fyysikot_tyossaan.jpg)
/-/https/img.youtube.com/vi/amyaYsJLjss/0.jpg)
/-/https/img.youtube.com/vi/CmV2QZvfgck/0.jpg)
/-/https/img.youtube.com/vi/xIjMYB_qNOI/0.jpg)