/-/https/www.sciencebuddies.org/cdn/Files/21464/5/sb-logo.png)
/-/https/www.sciencebuddies.org/cdn/Files/21464/5/sb-logo.png)
Summary
/-/https/www.sciencebuddies.org/cdn/Files/11856/6/crt-tv.jpg)
/-/https/www.sciencebuddies.org/cdn/Files/11857/7/flat-screen-TV.jpg)
/-/https/www.sciencebuddies.org/cdn/Files/11869/6/digital-vs-analog-thumbnail.png)
Overview
We hear the word "digital" all the time—digital technology, digital device, digital TV, etc. But what does it actually mean? In this lesson plan, your students will learn how digital signals allow us to reliably transmit and store information.Learning Objectives
- Understand how noise impacts analog and digital signals differently.
- Explain how digital methods are better than analog methods for storing, copying, and transmitting information.
NGSS Alignment
This lesson helps students prepare for these Next Generation Science Standards Performance Expectations:- MS-PS4-3. Integrate qualitative scientific and technical information to support the claim that digitized signals are a more reliable way to encode and transmit information than analog signals.
|
Science & Engineering Practices
Planning and Carrying out Investigations.
Collect data about the performance of a proposed object, tool, process, or system under a range of conditions.
|
Disciplinary Core Ideas
PS4.C: Information Technologies and Instrumentation.
Digitized signals (sent as wave pulses) are a more reliable way to encode and transmit information.
|
Crosscutting Concepts
Science is a Human Endeavor.
Advances in technology influence the progress of science and science has influenced advances in technology.
|
Materials
/-/https/www.sciencebuddies.org/cdn/Files/11855/12/digital-vs-analog-materials.jpg)
- Printer paper (1 piece per student). Make sure the paper can be used for tracing (do not use heavy weight paper).
- Graph paper (1 piece per student). Make sure the paper can be used for tracing (do not use heavy weight paper).
- Scissors (for teacher prep work)
- For the entire class: Smartphone with a sensor app such as phyphox, available for free on Google Play for Android devices (version 4.0 or newer) or from the App Store for iOS devices (iOS 9.0 or newer).
Background Information for Teachers
This section contains a quick review for teachers of the science and concepts covered in this lesson.Do you remember the days of cassette tapes, VCRs, and analog TVs? If so, then you probably remember fuzzy pictures and the sound of static (Figure 1). Newer technologies like CDs, DVDs, Blu-Ray, and digital TVs are seemingly devoid of these problems—but why? This occurs because of an important difference between analog and digital signals. This section will give an overview of what analog and digital signals are, and how they are different.
Figure 1. Static on an older analog TV (left), and a "no signal" message on a newer digital TV (right).
First, we will use an example you are familiar with from your everyday life, especially as a teacher: writing. You probably have some students who have sloppy handwriting and some with "perfect" handwriting. But even if you ask a student with "perfect" handwriting to write the same letter of the alphabet over and over again, no two letters will be exactly the same (Figure 2). Handwritten letters are analog, meaning they can vary continuously. The position of the pencil tip and how hard you press down on the paper will always change slightly when you write, even if it is by a very small amount. This can result in small changes in the position or thickness of the line. Conversely, try typing the same letter repeatedly on a computer. Each instance of the letter will look exactly the same. These letters are digital, meaning they cannot vary continuously—they can only take on a discrete (or finite) set of values. There are a finite number of pixels on your computer screen, and (assuming we are typing black text on a white background) each pixel will either be black or white. So, for a fixed font, each copy of the same letter will look exactly the same.
/-/https/www.sciencebuddies.org/cdn/Files/11854/7/letters-analog-digital.jpg)
Figure 2. Handwriting, which is analog, (left) vs. typing on a computer, which is digital (right).
So, what do we mean by a "signal"? A signal can be any method to transmit information over a distance. Humans had plenty of ways to do this before modern electronics (e.g. smoke signals, lighthouses, signal fires, drums/horns, etc.). In modern times, when we talk about signals, we are usually referring to electronic signals that are either sent through wires, or wirelessly through the air as electromagnetic waves. If you have ever plugged a video game console into a TV with a video cable, or connected your phone/laptop to Wi-Fi, then you have witnessed those devices using electronic signals to send information.
Like with our handwriting example, an analog signal has a value that can vary continuously. What does that mean? It helps to visualize signals using a graph where the x-axis is time and the y-axis is the value of the signal, like Figure 3 (for our purposes here, we will not worry about the units of the y-axis, since they depend on the specific type of signal). The graph is "squiggly," and the y-value (in this example) can be anything between 0 and 1.
/-/https/www.sciencebuddies.org/cdn/Files/11860/8/analog-signal-no-noise.png)
Figure 3. An example analog signal.
A digital signal can only take on certain, discrete values. In its simplest form, the signal can be binary, meaning it can only take on two values: high or low (also referred to as on/off, true/false, or one/zero). Again, we can visualize this using a graph, like Figure 4. This graph is a "square wave"—the y value is either 0 or 1, but nothing in between.
/-/https/www.sciencebuddies.org/cdn/Files/11861/8/digital-signal-no-noise.png)
Figure 4. Example digital signal.
So, what is important about that difference? All electronic signals are subject to noise (meaning electronic noise, not necessarily the kind you can hear with your ears), which can affect the value of the signal. Noise can be introduced by other nearby electronic devices, by transmitting signals over very long distances, or by copying a signal over and over. Figures 5 and 6 show our example analog and digital signals with noise added.
/-/https/www.sciencebuddies.org/cdn/Files/11863/6/analog-signal-with-noise.png)
Figure 5. Example analog signal with noise added.
/-/https/www.sciencebuddies.org/cdn/Files/11864/6/digital-signal-with-noise.png)
Figure 6. Example digital signal with noise added.
Look at Figures 5 and 6—can you guess why digital signals are better for storing or transmitting information? Even with noise added, you can still clearly tell whether any point in the digital signal is "high" or "low" (e.g. a value of 0.93 or 1.1 on the y-axis still counts as "high," even though it is not exactly 1.0). However, adding noise makes it impossible to recover the exact original values in the analog signal. For example, in Figure 3, at time = 1 second, the y-value of the graph is exactly 0.5. But in Figure 5, with noise added, the y-value at time = 1 second is 0.54—the value has changed! There is no way to know that the original value was supposed to be exactly 0.5.
Now imagine that the analog signal is being sent through a cable from your VCR to your TV, and the y-value represents the brightness of a pixel on the screen. If that value is subject to noise (and this occurs for all the pixels, not just one of them), it will result in a fuzzy or distorted image. However, for the digital signal, all the 1's and 0's arrive intact (they never get "flipped" to the opposite value), so the data does not get distorted at all.
That might sound like a lot of information for your students to absorb, but do not worry. You will start the lesson off with something much more student-friendly: drawing and tracing. They will see how tracing something drawn freehand onto printer paper (analog, because the line can vary continuously) compares to tracing something drawn on graph paper by filling in squares (digital, because each square can only be one of two values—filled in or blank). Then, you will use a mobile phone and a sensor app to experiment with sending analog and digital signals in your classroom and see how they are affected by noise.
Additional Background Links
- Analog vs. Digital, SparkFun Electronics
Prep Work (15 minutes)
- For each student, cut one piece of printer paper and one piece of graph paper into eighths (so each student will get 8 slips of printer paper and 8 slips of graph paper).
- Make sure you are familiar with the sensor app you are using before you show it to your students. The best way to do this is to play with the app on your phone to get comfortable enough using it to explain it to your students. Ideally, you want to test the experiment yourself with the app before class to make sure it works as intended.
/-/https/i.ytimg.com/vi/3cpZEVSC6Nw/maxresdefault.jpg)
/-/https/www.sciencebuddies.org/cdn/Files/20511/4/google-classroom.png)
/-/https/www.sciencebuddies.org/cdn/Files/20512/4/ms-teams.png)
/-/https/www.sciencebuddies.org/cdn/Files/20469/4/Canvas_Bug_Color_RGB.png)
/-/https/www.sciencebuddies.org/cdn/Files/20470/5/Schoology-Logo.png)
/-/https/www.sciencebuddies.org/cdn/Files/20471/4/lms.png)
/-/https/www.sciencebuddies.org/cdn/Files/20469/4/Canvas_Bug_Color_RGB.png)
/-/https/www.sciencebuddies.org/cdn/Files/20470/5/Schoology-Logo.png)
/-/https/www.sciencebuddies.org/cdn/Files/20471/4/lms.png)
Teacher Tool Box
Engage (20 minutes)
- Pass out eight slips of printer paper and eight slips of graph paper to each student.
- Arrange students in groups of 4–8.
- Tell everyone to make a simple drawing (a shape, a smiley face, a stick figure, a letter, etc.) on one piece of printer paper.
- The drawing should only include lines (no shading) and they should be able to finish it in less than 30 seconds. Make sure they press firmly so the lines are dark, because others will need to trace them.
- Everyone should write his or her name and the number "1" in the corner of the drawing.
- Each student should pass his or her drawing to the next person in the group (decide on an order so everyone passes the drawings in the same direction).
- The next person should make a copy of the drawing by tracing it onto a new piece of printer paper. Write the number "2" and the original student's name in the corner of the paper.
- Pass the copy (not the original) on to the next student, who will make another copy and number it accordingly. Repeat this process until there are eight versions of each drawing (the original plus seven copies labeled 2–8).
- Return all copies of each drawing to the original student. Have students arrange their copies in order.
 What do you notice about each subsequent copy of your drawing? Compare the last drawing to the initial drawing—how different are they?
 You should see that there are slight changes in each copy of the drawing. These changes accumulate over time, so the final drawing may look very different from the initial drawing (see Figure 7 for an example).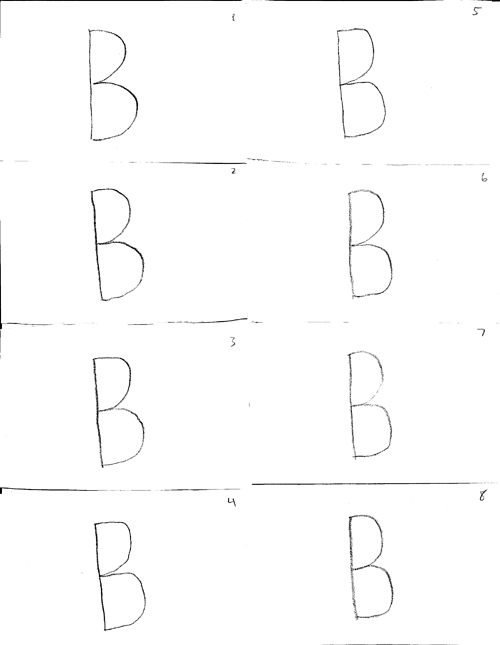
Figure 7. Eight copies of the letter "B," drawn freehand on printer paper. Notice how small changes in each copy accumulate, so the last copy looks noticeably different from the initial version. - Now, repeat steps 1–7 with graph paper. This time, instead of drawing lines on the paper, students should make drawings by filling in squares on the paper. Note: it will take too long if they fill in each square completely. They should fill in each square enough that, when tracing, you can easily tell if a square is "filled" or "not filled." You can do this by drawing a dark circle or "X" in each square.
What do you notice about each copy of the drawing this time? How does the last drawing compare to the first drawing?You should see that this time, each copy of the drawing is identical (see Figure 8 for an example). Note: it is important to clarify that by "identical" we mean that the squares that are filled in remain the same, not whether the shape of each pencil/ink blob inside each square is exactly the same.
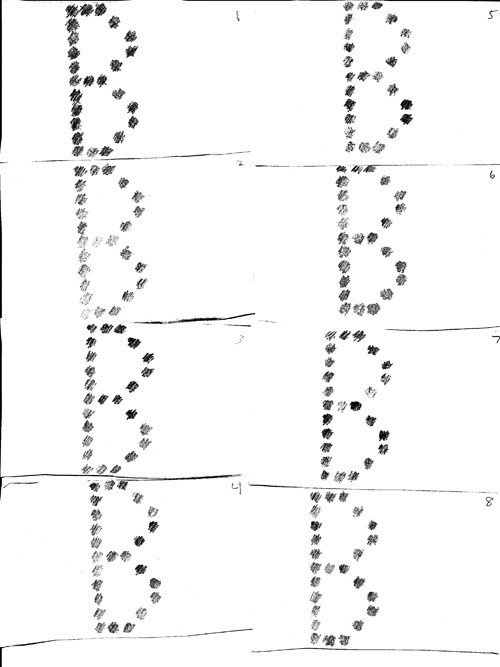
Figure 8. Eight copies of the letter "B," drawn by filling in squares on graph paper. Notice how each copy is identical (a filled-in square never changes to a blank square, and vice versa), so the final copy is the same as the original copy.Which method do you think would be better for storing and copying information?The second method is better because each copy of the drawing is identical. It is very difficult to "accidentally" change a filled-in square to a blank square or vice versa when tracing on graph paper. However, when tracing on printer paper, your pencil tip can move continuously, resulting in small errors that accumulate with each new copy. - Explain that the first method the students tried was analog, meaning the positions of their pencils could vary continuously. The second method they tried was digital, meaning there were a fixed number of squares they could fill in on the paper. Since the invention of modern electronic communication (telephone, radio, television, internet, etc.), we have used both analog and digital methods to send information as signals, or a way to send information from one place to another. Electronic signals are usually sent through wires (like the cables connecting a computer to a monitor, or a game console to a TV) or wirelessly through the air (like the internet connection to a smartphone or tablet). Whenever you push a button on a game controller, download a song, or send a text message, you are using electronic signals. In the rest of the lesson, they will use an app on a phone to compare sending digital and analog signals across the classroom.
/-/https/www.sciencebuddies.org/cdn/Files/11862/6/letter-B-analog.png)
/-/https/www.sciencebuddies.org/cdn/Files/11865/6/letter-B-digital.jpg)
Explore (20 minutes)
- Introduce the sensor app to your students, specifically the sound sensor (audio amplitude in phyphox). Remember that when using the phyphox app you will have to calibrate the audio amplitude sensor together with your students before they do any measurements. Do this calibration together as a class before you start your investigations, so each device has comparable sensor readings. Remind students that they will have to recalibrate their sensor every time they start a new recording! Then use the calibrated audio amplitude sensor and walk around to show students how the decibel level changes as people talk and make different noises (e.g. dropping a book, tapping a pencil, etc.).
- Explain that instead of drawing on paper, they will now make analog and digital signals using graphs in their sensor app. The x-axis of the graph will be time, and the y-axis will be sound level in decibels. Remind students that an analog signal can vary continuously, whereas a digital signal can only have a certain number of values (in the simplest case, just two values: either "high" or "low").
- Ask the whole class to be as quiet as possible (sit still, no talking, etc.).
- See if a single student can generate an analog signal on the phone by humming or yelling while changing the volume of his or her voice (e.g. "mmmmmmMMMmmmmmmmmmMMMmmmmmm"). Check if your audio sensor in phyphox is still calibrated or recalibrate it (re-set the dB offset) if necessary. Then make a recording of the signal, save your data, and show the graph to your students.
- Ask another student to generate a digital signal by making a sound to represent "high" and no sound to represent "low" (e.g. "AAAHHH" for high). Repeat the sound a few times, making each sound (or lack of sound) last about one second. Make a recording of the signal, save your data, and show the graph to your students. Do not forget to to recalibrate your sensor in between recordings if necessary.
- Repeat steps 3.a–3.b a few more times, until about half the class has had a chance to try generating at least one signal (the other half of the class will get to try in the next step). Walk around the class with the phone and stand near each student when you take a recording. Optionally, you can save each recording in phyphox app with the student's name.
- Figure 9 shows two example signals. You should see that the analog signal varies continually, while the digital signal looks more "square." Note that technically, the digital signal in Figure 9 does not have exactly two values, like Figure 4 in the Teacher Background section, and your students might notice this. The value can still fluctuate slightly. However, remember that with digital signals we only care if we can tell whether the value is high or low, and not the exact value (just like with the graph paper, how we only cared if we could tell whether or not a square was filled in, and not exactly how it was filled in).
/-/https/www.sciencebuddies.org/cdn/Files/11866/17/analog-digital-signals.png)
Example graphs showing sound intensity in decibals of analog and digital signals. The graph of the analog signal (left) shows the profile of a sound that is continous and changes in volume, resulting in a graph that gradually increases and decreases. The graph of the digital signal (right) shows the profile of a sound that is loud and abrupt, resulting in a graph that drastically increases and decreases.
Figure 9. An example analog signal (left) and a digital signal (right).
- Now, tell the class they do not have to be completely quiet. They can talk and move around at their desks, using reasonable indoor voices and motions (no yelling, jumping, throwing things, etc.).
- Repeat steps 3.a–3.c.
- Figure 10 shows two example graphs. You should see that the noise affects the lower values on both graphs. For the analog signal, this means it is impossible to know the true value of the signal if it is below 35 dB, because it gets "lost in the noise." For the digital signal, even though the "low" values are very noisy, you can still clearly tell whether the signal is high (above 45 dB) or low (below 35 dB). Your graphs may look different depending on the noise levels in your classroom, but the concept remains the same. You may also see some distortion of the higher values if someone yells or makes a particularly loud noise.
/-/https/www.sciencebuddies.org/cdn/Files/11867/14/analog-digital-signals-noise.png)
Example graphs showing sound intensity in decibals of analog and digital signals with noise. The graph of the analog singal (left) shows a sound profile that is continous and changes in volume, resulting in a graph that gradually increases and decreases. The graph of the digital signal (right) shows a sound intensity profile that is loud and abrupt which results in a graph that drastically increases and decreases. Both graphs show the effects of noise in areas of the graph where the decibel values drop below 45.
Figure 10. Analog (left) and digital (right) signals with background noise added. Both signals were intended to look like the ones from Figure 9.
/-/https/www.sciencebuddies.org/cdn/Files/14174/23/note-question-mark-30.png) |
How do our graphs compare in the "quiet" classroom vs. the "noisy" classroom?
|
/-/https/www.sciencebuddies.org/cdn/Files/14175/24/conversation-bubbles-30.png) | You should see that the graphs recorded in the quiet classroom look much "cleaner" (the lines are smoother), whereas the graphs recorded in the noisy classroom are much messier (the lines are spiky and jagged in places, especially for lower y-axis values on the graph).
|
- Explain that we just did a demonstration to see how analog and digital sound signals are affected by noise (the kind we can hear). Electronic signals (the kind transmitted through wires or wirelessly through the air) can also be affected by electronic noise, which we cannot hear. For example, noise can be introduced by other nearby electronic devices, or when transmitting signals over very long distances. We can do our best to eliminate sources of noise, but we can never completely get rid of it.
Reflect (5 minutes)
| Which method do you think would be better for sending information electronically, analog or digital? Why?
|
|
Digital signals are better for sending information electronically, because they are not affected as easily by noise.
We saw that background noise really messed up the graph of our analog signal. This means that if we were trying to send information using an electronic signal (like text, music, or pictures), the information could be changed, corrupted, or lost. Even though parts of our digital signal graph did look "noisy," we could still tell whether the signal was high or low. That means that if we send information digitally, it is more likely to arrive at the destination unchanged.
|
| Older technologies that your parents and grandparents used, like VCRs and cassette tapes, used analog signals. Why would people want to switch over to newer, digital technology?
|
|
The newer technology can more reliably send and store information. This is useful for consumers (listening to songs, watching movies, etc.) and
also for scientists as it allows us to develop more accurate scientific instruments.
|
Assess
You can use this quiz to assess student learning after the activity:
- Online quiz, assignable in any LMS
- Quiz (pdf) and answer key (PDF)
Make Career Connections
Discussing or reading about these careers can help students make important connections between the in-class lesson and STEM job opportunities in the real world.
/-/https/careerdiscovery.sciencebuddies.org/cdn/Files/1223/17/iStock-971549326.jpg)

/-/https/careerdiscovery.sciencebuddies.org/cdn/Files/5616/13/iStock-1194430829.jpg)
Lesson Plan Variations
- How does distance affect the quality of a signal, and how the signal is impacted by noise? Instead of walking around the classroom to take recordings from each student, try staying at your desk. How do the results change with students who are close to you vs. those at the back of the room?
- Try this project with the light sensor instead of the microphone. Use a flashlight to send the signal. To send an analog signal, change how you aim the light (aim it directly at the phone for full brightness, and shift the beam to the side to decrease the brightness). To send a digital signal, aim the flashlight directly at the phone and click it on and off. How is this method of transmitting information affected by noise? For example, what happens if you turn the lights in the classroom on and off, open or close window blinds, or walk between the flashlight and the phone?
- In this lesson, you looked at graphs of analog and digital signals qualitatively, but you did not try to send any actual "information." Try sending simple information (like a single number) using both analog and digital signals. For example, for an analog signal, try sending a value (the y-axis of the graph) of exactly 42 dB using sound. To make it easier to send analog signals, you can use a tone generator app or website. It is hard to keep your voice at exactly the same volume when humming or singing, but much easier to adjust the volume of a computer speaker when playing a constant tone. Then, try to send the binary equivalent (101010) using a digital signal. Which method makes it easier to send the exact number?
/-/https/img.youtube.com/vi/2G4pTsKW_pU/0.jpg)
/-/https/img.youtube.com/vi/fJ-FJDCCjUw/0.jpg)
/-/https/img.youtube.com/vi/QLcmEqBayr0/0.jpg)