/-/https/www.sciencebuddies.org/Files/21464/5/sb-logo.png)
/-/https/www.sciencebuddies.org/Files/21464/5/sb-logo.png)
Why and How do We Breathe?
Summary
/-/https/www.sciencebuddies.org/Files/16828/7/lung-breathing-lesson-plan.jpg)
Overview
Breathing occurs effortlessly, but did you ever wonder how we breathe? In this lesson, students will make a model to discover how air effortlessly flows in and out of our lungs. Next, students will compare lung breathing to other ways of breathing to discover reasons why humans might have developed lungs.
Remote learning: This lesson plan can be conducted remotely. Students can work individually and independently during the Explore section guided by the video and the Student Worksheet. A set of materials can be prepared in advance. The reflect section with a discussion can be done over a video call. The Engage section can be dropped entirely
Learning Objectives
- Understand why humans breathe, and why they developed body parts that support breathing.
- Use the model made in this lesson to explain how humans breathe, and list the external and internal body parts of a human body used for breathing.
- Explain how lung breathing is advantageous for humans or other large animals, and understand at least one other mechanism for breathing used by animals.
NGSS Alignment
This lesson helps students prepare for these Next Generation Science Standards Performance Expectations:- 4-LS1-1. Construct an argument that plants and animals have internal and external structures that function to support survival, growth, behavior, and reproduction.
|
Science & Engineering Practices
Developing and Using Models.
Use a model to test interactions concerning the functioning of a natural system.
Engaging in Argument from Evidence. Construct an argument with evidence, data, and/or a model. |
Disciplinary Core Ideas
LS1.A: Structure and Function.
Plants and animals have both internal and external structures that serve various functions in growth, survival, behavior, and reproduction.
|
Crosscutting Concepts
Systems and System Models.
A system can be described in terms of its components and their interactions.
|
Materials
/-/https/www.sciencebuddies.org/Files/13613/7/materials-simple-lung-model.jpg)
Teacher or another adult:
- Utility knife
Per group of up to four students:
- Disposable, empty transparent bottle (10–16 fluid ounces) made of hard plastic (such as a sports drink bottle)
- Two balloons, with a few extra in case one pops (8-inch balloons work well)
- Scissors
- Optional: Tape
Background Information for Teachers
This section contains a quick review for teachers of the science and concepts covered in this lesson.When humans breathe in, air flows in via the mouth or nose. The air then follows the windpipe, which splits first into two bronchi: one for each lung. The bronchi then split into smaller and smaller tubes that have tiny air sacs at their end called alveoli (see Figure 1). We have millions of alveoli in our lungs! These sacs have thin walls—so thin that oxygen and carbon dioxide can pass through them and enter or leave our blood. The blood transports oxygen to almost every cell of the body. The blood picks up carbon dioxide released from the cells and gives it a ride back to the lungs. Carbon dioxide is released when we breathe stale air out.
/-/https/www.sciencebuddies.org/Files/16843/7/illustration-anatomy-lungs.jpg)
Figure 1. Illustration of the parts of the human bronchi and lungs.
Many living organisms need oxygen to create energy within their cells. Oxygen is not essential for all living organisms, but humans adopted an oxygen-based metabolism because it is so efficient. When the cells use oxygen to create energy, they make carbon dioxide, a byproduct that needs to be disposed of. Humans get oxygen by filling their lungs with fresh air. The air we breathe in typically consists of about 78% nitrogen gas, about 21% oxygen gas, and less than 1% argon gas and traces of several other gasses. We remove carbon dioxide from the body by breathing out stale air. Because the human lungs extract about 15% of the oxygen we inhale, the air we exhale still contains about 17% oxygen. This lesson explores how air flows in and out of our lungs, compares lung breathing with other breathing mechanisms, and discusses why humans might have developed lung-breathing.
Relaxed breathing is a reflex; we do not have to think to breathe. During this unforced inhalation, our diaphragm—the dome-shaped muscle between the chest and the abdominal cavity—flattens. This expands the chest cavity and, as a result, air is drawn in (Figure 2). During exhalation, the diaphragm relaxes, the lungs naturally recoil, and air is gently pushed out, as shown in Figure 3.
/-/https/www.sciencebuddies.org/Files/13622/7/diaphragm-movement-breathe-in-diagram.jpg)
Figure 2. Illustration showing how a flattened diaphragm initiates inhalation.
/-/https/www.sciencebuddies.org/Files/13624/7/diaphragm-movement-breathe-out-diagram.jpg)
Figure 3. Illustration showing how the relaxation of the diaphragm initiates exhalation.
This dynamic works because of air pressure, which is a measure of how hard air presses against objects. Air pressure increases when you decrease the amount of space the air has, and decreases when you give air more space. Because air will move from areas of high pressure to areas where the pressure is lower—unless something blocks the movement—air rushes in or out of the lungs when we increase or decrease the size of the chest cavity. When the chest cavity expands there is more space for the lungs. In this condition the lungs can expand, making it a low-pressure area, and air rushes in to balance out the difference in pressure. Then to breathe out the chest cavity and lungs shrink. This increases the air pressure in your lungs, and the air rushes back out.
We can also breathe more forcefully. When we exercise, sing loudly, or otherwise need or want more air or oxygen we can exert force to breathe more deeply. We use various muscles to increase chest volume more dramatically. In the same way as in relaxed breathing, the expansion of the chest cavity draws air in so the lungs fill up. The relaxation of the chest cavity pushes air out. Muscles can also force the chest cavity to contract even further, pushing even more air out. Because the expansions and contractions are larger in this case, a bigger volume of air flows in and out of our lungs, and our body gets a larger supply of oxygen and we have more air to create sound.
Not all animals have developed lungs to breathe. Insects, centipedes, and arachnids use tracheal breathing. They have up to ten small breathing holes called spiracles. The spiracles allow air to enter smaller branches called tracheae, which allow for the oxygen and carbon dioxide exchange within the cells. Note that no blood or other transport mechanism is used to distribute oxygen throughout the body in tracheal breathers. Only small animals use tracheal breathing. Some animals with a thin and moist skin use skin breathing. Their skin is permeable enough to absorb oxygen and release carbon dioxide. These animals have thin blood vessels that transport the oxygen throughout the body. Sponges, corals, jellyfish, and worms breathe this way. Fish and crabs, on the other hand, use gill breathing. Gills allow the animal to absorb oxygen dissolved in water, and to deposit carbon dioxide into the water. Gills work for most aquatic animals, but are insufficient to sustain large aquatic animals like whales. Because 1 L of air contains a lot more oxygen than 1 L of water, large aquatic animals that need a lot of oxygen to sustain their cells developed lung breathing, just like humans did.
Whales do not breathe through their mouths, but developed blowholes. These holes are on the top of their heads, making it easier for them to breathe. They also developed distinct openings for eating and breathing. This allows them to eat underwater without getting fluid in their lungs when swallowing. Whales need to sustain a huge body, so they need a very efficient way to use the oxygen they inhale. Some researchers state that whales can use up to 90% of the oxygen they inhale! For humans, a 15% efficiency is enough. The human respiratory system still allows an exchange of large amounts of oxygen and carbon dioxide in a short time span, and the circulatory system allows distribution of this oxygen throughout the body. This helps us provide oxygen to nourish the 30 to 40 trillion cells making up the human body.
There is not always a clear-cut distinction between the types of breathers. Some animals use more than one type of breathing. Frogs, for example, use skin breathing and lung breathing. Other animals change their breathing type during their lives. When tadpoles morph into frogs, their breathing mechanism changes from gill breathing to lung and skin breathing.
In this lesson, students will explore the human respiratory system, and compare it to tracheal breathing, skin breathing, and gill breathing. The comparison will help them understand why humans developed lungs.
Additional Background Links
- Your Lungs & Respiratory System, KidsHealth
- How Do Animals Breathe?, Animal Fun Facts
Prep Work (15 minutes)
- Empty and clean a transparent disposable bottle made of hard plastic, one per group of students.
- Cut off most of the plastic bottle's bottom so that when a balloon hangs inside the bottle from the spout, as shown in Figure 4, there is about 1/3 to 3/4 of an inch of empty space below the balloon.
/-/https/www.sciencebuddies.org/Files/13614/6/balloon-hanging-in-cut-bottle.jpg)
Figure 4. A balloon inside a bottle will represent a lung inside a ribcage.
- Watch the video below. It explains how to make the lung model step-by-step, and how it models human breathing. Decide whether you want to use the video as a guide to make the model during the lesson, or practice making a model yourself now so you can guide the students during the lesson. The video is also available in Spanish.
/-/https/i.ytimg.com/vi/WJ06mrNliC0/maxresdefault.jpg)
/-/https/www.sciencebuddies.org/Files/20511/4/google-classroom.png)
/-/https/www.sciencebuddies.org/Files/20512/4/ms-teams.png)
/-/https/www.sciencebuddies.org/Files/20469/4/Canvas_Bug_Color_RGB.png)
/-/https/www.sciencebuddies.org/Files/20470/5/Schoology-Logo.png)
/-/https/www.sciencebuddies.org/Files/20471/4/lms.png)
/-/https/www.sciencebuddies.org/Files/20469/4/Canvas_Bug_Color_RGB.png)
/-/https/www.sciencebuddies.org/Files/20470/5/Schoology-Logo.png)
/-/https/www.sciencebuddies.org/Files/20471/4/lms.png)
Teacher Tool Box
- Make a Lung Model video (in English) (in Spanish)
- Whales Breathing video
- Slideshow (PDF)
- Quiz (assignable in any LMS)
- Student worksheet (PDF)
- Quiz (PDF)
- Answer sheet (PDF)
Engage (5 minutes)
- Get students interested and intrigued.
Show the students the following video of whales breathing.
 Does anyone know what these whales are doing? Why would they do this?
 Listen to students' answers. Do not correct or change their answers; you will come back to this video at the end of the lesson.
 - Tell the students that today they will not look at whales, but at humans. More specifically, they will look at how humans breathe.
Why do you think humans breathe, and how do humans breathe? What body parts do we use while breathing?Listen to students' answers. Do not correct or change their answers, but note the answers students give on a whiteboard; you will come back to this question later in the lesson.
/-/https/www.sciencebuddies.org/Files/14174/23/note-question-mark-30.png)
/-/https/www.sciencebuddies.org/Files/14175/24/conversation-bubbles-30.png)
Explore (45 minutes)
Part 1: Explore the human lung (30 minutes)
- Explain that the students will make a model to test their ideas of how humans breathe.
- Divide the class into groups of up to 4 students, provide them with the
Student Worksheet
and the materials—plastic bottle of which the bottom has been removed, 2 balloons, and scissors —and guide them through the process of making the model. You can also use the Make a Lung Model video from 0:43 to 1:55 to guide the students step-by-step. A slideshow with Figures 5–14 is also available.
- If the edges where the bottle has been cut off are sharp, cover them with tape.
- Set the cut bottle down on the wide opening. Lower a balloon into the bottle until only part of the balloon's neck sticks out. Fold the neck of the balloon over the top of the bottle, as shown in Figure 5.
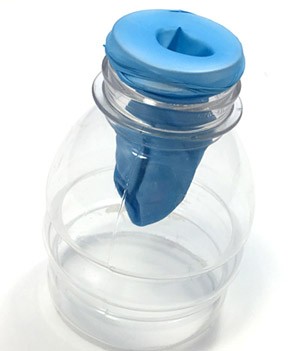
Figure 5. A balloon hanging inside a bottle will represent a lung inside a ribcage.
- Turn the bottle over (keeping the balloon inside) so the bottle top rests on the table.
- Make a knot in the neck of the second balloon. On the opposite side of this balloon cut off about one-third of the balloon, as shown in Figure 6 so you are left with a wide opening.
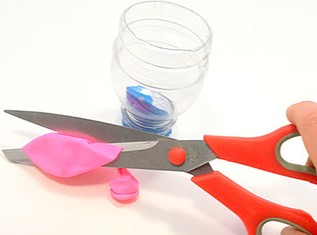

Figure 6. A section of a second balloon will be used to add the diaphragm to the model. - Stretch the wide opening of the cut balloon over the wide opening of the bottle. Pull the edges of the balloon far enough up the bottle so the balloon surface is gently stretched. Make sure that the knot is on the outside and located near the middle of the bottle opening, as shown in Figure 7.
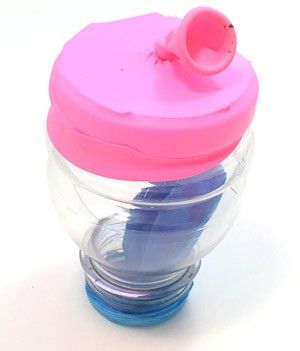
Figure 7. A stretched-out balloon will represent the diaphragm.
- Help students explore their model.
- Ask the students to hold the bottle so they can see the balloon inside.
- Let the students observe what happens to the balloon inside the bottle when they pull the knot back, as shown in Figure 8.
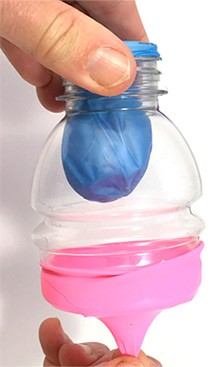
Figure 8. Pulling back the knot makes air rush into the balloon. As a result, the balloon inside the bottle fills up.
- Then point their attention to what happens to the balloon inside the bottle when they let the knot gently come back to its neutral position and then gently push it in, as shown in Figure 9.
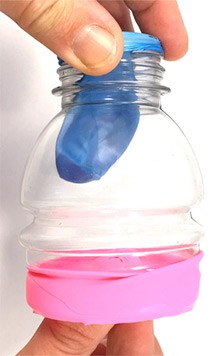
Figure 9. Pushing the knot in makes air rush out of the balloon. As a result, the balloon inside the bottle collapses.
- Ask students to repeat this process a few times so all members of the group have tried it out and had an occasion to observe.
- Let students discuss with their group how this is similar to how we breathe. Have students write down their observations and thoughts as they answer questions 2–4 on the Student Worksheet.
- Explain that the "human respiratory system" refers to the collection organs and body parts that help us breathe. Encourage groups to label the parts of the respiratory system that they know on their worksheet and ask them to find a part in the model that has the same function.
- Review similarities between their model and human breathing.
- Listen to how the students felt their model is similar to the human respiratory system and to how we breathe. Guide the students where needed. At the end of the discussion, students should know the
main parts of the human respiratory system:
the nose, the trachea or windpipe, and the lungs, as shown on Figure 10. Figure 11 shows the similarities with the model. Students should understand that when humans breathe in, their lungs fill up with air just like the balloon in their bottle filled up with air when they pulled the knot back. When humans breathe out, air flows out of their lungs just like air flowed out of the balloon when they pushed the knot in. Humans have two lungs, and the balloon inside the bottle is like one of their lungs.
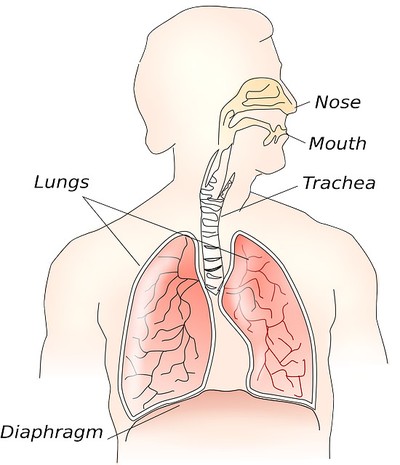
Figure 10. Parts of the human body that are involved in breathing.
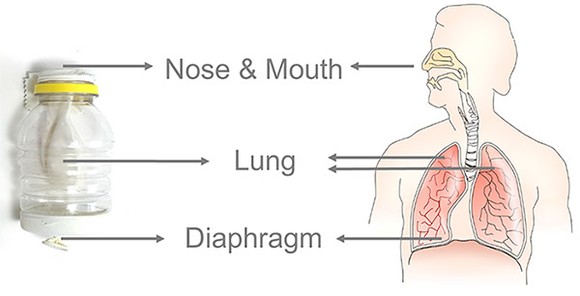
Figure 11. Similarities between the model and the human respiratory system.
- Explain the role of the diaphragm.
What makes the lung in the model fill up with air? Does something similar happen when humans breathe?After you listen to their suggestions, explain that humans have a muscle that separates the chest cavity from the abdominal cavity. This muscle is called the diaphragm. When humans breathe in a relaxed way, the diaphragm flattens. This expands the chest cavity and, as a result, air is drawn in just like when you pull back the knot and air flows in the balloon. This means that humans do not need to force themselves to suck in air! During exhalation, the diaphragm relaxes, and the lungs naturally decrease in size, and air is gently pushed out. This means that humans do not need to force themselves to blow out air either; it naturally happens when the diaphragm relaxes, just like air flows out of the balloon when you release and gently push in the knot. Figures 12 and 13 illustrate this process.Let the students discuss these questions in their groups before addressing them as a class.
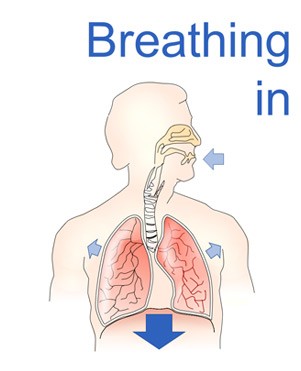
Figure 12. A comparison of the model and a human breathing in.
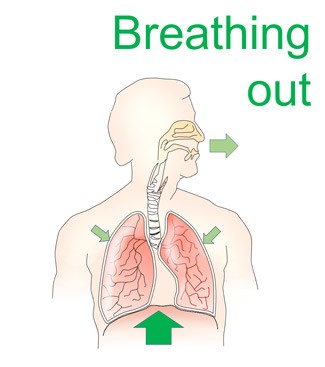
Figure 13. A comparison of the model and a human breathing out.
- Listen to how the students felt their model is similar to the human respiratory system and to how we breathe. Guide the students where needed. At the end of the discussion, students should know the
main parts of the human respiratory system:
the nose, the trachea or windpipe, and the lungs, as shown on Figure 10. Figure 11 shows the similarities with the model. Students should understand that when humans breathe in, their lungs fill up with air just like the balloon in their bottle filled up with air when they pulled the knot back. When humans breathe out, air flows out of their lungs just like air flowed out of the balloon when they pushed the knot in. Humans have two lungs, and the balloon inside the bottle is like one of their lungs.
- Extend the model to discover why we breathe. Let students discuss the next two questions in their groups before discussing them as a group.
Can you make your model breathe more deeply?You can make the model breathe more deeply by pulling the knot farther and pushing it in more. In humans, the center of their diaphragm also moves more when they take deep breaths: up to four inches! Humans can also use muscles to move the ribcage. In the model, the ribcage (plastic bottle) is fixed.When do humans breathe more deeply? Why do they do that?Conclude by explaining that humans' main purpose for breathing is to provide oxygen to the cells. We breathe in oxygen-rich air and the thin walls of the lungs allow oxygen to pass through so it can be picked up by the red blood cells. The blood flows through tubes called arteries to deliver oxygen to cells all over the body (Figure 14), and cells use it to grow and thrive. Cells produce carbon dioxide (CO2 ) in the process. CO2 is picked up by red blood cells and transported back to the lungs in veins. CO2 passes through the thin walls in the lungs and we dispose of the CO2 when we breathe out.Listen to the students' answers. If needed, lead them to the conclusion that humans breathe more deeply when they exercise or when they sing loudly. These situations are examples of occasions where they need either more air or more oxygen. In those cases, humans use various muscles to increase chest volume more dramatically. In the same way as in relaxed breathing, the expansion of the chest cavity draws air in so the lungs fill up. The relaxation of the chest cavity pushes air out. Muscles can also force the chest cavity to contract even farther, pushing even more air out. Because the expansions and contractions are larger in this case, a bigger volume of air flows in and out of our lungs, and our body gets a larger supply of oxygen and more air to create a louder sound.
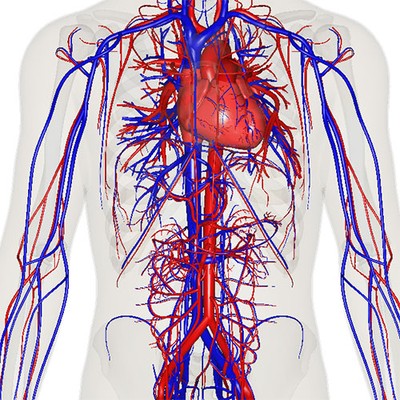
Figure 14. The circulatory system. Arteries (red) distribute oxygen-rich blood all over the body and veins (blue) carry blood that is rich in carbon dioxide back.
- Ask students to write down on their worksheet why humans breathe, in their own words, and let them draw a simple drawing of lung breathing on their worksheet. Ask them to draw arrows to indicate where oxygen is absorbed and where carbon dioxide is released. Draw or let a student draw a sketch of lung-breathing on the board, similar to Figure 15, so students can correct their drawing.
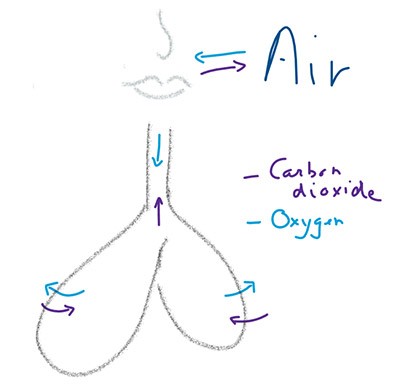
Figure 15. A sketch of lung breathing.
/-/https/www.sciencebuddies.org/Files/16837/7/cut-balloon-to-create-diaphragm.jpg)
/-/https/www.sciencebuddies.org/Files/13615/6/cut-bottle-and-cut-balloon.jpg)
/-/https/www.sciencebuddies.org/Files/13616/6/simple-lung-model-upside-down.jpg)
/-/https/www.sciencebuddies.org/Files/13621/9/lung-model-breathe-in-vertical.jpg)
/-/https/www.sciencebuddies.org/Files/13623/6/lung-model-breathe-out-vertical.jpg)
/-/https/www.sciencebuddies.org/Files/16839/7/anatomy-respiratory-system.jpg)
/-/https/www.sciencebuddies.org/Files/16840/8/easy-lung-model.jpg)
/-/https/www.sciencebuddies.org/Files/16838/7/respiratory-system-middle.jpg)
/-/https/www.sciencebuddies.org/Files/16841/7/sketch-lung-breathing.jpg)
Part 2: Explore other ways of breathing (15 minutes)
- Introduce other ways of breathing.
Animals need oxygen, but do all of the animals you know have lungs? Do you know of other ways animals take in oxygen? If students need a hint, ask them how fish breathe, how amphibians breathe, and how most insects breathe.Mammals, birds, reptiles, and some amphibians use lung breathing, just like humans, but fish and crabs use gills to breathe, some amphibians breathe through their skin, and insects and spiders use tracheal breathing.
- Explore the benefits of the alternative ways of breathing.
Assign each group at least one type of breathing—tracheal breathing, gill breathing and skin breathing—on which to perform the following tasks.
- Read the description of this type of breathing (see worksheet) and make a drawing representing this type of breathing. Add arrows to indicate where oxygen is absorbed and carbon dioxide is released.
- Describe why this type of breathing could be good for these animals.
- Describe why this type of breathing might not be ideal for humans.
- Explore the benefits of lung breathing for humans. Ask students to discuss with their group why lung breathing might be good for humans. Why might humans have developed lungs? Let them write down their thoughts on the worksheet.
Reflect (10 minutes)
- Discuss why lung breathing is good for humans.
Now that you have looked at some other ways of breathing, why do you think humans developed lungs? What advantages do lungs bring to humans?You can go over the different ways of breathing listed above and discuss why lung breathing is more beneficial for humans:Listen to the students' answers and add where needed.
- Skin breathing only works when the skin stays moist, and only small amounts of oxygen can pass through, so it only works for small animals that can stay moist.
- Tracheal breathing does not use blood to distribute the oxygen, so the absorbed oxygen cannot be distributed over a large body. Tracheal breathing is only a good system for small animals.
- The gills that allow gill breathing need to stay moist, that is why fish suffocate quickly when out of the water. Crabs use gills, too, even though they live out of the water; they store water to keep their gills moist. It is not the way humans evolved.
- The lungs in lung breathing allow an exchange of large amounts of oxygen in short periods of time, so they are ideal for animals that need a lot of oxygen. Humans need a lot of oxygen to support their bodies; thus, lungs support the well-being of humans and enhance their survival.
- Come back to the introduction to explain the video.
Looking back at the video we saw at the start of the lesson, what do you think this whale was doing? What type of breading system do you think whales use?The whale is breathing. Whales have lungs and use lung breathing to get their oxygen.Do whales breathe through their mouths? Why would they have developed another way to fill their lungs? Why do you think whales use lungs and not gill breathing?Whales have lungs and use breathing holes to breathe. They have developed separate holes for breathing so they can eat and swallow underwater without filling their lungs with water. Gills work well for aquatic animals, but are insufficient to sustain very large aquatic animals like whales. One L of air contains a lot more oxygen than 1 L of water, so large aquatic animals that need a lot of oxygen developed lung breathing, just like humans did. Whales even developed a more-sophisticated respiratory system; they are able to extract up to 90% of the oxygen in the air they breathe while humans typically extract about 15% of it.
- Make a final conclusion.
We have discovered how humans breathe, how some other animals breathe and looked at how whales breathe. Why do you think each animals developed the particular breathing system they have?Conclude that each species develops a breathing system that serves them well, and that helps them survive. Ask students to write this on their Student Worksheet.
Assess
You can use this quiz to assess student learning after the activity:
- Online Quiz, assignable in any LMS
- Quiz (pdf) and Answer Key (pdf)
Make Career Connections
Discussing or reading about these careers can help students make important connections between the in-class lesson and STEM job opportunities in the real world.
/-/https/careerdiscovery.sciencebuddies.org/Files/967/17/unsplash-d4KQc-ZqBrc.jpg)

/-/https/careerdiscovery.sciencebuddies.org/Files/1719/17/Respiratory_therapist.jpg)
Lesson Plan Variations
- Use the model to study what happens when our lungs are infected. Check out the Explore How Lung Infection Influences Breathing activity for ideas.
- Let students research and make lists of animals for each breathing system. What similarities do they see between these animals? Why would these animals have adapted this type of breathing? What organs and body parts did these animals develop to help them absorb the oxygen they need to survive?
- Instead of this simple model, make the more-advanced model, include a windpipe and/or create a model with two lungs (Figure 16).
/-/https/www.sciencebuddies.org/Files/16842/7/extended-lung-models.jpg)
Figure 16. Picture of two variations of the simple lung model. Left: model with two lungs, a trachea and bronchi. Right: model with one lung and a trachea.
/-/https/img.youtube.com/vi/CmV2QZvfgck/0.jpg)
/-/https/img.youtube.com/vi/OEkw3F7RZ3w/0.jpg)
/-/https/img.youtube.com/vi/FfrFYW4TDQQ/0.jpg)