/-/https/www.sciencebuddies.org/Files/21464/5/sb-logo.png)
/-/https/www.sciencebuddies.org/Files/21464/5/sb-logo.png)
Get Energized with Cellular Respiration!
Summary
/-/https/www.sciencebuddies.org/Files/8664/10/lp-cellular-respiration-overview.png)
Cells in the human body rely on an input of oygen and glucose to create energy. When that energy is spent they release by-products of carbon dioxide and water.
Overview
In this fun lesson plan, students will measure how the amount of carbon dioxide in their exhaled breath changes with exercise levels. Carbon dioxide is a product of cellular respiration, so the lesson highlights how breathing is connected to cellular respiration and energy production in our body. Students will make the measurements using a simple colorimetric reaction that can easily be assessed visually.Learning Objectives
- Understand the purpose and mechanism of cellular respiration
- Determine the relationship between breathing (respiration) and cellular respiration
- Analyze graphs of experimentally-recorded data
NGSS Alignment
This lesson helps students prepare for these Next Generation Science Standards Performance Expectations:- MS-LS1-7. Develop a model to describe how food is rearranged through chemical reactions forming new molecules that support growth and/or release energy as this matter moves through an organism.
|
Science & Engineering Practices
Planning and Carrying Out Investigations.
Collect data about the performance of a proposed object, tool, process, or system under a range of conditions.
Asking Questions and Defining Problems. Ask questions that can be investigated within the scope of the classroom, outdoor environment, and museums and other public facilities with available resources and, when appropriate, frame a hypothesis based on observations and scientific principles. Analyzing and Interpreting Data. Analyze and interpret data to provide evidence for phenomena. Constructing Explanations and Designing Solutions. Apply scientific reasoning to show why the data or evidence is adequate for the explanation or conclusion. |
Disciplinary Core Ideas
LS1.C: Organization for Matter and Energy Flow in Organisms.
Within individual organisms, food moves through a series of chemical reactions in which it is broken down and rearranged to form new molecules, to support growth, or to release energy.
PS3.D: Energy in Chemical Processes and Everyday Life. Cellular respiration in plants and animals involve chemical reactions with oxygen that release stored energy. In these processes, complex molecules containing carbon react with oxygen to produce carbon dioxide and other materials. |
Crosscutting Concepts
Energy and Matter.
Matter is conserved because atoms are conserved in physical and chemical processes.
Within a natural or designed system, the transfer of energy drives the motion and/or cycling of matter. Cause and Effect. Cause and effect relationships may be used to predict phenomena in natural or designed systems. Systems and System Models. Models can be used to represent systems and their interactions—such as inputs, processes and outputs—and energy, matter, and information flows within systems. |
Materials
/-/https/www.sciencebuddies.org/Files/8665/15/cellular-respiration-materials-new.jpg)
Materials per group of 2–4 students:
- Straws (2 per student)
- Check valves for straw (minimum 1 per group, can be re-used); available from Amazon
- 9 oz transparent cup or 150 mL beaker
- Rubber band
- Plastic wrap
- Bromothymol blue indicator solution (0.04%), available from Amazon
- Deionized, or distilled water; available at grocery stores
- Teaspoon
- Stopwatch
Materials for teacher demonstration:
- 9 oz transparent cups or 150 mL beakers (5)
- Baking soda
- Distilled vinegar
- Tablespoon
- All of the materials listed for one student group
Background Information for Teachers
This section contains a quick review for teachers of the science and concepts covered in this lesson.Your body needs lots of energy to perform everyday functions such as walking, talking, or thinking. All of this energy comes from the food you eat. The process of converting food into a form of energy that your body can use is called cellular respiration. Cellular respiration happens continuously inside the cells of your body to provide you with nonstop energy. These cells can also store energy in form of chemical molecules so you can use them whenever you need to. The process of cellular respiration is summarized in Equation 1.
Equation 1:
Cellular respiration happens in several stages. First, all the food you eat has to be broken down into glucose, a type of sugar, which is then broken down into even smaller molecules. This step occurs in the cytoplasm of your cells and already produces some energy. The next stage takes place in the "powerhouses of your cells," the mitochondria. Here, the smaller molecules from glucose are broken down further and, in combination with oxygen, make the end products of cellular respiration carbon dioxide, water and energy. This step releases a much larger amount of energy than the first step.
Equation 1 also explains why you breath, a process that is also called respiration, although it is not the same as cellular respiration. When you breathe, you inhale oxygen from the air, which, as you know from Equation 1, is necessary for breaking down glucose during cellular respiration. The carbon dioxide, which is produced during the further breakdown of glucose, ends up in the air you exhale. In this lesson plan, your students will make this end product of cellular respiration visible, and can even assess the amount of CO2 they produce when breathing! While doing this, they will make use of the fact that carbon dioxide is an acidic gas.
This means that when carbon dioxide is dissolved in water, it forms carbonic acid (H2CO3), which is acidic. You know carbonated water in the form of soda or sparkling water, which contains a lot of CO2. The carbonic acid is what gives these drinks their tangy taste. You can make the acid visible with an indicator solution, such as bromothymol blue, that changes color depending on if the solution is acidic, neutral, or basic. Using this indicator, your students will determine the rate of cellular respiration by measuring how long it takes to turn a neutral solution acidic when blowing into it through a straw, and record the color change of the solution. They will also assess how their CO2 output changes once they challenge their body to produce more energy through exercising. Increasing the cellular respiration rate through exercise will result in higher amounts of carbon dioxide in their breath, which makes the indicator change color faster. This observation will allow your students to link the energy requirements of their bodies to the cellular respiration rate.
Additional Background Links
- Cellular respiration introduction, Kahn Academy (video)
- Harvesting Energy From Humans, Popular Science
- Why Does Blood Become More Acidic When Carbon Dioxide Increases?, Live Strong
- pH indicator, Wikipedia
Prep Work (15 minutes)
- Practice going through the experimental procedure yourself, so you can explain and demonstrate it to the students. Note: For safety reasons, students should use a one-directional check valve with their straws when exhaling into the indicator solutions to prevent any accidental ingestion of the solution. The valve will only allow air flow in one direction, which prevents suction of the indicator solution into the straw.
- Prepare three cups or beakers with indicator solution for demonstrating the indicator's color change to students.
- Fill three 9 oz cups two thirds with deionized water and add about 2 mL of bromothymol blue indicator. The color of all these solutions should be green.
- Have an acid, such as distilled vinegar, ready.
- Prepare an alkaline (basic) solution by making a saturated solution of baking soda in water (add about 5 grams to 50 mL of water).
Teacher Tool Box
Engage (20 minutes)
- Discuss the concept of cellular respiration and put it in context with respiration (breathing).
 What does your body need to survive and function? Can you give some examples?
 Nudge the discussion as needed so that oxygen, food, water, and energy are all mentioned.Why do we need all of these things? For example, can you explain why we need to eat? [You might need to prompt students to get to the answer with questions like "What happens if you do not eat for a long time?" or "Do you think you will feel more energized and can run around faster and longer with or without food?" et cetera.]We need food and oxygen to generate energy that our body can use for growth, repair and movement. If we do not eat, our body will eventually run out of energy, will not be able to function anymore, and will starve.What happens inside our body to the food we eat?The food we eat is digested in our stomach and digestive system. That means it is broken down into smaller components (such as proteins, vitamins, carbohydrates, and fats) that can be absorbed by our body to be processed. Some of these processes release energy that our body can use for functions such as moving, thinking, or growing.What kind of nutrients or compounds do you think foods contain that help give our body energy? How does our body transform food into energy?[Students may not know the answer—that is fine, and a good time to formally introduce cellular respiration.] Many foods that we eat can be converted by our body to carbohydrates or sugars such as glucose, which is the most important starting compound to make energy. The process that our body uses to make energy from glucose is called cellular respiration. It happens continuously in the cells of our body to provide energy to us nonstop. Respiration, the process of breathing, is not the same as cellular respiration, although both are related.
 - Write down the chemical equation for cellular respiration and explain it to your students:
/-/https/www.sciencebuddies.org/Files/14174/23/note-question-mark-30.png)
/-/https/www.sciencebuddies.org/Files/14175/24/conversation-bubbles-30.png)
| C6H12O6 | + | 6 O2 | → | 6 CO2 | + | 6 H2O | + | energy |
| glucose (from food) | oxygen (from air) | carbon dioxide (in exhaled breath) |
water (used by body) | (used by body) |
- Explain to your students that cellular respiration is a two-stage process. First, glucose is broken down into smaller molecules, which happens in the cytoplasm of our cells and produces some energy. The second stage takes place in the "powerhouses of our cells," the mitochondria. Here, the smaller molecules from glucose are broken down further and, in combination with oxygen, make the end products of cellular respiration carbon dioxide, water, and energy. This step is the major energy contributor during cellular respiration.
- Make the link between cellular respiration and breathing (respiration) by discussing the following questions.
Where do you think the oxygen that we need for cellular respiration comes from?The oxygen for cellular respiration comes from the air (which contains about 20% oxygen). This is the reason why we have to breathe—to provide oxygen to the cells for breaking down glucose to generate energy.What do you think happens to the by-products of cellular respiration, carbon dioxide and water?Both, carbon dioxide and water, are carried away in our bloodstream. The water usually leaves our body through sweating or is transported to our kidneys and ends up in our urine. The carbon dioxide eventually ends up in the breath that we exhale.
- Explain your students that you will do a series of experiments to measure the end product of cellular respiration (carbon dioxide) that is present in their exhaled breath. Optionally, you can show your students this introductory video to this lesson plan experiment:
/-/https/i.ytimg.com/vi/G7gvJEKh_p8/maxresdefault.jpg)
/-/https/www.sciencebuddies.org/Files/20511/4/google-classroom.png)
/-/https/www.sciencebuddies.org/Files/20512/4/ms-teams.png)
/-/https/www.sciencebuddies.org/Files/20469/4/Canvas_Bug_Color_RGB.png)
/-/https/www.sciencebuddies.org/Files/20470/5/Schoology-Logo.png)
/-/https/www.sciencebuddies.org/Files/20471/4/lms.png)
/-/https/www.sciencebuddies.org/Files/20469/4/Canvas_Bug_Color_RGB.png)
/-/https/www.sciencebuddies.org/Files/20470/5/Schoology-Logo.png)
/-/https/www.sciencebuddies.org/Files/20471/4/lms.png)
- Tell your students that in their experiments, they will investigate what happens to cellular respiration when they get more active and need more energy—like when exercising. Use the following questions for them to make predictions. Write the predictions down to compare to the results after the experiment.
What would happen if your body suddenly needed a lot of extra energy (for example, when you exercise)? Do you think the cellular respiration rate would change? What does that mean for the amounts of carbon dioxide and water being produced? Would the amounts increase or decrease?
- Once the prediction is made, help students understand how the indicator solution is related to carbon dioxide and cellular respiration by asking questions and doing two short demonstrations.
Carbon dioxide is an acidic gas. Can you think of a liquid that has carbon dioxide in it? Is that liquid acidic, basic, or neutral?Soda has carbon dioxide. Adding carbon dioxide to a liquid makes it acidic.Knowing that carbon dioxide is acidic, and makes water acidic, how could we measure how much carbon dioxide we exhale?Knowing that carbon dioxide acidifies a solution, we can measure the amount of carbon dioxide being produced by the time it takes to make a neutral solution acidic. We can use pH indicators that change color dependent on if the solution is acidic, neutral, or basic. An example of such an indicator is bromothymol blue.
- Demonstrate how the indicator solution (bromothymol blue) changes color depending on if the solution is acidic, neutral, or basic.
- Place the three cups with indicator solution in front of the class so everybody can see them. Let your students notice the color and tell them that this is a neutral solution of just water (plus indicator).
- Add one teaspoon of acid (vinegar) to one of the cups or beakers and let your students observe the color change (to green/yellow). Tell them that you added an acid to the indicator solution.
- Add enough of the prepared baking soda solution to one of the other cups to make the color change from green to blue and let your students observe the color change. Tell them that you added a base to the indicator solution.
- Let your students compare the different colors and recall which solution is acidic, basic, or neutral.
- Show that the indicator solution also turns green/yellow (acidic) when you breathe into it through a straw, due to the carbon dioxide in your breath.
Explore (30 minutes)
- Based on previous discussions, let each student formulate his/her hypothesis on how cellular respiration rates (or the amount of carbon dioxide in your breath) changes after exercising.
- Divide the class into groups of 2-4 students and inform them that each group will conduct an experiment to measure the amount of carbon dioxide in their breath before and after exercising, to test their hypotheses. Each student should perform the whole experiment (before and after exercising) once. Within an experiment, students should divide tasks. For example, one student could prepare the indicator solution, another one exhales into the indicator solution, and a third student measures the color change with the stopwatch. Students should then rotate through each task so everyone can have a turn measuring the amount of carbon dioxide in their breath.
- Walk the students through the experimental procedure described below. (A
slideshow
is available that you can use to guide your students through the experiments.)

Make sure the students use a one-directional check valve with their straws when exhaling into the indicator solutions to prevent any accidental ingestion of the solution. The valve will only allow air flow in one direction, which prevents any suction of the indicator solution into the straw. Experimental Procedure
- To familiarize students with the experimental procedure, first let them practice exhaling through a straw into just water. Students should take turns so everyone in the group can perform the experiment once.
- Fill a 9 oz cup or 150 mL beaker two thirds with water.
- Cover the cup with plastic wrap and secure it with a rubber band.
- With a straw, poke two holes into the plastic wrap. One should be located closer to the rim of the cup.
- Prepare the straw by cutting it into two pieces and inserting the valve in the top part as shown in Figure 2. Each student needs to prepare his/her own straw. They can use one valve each, or alternatively, students of one group can share a valve. In this case, the valve needs to be passed from student to student during the experiment so each one can insert it into their individual straw.
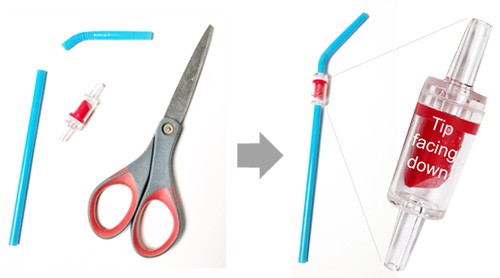
Figure 2. Inserting the check valve into the top part of the straw.
- Stick the bottom of the straw through the hole that is closer to the rim of the cup.
- Take a deep breath and start exhaling through the straw into the water for as long as you can. Try to exhale from your lungs. Then inhale through your nose and continue blowing into the water.
- Now, let your students do the experiment with indicator solution instead of water.
- Fill a 9 oz cup or 150 mL beaker two thirds with water.
- Add about 2 mL, or half a teaspoon of 0.04% bromothymol blue indicator solution.
- The solution should be green or blue dependent on the pH of your water. If the solution is already yellow or very light green, try a different water.
- Repeat steps a.ii–a.vi. But this time, start a stopwatch immediately before the experimenter starts exhaling into the indicator solution. Students can reuse their individual prepared straws and valves.
- Stop the stopwatch once the color has changed from blue-green to yellow and does not change anymore. Record the time on your worksheet.
- Let each student repeat the same experiment. Each one should use his/her own straw. The safety valve can be shared. Make sure they record all their data in the student worksheet.
- Once all trials for the first experiment have been completed, repeat steps b. and c. again, but before the experimenter starts exhaling into the indicator solution, he/she should do jumping jacks or a similar exercise for one minute. Even though the students might feel a little winded, they should try to exhale into the straw the same way they did during the experiment before exercising. Let the students prepare a new straw for this step to avoid accidental swapping of straws. The safety valves can be reused.
Lesson Completion
Let the students clean up their experimental supplies. All the solutions can be disposed of in the sink.

If time is short, break here and have students analyze their data the next day of class. Troubleshooting
Depending on what kind of water you use, the pH can be different. The pH of water is usually in the range of 6.5–8.5. If your tap water results in a dark blue color when adding the indicator solution, meaning it is slightly basic, you can still use it for the experiment. Ideally, distilled or deionized water should have a neutral pH and should result in a blue-green color with bromothymol blue. If your water has a light green or yellow color with the indicator, you cannot use it for this experiment and you should try a different water source. - To familiarize students with the experimental procedure, first let them practice exhaling through a straw into just water. Students should take turns so everyone in the group can perform the experiment once.
/-/https/www.sciencebuddies.org/Files/8658/15/warning-purple-40.png)
/-/https/www.sciencebuddies.org/Files/8667/10/lp-straw-preparation-valve.jpg)
/-/https/www.sciencebuddies.org/Files/8346/30/clock-purple-32.png)
Reflect (15 minutes)
- Throughout the data analysis process, encourage the students to question their data. You could ask questions like:
How reproducible was your data? Did all your trials before or after exercising result in a similar pattern? Did all groups observe the same trend in their results?The amount of exhaled carbon dioxide, or actual times needed to change the color of the indicator solution, will probably vary from student to student. However, all groups should have observed the same trend between their data from before versus after exercising.What are possible sources of variation in your data? For example, did you see a difference depending on which student conducted the experiment?
- Let each group review the data they recorded in their student worksheet.
- Discuss the results with the students and ask them to interpret the meaning of their data.
How many of you observed a faster color change after exercising?All students should raise their hands. If there is a group that has opposite results, do some joint troubleshooting to find out what led to their results. Everyone should have seen the same trend (faster color change after exercising) in their experiments.Why do you see a faster color change in the indicator solution after exercising?A faster color change of the indicator solution from neutral (blue-green) to acidic (green-yellow) means that more carbon dioxide was exhaled into the solution during the same time period, turning the solution acidic faster.What does a faster color change tell you about your cellular respiration rate?More carbon dioxide in your exhaled breath means that cellular respiration rates increase when exercising, as your body needs more energy to perform the exercises.
- If you have time, you can combine all the groups' average color change times before and after exercising into a scatter plot on the board to reflect the entire class's data. This way they can also see the trend of the data clearly, showing that after exercising, more carbon dioxide is produced due to a higher cellular respiration rate.
Did the amount of exhaled carbon dioxide vary between different experimenters?Even if people are doing the same activities, it does not mean that their cells respire at the same rate. Every person's metabolism functions slightly different so the amount of exhaled carbon dioxide can vary from person to person even if they are doing the same thing.
Assess
You can use this quiz to assess student learning after the activity; quiz is available in online and pdf formats:
- Online quiz, assignable in any LMS
- Quiz (pdf) and answer sheet (pdf)
Make Career Connections
Discussing or reading about these careers can help students make important connections between the in-class lesson and STEM job opportunities in the real world.
/-/https/careerdiscovery.sciencebuddies.org/cdn/Files/947/17/pexels-photo-3825412.jpg)

/-/https/careerdiscovery.sciencebuddies.org/cdn/Files/1628/18/iStock-1203995945.jpg)
/-/https/careerdiscovery.sciencebuddies.org/cdn/Files/1719/17/Respiratory_therapist.jpg)
Lesson Plan Variations
- In addition to monitoring the amount of CO2 in their exhaled breath, you can let your students count the number of breaths they take in a certain amount of time and record their heart rates before and after exercising. The results will enable them to assess how the heart rate and breathing rate are related to cellular respiration. This will allow students to explore how body functions are linked, as well as identifying how chemicals flow through our body, for example, how oxygen in our blood is pumped from the lungs through our heart to our muscles.
- Make the connection between cellular respiration and photosynthesis, which is the production of sugar molecules (glucose) and oxygen from carbon dioxide and water. You can demonstrate the photosynthesis reaction by adding an aqueous plant such as Elodea to the indicator solution after it changed color. The excess carbon dioxide, which resulted in the color change, will be taken up by the plant when exposed to direct sunlight and will be transformed into oxygen and glucose. When enough carbon dioxide is used up, the indicator color will change back to green, which indicates that carbon dioxide has been removed from the solution. You can even demonstrate the importance of sunlight for photosynthesis by running several parallel experiments in which you expose some plants to sunlight and keep others in the dark. A color change should only happen in the presence of sunlight. This variation allows the students to understand how organisms in nature depend on each other in a diverse ecosystem.
/-/https/img.youtube.com/vi/CqYGVW2Eu6Y/0.jpg)
/-/https/img.youtube.com/vi/WJ06mrNliC0/0.jpg)
/-/https/img.youtube.com/vi/wFXu2gcvCvE/0.jpg)