/-/https/www.sciencebuddies.org/Files/21464/5/sb-logo.png)
/-/https/www.sciencebuddies.org/Files/21464/5/sb-logo.png)
Make a Dye-Sensitized Solar Cell
Summary
/-/https/www.sciencebuddies.org/Files/18159/10/logo-beyond-benign-high-res.png)
/-/https/www.sciencebuddies.org/Files/18160/7/dye-sensitized-solar-cells-four.jpg)
Overview
How does a solar cell work? In this green chemistry lesson plan, students will build and test their own dye-sensitized solar cells using dye from blackberries. Along the way, they will learn about the principles of green chemistry and evaluate how solar cell manufacturing can go green.
Learning Objectives
- Consider this process against the twelve principles of green chemistry.
- Construct a dye-sensitized solar cell.
- Evaluate and compare the differences in solar cell technologies.
NGSS Alignment
This lesson helps students prepare for these Next Generation Science Standards Performance Expectations:- HS-ESS3-2. Evaluate competing design solutions for developing, managing, and utilizing energy and mineral resources based on cost-benefit ratios.
- HS-ESS3-4. Evaluate or refine a technological solution that reduces the impact of human activities on natural systems.
|
Science & Engineering Practices
Engaging in Argument from Evidence.
Evaluate competing design solutions to a real-world problem based on scientific ideas and principles, empirical evidence, and logical arguments regarding relevant factors (e.g. economic, societal, environmental, ethical considerations).
Constructing Explanations and Designing Solutions. Design or refine a solution to a complex real-world problem, based on scientific knowledge, student-generated sources of evidence, prioritized criteria, and tradeoff consideration |
Disciplinary Core Ideas
ESS3.A: Natural Resources.
All forms of energy production and other resource extraction have associated economic, social, environmental, and geopolitical costs and risks as well as benefits. New technologies and social regulations can change the balance of these factors.
ESS3.C: Human Impacts on Earth Systems. Scientists and engineers can make major contributions by developing technologies that produce less pollution and waste and that preclude ecosystem degradation. ETS1.B: Developing Possible Solutions. When evaluating solutions, it is important to take into account a range of constraints, including cost, safety, reliability, and aesthetics, and to consider social, cultural, and environmental impacts. (secondary) |
Crosscutting Concepts
Influence of Science, Engineering, and Technology on Society and the Natural World.
Engineers continuously modify these technological systems by applying scientific knowledge and engineering design practices to increase benefits while decreasing costs and risks.
Analysis of costs and benefits is a critical aspect of decisions about technology. Stability and Change. Feedback (negative or positive) can stabilize or destabilize a system. |
Materials
A blackberry solar cell classroom kit is available from Flinn Scientific.Each student group will need:
- 1 transparent indium tin oxide conductive glass slide (ITO slide), 15 mm x 35 mm x 1 mm
- 1 TiO2-coated indium tin oxide conductive glass slide, 15 mm x 35 mm x 1 mm
- 4 drops of iodide electrolyte solution (0.5 M potassium iodide mixed with 0.05 M iodine in propylene glycol)
- 2 small binder clips
- 1 blackberry (thawed, frozen blackberries work well)
- 1 small spatula
- 1 graphite pencil
- 1 piece of parafilm, cut into 20 mm x 40 mm size
- 1 small aluminum dish pan (2 inches)
- 1 paper towel
- 1 razor blade
- Multimeter
- Light source (flashlight or sunlight)
If preparing the TiO2-coating yourself, teachers will also need:
- Tape
- Mortar and pestle
- TiO2 (titanium dioxide)
- Trimesic acid (1,3,5-tricarboxylbenzoic acid)
- Stirring rod
Note: Handle the glass plates by the edges to avoid touching the faces of the plates.
Background Information for Teachers
This section contains a quick review for teachers of the science and concepts covered in this lesson.There is a growing need to investigate alternative energy sources due to the impacts of fossil fuels on global warming and clean air. Solar energy, or energy from the sun, is a free, readily available, plentiful resource that can be collected by solar cells to generate electricity.
Although solar cells have been around for a long time, their use for energy generation is not widespread. This is because traditional solar cells are expensive and inefficient (typically 11-18% of the sunlight they absorb is converted to electricity). To be considered a green chemistry technology, the technology must demonstrate three standards: performance, safety, and cost benefits. In this experiment, your students will make a dye-sensitized solar cell (DSSC) that is efficient, uses safe materials, and is inexpensive.
Unlike traditional solar cells that generate electricity through p/n junctions, the chemistry of the nanocrystalline TiO2 is based on red-ox (reduction-oxidation) chemistry. This means that the excitement of electrons to generate electron movement through the system is what drives electricity, which can be measured in terms of voltage (V). The mechanism of a photovoltaic cell has three steps (Figure 1):
- A dye, adsorbed on a layer of semiconductor (TiO2), interacts with the visible light provided by the sun (just like the green pigment does in a leaf), promoting an electron from a lower-level orbital to an excited one.
- The excited electron is injected by the dye into the semiconductor and, traveling through the bulk of it, reaches the electric contact with the outside circuit.
- The electrons return to the cell to complete the circuit and bring the dye back to its "normal" state via an electrolyte solution that helps carry electrons through the cell.
The cells are a "sandwich" in which two conducting glass slides are overlapped. The photoanode is coated with the layer of TiO2 sensitized with the dye, and the other is coated with graphite in order to enhance the interaction with the electrolytic solution that is contained between the glass slides themselves.
/-/https/www.sciencebuddies.org/Files/18161/7/fig-1-diagram-dye-sensitized-solar-cell.png)
Figure 1. Mechanism of a dye-sensitized solar cell.
Prep Work
- Order/acquire two conductive glass plates coated with ITO per group.
- Purchase frozen blackberries from your local grocery store (you can use fresh, but they tend to be a lot more expensive).
- Prepare iodide electrolyte solution (0.5 M potassium iodide mixed with 0.05 M iodine in propylene glycol). Propylene glycol is the more environmentally friendly antifreeze, as opposed to ethylene glycol, which is not so friendly.
- Use a multimeter with its setting placed on resistance (Ω) to determine which side of the glass slide has the indium tin oxide coating.
- "Mask," or cover, the glass slide along all four edges with 2 mm of tape with conductive side facing up. Secure the slide to the table by adhering the free side of the tape to the tabletop at a 45° angle. Your slide should look like the diagram below.
/-/https/www.sciencebuddies.org/Files/18162/8/prep-step-5-glass-slide-c.jpg)
- Prepare TiO2 paste and coat 80% of the inside of the conductive slide, leaving a 2 mm border all the way around (1 per student group). Paste is produced by mixing the following:
- Grind 15% TiO2 and 0.7% trimesic acid (1,3,5-tricarboxylbenzoic acid) with a mortar & pestle.
- Add 84.3% water by mass slowly and continue to grind as you add more water to make the paste.
/-/https/www.sciencebuddies.org/Files/18165/6/prep-step-6-liquid-drops-rolling-stirring-rod.jpg)
/-/https/www.sciencebuddies.org/Files/18166/7/prep-step-6-rolling-stirring-rod.jpg)
- Add 3 drops of the TiO2 solution uniformly to the conductive glass and spread it across the glass using the body of a stirring rod until the glass is covered completely.
- Allow the TiO2 to dry for 10 minutes, then remove tape slowly to avoid damaging the conductive glass.
Teacher Tool Box
Engage
- Ask the class what they know about solar cells and if they know anyone who has them on their house.
- Hand out the Student Background Worksheet. Have students read article #1 (How Green Are Those Solar Panels, Really?) independently or read it as a class. You may also want to assign this article as homework reading prior to class.
- Discuss the article and ask the students what they now think about solar panels.
- Explain that, as good scientists, we should scientifically evaluate the process of making solar energy panels.
- Give students time to read articles #2 (How Are Solar Panels Currently Made?) and #3 (What is green chemistry?) in the Student Background Worksheet and answer the questions.
- Discuss the results.
- Explain to students that green chemists obviously have cause for concern when it comes to solar panels, and that there is an opportunity for a chemist to develop a better way of making solar panels.
- Explain that they are now going to make a dye-sensitized solar cell, which is one of the ways that green chemists are working to improve solar energy production.
Explore
- Allow students to work in small groups (working in pairs is ideal, but can be adjusted based on class needs/materials).
- Hand out the Student Lab Worksheet which has directions for the students to follow and post-lab questions. The video shows how to do the experiment as do steps 4–21.
Create AssignmentEmbed Link
 Google Classroom
 Microsoft Teams
 Canvas
 Schoology
 Other
Other - Review the safety instructions with students:
- Handle glass slides with care to prevent injury to yourself and breakage of the glass.
- Do not ingest any materials (students may be tempted with the blackberries).
- It is recommended that only teachers should handle the knife when cutting out the center of the parafilm.
- Place the blackberry in the aluminum pan.
- Using a spatula, crush the blackberry to extract the juices. Scoop out the solid pulp.
- Remove the glass slide containing the white TiO2 coating from its bag. Handle the glass slide by the edges only. Determine which side has the TiO2 coating.
- Place the glass slide with the TiO2 face down into the aluminum pan. Allow to sit for 3-5 minutes.
- Remove the ITO-coated glass slide from its bag. Determine which side the coating is on by using a multimeter with its setting placed on resistance (Ω). The indium tin oxide coating is on the side of the slide that gives a non-zero reading on the multimeter.
- Using the tip of a graphite pencil, lay down the carbon catalyst by shading the indium tin oxide coated side of the slide. The graphite may not leave a visible mark.
- Remove the TiO2 slide from the blackberry juice. Use the paper towel to gently blot the excess juices off the slide. Dry the slide as much as possible, but do not remove any of the TiO2 coating. Do not wipe the slide, as this may remove some of the TiO2 coating.
- Remove and discard the wax paper backing from the parafilm and place the parafilm on top of the dye-coated TiO2 slide. Use the eraser end of the pencil to press the parafilm to the glass slide in the area that borders the TiO2.
- Read the entire step carefully before beginning: Using a razor blade, carefully cut out the area of the parafilm that sits on top of the TiO2. Press lightly with the blade, so that the conductive coating does not scratch off. Reinforce the parafilm seal around the edges of the TiO2 area with the eraser end of the pencil.
/-/https/i.ytimg.com/vi/_PyuApQnrWg/maxresdefault.jpg)
/-/https/www.sciencebuddies.org/Files/20511/4/google-classroom.png)
/-/https/www.sciencebuddies.org/Files/20512/4/ms-teams.png)
/-/https/www.sciencebuddies.org/Files/20469/4/Canvas_Bug_Color_RGB.png)
/-/https/www.sciencebuddies.org/Files/20470/5/Schoology-Logo.png)
/-/https/www.sciencebuddies.org/Files/20471/4/lms.png)
/-/https/www.sciencebuddies.org/Files/20469/4/Canvas_Bug_Color_RGB.png)
/-/https/www.sciencebuddies.org/Files/20470/5/Schoology-Logo.png)
/-/https/www.sciencebuddies.org/Files/20471/4/lms.png)
/-/https/www.sciencebuddies.org/Files/18167/5/explore-step-12-using-utility-knife-1.jpg)
/-/https/www.sciencebuddies.org/Files/18168/6/explore-step-12-using-utility-knife-2.jpg)
/-/https/www.sciencebuddies.org/Files/18169/5/explore-step-12-using-pencil-eraser.jpg)
- Place 1-2 drops of the iodide electrolyte solution on top of the TiO2. The parafilm should act as a wall that prevents the electrolyte solution from leaking out.
- Place the ITO-coated glass slide on top of the TiO2 slide so that the conductive sides face each other. Stagger the slides to expose as much of the glass slide as possible and to cover the entire TiO2.
/-/https/www.sciencebuddies.org/Files/18170/5/explore-step-14-two-glass-slides-sandwiched.jpg)
- Use the 2 small binder clips to hold the slides together along the longer sides.
- Carefully push back a small amount of the parafilm wall to expose a tiny part of the conductive side of the slide.
- Place the multimeter probes on opposite ends of the solar cell's conductive glass slides.
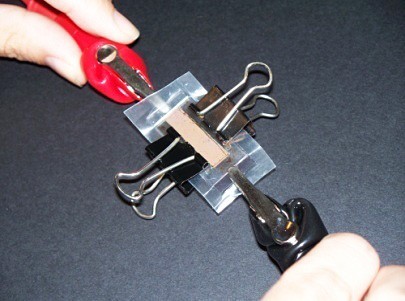
- Place the solar cell under either sunlight or a flashlight.
- With the multimeter set to measure electric potential, measure the voltage of the solar cell.
- Record on the data table how many millivolts (mV) are generated for the light source.
- Repeat steps 15–17 for 1 or 2 more light sources.
- Have student groups share their data with the rest of the class. Sum up how many volts the class would make as a whole if the cells were connected in a series.
- Disposal information: The paper towel, parafilm, parafilm paper backing, and used blackberry can be thrown into the trash. Teachers can rinse or wipe down the glass slides, aluminum dish, binder clips, spatula, knife, and multimeter probes (if necessary).
/-/https/www.sciencebuddies.org/Files/18171/5/explore-step-17-alligator-clips-solar-cell.jpg)
Reflect
- Review student responses to post-lab questions.
- Discuss what kinds of applications the volts generated by the class can power. Could the solar cell power a calculator, for instance?
- Discuss the different locations that a small, flexible solar cell can be placed.
/-/https/img.youtube.com/vi/0QQAU5gB0fI/0.jpg)
/-/https/img.youtube.com/vi/pIEjwMhnAGo/0.jpg)
/-/https/img.youtube.com/vi/dZhmcai85Y0/0.jpg)