/-/https/www.sciencebuddies.org/cdn/Files/21464/5/sb-logo.png)
/-/https/www.sciencebuddies.org/cdn/Files/21464/5/sb-logo.png)
Summary
/-/https/www.sciencebuddies.org/cdn/Files/8635/13/earthquake-base-decorated-house-main.jpg)
Overview
Explore how technology can save lives in this fun engineering lesson plan! Earthquakes can cause devastation and loss of life when they strike, but earthquake-resistant buildings can stay standing and keep people safe. In this project, your students will build model earthquake-resistant buildings and measure their movement during a simulated earthquake using a mobile phone and a sensor app. A French translation of this activity is available.Learning Objectives
- Analyze data from simulated earthquake tests to determine how well a base isolation system performed.
- Understand that technology can reduce the impact of natural disasters on humans.
- Compare the test data from two competing solutions and determine which solution was better.
NGSS Alignment
This lesson helps students prepare for these Next Generation Science Standards Performance Expectations:- MS-ESS3-2. Analyze and interpret data on natural hazards to forecast future catastrophic events and inform the development of technologies to mitigate their effects.
- MS-ETS1-2. Evaluate competing design solutions using a systematic process to determine how well they meet the criteria and constraints of the problem.
|
Science & Engineering Practices
Analyzing and Interpreting Data. Analyze and interpret data to determine similarities and differences in findings.
Constructing Explanations and Designing Solutions. Apply scientific principles to design an object, tool, process, or system. Engaging in Argument from Evidence. Evaluate competing design solutions based on jointly developed and agreed-upon design criteria. |
Disciplinary Core Ideas
ESS3.B: Natural Hazards. Mapping the history of natural hazards in a region, combined with an understanding of related geologic forces, can help forecast the locations and likelihoods of future events.
ETS1.B: Developing Possible Solutions. There are systematic processes for evaluating solutions with respect to how well they meet the criteria and constraints of a problem. |
Crosscutting Concepts
Patterns. Graphs, charts, and images can be used to identify patterns in data.
Stability and change. Stability might be disturbed either by sudden events or gradual changes that accumulate over time. |
Materials
/-/https/www.sciencebuddies.org/cdn/Files/8629/13/earthquake-table-materials.jpg)
A cardboard box is used to simulate a house. A sheet of cardboard that is larger than the cardboard box is used for the tabletop. Scissors, tape, yarn, springs, paperclips, thumb tacks, markers, straws, rubber bands, cotton balls and binder clips are used to construct the tabletop. A ruler and stopwatch app on a smartphone are used to measure the shaking of the tabletop.
Testing Station (at least 1 per class, more if you have multiple phones available)
- Smartphone with a sensor app such as phyphox, available for free on Google Play for Android devices (version 4.0 or newer) or from the App Store for iOS devices (iOS 9.0 or newer).
- Double-sided foam tape
- Stopwatch
- Ruler
For each group of 2–4 students:
- A standardized object to use as a "house." For example, small cardboard boxes or plastic food storage containers. See the Lesson Plan Variations section for ideas on how students can build their own houses.
- Piece of corrugated cardboard that is larger than the base of the "house"
- Materials to build an earthquake-resistant base:
- Corrugated cardboard
- Assorted round objects to use as rollers: markers, marbles, etc.
- Assorted shock-absorbing objects: rubber bands, cotton balls, erasers, springs (you can get springs at a hardware store or by disassembling ballpoint click pens), etc.
- Assorted attachment materials: pushpins, binder clips, paper clips, straws, string, stapler, etc.
- Object that is about the same weight as the phone (box of pencils, plastic baggie full of coins, etc.)
- Masking tape or Scotch® tape
- Scissors
- Ruler
- Stopwatch
Background Information for Teachers
This section contains a quick review for teachers of the science and concepts covered in this lesson.Earthquakes can cause loss of life and devastating damage to buildings, yet many of the world's most populous cities are in earthquake-prone regions. To save lives and reduce damage to buildings, engineers have developed various techniques to make buildings earthquake-resistant. One method involves putting a building's foundation on bearings that allow the whole building to move (technically called a base isolation system). There are several different kinds of earthquake-resistant bearings (see the Additional Background section for details), but in general, they have a few common features:
- They isolate the building's base from the movement of the ground, allowing the building and ground to move independently of each other.
- They have a restoring force (like a spring) that returns the building to its original position after an earthquake.
- They have damping (friction) that helps absorb energy from the earthquake and prevent the building from oscillating back and forth for a long time.
The bearings function very similarly to shock absorbers on a car. When you drive over a big speed bump or pothole, the shock absorbers help prevent the vibration from being transferred to the people riding in the car. Similarly, bearings help prevent sudden movements of the ground from transferring to the building itself.
Engineers test their earthquake-resistant designs using shake tables, special tables that simulate the effects of earthquakes on scaled models. Figure 1 shows two buildings on a shake table. The building on the left is attached directly to the ground, and the one on the right has a base isolation system. Notice how the building on the left wobbles significantly as the table shakes. However, the building on the right stays upright and appears to mostly stay in place as the table moves back and forth under it.
/-/https/www.sciencebuddies.org/cdn/Files/8624/7/animated-base-isolation.gif)
The buildings in this model are identical but they are built with different bases. The building on the left sways more violently because its base is built directly on the foundation. The building on the right has noticably less sway because there are rollers that separate the base of the building from the shaking foundation.
Figure 1. Shake table test of a building with a fixed base (left) and a building with a base isolation system (right). Image credit Wikimedia Commons user Valentin Shustov, 2011.
In this lesson, your students will design and build their own base isolation systems for standardized buildings (like equal-size cardboard boxes), and a simple hand-powered shake table (using a ruler and stopwatch to standardize how much and how fast they shake). One way to measure the effectiveness of a base isolation system (or any other type of earthquake-resistant modification) is to do destructive testing—keep shaking the table harder until the building collapses. However, for non-destructive testing, you can measure how much the building moves using an accelerometer, a device that measures acceleration in meters per second squared (m/s²). Your students will do this using their mobile phones and a sensor app, which allows you to record data using the phone's built-in accelerometer. A building that is attached directly to the ground will experience much larger peaks in acceleration (Figure 2, left) than a building with a successful base isolation system (Figure 2, right).
/-/https/www.sciencebuddies.org/cdn/Files/8630/7/earthquake-table-diagram.png)
Two diagrams showing acceleration of buildings with fixed and roller base configurations. The left diagram shows the acceleration of a fixed base building over time. Large variations in the acceleration of the fixed base building represent severe swaying during the shake table test. The right diagram shows the acceleration of a roller base building over time. The acceleration of the roller-base building has minimal variations representing less movement during the shake table test.
Figure 2. Example acceleration data recorded with a structure attached directly to the ground (left) and a structure on rollers that serve as a base isolation system (right).
In this project, your students will follow the engineering design process. The engineering design process is an iterative process where students design, build, and test their containers. It is important for students to understand that there is no single "right answer" to an engineering project. There are multiple possible solutions to the problem, and it is OK if their designs do not work very well on the first try. Part of the process is redesigning, rebuilding, and retesting your system based on what you learn from your initial tests.
Additional Background Links
- Testing of a New Line of Seismic Base Isolators, Network for Earthquake Engineering Simulation (video)
- How do Base Isolators Work?, Science Learning Hub
- How Buildings Stay Up When the Earth Shakes, Gizmodo
- Earthquake engineering, Wikipedia
- Base isolation, Wikipedia
- Engineering Design Process, Science Buddies
- Comparing the Engineering Design Process and the Scientific Method, Science Buddies
Prep Work (10 minutes)
Make sure you are familiar with the sensor app you are using before you show it to your students. The best way to do this is to play with the app on your phone to get comfortable enough using it to explain it to your students. Ideally, you want to test the experiment yourself with the app before class to make sure it works as intended.
To set up your classroom for the activity:
- Set up a single shake-table testing station with the phone, double-sided foam tape (which students will use to attach the phone to their buildings), scissors, ruler, and stopwatch. Tape the ruler to the table so it does not slide around.
- Lay out all the construction materials on a table so groups have easy access to them.
Teacher Tool Box
Engage (20 minutes)
- Show this video to your students as a general introduction to earthquakes:
Create AssignmentEmbed Link Google Classroom
 Microsoft Teams
 Canvas
 Schoology
 Other
Other
- Show this video to your students as an introduction to base isolation systems:
 What did you observe in the second video?
 The video shows two model buildings on a large shake table. The building on the left is attached directly to the ground. The building on the right has a base isolation system that isolates it from the movement of the ground. The system works similarly to shock absorbers in a car that help prevent you from feeling big bumps in the road. As you can see in the video, this helps the building on the right wobble less and prevents it from collapsing.Why are earthquake protection systems like this important?Students' knowledge about this topic might depend on where you live and whether the region is earthquake-prone. Earthquakes can cause loss of life and severe damage to buildings. Systems that help buildings stay upright during earthquakes can save lives and dramatically reduce the cost of repairs.
 - Introduce the sensor app to your students, specifically the accelerometer. When using the phyphox app, they will need to use the accelerometer (without g) sensor and measure the absolute acceleration (navigate to the "Absolute" tab in the phyphox app). The accelerometer (without g) gives the actual acceleration without the gravitational acceleration, which means that this sensor reports 0 when the device is resting.
- Explain that phones contain built-in accelerometers which are electronic devices that can detect motion (technically they measure acceleration in meters per second squared [m/s2]). Accelerometers are used for motion controls in many phones and video game controllers.
- Various sensor apps such as phyphox let you record data from the accelerometer and display it in a graph.
- When using the phyphox app, open the accelerometer (without g) function and go to the "Absolute" tab to measure absolute acceleration. Press the play button to start a recording and show students what happens as you wave your hand around. Optionally, let students play with the phone and look at the graph themselves. The absolute accelerometer displays the phone's total acceleration in all directions, as opposed to the X, Y, and Z accelerometers, which only display the acceleration in one direction (relative to the phone).
- Explain that accelerometers can also be used to measure how much buildings move during earthquakes.
- Do a quick demonstration for your students (see Figure 3).
- Use double-sided foam tape to attach the phone to the top of a small cardboard box, with the screen facing up.
- When using the phyphox app, open the accelerometer (without g) sensor and go to the "Absolute" tab to measure absolute acceleration. Press the play button to start a recording.
- Shake the cardboard box back and forth a few times, then press the pause button to stop recording. Save your data for data analysis.
- Show the graph to your class and determine the maximum acceleration felt by the phone. You can use the pick data tool to select any data point within your graph and view its values.
- Now, place the box on top of some markers or other round objects on top of a piece of corrugated cardboard.
- Start a new recording and shake the piece of cardboard back and forth a few times. Try your best to shake it at the same speed you shook the box itself. You should notice that the box does not move back and forth as much as the cardboard does. Because of the rollers, the cardboard can move back and forth under the box.
- Stop recording, save your data, and show the graph to your class. Again, determine the maximum acceleration felt by the phone and compare its value to when you shook the box directly.
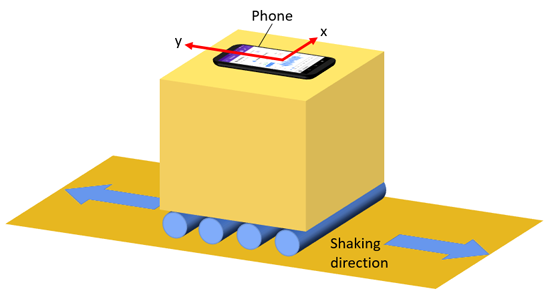
Figure 3. Demonstration setup.What do the graphs tell us? How do the two graphs compare? How does this relate to the video you just watched?Shaking the cardboard back and forth simulates ground movement during an earthquake. When you shake the box directly, it is like a building that is attached directly to the ground. The building moves more, so the maximum acceleration is higher. When you put the box on rollers, they act like the base isolation system from the video. The ground can move back and forth beneath the building, and the building does not move as much. This makes maximum acceleration lower. - Explain that students will use the materials you have provided to build their own base isolation system. The demonstration you did with markers was just a simple example, but they will try to improve the design. For purposes of this lesson, they will only shake the "ground" back and forth in one direction.
What are some potential problems with just putting a building on rollers like in the demonstration?Possible answers include: there is nothing to stop the building from rolling off either edge, and there is nothing to force the building to return to its original position after the earthquake. Real base isolation systems allow a building to move back and forth, but they also include these features—you want to make sure your building winds up back where it started!How could you use the materials we have available in the classroom to improve the design?Some examples include using springs or rubber bands to pull the building back towards the middle, or adding padded stoppers on both sides to prevent the building from rolling off the edge.
- Explain that they will use the engineering design process to build their base isolation systems. The process is iterative, meaning you might go back and redo some of the steps. There is no single "right answer" to an engineering problem, and their designs might not work well on the first try. This is OK and just like real-world engineering. Students will be allowed to build, test, and redesign their devices as many times as they want within the time limit.
/-/https/i.ytimg.com/vi/e7ho6z32yyo/maxresdefault.jpg)
/-/https/www.sciencebuddies.org/cdn/Files/20511/4/google-classroom.png)
/-/https/www.sciencebuddies.org/cdn/Files/20512/4/ms-teams.png)
/-/https/www.sciencebuddies.org/cdn/Files/20469/4/Canvas_Bug_Color_RGB.png)
/-/https/www.sciencebuddies.org/cdn/Files/20470/5/Schoology-Logo.png)
/-/https/www.sciencebuddies.org/cdn/Files/20471/4/lms.png)
/-/https/www.sciencebuddies.org/cdn/Files/20469/4/Canvas_Bug_Color_RGB.png)
/-/https/www.sciencebuddies.org/cdn/Files/20470/5/Schoology-Logo.png)
/-/https/www.sciencebuddies.org/cdn/Files/20471/4/lms.png)
/-/https/i.ytimg.com/vi/kzVvd4Dk6sw/hqdefault.jpg)
/-/https/www.sciencebuddies.org/cdn/Files/8631/7/earthquake-table-x-y.png)
Explore (60 minutes)
- Break the class up into groups of 2–4 students.
- Establish rules for testing using a ruler and stopwatch. For example, "shake your building back and forth +/-1 cm, 20 times in 10 seconds." While it is not possible to perfectly replicate this each time when testing by hand, it will give students a baseline idea for the amount of shaking their designs should be able to withstand.
- Instruct each group to use the student worksheet to brainstorm and sketch their designs before they start building.
- Let each group gather their materials and start building their base isolation system. Encourage them to have their first iteration built and ready to test within 20 minutes, so they have time to modify and retest their designs. Their final designs should be done after about 45 minutes. If you only have one phone available, students can test their designs at their desks without using the phone:
- Attach an object that weighs about the same as the phone to the top of the house. This is important because the total mass of the house will affect how it vibrates. If you test with an empty cardboard box at your desk, then attach the phone at the official testing station, the results might change significantly.
- Shake the cardboard base back and forth. Remember to use a ruler and stopwatch to control how hard you shake the base, using the rules established for the whole class.
- Observe how much the house moves. Does it move as much as the cardboard does? Does it appear to stay in place while the cardboard moves back and forth under it?
- When individual groups are ready, they can come to the testing station to test their design using the phone equipped with the sensor app.
- Attach the phone to the top of the house using double-sided foam tape, with the screen facing up. Make sure the long dimension of the phone lines up with the direction you will shake the building (see Figure 3).
- When using the phyphox app, open the accelerometer (without g) sensor and go to the "Absolute" tab to measure absolute acceleration. Press the play button to start a recording.
- Shake the cardboard back and forth, again using a ruler and stopwatch to standardize the shaking (e.g. +/-1 cm, 20 times in 10 seconds).
- Stop shaking the base and press the pause button to stop the recording. Save your data for data analysis.
- Determine the maximum acceleration felt by the phone. You can use the pick data tool to select any data point within your graph and view its values. Then record the maximum acceleration value on the student worksheet.
- Allow groups to return to their work stations and modify their designs as much as they would like, as time allows. Save about 15 minutes at the end for a class-wide competition. Encourage groups to ask questions and think about their designs as they test.
Do they notice any problems with their design? For example, if the design has stoppers on the ends, does the house slam into the stoppers too hard? Does this create spikes in the acceleration graph? If the design has rubber bands, are the rubber bands too tight or too loose? Do they cause the oscillations to get worse instead of better?If you notice problems, how can you change your design to make it better?
- After 45 minutes, tell students to stop building and do a class-wide competition. Nominate a single person to do all the shaking (you may want to do this yourself to ensure neutrality). Repeat step 4 for each group's design. Which design results in the lowest maximum acceleration?
Reflect (10 minutes)
/-/https/www.sciencebuddies.org/cdn/Files/14174/23/note-question-mark-30.png) | Which design(s) worked the best? |
| Did any designs fail to work as expected? |
| Are there features of different designs you could combine to make a single better design? |
/-/https/www.sciencebuddies.org/cdn/Files/14175/24/conversation-bubbles-30.png) |
The answers to these questions will depend on the individual results in your classroom. For example, certain designs (like rubber bands that are pulled very tight, or stoppers that are too close to the building with no cushioning) might actually make maximum acceleration bigger.
|
Assess
You can use this quiz to assess student learning after the activity; quiz available in online and pdf formats:
- Online quiz, assignable in any LMS
- Quiz (pdf) and answer key (pdf)
Make Career Connections
Discussing or reading about these careers can help students make important connections between the in-class lesson and STEM job opportunities in the real world.
/-/https/careerdiscovery.sciencebuddies.org/cdn/Files/1133/17/pexels-photo-3862135.jpg)

/-/https/careerdiscovery.sciencebuddies.org/cdn/Files/1429/17/unsplash-4pM4nhHyo9M.jpg)
Lesson Plan Variations
- To save time, this lesson plan has you use standardized items as "houses" (like small cardboard boxes), while students focus on engineering an earthquake-resistant base. Instead, let students build their own towers using construction materials you have available (e.g. popsicle sticks and glue, wooden skewers and Styrofoam® balls, building toys like LEGOs® or K'Nex®).
- Base isolation is just one method of making a building earthquake-resistant. Can your students incorporate other methods (for example, search online for "tuned mass damper")? Who can build the tallest, most earthquake-resistant tower?
- In this lesson, you only shake the ground back and forth in one direction. What happens if you shake the table in two directions? How do students need to modify their designs?
- It can be difficult to do repeatable, controlled tests when shaking a table by hand. Build a simple shake table using rubber bands as described in Set Your Table for a Sweet and Sticky Earthquake Shake. This allows you to do repeatable tests by stretching the rubber bands the same initial amount for each test. Alternatively, you can build or purchase a motorized shake table (various kits and plans for building one are available online).
- How does soil type affect a building's motion during an earthquake? Check out Science Buddies' science fair project Set Your Table for a Sweet and Sticky Earthquake Shake for an activity you could adapt for your classroom.
/-/https/img.youtube.com/vi/abVB68BR9bQ/0.jpg)
/-/https/img.youtube.com/vi/jr3BOE_EpOk/0.jpg)
/-/https/img.youtube.com/vi/WI0pGk0MMhg/0.jpg)