Fabulous Fabrics: The Chemistry of "Green" Textiles
Summary
/-/https/www.sciencebuddies.org/cdn/Files/19006/4/dyed-fabric-colors.jpg)
Overview
Look around and you will see fabrics everywhere, from clothes to upholstery, in a wide range of colors. In this chemistry lab students will dye strips of fabrics to explore how variables like pH and fiber type influence fabric colors. Students will also look at the life cycles of natural and synthetic fibers and apply green chemistry principles to understand how science can help make advances towards a "greener" textile industry.
Learning Objectives
Students will:
- Understand that synthetic fabrics come from natural resources and impact society
- Apply the green chemistry concepts to decision making
- Consider properties of natural and synthetic fabrics
- Investigate the impact of pH changes through dyeing
NGSS Alignment
This lesson helps students prepare for these Next Generation Science Standards Performance Expectations:- MS-PS1-3. Gather and make sense of information to describe that synthetic materials come from natural resources and impact society.
- MS-ETS1-2. Evaluate competing design solutions using a systematic process to determine how well they meet the criteria and constraints of the problem.
Materials
- Multi-fiber ribbon (available from Educational Innovations Inc., or Flinn Scientific); 2 strips per group. Alternatively, give groups at least four different types of white material or yarn including cotton, wool, polyester and nylon; 2 swatches of each material per group.
- Microscopes (or magnifying glasses)
- Digital scale
- Safety glasses
- Red Kool-Aid® for dye
- Plastic cups (2 per group)
- Plastic pipettes (2 per group)
- 50-mL beaker (1 per group)
- 100-mL beaker (1 per group)
- Ammonia (30 mL per group)
- Vinegar (<30 mL tota)
- Red and blue litmus strips (6 of each color per group)
- Stirring rod/spoon
- Permanent markers (1 per group)
- Paper towels
Background Information for Teachers
In this lesson plan, students will learn about green chemistry, acids and bases, and the complex nature of making "green" products. Green chemistry is the design of products (made through chemistry) and chemical processes with an emphasis on reducing or eliminating waste and harmful chemicals while being efficient with energy and output. There are twelve principles of green chemistry which chemists apply when problem solving. You can learn more about how green chemistry fits into education and industry in this video from one of the founders of green chemistry, John Warner.
/-/https/i.ytimg.com/vi/kKe6ycZpuJ0/maxresdefault.jpg)
/-/https/www.sciencebuddies.org/cdn/Files/20511/4/google-classroom.png)
/-/https/www.sciencebuddies.org/cdn/Files/20512/4/ms-teams.png)
/-/https/www.sciencebuddies.org/cdn/Files/20469/4/Canvas_Bug_Color_RGB.png)
/-/https/www.sciencebuddies.org/cdn/Files/20471/4/lms.png)
/-/https/www.sciencebuddies.org/cdn/Files/20469/4/Canvas_Bug_Color_RGB.png)
/-/https/www.sciencebuddies.org/cdn/Files/20471/4/lms.png)
Fabrics are an incredibly diverse group of materials. From high-tech athletic clothing to elegant formal wear, the purpose a fabric serves often is determined by its properties. Most textile products are made using a combination of natural and synthetic fibers. When considering fabrics from a green chemistry perspective, it is difficult to determine whether one fabric is "greener" than another because of the many components that must be considered in the production of fabrics. Synthetic fibers mostly come from non-renewable resources, but some of these can be recycled. Natural fibers must be grown or produced, which often involves land, water, and pesticide use. The dye process is also a challenge in relation to green chemistry, as dyeing usually produces a great deal of water waste and often uses hazardous materials. Because textiles are such an important part of our world, there is a great opportunity for future scientists and engineers to help create greener, more sustainable materials for all of our diverse fabric needs. One example of applying green chemistry to the textile industry is an innovation, created in a collaboration between several companies including fabric company Victor Innovatex and chemical engineering company McDonough Braungart Design Chemistry, to remove antimony from the process of making polyester. Polyester, a synthetic fabric, has traditionally been made using the heavy metal antimony as a catalyst (a component that speeds up a chemical reaction) during the production process. Through research and experimentation, chemists were able to successfully switch from antimony, which is harmful to humans and the environment, to titanium, a safer material. In addition, the companies worked together to make sure that the resulting fabric was dyed with more eco-friendly dyes. The result was a line of polyester called Eco-Intelligent Polyester™ which is used in a number of applications today including office furniture.
In this lab students explore acid dyes and basic dyes. Acid dyes dissolve in water and gain a negative charge, while basic dyes dissolve in water and gain a positive charge. Different types of fabrics take better to either acidic or basic dyes, depending on the properties of the individual fabric. As a reminder, opposite charges attract, so a positively charged dye binds to a negatively charged fiber. This lab considers two main categories of fibers: synthetic and natural (see Table). In general, synthetic fibers typically have a slight negative charge and will therefore better absorb a basic dye. Natural fibers can come from either animal or plant sources. Textiles that come from animal sources, like silk and wool, are usually made up of proteins that have a slight positive charge, so they better absorb acidic dyes. In contrast, natural fibers made from plants, like cotton, have very different properties than other types of natural fibers and dye best with dyes other than acidic or basic dyes, like direct dyes or vat dyes. Students consider the difference between natural and synthetic fibers and investigate the ways that a variety of fabrics interact with both basic and acidic dyes.
| Synthetic | Natural—Animal Source | Natural—Plant Source |
|---|---|---|
| Polyester, rayon, spandex, nylon, acrylic | Wool, silk, cashmere | Linen, cotton (many types of fabric are made from cotton including canvas and denim) |
Prep Work
- Teachers may wish to have pre-dyed samples on hand as a reference.
- If microscopes are available, set them up before class.
- To save time during the experiment, you may wish to pre-measure cups of Kool-Aid and small cups or bottles of ammonia for each student group.
- Set aside a cup each of Kool-Aid, vinegar, and ammonia for the Explain class demo.
- Print out a worksheet for each student as well as a 12 Principles of Green Chemistry handout.
- Print and cut out one set of fabric life-cycle cards for each group. Tip: Laminate these so that they can be used repeatedly.
Keys To Success
- Magnifying glasses may be used in place of microscopes. If neither is available, a visual assessment may be made without magnification.
- Students will be given two multi-fiber ribbons at the beginning of their experiment and immediately begin dyeing one of these strips. This will allow sufficient time for the fabric to dye without creating any down time in class.
- The multi-fiber ribbons come with a key. If using swatches of fabric or yarn instead, make sure you have a strategy for telling which fiber is witch.
- Kool-Aid is used in this experiment not only because it is safe for students, but also because it is used as a standard stain in a range of products, from industry to fabric cleaning products.
- If necessary, remind students that any food materials used in the lab for experiments are not for eating or drinking.
Engage
- Have students work in pairs for one minute to come up with a definition for green chemistry. Break down the meaning of both words.
 What is chemistry? What does chemistry mean to you? Do you think of good things or bad things?
 Establish that chemistry is the science of making products. Chemists make "stuff" like materials and medicines.Who has heard of companies going green? What does that mean?Eco-friendly, good for the environment, sustainable. Green chemistry is about preventing pollution at the molecular level when products are first being designed.
/-/https/www.sciencebuddies.org/cdn/Files/14174/23/note-question-mark-30.png)
/-/https/www.sciencebuddies.org/cdn/Files/14175/24/conversation-bubbles-30.png)
Use wait time. Build off their prior knowledge. Acknowledge student responses and prompt them for more information. Control the conversation by asking for a certain number of answers.
- Once you have worked together to define green chemistry, work together to define what green chemists do.
Is there anything in this room that a chemist invented? What about the material for the desks, paint, floor etc.? Who has taken medicine? Who has used a computer or cell phone?Chemists are inventors. They help to design just about every material and product out there. Traditionally chemists were not taught about the environmental impact or toxicology. We have had many advances and helpful inventions, but we have also had inventions that have caused harm to the environment. Green chemists design products taking into account the entire process, energy efficiency, renewable resources, and the product itself along with the end-of-life impact of the product. To do this they use the Principles of Green Chemistry.
- Students discuss the difference between natural and synthetic fabrics by considering the different fabrics students are wearing.
Even your clothes are manufactured using chemistry. What fabric is the top you are wearing today made from?Have them work with a partner to read the tag and tell you so you can write the fabric names on the board. Create two unlabeled columns: one column should include natural fibers, while the other should include synthetic fibers. Tip: This resource on fabrics categorized by fiber source is useful as a reference.
- Ask students if they know of other fabrics that are not listed, then add them to the board.
- Explain that you have purposely separated the fabrics into two categories. Instruct students to write down the two lists in their worksheet and discuss in their groups what the two categories might be.
Why have I made two categories of fabrics? What do you think the label for each category could be?After a minute or two, ask students to share their ideas. Label the columns "Natural" and "Synthetic." Review with students the difference between natural and synthetic materials. Natural materials are derived from nature while synthetic materials are man-made.
- Ask students if they notice anything else about the fabrics they are all wearing and the other fabrics in the room (backpacks, upholstery, etc.).
There are a lot of different pieces of fabric in this room. Our clothes, your backpacks, my chair cover—these are all made of fabric. Other than fabric type, how else do they differ?Students may have a variety of answers including properties like texture, degree of water resistance, and color. Focus on the color and let students know that the dyeing process is a chemical process.
- Have students work in their groups to identify some of the variables involved in dyeing fabric.
There are variables involved in all chemical processes. Changing the variables changes the outcome. What do you think are some of the variables involved in dyeing fabric?After a minute or two, ask students to share their ideas. Diagram the variables on the board.
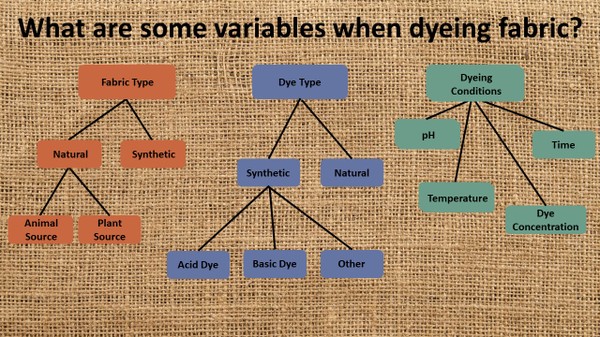
There are three categories of variables when dyeing fabric. The first is the fabric type. For example, the fabric could be synthetic or natural. If natural, the fibers could be from a plant or animal source. A second category of variables is the dye type. Dyes can be synthetic or natural. Synthetic dyes can be further classified as acid or basic dyes or other types. The third category of variables are the dyeing conditions. Those include the pH, temperature of the dye bath, dye concentration, and time spent in the dye.
- Tell students that in today's lab they will be exploring two variables in the process of dyeing fabric: fiber type and the pH of the dyeing conditions.
/-/https/www.sciencebuddies.org/cdn/Files/19007/4/variables-when-dyeing-fabric.jpg)
Explore
- Give each group two multi-fiber ribbons and paper towels. If microscopes are unavailable, pass out magnifying glasses.
- Working in their groups, have students brainstorm ways to tell different fabrics apart. Have students record their ideas in their worksheet.
- After examining the multi-fiber ribbon with a microscope or magnifying glass.
- When all groups are done, share with the class what each fabric is in their multi-fiber ribbons and where each fabric is located. (This will depend on which brand of multi-fiber ribbon you buy. Refer to the key that comes with your ribbon.) Students should write this information down in the data table on their worksheet.
- On their worksheets, students should make predictions about the ability of different fabrics to absorb dye.
- If you have pre-measured the cups of Kool-Aid, pass out two cups of dye to each group. Instruct students to start dyeing one of their fabric strips and mark the time. Students will remove this strip in 10 minutes.
Explain
- While their first multi-fiber ribbon is in the dye, students consider the difference between acids and bases, as related to the dye in the Kool-Aid.
- Explain to the class that there are two common types of dyes used to dye fabrics: acid dyes and basic dyes. The dye they are using is either an acid dye or a basic dye. The strip they are currently dyeing will tell them how well each of their fabrics dye in one of those two conditions. However, they need to evaluate their fabric and the red Kool-Aid dye in both basic and acidic conditions.
- Ask the class to reflect on what they know about acids and bases and predict whether their Kool-Aid dye solution is acidic or basic.
Based on what you know about acids and bases, do you think that the red Kool-Aid is an acidic or basic solution?
- Review the function of litmus paper with the class.
- Pull out the cups of Kool-Aid, vinegar, and ammonia. Invite one volunteer to help determine whether the Kool-Aid is acidic or basic using litmus paper.
- After determining that Kool-Aid is acidic, tell the class that they will need to add either vinegar or ammonia to their Kool-Aid solution to change it from acidic to basic. Ask the class to predict which one they will need to add.
- Invite another volunteer to perform a litmus paper test to determine whether vinegar or ammonia is basic. Consider showing students the What Are Acids & Bases? video to further their understanding.
/-/https/i.ytimg.com/vi/mnbS56HQbaU/maxresdefault.jpg)
- After determining that ammonia is basic, pass out cups of ammonia and instruct student groups to add ammonia to their second cup of dye in 5-mL increments until their dye changes from acidic to basic. Students will use litmus paper to determine when this change occurs.
- Once their dye solution is basic, students should add their second fabric strip to this cup and record the time.
- Instruct students to predict the dyeability of each fabric in the multi-fiber ribbon according to the directions on their worksheet.
- Once the first strip has been in the dye for 10 minutes, have pairs remove their first fabric strip from the acidic solution.
Elaborate
- Instruct students to fill out predictions for their basic-dyed fabric strip in the data table while their second strip is dyeing.
- Have students compare the dyed results of their first fabric strips to their predictions by filling in their data table.
- After 10 minutes have elapsed for the second fabric strip, have students remove it from the basic dye.
- Instruct students to finish filling in their data table and answer the questions in their worksheets.
Evaluate
- Ask student pairs to share their answers to the discussion questions on their worksheet:
- How did pH affect the dyeability of each of the fabrics? What patterns, if any, did you notice?
- Looking at your results, what was surprising?
- Which fabrics dyed best in the acidic conditions? In the basic conditions? Hand out the fabric life cycle cards to each student group. The cards illustrate the life cycle for two fabrics: cotton and polyester. Ask students to separate the cards based on which fabric they belong to and then put them in order based on the life cycle.
- Hand out and review the principles of green chemistry as a class.
- Discuss which fabric is "greener."
Based on the life cycle cards and your new knowledge of green chemistry, which do you think is a "greener" fabric: cotton or polyester?Help students realize that there is no easy answer to this question. Both fabrics have drawbacks; neither is perfect. Generating a pros and cons list together may help students see this.
- Brainstorm how each type of fabric could be made "greener."
How do you think green chemistry and other areas of science could be applied to make the production of each of these fabrics "greener"?There are many valid answers. Here are a few. Find varieties of cotton that can be grown with less water, engage in more water-efficient agricultural practices when growing cotton so that water is not wasted, use renewable fuels and energy for the harvesting, ginning, and manufacturing processes of cotton, make sure the dyes used to color fabric are not harmful and use conditions that mean that the least amount of dye is used to get the desired color, innovate on recycling processes, influence consumers to upcycle and recycle.
- Have students read about Eco-Intelligent Polyester™ as a real-world example of how green chemistry is being applied to the textile industry.
Extension Options
- Use multiple colors of Kool-Aid (or other drink mix/food dye) and compare how each dye works for each fabric.
- For more guided inquiry, students can be given an unknown sample of one type of fabric from the multi-fiber ribbon and challenged to identify it using the dyeing process.
Assess
Collect student worksheets for evaluation.
/-/https/img.youtube.com/vi/kUUl-QcbHbA/0.jpg)
/-/https/img.youtube.com/vi/gj-H_agfd6U/0.jpg)
/-/https/img.youtube.com/vi/yEciiScv3Gw/0.jpg)