/-/https/www.sciencebuddies.org/cdn/Files/21464/5/sb-logo.png)
/-/https/www.sciencebuddies.org/cdn/Files/21464/5/sb-logo.png)
Black in the Spotlight
Summary
/-/https/www.sciencebuddies.org/cdn/Files/11966/11/light-reflection-measurement-thumbnail.jpg)
/-/https/www.sciencebuddies.org/cdn/Files/11967/12/light-reflection-measurement.jpg)
Overview
How does light interact with matter? In this fun hands-on lesson, your students explore how different materials transmit, absorb and/or reflect light. They create their own experiments to demonstrate these phenomena and use a phones' built-in light sensor and a sensor app to add quantitative data to their arguments.Learning Objectives
- Show examples of light absorption, reflection, transmission, or any combination of these phenomena.
- Use light intensity measurements to indicate whether a material absorbs, reflects, or transmits light.
NGSS Alignment
This lesson helps students prepare for these Next Generation Science Standards Performance Expectations:- MS-PS4-2. Develop and use a model to describe that waves are reflected, absorbed, or transmitted through various materials.
|
Science & Engineering Practices
Developing and Using Models.
Develop and use a model to describe phenomena.
Planning and Carrying Out Investigations. Plan an investigation individually and collaboratively, and in the design: identify independent and dependent variables and controls, what tools are needed to do the gathering, how measurements will be recorded, and how many data are needed to support a claim. Engaging in Argument from Evidence. Construct, use, and present oral and written arguments supported by empirical evidence and scientific reasoning to support or refute an explanation or a model for a phenomenon. |
Disciplinary Core Ideas
PS4.B: Electromagnetic Radiation.
When light shines on an object, it is reflected, absorbed, or transmitted through the object, depending on the object's material and the frequency (color) of the light.
|
Crosscutting Concepts
Structure and Function.
Structures can be designed to serve particular functions by taking into account properties of different materials, and how materials can be shaped and used.
Cause and Effect. Cause and effect relationships may be used to predict phenomena in natural systems. |
Materials
/-/https/www.sciencebuddies.org/cdn/Files/11968/5/reflective-absorbing-transmitting-materials.jpg)
For the class:
- Laser pointer, class I or II. The Laser Safety Guide provides information on laser classification and how to use a laser safely.
- White paper
- Mirror
- Smartphone with a sensor app such as phyphox, available for free on Google Play for Android devices (version 4.0 or newer) or from the App Store for iOS devices (iOS 9.0 or newer).
- Optional: scissors
- Optional: tape
- Optional: sheets of cardboard
For each team of 2 to 4 students:
- Flashlight
- Smartphone with a sensor app such as phyphox, available for free on
Google Play for Android devices (version 4.0 or newer) or from the App Store for iOS devices (iOS 9.0 or newer). Note: Phyphox does not support the light sensor on iOS devices. If you need the light sensor, you have to use Android devices for your experiment. Note that on some devices the light sensor is only updated when there is a coarse change of illuminance. This means that if the light intensity does not change or only changes slightly, the sensor appears to not record any data. The recording will continue once the light intensity changes again. If your experiments allows, it helps to wiggle the phone or the light source (e.g. flashlight) slightly to induce minimal reading fluctuations and keep the sensor active.
For each pair of teams:
Cardboard box filled with:- Sheet of aluminum foil or baking pan
- Small mirror
- Sunglasses
- Flat pieces of plastic: transparent, translucent but not transparent, one white and one black. Examples: a translucent folder divider, a white lid of a yogurt container, a black plastic food container (like a to-go box) with a clear plastic lid
- Sheets of paper: white(1) and black(3)
- A sheet of tissue paper (white or black) or tracing paper
- Optional: Ruler
Background Information for Teachers
This section contains a quick review for teachers of the science and concepts covered in this lesson.Why can we see some areas of the face in Figure 1 and not others? Is this face white, gray, or black? These are questions this lesson addresses.
/-/https/www.sciencebuddies.org/cdn/Files/11969/5/statue-light-face.jpg)
Figure 1. Light reflected on a statue.
We can categorize materials by their appearance, like transparent, translucent, or opaque; dark or light colored; glossy or matte finish, etc. These classifications are based on how the materials transmit, absorb, and reflect light. These concepts are explained in more detail below.
When a material transmits light, it allows light to pass through (Figure 2, left), so it appears transparent or translucent. Notice that we cannot see materials that transmit all light; we see what is behind the material instead. The clear glass used in most windows is a good example.
When a material absorbs light, it captures the energy carried by the light (Figure 2, right), and transforms it into thermal energy. These materials look dark and tend to get warm when left exposed to light. Notice we also cannot see materials that absorb all light; we see the absence of light. This is shown in this super-black coating demonstration.
/-/https/www.sciencebuddies.org/cdn/Files/11970/5/model-transmission-absorption.png)
Figure 2. Illustrations of transmission of light (left) and absorption of light (right).
We can only see materials that reflect or bounce back light. The bouncing of light is similar to that of a bouncy ball in that the angle at which the light falls onto the reflecting surface is identical to the angle at which it bounces back (Figure 3, left). A mirror is a perfect example of reflection on a smooth material. Because it is so smooth, all light reflects at the same angle (Figure 3, middle) giving the material a shiny appearance. Materials that do not have a smooth surface, reflect light in a diffuse way (Figure 3, right). Bumps on their surface cause light to reflect in many directions. These materials appear matte.
/-/https/www.sciencebuddies.org/cdn/Files/11971/5/model-reflection.png)
Figure 3. Illustrations of how light reflects on surfaces.
No common material exists that transmits, absorbs, or reflects all light. For example, even though window glass looks clear to us, it still reflects a little bit of light. There is always a combination of two or all three phenomena. The ratio of light transmitted, absorbed, and reflected determines what the object looks like. Table 1 shows a list of common materials with an estimate of how much light they transmit, reflect, and absorb.
| Material | Transmit (%) | Absorb (%) | Reflect (%) |
|---|---|---|---|
| Mirror | 0 | 20-10 | 80-90 |
| Black felt | 0 | 95-85 | 5-15 |
| White paper | 0 | 30-20 | 70-80 |
| Clear window glass | 96-92 | 0 | 4-8 |
In this activity, students build examples showing transmission, reflection, and absorption of light. They measure light intensity with a phone equipped with a light sensor and a sensor app and use the data to prove the phenomenon occurs. The app provides access to data from the light sensor that is built into many smartphones and measures light intensity in lux.
This lesson can easily be extended by looking at how colors influence reflection, absorption, and transmission. White light consists of light of all colors in the rainbow, and each color interacts independently with material. You can see this happen when you place a red transparency in front of a white flashlight. You see a red beam of light. This shows how the red transparency transmits red light and absorbs all other colors. In a similar way, a red apple looks red under white light because it reflects red light and absorbs all other colors. Under green light, the same apple looks black, as the red apple absorbs green light. These examples show how adding color to this lesson can create rich and interesting experiences.
Additional Background Links
- Light Absorption, Reflection, and Transmission, Bozeman Science
- Light Absorption, Reflection, and Transmission, the Physics Classroom
- The World's Blackest Material - An Inside Look At Vantablack, BuzzFeedBlue
Prep Work (15 minutes)
Make sure you are familiar with the sensor app you are using before you show it to your students. The best way to do this is to play with the app on your phone to get comfortable enough using it to explain it to your students. Ideally, you want to test the experiment yourself with the app before class to make sure it works as intended. In this project, you will measure the intensity of emitted, reflected, and transmitted light. Before students start, you will show them how the light sensor reading decreases rapidly when you move away from the light source. Try this out first so that you see how the light sensor's readings change over time when you move away and closer to a light source.Teacher Tool Box
Engage (10 minutes)
- Tell the students that you are going to show them a video or picture of a special type of black. Before you do so, you would like them to define black.
 How would you define black with words?
 The answers might include:
- Black is the opposite of white.
- Black is the absence of light.
- Black absorbs all or most light that falls onto it.
- Black does not reflect any light.
- Black is the absence of color.
- Black is the darkest of all colors.
- Black is when you mix all colors together.
Write down the answers. Do not state which answers are correct or incorrect. You will come back to these later in the lesson.
- Show the students this super-black coating demonstration video (with the sound muted) or display this super-black example. Explain that these are identical statues except one has been painted black.
Create AssignmentEmbed Link
 Google Classroom
 Microsoft Teams
 Canvas
 Schoology
 OtherWhat is remarkable about the statue painted black in this video/picture? Can you see any features of its face? Why do you think this is the case?The statue painted black is remarkable because it looks like it is flat, two-dimensional. We see the contour of the face, but we cannot see any features of the face.
The explanations might include:
- We do not believe it is the same statue painted in black. It might be a flat black paper cut in the shape of the face.
- This black is so dark that we cannot see the features of the face.
- This black absorbs all light. Therefore, no light reflects off this surface into our eyes, so we cannot really see it. We see the absence of light.
Write down the explanations students give. Do not state which are correct or incorrect.
- Tell the students that in this lesson they will explore how light interacts with matter. Understanding this will help them understand why the black in the super-black example looks the way it looks.
/-/https/i.ytimg.com/vi/9v0_fID_jvA/maxresdefault.jpg)
/-/https/www.sciencebuddies.org/cdn/Files/20511/4/google-classroom.png)
/-/https/www.sciencebuddies.org/cdn/Files/20512/4/ms-teams.png)
/-/https/www.sciencebuddies.org/cdn/Files/20469/4/Canvas_Bug_Color_RGB.png)
/-/https/www.sciencebuddies.org/cdn/Files/20470/5/Schoology-Logo.png)
/-/https/www.sciencebuddies.org/cdn/Files/20471/4/lms.png)
/-/https/www.sciencebuddies.org/cdn/Files/20469/4/Canvas_Bug_Color_RGB.png)
/-/https/www.sciencebuddies.org/cdn/Files/20470/5/Schoology-Logo.png)
/-/https/www.sciencebuddies.org/cdn/Files/20471/4/lms.png)
Explore (55 minutes)
- Create teams of 2 to 4 students. Each team should have access to the sensor app on their phone.
- Reduce ambient light (the light that is already present) in the classroom by turning off overhead lights or closing window blinds. Students should still be able to comfortably see what they are doing, but their flashlights should be brighter than the surrounding light.
- Introduce the sensor app to your students, specifically the light sensor. If your students are already familiar with the app and the light sensor, you can skip this step.
- Explain that phones contain a built-in light sensor that can sense light levels.
- Open the light sensor in the app and start a sensor recording. Show the graph to your class.
- Let them watch how the graph changes as you move your finger in front of the light sensor. You might need to explain to your students that on some devices the light sensor is only updated when there is a coarse change of illuminance. This means that on these devices the app does not seem to record any data if the light intensity does not change or only changes slightly.
- Have the students open the sensor app on their own phones and then select the light sensor. Instruct them to press the play button in the phyphox app to start a recording and then wave their finger in front of the phone to locate where the phone detects the light signal.
Can anyone tell me in which units the sensor app expresses light intensity?The phyphox app measures light intensity in lux. The higher the lux readings the brighter is the recorded light. - To illustrate that different light sources have different intensities, let students aim their flashlights at the sensor from a distance of 6 inches (1/2 foot) and measure the light intensity with the light sensor.
What happens when you tilt the phone so that the light does not fall straight onto the sensor? When do you think you will get the most accurate measurement?The sensor reading changes. To make accurate measurements, the light needs to point straight at the sensor. The measurement reaches a maximum for this position. You can observe this by tilting the phone in any direction and observing how the measured value decreases.Compare your light sensor reading with the teams close to you. Are they similar? Why would this be the case?The outcome will depend on the flashlights the students use. Readings made with identical flashlights powered by new batteries should be similar. Different flashlights (types, light bulbs, or how the light is focused) or flashlights powered by used batteries may cause different readings.
- To illustrate how the distance to the light source affects light sensor readings, have the students observe how the light intensity graph changes as they move the light source closer to and then away from the light sensor (the phone) while keeping everything else the same.
What happens to the light intensity when we increase the distance between the source and the sensor?The light intensity values decrease with increasing distance.
Note: this decrease is mainly because flashlights send out light in a cone, and the amount you intercept with your sensor becomes smaller with distance. Only a very small fraction of the light is absorbed by the air particles.
- Two demonstrations can show how light moves in straight lines but can change direction when hitting the surface of another material.
First, shine a laser pointer on the wall or whiteboard. Be careful. Never shine a laser in a person's eye! Show students the illuminated spot the laser light creates on the wall or whiteboard.
If I hold the pointer in a different direction, can you predict where the light will hit the wall?The students will be able to predict the location.How can you make this prediction?Students might imagine a straight line from the pointer to the wall to predict the location. They use knowledge of the characteristic of light to move in a straight line to make this prediction.Explain to students that all light, not only light from a laser pointer, moves in straight lines.
Note that a flashlight or a light bulb illuminates a larger area because it sends out light in several directions, forming a light cone as shown in Figure 4. Each light ray inside the cone still travels along a straight line.
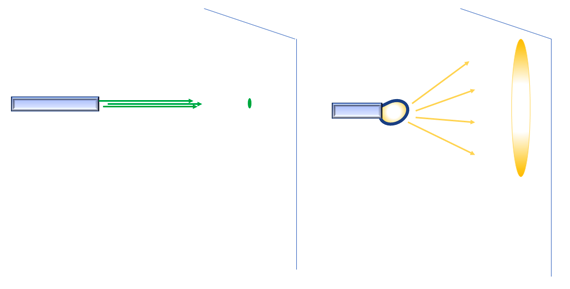
Figure 4. A laser illuminates a small area; a flashlight illuminates a larger area.What happens when I aim my laser pointer at this mirror?Point the laser pointer to a small mirror and make sure the reflected light hits the wall. (Be careful to ensure the light will reflect onto a wall or surface away from students.)
The light moves in a straight line until it hits the mirror. Move the laser pointer to change the angle with which the light beam hits the mirror and observe how the spot on the wall moves.Explain to students that light rays can change directions when hitting the surface of a different material.
- Explore the terms transmission, reflection, and absorption of light.
 One group presents their definition; other groups add (one by one) to the discussion.
Possible definitions are:
- Transmission of light is light passing through a material
- Reflection of light is light bouncing back off a material
- Absorption of light indicates light being soaked up by the material
Let students match the correct term (transmission, reflection, and absorption) with the schematic representation shown in Figure 5 and on their worksheet.
/-/https/www.sciencebuddies.org/cdn/Files/11972/5/laser-vs-flashlight.png)
/-/https/www.sciencebuddies.org/cdn/Files/11870/13/icon-experiment-45.png)
/-/https/www.sciencebuddies.org/cdn/Files/11973/5/model-reflection-transmission-absorption.png)
Figure 5. Schematic representation of reflected light (left), transmitted light (middle), and absorbed light (right).
- Pair up teams.
- Give each pair of teams (hereafter referred to as a "group") one box of materials. Instruct students not to open their box yet.
- Explain the activity.
After demonstrating that transmission of light occurs, you will show that some materials reflect light, some materials absorb light, and some materials show a combination of two or more of these phenomena.
The worksheet guides students. Students will show the following phenomena in this order:- Transmission of light
- Reflection of light
- Absorption of light
- A combination of at least two of the three phenomena listed above.
Below is one example for each phenomenon.
a. Transmission of light
The setup might look like Figure 6. Possible data is shown in Table 2.
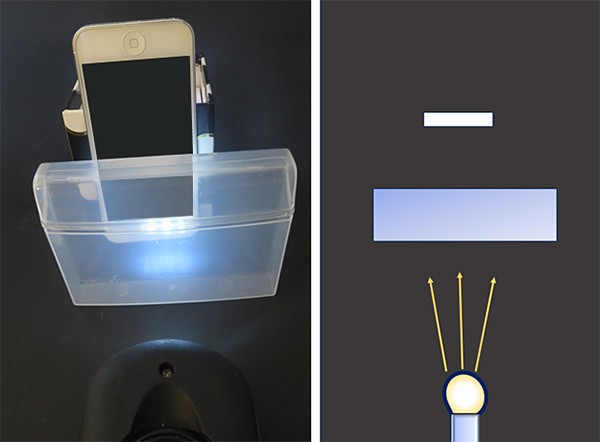
Figure 6. A picture of a setup used to measure transmitted light (left) and a sketch of the setup (right).
Table 2. Example data showing light transmits the material.Steps in the experiment Light intensity measurement
(lux)Flashlight is off; setup as shown in Figure 6. 2 Switch flashlight on. 550 Remove the material; keep everything else the same. 600 The variables for this experiment are as follows:
- Independent variable: the material placed between the light source and the sensor.
- Dependent variable: the light intensity behind the material.
- Main control variables: distance from the light to the sensor, the ambient light, and the angle at which the phone (sensor) is held.
Check that students measure light intensity with and without the translucent material in place while keeping all other parameters identical.
Note: making measurements in a dark room and reducing glare by using a black background will yield better data. Students can also get good data by keeping the ambient light and background constant.
b. Reflection of light
The setup might look like Figure 7, where you move the phone in a semicircle to find the location where the light intensity maximizes. Possible data is shown in Table 3.
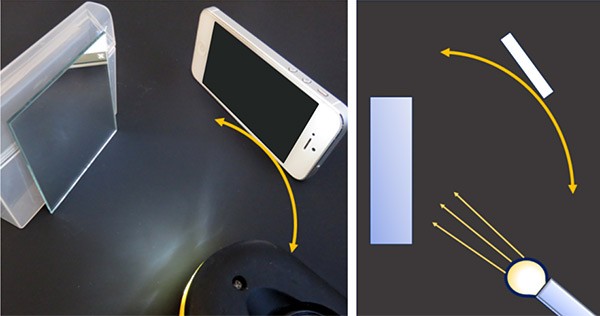
Figure 7. A picture of a setup used to measure reflected light (left) and a sketch of the setup (right). The yellow arrows indicate how to move the phone to find the location where the intensity of reflected light peaks.
Table 3. Example data showing light reflected by a material.Steps in the experiment Light intensity measurement
(lux)Flashlight is off. 2 Switch flashlight on. Move the phone in a half circle as indicated by the yellow arrow in Figure 7.
Observe how the light intensity changes.
Record the maximum registered value.211 Keep the sensor (phone) at the location where you registered the maximum intensity but remove the mirror. 21 The variables for this experiment are as follows:
- Independent variable: the material placed so that it reflects light.
- Dependent variable: the light intensity in front of the material.
- Main control variables: distance from the light to the sensor, the ambient light, and holding the phone at a right angle with respect to the light beam.
Check that students measure light intensity with and without the reflecting material in place while keeping all other parameters identical.
c. Absorption of light
Absorption can be shown as the absence of a substantial amount of reflected and transmitted light. A setup as shown in Figure 8 allows you to rate transmission and reflection of light. Note that it is harder to prove that a material absorbs light using the sensor app because, by definition, the light is absorbed by the material. Possible data is shown in Table 4.
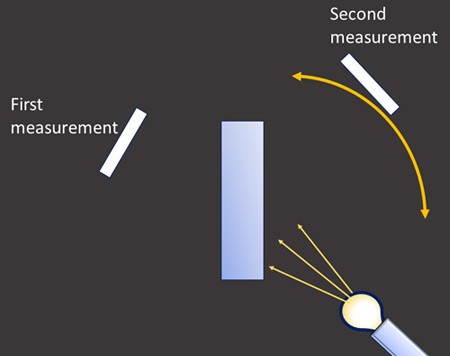
Figure 8. Sketch of a setup to measure transmitted light (first measurement) and reflected light (second measurement).
Table 4. Example data suggesting light is absorbed by the material.Steps in the experiment Light intensity measurement
(lux)Flashlight is off; the sensor is in the first measurement position. 2 Switch flashlight on. 3 Pick up material. (Remember how it was positioned.) 600 Place the material back.
Move the sensor to the second measurement position. Move the phone in a half circle as indicated by the yellow arrow in Figure 8.
Observe how the light intensity changes.
The maximum registered value:17 Keep the sensor where it measures maximum intensity. Pick up the material. 4 Since the material does not transmit light, and very little light is reflected, it absorbs most of the light. Note that absorbed light is converted into thermal energy, but students will probably not be able to feel the material heat up.
The variables for this experiment are as follows:
- Independent variable: the material used to place before the flashlight.
- Dependent variables: the light intensity behind and in front of the material.
- Main control variables: distance from the light to the material and sensor, the ambient light, and holding the phone at a right angle with respect to the light beam.
d. Combination of two phenomena
The setup and procedure to prove a combination of phenomena is identical to the one used to prove absorption.
Sunglasses with a reflective side are ideal to show partial reflection and partial transmission. A white paper shows partial absorption and partial reflection. Black tissue paper works well to show partial absorption and partial transmission.
/-/https/www.sciencebuddies.org/cdn/Files/11974/11/light-transmission-setup.jpg)
/-/https/www.sciencebuddies.org/cdn/Files/11975/12/light-reflection-setup.jpg)
/-/https/www.sciencebuddies.org/cdn/Files/11976/5/light-absorption-setup.jpg)
Reflect (10 minutes)
Gather the class for a discussion.
/-/https/www.sciencebuddies.org/cdn/Files/14174/23/note-question-mark-30.png) | What did you learn? Did you see anything surprising?
Prompt students to be specific and provide examples. Ask if other groups observed the same phenomenon and see if the class can list other materials that would show the same characteristics. |
/-/https/www.sciencebuddies.org/cdn/Files/14175/24/conversation-bubbles-30.png) |
Examples may include:
|
|
Can this information help us understand why we could not distinguish the features in the face of the statue painted in black?
Show the video or picture shown in the Engage section again. |
|
The black used to paint the statue absorbs almost all light.
As no light reflects into our eyes, what we see is an absence of light. Come back to the explanations students gave at the start of the lesson and explain why they were correct or incorrect.
|
| Can you think of ways this special paint might be used? |
| Students might not instantly know of a good application. This video introduces students to
how black is made and its uses.
You can also assign watching the video as homework. |
/-/https/i.ytimg.com/vi/CzW2Xqw7k6A/maxresdefault.jpg)
Assess
You can use this quiz to assess student learning after the activity:
- Online quiz, assignable in any LMS
- Quiz (pdf) and answer key (PDF)
Make Career Connections
Discussing or reading about these careers can help students make important connections between the in-class lesson and STEM job opportunities in the real world.
/-/https/careerdiscovery.sciencebuddies.org/cdn/Files/1429/17/unsplash-4pM4nhHyo9M.jpg)

/-/https/careerdiscovery.sciencebuddies.org/cdn/Files/1640/26/Fyysikot_tyossaan.jpg)
Lesson Plan Variations
- Let students research how reflection, absorption, and transmission relate to color by adding dry erase or permanent markers and, optionally, a red, blue, or green light source to the material box. Water colored with food coloring works well, too. Students can observe how a colored filter (transparent material colored with the markers or colored water) only lets part of the light through. They can observe what happens if more filters are placed one after the other, and how the color of the light shining on a material, together with the color of the material, determines the color we observe.
- Perform a similar project with sound waves, as sound waves can also be transmitted, absorbed, and reflected. The lesson Block That Noise! uses a sensor app to measure sound intensity and observe how materials absorb sound.
- Let students explore light refraction when light goes through a material like water, glass, or gelatin. Science Buddies' Now You See It... Testing Out Light Refraction activity can be a good starting point. Note that a laser beam is visible when passing through gelatin. This allows you to demonstrate how light changes direction when entering or exiting the gelatin.
/-/https/img.youtube.com/vi/liSEwqdq7aA/0.jpg)
/-/https/img.youtube.com/vi/Djzx54j-2ZU/0.jpg)
/-/https/img.youtube.com/vi/6RA9x4wlnW8/0.jpg)
