/-/https/www.sciencebuddies.org/cdn/Files/21464/5/sb-logo.png)
/-/https/www.sciencebuddies.org/cdn/Files/21464/5/sb-logo.png)
Summary
/-/https/www.sciencebuddies.org/cdn/Files/16572/5/lp-overview-can-you-see-through-me.jpg)
Overview
In this lesson, students explore firsthand what transparent, translucent, and opaque mean, and how they are related to light. They will place a variety of materials in front of an illuminated object and predict if and how well they will be able to see the object through the material sheet. In doing that, students will realize that different materials allow different amounts of light to pass through.
Remote learning: This lesson plan can be conducted remotely. The Engage section of the lesson can be done over a video call, then students can work individually and independently during the Explore section, using the Student Worksheet as a guide. A set of materials can be prepared in advance or students can use materials found around the house. End the lesson with discussion over a video call during the Reflect section.
Learning Objectives
- Explain the difference between translucent, transparent, and opaque materials.
- Conduct an investigation to find out if a material is translucent, transparent, or opaque.
NGSS Alignment
This lesson helps students prepare for these Next Generation Science Standards Performance Expectations:- 1-PS4-3. Plan and conduct investigations to determine the effect of placing objects made with different materials in the path of a beam of light.
|
Science & Engineering Practices
Planning and Carrying out Investigations.
Make observations (firsthand or from media) and/or measurements to collect data that can be used to make comparisons.
Analyzing and Interpreting Data. Compare predictions (based on prior experiences) to what occurred (observable events). Engaging in Argument from Evidence. Construct an argument with evidence to support claim. |
Disciplinary Core Ideas
PS4.B: Electromagnetic Radiation.
Some materials allow light to pass through them, others allow only some light through and others block all the light and create a dark shadow on any surface beyond them, where the light cannot reach.
|
Crosscutting Concepts
Cause and Effect.
Simple tests can be designed to gather evidence to support or refute student ideas about causes.
|
Materials
/-/https/www.sciencebuddies.org/cdn/Files/16573/5/see-through-me-materials.jpg)
For each student group of 2-3:
- Cardboard tubes, such as a toilet paper roll or paper towel roll
- Rubber band
- 3 different, small, opaque objects, such as a toy car, rubber ducky, action figure, plastic animal, etc.
- Sheets of several transparent, translucent, and opaque materials (same for each group)
- At least 2 different transparent sheets (plastic wrap, plastic baggie, glass from a picture frame)
- At least 2 different translucent sheets (parchment paper, wax paper, frosted plastic sheet, tissue paper, white printer paper)
- At least 2 different opaque sheets (cardstock paper, cardboard, wood, dark-colored construction paper)
For teacher:
- Bag to hold the objects
- Drinking glass
- Frosted plastic cup
- Ceramic cup
- Flashlight
Background Information for Teachers
This section contains a quick review for teachers of the science and concepts covered in this lesson.We can categorize materials by their appearance, like transparent, translucent, or opaque; dark or light colored; glossy or matte finish, etc. These classifications are based on how the materials interact with light that shines on them. Materials can transmit, absorb, scatter, or reflect light.
When a material transmits light, it allows light to pass through. Materials that let all or most of the light pass through are called transparent (Figure 1, right). Transparent materials themselves appear clear, which is why you can clearly see any object behind a transparent material. A translucent material also allows light to pass through, but the transmitted light is scattered in all directions (Figure 1, middle). Although you can see through a translucent material, the scattering of the light results in a blurry image of any object that is placed behind a translucent material. Even if the object itself is not clearly visible, you will still be able to see light as brightness through a translucent material. Opaque materials do not let any light pass through (Figure 1, left). Some of these materials look dark and tend to get warm when left exposed to light. Others reflect most or some of the incident light. As a result, it is not possible to see through an opaque material; the only thing you will be able to see is darkness.
/-/https/www.sciencebuddies.org/cdn/Files/16574/5/opaque-translucent-transparent.png)
The left image shows a black rectangle, which represents an opaque material. Yellow arrows pointing toward the black rectangle from the left symbolize the incident light. No arrows are seen on the right side of the black rectangle. The middle image shows a grey rectangle, which represents a translucent material. Yellow arrows pointing toward the black rectangle from the left symbolize the incident light. On the right side of the rectangle, yellow arrows are pointing away from the grey rectangle in random orientation. The right image shows a white rectangle which represents a transparent material. Yellow arrows pointing toward the black rectangle from the left symbolize the incident light. On the right side of the white rectangle, the yellow arrows point straight to the right in the same angle as on the left side.
Figure 1. Illustrations of light absorption (left), scattered light (middle), and transmitted light (right).
However, no common material exists that transmits or absorbs all light. For example, even though window glass looks clear to us, it still reflects a little bit of light. Also, we would not be able to see materials that absorb all light; we would only see the absence of light. This is shown in this super-black coating demonstration.
In this lesson plan, students will investigate a variety of translucent, transparent, and opaque materials. Specifically, they will test if they can see an illuminated object through a material and assess the object's appearance. In doing so, they will realize that different materials have different optical properties. Based on their observations, they will then classify the materials based on how much light they let pass through them.
Additional Background Links
- Light Absorption, Reflection, and Transmission, the Physics Classroom
Prep Work (10 minutes)
- Trim down the sheets of the various materials so they comfortably fit in front of the cardboard tube. Students will need to be able to cover one opening of the tube with each material sheet and secure it with a rubber band.
- Put all of the small objects into a bag and place it on a table that is equally accessible to all students.
Teacher Tool Box
Engage (30 minutes)
- Start the lesson by making students aware that light travels in a straight line. In a dim room, switch on the flashlight and point it at a wall. If you can, make the beam as narrow as possible. Discuss the following with your students:
 What do you notice about where the light travels?How can you describe the way the light travels?
 - Move the spot of light by moving the flashlight. Then ask:
What did you notice?What changed from before to now?
 Let students discuss their observations. Then, using students' ideas from the discussion, draw the students' attention to the spot of light and explain that light travels from the flashlight to the wall. It travels in a straight line, which is why the spot on the wall moves when you move the flashlight.
 - Leave the flashlight on, pointing at the wall. Keep a distance of about 20–35 inches from the flashlight to the wall. Then start an
introductory investigation that shows students how different materials interact with light.
Show students the first object (the drinking glass).
What do you think will happen if I put the glass into the light beam between the flashlight and the wall?Have students share their thoughts and encourage them to explain their reasoning for their predictions.
- Hand the glass to one student and have him/her place the glass halfway between the wall and the glass, as shown in Figure 2. Ask:
What do you notice?Was your prediction right or wrong?What happened to the light when you put the glass into the beam of light?Have students share what they see and help them realize that the light travels through the glass. On the wall, students should still see the spot of light. In addition, they might see a light shadow of the glass, which means that the glass also blocks a little of the light.
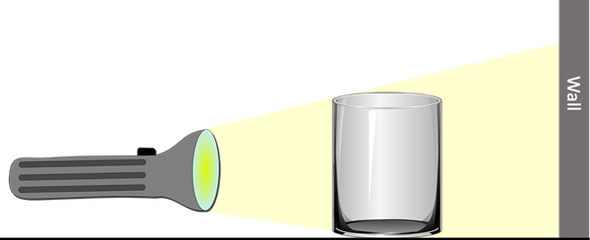
Figure 2. The glass is placed in the beam of the flashlight, about halfway between the wall and the flashlight. - Next, show students the second object (frosted plastic cup). Again, ask:
What do you think will happen if I put the frosted plastic glass into the light beam between the flashlight and the wall?Have students exchange their thoughts and explain their predictions.
- Have another student replace the drinking glass with the frosted plastic cup. Ask:
What do you observe this time?How are your observations different or similar than before?What happened to the light when you put the frosted plastic cup into the beam of light?Did you expect this to happen?Listen to students' replies. Elicit responses that mention that in the spot of light there is a shadow on the wall in the shape of the frosted plastic cup. The shadow should look darker than that of the clear glass before.
- Finally, show students the third object (ceramic cup). One more time ask:
What do you think will happen if I put the ceramic cup into the light beam between the flashlight and the wall?Let students talk about and explain what they think will happen.
- Then ask another student to replace the frosted plastic cup with the ceramic cup. Ask:
What do you notice this time?What happened to the light when you put the ceramic cup into the beam of light?How are your observations different or similar than before?Did you expect this to happen?This time, students should see a black shadow of the cup on the wall. Prompt students to think about what this means and why the light of the flashlight disappeared behind the cup and did not go around it.What did you notice about the three different objects/materials?How were your observations different for each of them?What does that mean about the way light passes through each of them?Pick up students' ideas and explanations and point out that there are three kinds of materials. Some, like glass, let all or most of the light pass through, which is why you only see a very faint shadow on the wall. Others, like the frosted plastic cup let some light pass through. The shadow on the wall appears a bit darker. And yet others block all light and do not let any light pass through, such as the ceramic cup. This is why we saw a black shadow of the ceramic cup on the wall.
- Tell students that they will now do their own investigation, and based on their previous observations, will investigate different materials to see how much light they let through.
/-/https/www.sciencebuddies.org/cdn/Files/14174/23/note-question-mark-30.png)
/-/https/www.sciencebuddies.org/cdn/Files/14175/24/conversation-bubbles-30.png)
/-/https/www.sciencebuddies.org/cdn/Files/16575/5/setup-flashlight-glass-wall.png)
Explore (35 minutes)
- Show students the cardboard tube and the different material sheets. Explain how the investigation works and have one student help demonstrate by testing one or two materials with you.
- Break students into small groups of 2–3. Then pass out the cardboard tubes and the sheets of various materials to each group. Keep the bag with the small objects on a table that is accessible to all groups.
-
Have each student group conduct their investigations independently by following the steps described below.
Keep the classroom lights on during the investigation so the objects are illuminated by the light in the room. Students should take turns choosing the objects.
- One group member starts: Choose an object from the bag and bring it back to your group. Place it on the table.
- Choose one of the material sheets. Wrap it around one of the openings of the tube and secure it with the rubber band, as shown in Figure 3.
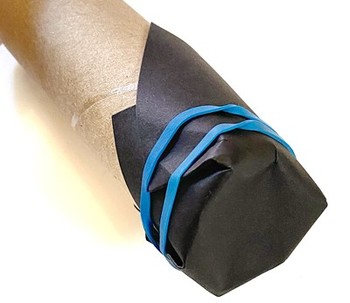
Figure 3. The material sheet is wrapped around the opening of the cardboard tube and secured with a rubber band. - Discuss the following questions within your group:
What do you think you will see when you look at the object through the cardboard tube?Do you think you will be able to see the object? If so, will it look clear or blurry?
- Fill out the "How do you think it will look?" column in the Student Worksheet for this material.
- Look through the unwrapped opening at the cardboard tube while pointing it at the chosen object on the table. Take turns so every group member can look through the tube. Then discuss with your group:
What did you see?Can you recognize the chosen object?How does the object look?
- Fill out the "How does it look?" column in the student worksheet for this material.
- Remove the material sheet from the cardboard tube. Choose a new material sheet. Wrap it around one opening of the cardboard tube and secure it with a rubber band.
- As a group, discuss:
What do you think you will see this time?Do you think you will be able to see the object clearly through this material?How do you think the object will look this time?
- Fill out the "How do you think it will look?" column in the student worksheet for this material.
- Let each group member look at the object through the cardboard tube. As a group, discuss:
What did you see this time?How does your prediction compare to what you actually observed?How were your observations different or similar compared to the previous material?How did the object look this time?
- Fill out the "How does it look?" column in the student worksheet for this material.
- Now it is another group member's turn to choose an object. Return the first object to the bag and choose a new one.
- Repeat steps a.–k. until each group member has had a turn. Test two different material sheets in each round.
- While students are working, walk around and check in with them. Listen to their discussions and provide support where needed. Engage students by asking them about their thoughts and observations.
/-/https/www.sciencebuddies.org/cdn/Files/16576/6/wrapped-cardboard-tube-rubberband.jpg)
Reflect (20 minutes)
- Once all groups are done with their investigation, facilitate a whole-group discussion about their observations.
What was easy about recognizing the object?What was hard about recognizing the object?What materials worked best for recognizing the object? Why?Have students share their observations. Prompt them to name materials that they could see through, partially see through, and not see through.
- Continue the discussion and connect their observations to the introductory experiment. Have them look at their student worksheet and ask:
How were the materials different from each other?What materials were similar to the glass, the frosted plastic cup, or the ceramic cup?How can we describe the way light travels through materials like the glass, the frosted plastic cup, and the ceramic cup?Listen to students' ideas. Focus on ideas that describe "all (or most) light" passes through, "some light" passes through, and "no light" passes through a material. Then tell students that the scientific word for materials that let all (or most) light pass through is called transparent, the word for materials that let some light through is translucent and materials that do not let any light through are called opaque.
- Based on this knowledge, have students look at their student worksheet again. Ask them to color the boxes listing the materials based on if they let all (or most) light pass through (are transparent), let some of the light through (are translucent), or let no light through (are opaque). Coloring instructions are given on the student worksheet.
- As a group, discuss how they sorted the materials:
How did you sort the materials?Which ones do you think are transparent?Which ones are translucent?Which ones are opaque? Why?Have students share how they sorted their materials and let them use the data they collected as evidence for why they classified each material that way.
- Close the activity by discussing why it is important to have materials that are transparent, translucent, and opaque.
Why is it important to know the way that light travels through different types of materials?What materials would you use to make a shower curtain, a door, etc.?Why do you think that is the best material for a shower curtain, a door, etc.?
Make Career Connections
Discussing or reading about these careers can help students make important connections between the in-class lesson and STEM job opportunities in the real world.
/-/https/careerdiscovery.sciencebuddies.org/cdn/Files/1429/17/unsplash-4pM4nhHyo9M.jpg)

/-/https/careerdiscovery.sciencebuddies.org/cdn/Files/1640/26/Fyysikot_tyossaan.jpg)
Lesson Plan Variations
- Investigate even more materials or objects. Gather objects that are in your surroundings and use a flashlight to test if they let light pass through them. Sort them according to their properties.
- Continue the investigation to also include materials that are reflective (such as aluminum foil or mirrors).
- Do a light scavenger hunt with your students. Challenge them to find materials in the classroom that are transparent, translucent, and opaque.
/-/https/img.youtube.com/vi/2ymXk67MAcs/0.jpg)
/-/https/img.youtube.com/vi/tVrlD2KIvk4/0.jpg)
/-/https/img.youtube.com/vi/RSxscDvVWwo/0.jpg)