/-/https/www.sciencebuddies.org/cdn/Files/21464/5/sb-logo.png)
/-/https/www.sciencebuddies.org/cdn/Files/21464/5/sb-logo.png)
Magnet Mining
Summary
Svenja Lohner, PhD, Science Buddies
/-/https/www.sciencebuddies.org/cdn/Files/13634/11/warship-magnetic-mine-thumbnail.png)
Overview
How was magnetism responsible for the destruction of dozens of ships during World War II? In this lesson, your students will explore the concepts of magnetic fields and forces using the example of World War II magnetic mines. With the help of a magnetometer, a smartphone, and a sensor app, students will investigate what factors affect the strength of a magnetic field. Then they will use their knowledge to try to discover the location of hidden "mines" and investigate how they can cloak a magnetic field to become undetectable by a magnetic trigger mechanism.Learning Objectives
- Describe what factors affect the strength of magnetic forces.
- Provide evidence that magnetic fields exist between objects exerting forces on each other even though the objects are not in contact.
- Conduct investigations to measure the strength of a magnetic field.
NGSS Alignment
This lesson helps students prepare for these Next Generation Science Standards Performance Expectations:- MS-PS2-3. Ask questions about data to determine the factors that affect the strength of electric and magnetic forces.
- MS-PS2-5. Conduct an investigation and evaluate the experimental design to provide evidence that fields exist between objects exerting forces on each other even though the objects are not in contact.
|
Science & Engineering Practices
Planning and Carrying Out Investigations.
Collect data to produce data to serve as the basis for evidence to answer scientific questions or test design solutions under a
range of conditions.
Conduct an investigation and evaluate the experimental design to produce data to serve as the basis for evidence that can meet the goals of the investigation. Analyzing and Interpreting Data. Analyze and interpret data to provide evidence for phenomena. Constructing Explanations and Designing Solutions. Undertake a design project, engaging in the design cycle, to construct and/or implement a solution that meets specific design criteria and constraints. Engaging in Argument from Evidence. Construct and present oral and written arguments supported by empirical evidence and scientific reasoning to support or refute an explanation or a model for a phenomenon or a solution to a problem. |
Disciplinary Core Ideas
PS2.B: Types of Interactions.
Electric and magnetic (electromagnetic) forces can be attractive or repulsive, and their sizes depend on the magnitudes of
the charges, currents, or magnetic strengths involved and on the distances between the interacting objects.
Forces that act at a distance (electric, magnetic, and gravitational) can be explained by fields that extend through space and can be mapped by their effect on a test object (a charged object, a magnet, or a ball, respectively). |
Crosscutting Concepts
Cause and Effect.
Cause and effect relationships may be used to predict phenomena in natural or designed systems. Systems and System Models. Models can be used to represent systems and their interactions—such as inputs, processes and outputs—and energy and matter flows within systems. Influence of Science, Engineering, and Technology on Society and the Natural World. The uses of technologies and any limitations on their use are driven by individual or societal needs, desires, and values; by the findings of scientific research; and by differences in such factors as climate, natural resources, and economic conditions. |
Materials
/-/https/www.sciencebuddies.org/cdn/Files/13635/14/magnetic-mining-materials.jpg)
Materials per group of 2–3 students:
- Ceramic disc magnets, 18mm diameter (5), available from Amazon.com
- Printout of grid paper template (5-6). Note: You might need to adjust the size of the template based on the boxes you use.
- Construction paper (darker color but not black)
- Duct tape
- Pencil or pen
- Transparent shoe or storage box, available from Amazon.com
- Aluminum foil
- Materials for cloaking activity: your students can get creative here. Some possibilities are aluminum foil, additional magnets, copper wire (non-magnetic), iron wire (magnetic), foam sheets, paper, etc.
- Smartphone with a sensor app such as phyphox, available for free on Google Play for Android devices (version 4.0 or newer) or from the App Store for iOS devices (iOS 9.0 or newer).
Materials for teachers:
- Two bar magnets
Disclaimer: Science Buddies participates in affiliate programs with Home Science Tools®, Amazon.com, Carolina Biological, and Jameco Electronics. Proceeds from the affiliate programs help support Science Buddies, a 501(c)(3) public charity, and keep our resources free for everyone. Our top priority is student learning. If you have any comments (positive or negative) related to purchases you've made for science projects from recommendations on our site, please let us know. Write to us at [email protected].
Background Information for Teachers
This section contains a quick review for teachers of the science and concepts covered in this lesson.A material that you can turn into a magnet is called a ferromagnetic material. Some examples are iron, steel, nickel, and cobalt. Once a ferromagnetic material becomes magnetic, it is able to attract other magnetic materials. A magnet always has two opposite poles, which are referred to as north and south. Similar or "like" poles will repel each other (push each other away). Opposite or "unlike" poles will attract each other (pull towards each other) as shown in Figure 1.
/-/https/www.sciencebuddies.org/cdn/Files/12502/5/magnet-poles-attract-repel.png)
Figure 1. Diagram showing how magnets can attract and repel each other depending on the orientation of their poles. The north and south poles are labeled "N" and "S" respectively.
Each magnet produces a magnetic field, which is the area around the magnet where a magnetic force exists that can act on other magnetic materials. You can make a magnetic field visible by sprinkling iron filings on and around a magnet. The iron filings react to the magnetic forces and line themselves up along the magnetic field lines as shown in Figure 2. Magnetic fields are usually represented by such magnetic field lines. These lines describe the direction of the magnetic force within the magnetic field. You can measure the direction of a magnetic field with a compass. A compass contains a needle shaped magnet that can freely move on a balanced pivot point. When the magnetic needle is exposed to a magnetic field, it will line up with the magnetic field with its south pole pointing toward the north pole of the magnet and its north pole pointing toward the south pole of the magnet.
/-/https/www.sciencebuddies.org/cdn/Files/13636/9/magnetic-field-lines.png)
Figure 2. Picture showing the magnetic field lines of a bar magnet's magnetic field visualized with iron filings.
Magnetism is often used for navigational purposes. This is possible because the Earth itself creates a magnetic field which is caused by the flow of molten iron inside the Earth's outer core. Earth's magnetic field looks similar to that of a bar magnet with its magnetic north pole near the geographic south pole and the magnetic south pole near the Earth's geographic north pole as shown in Figure 3. The Earth's magnetic field acts on all metal objects on the Earth's surface. Thus, a compass will align itself in the Earth's magnetic field and show the way North or South.
/-/https/www.sciencebuddies.org/cdn/Files/13637/10/earth-magnetic-field-visualization.png)
Figure 3. Illustration visualizing Earth's magnetic field which resembles the magnetic field of a bar magnet.
However, Earth's magnetism has not been applied for navigational purposes only. In World War II, magnetism was used to create special undersea explosives called magnetic mines. These mines were first developed by the British and German navy after World War I. When the Germans started to employ these magnetic mines in 1939, they turned out to be devastating for the British navy. The key to these mines was that they had a special magnetic trigger mechanism. But why magnetic mines to destroy ships? A battle ship is usually made of lots of steel, which is a ferromagnetic material. This means that such a ship is like a huge floating magnet with a large magnetic field surrounding it. Part of this magnetic field is caused by the ship components that consist of hard iron. During ship construction, these parts become magnetized by the Earth's magnetic field, creating some amount of permanent magnetism in the ship hull. At the same time, all the ship components made of soft iron will become temporarily magnetized by the Earth's magnetic field, which results in an additional induced magnetism of the ship. As the ship moves through the water, its magnetic field will move with it and interact with any other magnetic field close by.
The magnetism of these battle ships was what triggered the magnetic mines. Their ignition mechanism was designed in a way that it only reacted to a magnetic field. One example is the so-called dip needle mechanism. Such a trigger works very much like a compass turned on its side. A magnetized needle is carefully balanced inside the firing circuit. It is aligned horizontally to the Earth's magnetic field and leveled so that it does not make contact with the rest of the circuit. However, as soon as a ships vertical magnetic field acts on this needle, it will dip up or down and make contact to close the loop of the firing circuit which triggers the mine, as shown in Figure 4.
/-/https/www.sciencebuddies.org/cdn/Files/13638/9/lp-dip-needle-circuit.png)
Figure 4. Simplified schematic of the dip needle firing circuit of a magnetic mine.
This magnetic firing mechanism was very effective and responsible for a lot of destructed ships during World War II. This was until each side managed to develop technologies that could either mask the magnetic field of a ship or that allowed to trigger the magnetic mines from a distance. One of these technologies is called "degaussing". Degaussing a ship means reducing or eliminating the ship's magnetic signature by producing an opposite magnetic field. The opposite magnetic field was induced by letting a controlled amount of direct current flow through degaussing coils that were wrapped around the ship. The objective of these coils was to generate a magnetic field of equal magnitude and opposite direction that would cancel the ship's magnetic signature. With no magnetic signature the ships became undetectable by magnetic mines.
In this lesson plan, your students will simulate the search of magnetic mines represented by small ceramic magnets. With the magnets hidden from student's sight, they will use a mobile device with a built-in magnetometer to detect the hidden magnets' positions. A magnetometer is an instrument used for measuring magnetic forces and the strength of a magnetic field. Although such magnetic sensors were initially developed and used for navigation and tracking purposes, nowadays they are built into many consumer electronics such as mobile phones, tablets, or computers. With a built-in magnetometer, these devices can function as electronic compasses and can measure magnetic fields. Some magnetometers use the Hall effect discovered by Dr. Edwin Hall in 1879, to detect and measure magnetic fields. Hall discovered that magnetic fields have the tendency to deflect a moving charge as it flows through a conductor. This creates a voltage that can be measured by the sensor. The magnitude of the Hall voltage is proportional to magnetic field strength. Other magnetometers use so-called magnetoresistors that consist of special metal alloys that change their resistance in response to a magnetic field.
The magnetic field strength is measured in teslas (T). The stronger a magnet, the stronger is its magnetic field. Earth's magnetic field strength ranges from about 25 to 65 microteslas depending on the location on Earth, whereas ceramic magnets typically have a magnetic field strength of 0.5 to 1 tesla. Your students will use a mobile device and a sensor app with a magnetometer to map the location of hidden "mines" with the help of the device's built-in magnetometer. Based on their measurements, students will be able to derive the hidden magnet's magnetic field strength and in a second part of the lesson can explore ways of how to "cloak" their magnetized ships to make them less detectable.
Additional Background Links
- How Britain Beat Germany's Magnetic Sea Mines, Medium
- Permanent and induced magnetism, magnetic forces and fields, BBC
- Earth's magnetic field, Universidad de Alicante
- Magnetometer basics for mobile phone applications, Sensors & Transducers
- Magnetic Compass & Ship Magnetism, cultofsea Maritime Knowledgebase
- Ship's permanent magnetic field, Electricalfundablog
- Ship's induced magnetism, Electricalfundablog
- Degaussing, Federation of American Scientists (FAS)
Prep Work (20 minutes)
- Make sure you are familiar with the sensor app you are using before you show it to your students. The best way to do this is to play with the app on your phone to get comfortable enough using it to explain it to your students. Ideally, you want to test the experiment yourself with the app before class to make sure it works as intended.
- Print out the grid paper template on regular printer paper. Print enough so each group can get two sheets for themselves and one additional sheet for every other group.
- For each group, print out one more grid template on a darker colored construction paper.
- Print out a student worksheet for each student.
- Cover the sides of the transparent boxes with aluminum foil, so you cannot see into the boxes from the side.
Teacher Tool Box
Engage (30 minutes)
- Tell your students that this lesson will be about magnetism. Start probing them on their knowledge about magnets.
 What does it mean for something to be magnetic?
 Listen to student's responses and make a list of the characteristics of a magnet that students mention. If not mentioned by the students, add to the list that a magnet is a material or object that produces a magnetic field. These materials are called ferromagnetic materials. Although you cannot see the magnetic field itself, you can see what it does. The magnetic forces within a magnetic field are responsible for pulling on other ferromagnetic materials and they repel or attract other magnets.
 - Do a quick demonstration with bar magnets showing how they attract other ferromagnetic objects and repel or attract each other.
What did you observe? Can you explain what happened and why?Collect students' replies. Point out that a magnet always has two opposite poles, which are referred to as north and south. Similar or "like" poles will repel each other (push each other away). Opposite or "unlike" poles will attract each other (pull towards each other).Now that you know what magnets are and what they can do, can you think of a way how magnets could have been used in World War II?Have students speculate and share their ideas. Then continue with step 3.
- Show this video to your students:
Create AssignmentEmbed Link
 Google Classroom
 Microsoft Teams
 Canvas
 Schoology
 Other
Other - Ask questions about the video:
What was so special about the mines they are talking about in this video?The mines were magnetic. They had a magnetic trigger mechanism that could detect the ships passing over them.How does a ship trigger these magnetic mines to explode?A ship is usually made from steel, which is a ferromagnetic material. This means that the ship is basically a huge floating magnet with its own magnetic field. When the ship's magnetic field gets close to the mine, the magnet inside the mine's trigger mechanism will react to the ship's magnetic field and trigger the mine to explode. More detailed information on the trigger mechanism is provided in the teacher background section.How can you detect magnets or a magnetic field?You can use a compass to detect and measure the direction of a magnetic field. The compass needle is a magnet itself and can move around freely. When the compass needle is exposed to a magnetic field, the north pole of the needle will be attracted to the south pole of the magnet causing the magnetic field. This is why you can use a compass for navigation. As Earth has its own magnetic field, a compass needle will always orient itself in a way that shows where North and South is. To measure the strength of a magnetic field, you can use a special device, called a magnetometer. A magnetometer measures the magnetic field strength in Tesla. For example, Earth's magnetic field has a strength of about 25 to 65 microteslas depending on the location on Earth.
- Point out to your students that magnetometers nowadays are built into many electronic devices including mobile phones, so they can function as electronic compasses. There are specific sensor apps for mobile phones that allow us to use these magnetometers in our mobile devices to measure the strength of magnetic fields around us. Introduce the sensor app to your students, specifically the magnetometer.
- Demonstrate to your students how the magnetometer works. Open the magnetometer in the sensor app. In phyphox, go to the "absolute" tab as you want the absolute measurements of the magnetic field strength and don't need the individual x, y, and z data. Start a measurement by pressing the play button and show the screen to your students. Make sure there are no disturbing magnets or metal objects around. Then ask your students:
What does the magnetometer read?The baseline reading should be in the range of 25-65 microteslas.Why is the reading not zero, there is no magnet or metal object close by the magnetometer?The magnetometer is reading the Earth's magnetic field that acts on all metal objects on the surface of the Earth.
- Show your students one of the disc magnets that they will use and tell them that they will do an exploration about how magnets interact with the magnetometer.
/-/https/www.sciencebuddies.org/cdn/Files/14174/23/note-question-mark-30.png)
/-/https/www.sciencebuddies.org/cdn/Files/14175/24/conversation-bubbles-30.png)
/-/https/i.ytimg.com/vi/Eht0sGmiyBM/sddefault.jpg)
/-/https/www.sciencebuddies.org/cdn/Files/20511/4/google-classroom.png)
/-/https/www.sciencebuddies.org/cdn/Files/20512/4/ms-teams.png)
/-/https/www.sciencebuddies.org/cdn/Files/20469/4/Canvas_Bug_Color_RGB.png)
/-/https/www.sciencebuddies.org/cdn/Files/20470/5/Schoology-Logo.png)
/-/https/www.sciencebuddies.org/cdn/Files/20471/4/lms.png)
/-/https/www.sciencebuddies.org/cdn/Files/20469/4/Canvas_Bug_Color_RGB.png)
/-/https/www.sciencebuddies.org/cdn/Files/20470/5/Schoology-Logo.png)
/-/https/www.sciencebuddies.org/cdn/Files/20471/4/lms.png)
Explore (60 minutes)
Part 1: Find the Mines!
- Explain the activity that they are going to do:
In their first model, the magnet represents an underwater magnetic mine.
There will be three normal mines (single magnet) and two very sensitive mines (double magnets). They will be working in small groups to explore the magnets and their interaction with the magnetometer. After that, each group will be placing five "mines" on a grid paper in a shoebox (similar to a Battleship game) and cover them with another grid template printed on a dark piece of construction paper. Each group's task will then be trying to locate and map out the hidden mines of the other groups using their phone, sensor app, and the magnetometer.

- Once students have gathered their materials, make your students aware that before they start their exploration, they first need to determine the exact location of the magnetometer in their mobile devices. They can do that by moving a magnet across the screen of their phone. Where the magnetometer reading is the highest, this is where the magnetometer is located. When using the phyphox app make sure students measure the absolute magnetic field strength. Also point out that students should keep any metallic objects or magnets away from the magnetometer at all times unless they want to make measurements with that specific object. These objects would interfere with their data and give them skewed results.
- Next, have your students practice using the magnetometer with the sensor app. Again, tell them to use the "absolute" magnetometer function when using the phyphox app.
Ask them to investigate the following questions and record their observations in the student worksheet. Encourage them to collect data and take recordings of their data. Remind them to save each recording before starting a new one.
Afterwards have them analyze their data to answer the questions below.
Example graphs of what students would be measuring are shown in Figures 5 and 6.
What happens when you bring a magnet close to the magnetometer?What types of readings do you get?How close does the magnetometer need to be to detect the magnet?What factors affect the strength of a magnetic force?
/-/https/www.sciencebuddies.org/cdn/Files/11870/13/icon-experiment-45.png)
/-/https/www.sciencebuddies.org/cdn/Files/13639/14/magnetometer-graph-distance.jpg)
Example graph shows the strength of a magnetic field over time for a moving magnet. A large spike in the center of the graph occurs when the magnet moves closer to the magnetometer before receeding.
Figure 5. Example graph for magnetometer measurements while changing the distance of a magnet to the magnetometer. The closer the magnet is to the magnetometer, the higher the magnetic field strength. The x-axis is time in second [s] and the y-axis shows magnetic field strength in microtesla.
/-/https/www.sciencebuddies.org/cdn/Files/13640/15/magnetometer-graph-strength.jpg)
Example graph showing the strength of a single magnet and a double magnet in microtesla over time. A single magnet produces a small spike in the graph while a double magnet produces a large spike. The magnetic field of the double magnet is measured to be more than twice the strength of the single magnet.
Figure 6. Example graph for magnetometer measurements comparing a single and a double magnet. Stronger magnets (two magnets) result in a higher magnetic field strength. The x-axis is time in second [s] and the y-axis shows magnetic field strength in microtesla.
- After students have completed their investigations, let them cut out the grid paper template to fit inside their box. Have them secure the paper inside the box with duct tape.
- Next, each group decides where to place their "mines" (magnets— three single magnets and two double magnets) on the grid. The magnets are taped down securely on each location with duct tape. Students need to mark each of the magnets' location on a separate grid paper to create a "key" to their hidden mines. This "key" is labeled with their names and turned in to the teacher. It might also be a good idea to have them take a picture of their setup for their records. Remind students that the location of their magnets on the grid is secret!
- Finally, let the students cover their box with the dark construction paper and label the shoe box with their names. Make sure that the grid on the construction paper aligns with the grid of their grid paper inside the box. Now the mine search can begin!
- Each group leaves their box at their table and takes an empty grid sheet and the mobile device with their sensor app to another table with a different box. Their task now is to use ONLY the magnetometer to collect data and try to find out where each of the groups placed their magnets. Shaking the box or looking inside the box is prohibited! Again, encourage students to record their data in the sensor app for data analysis.
- Students analyze their magnetometer readings and based on the data they gathered during their own investigation with the magnetometer and the magnets, they have to mark on their empty grid paper where they think which magnet is hidden.
- Once they are done with one box, they move to the next table with another box to repeat the procedure until they have mapped out he magnet locations of each groups' box.
Reflect (30 minutes)
- When the mine search is completed, gather the whole class for a class discussion. Together discuss:
What was easy about finding the location of the magnets?Replies depend on student's experience.What was hard about finding the locations of the magnets?Replies depend on student's experience.How could you tell that the magnets were hidden at a certain spot?The magnetometer readings should have gone up once it got close to a magnetic field. From looking at the peaks of their magnetometer graphs, students could infer the location of the magnets.How could you differentiate between the sensitive and the normal mines (single or double magnets)?Double magnets have a stronger magnetic field compared to single magnets. Because of that the magnetometer readings should have been higher when close to a double magnet. The height of the peaks in their graphs allows student to differentiate between the sensitive and the normal mines as long as they were not varying the distance to the magnets during their measurements.What evidence did you have to proof the location and strength of a magnet?See answers above.
- Reveal the magnet locations in each shoe box. Read out the location of each magnet on the grid and tell its strength (single or double) for each shoe box. Ask who got the locations right for each magnet. Optional: make a tally sheet to record the number of correctly located mines versus incorrectly located mines for each group. The group with the best location mapping wins.
- Close this part of the investigation with the following questions.
Based on your findings, what challenges did the British Navy have to overcome to be safe from the magnetic mines?How do you think you can protect a ship from these mines?
- If you have time, move on to the second exploration. Otherwise end the lesson by having students describe and summarize what they have learned about magnets, magnetic forces, magnetometers, and the magnetic field.
Explore (60 minutes)
Part 2: Save Your Ships!
- Explain the second activity that they are going to do:
In the model they are using for this exploration, the magnetometer represents the magnetic mine and the magnet represents the ship.
Demonstrate the setup of the experiment shown in Figure 7. The mine (magnetometer) lies on the table with the display facing up so you can see it. You place the transparent/clear box over the magnetometer (phone) upside down. The box represents the water. The magnet, or ship, then moves from one side of the box across the magnetometer to the other side of the box. Students should see that the magnetometer shows a peak when the magnet is getting close to the magnetometer. Seeing such a peak means that the mine is being triggered to explode.
They will be working in small groups again to find a way to "cloak" their ship so that the peak measured by the magnetometer when they move the ship from one side to the other gets as small as possible.
If you like, you can determine a threshold reading at which the mine gets triggered. This would mean that with any magnetometer readings below this value, the ship is safe.
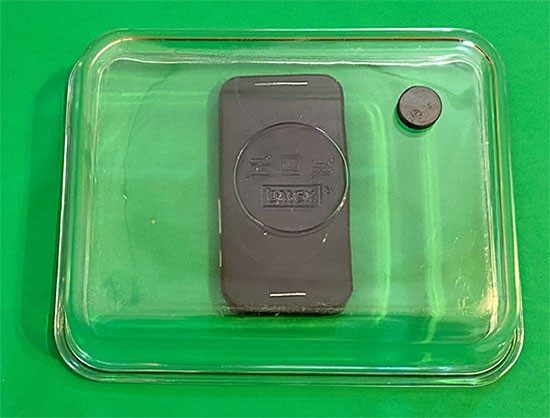
Figure 7. Experimental setup that models a ship (magnet) crossing over a magnetic mine (magnetometer in mobile device). - Remind your students that during their investigations they should keep the following in mind:
- The should know where the magnetometer is located in their device so they can do their measurements at the right spot.
- They need to make sure to remove any unwanted metallic objects or magnets from the proximity of the magnetometer.
- The distance between the magnet and the magnetometer should stay constant throughout their investigation. Their magnet (ship) should always be moved on the surface of the reversed box.
- They should base their designs on the findings from their first investigation about magnetic fields.
- They should record and save their data within the sensor app so they can compare and analyze their data for different designs.
- Provide materials to students and give groups time to come up with their design ideas. Have them think about what kind of materials they would use for their design. Then ask them to draw their designs on their worksheets. They should also take a picture of their design for their records.
- Let students create their designs. Again, ask them to take pictures for their records. Then have them test their designs and record their observations in their worksheet. While testing they should ask themselves the following questions.
How does their design work?What works well?What does not work as well?What changes do they need to make? Why and how?
- Have groups iterate and revise their designs until they are satisfied with their results. Remind them again to take recordings of their data with the sensor app.
- Then have each group label their modified ships (magnets) and collect them for a collective class test.
- Gather students around one experimental setup and have each group come forward to present their design. Then have each group move their cloaked ship across the magnetometer on the experimental setup while recording the data. Make sure to save the data with the group's name after each recording. Have each group do three trials, so they can determine how reproducible their results are. Do these measurements with all modified ships from every group. Make sure to use the same mobile device for each test to make the results are comparable.
- Once all groups are done, collectively analyze and compare the gathered data to find out which design resulted in the lowest magnetometer peak. Make a table in which you enter the highest measured magnetic field strength for each group's cloaked ship for each trial. You can use the "pick data" tool in the phyphox app to pick and view the values of individual data points within a graph. Have students calculate the average maximum magnetic field strength from all their trials. Then compare these numbers for each group. The design that resulted in the lowest measured magnetic field strength wins.
/-/https/www.sciencebuddies.org/cdn/Files/13641/14/magnetic-mining-setup.jpg)
Reflect (30 minutes)
- Start a class discussion about their different designs.
Which designs worked best?Which designs did not work as well?Why were some designs more successful than others?How was the best design able to cloak the ship's magnetic field?Does the magnetic field of the ship (magnet) change due to their modifications? If yes, how and why?
- In case students did not find a good solution to mask their ship, introduce them to the idea that a magnetic field can be eliminated by an opposite magnetic field. Demonstrate this with two magnets that you put together on top of each other. The second magnet needs to be in the reverse orientation (so that they repel each other). Tape them together and move this modified magnet across the magnetometer in the same experimental setup. Then compare the readings to a single magnet. Most likely, you will not be able to make the peak in the magnetometer readings disappear completely, but the peak should be significantly smaller.
- If you have time, look into how the British Navy actually managed to trick and destroy the magnetic mines by cloaking their ships. Have students research "degaussing" and "deperming" processes in which a ship's magnetic signature is canceled out by inducing an opposite magnetic field with metal or ceramic coils. An example resource can be found
at Bright Hub Engineering. Then discuss:
How are these techniques different or similar to your cloaking design?
- End the lesson by having your students summarize the main learning points from this lesson:
- What are magnets/magnetic fields?
- How do you know a magnetic field is there?
- What factors affect the strength of a magnetic field?
- How can a magnetic field and its field strength be measured?
- How can you mask or manipulate a magnetic field?
Assess
You can use this quiz to assess student learning after the activity:
- Online quiz, assignable in any LMS
- Quiz (pdf) and answer key (PDF)
Make Career Connections
Discussing or reading about these careers can help students make important connections between the in-class lesson and STEM job opportunities in the real world.
/-/https/careerdiscovery.sciencebuddies.org/cdn/Files/1640/26/Fyysikot_tyossaan.jpg)

/-/https/careerdiscovery.sciencebuddies.org/cdn/Files/1450/21/iStock-1227179796.jpg)
Lesson Plan Variations
- Test how other metallic objects besides the magnets affect your magnetometer readings. Can you still detect all the mines (magnets) if you place some other metallic objects on the grid paper within your box?
- Add triple magnets to the mix or introduce other kind of magnets with varying magnetic field strengths. How easy is it to identify them all?
- Do some more research on magnetometers. Explore why they are included in many electronic devices and find out how they function.
/-/https/img.youtube.com/vi/KCSAL2TLXi8/0.jpg)
/-/https/img.youtube.com/vi/shrrwhTZ-kA/0.jpg)
/-/https/img.youtube.com/vi/PenQ1zuphJU/0.jpg)