/-/https/www.sciencebuddies.org/Files/21464/5/sb-logo.png)
/-/https/www.sciencebuddies.org/Files/21464/5/sb-logo.png)
Summary
/-/https/www.sciencebuddies.org/Files/8927/4/milk-plastic-molded-plastic-thumbnail.jpg)
/-/https/www.sciencebuddies.org/Files/8902/9/milk-plastic-overview-2.jpg)
Overview
Teach your students how to make plastic out of milk in this hands-on lesson plan! You will conduct a simple milk-transforming experiment to explore how plastics can be derived from a natural resource such as milk. Students will perform their own experiments and can even create a product from their resulting organic casein polymer.Learning Objectives
- Explain what plastic, or a polymer, is made of on a microscopic/molecular scale
- Describe how the polymerization reaction can change the properties of a substance
- Reflect on the consequences of using natural resources for industrial purposes
NGSS Alignment
This lesson helps students prepare for these Next Generation Science Standards Performance Expectations:- MS-PS1-2. Analyze and interpret data on the properties of substances before and after the substances interact to determine if a chemical reaction has occurred.
- MS-PS1-3. Gather and make sense of information to describe that synthetic materials come from natural resources and impact society.
|
Science & Engineering Practices
Asking Questions and Defining Problems.
Ask questions that arise from careful observation of phenomena, models, or unexpected results, to clarify and/or seek additional information.
Constructing Explanations and Designing Solutions. Apply scientific ideas, principles, and/or evidence to construct, revise and/or use an explanation for real-world phenomena, examples, or events. |
Disciplinary Core Ideas
PS1.A: Structure and Properties of Matter.
Substances are made from different types of atoms, which combine with one another in various ways. Atoms form molecules that range in size from two to thousands of atoms.
Each pure substance has characteristic physical and chemical properties (for any bulk quantity under given conditions) that can be used to identify it. PS1.B: Chemical Reactions. Substances react chemically in characteristic ways. In a chemical process, the atoms that make up the original substances are regrouped into different molecules, and these new substances have different properties from those of the reactants. |
Crosscutting Concepts
Structure and Function.
Structures can be designed to serve particular functions by taking into account properties of different materials, and how materials can be shaped and used.
Connections to Engineering, Technology and Applications of Science Influence of Science, Engineering and Technology on Society and the Natural World. The uses of technologies and any limitation on their use are driven by individual or societal needs, desires, and values; by the findings of scientific research; and by differences in such factors as climate, natural resources, and economic conditions. Thus technology use varies from region to region and over time. |
Materials
/-/https/www.sciencebuddies.org/Files/8884/9/milk-plastic-materials.jpg)
Materials for teacher preparation:
- Measuring cup (1)
- Milk (enough for each group of students to have 1 cup)
- Stovetop oven and pan (1) or microwave and microwaveable container (1)
- Thermos or insulated container big enough to hold all the hot milk
- White vinegar
- A variety of items that are made from plastic as demonstration objects
Materials per group of 2–4 students:
- Work surface that is safe to get damp
- Prepared hot milk (1 cup)
- Styrofoam® or other heat-resistant cup
- White or distilled vinegar (4 tsp.)
- Paper towels (6)
- Spoon (1)
- Optional: food coloring, glitter, or markers
Background Information for Teachers
This section contains a quick review for teachers of the science and concepts covered in this lesson.Plastic products are all around us. They are all similar in that they are made up of molecules that are repeated over and over again in a chain called a polymer. Polymers can be chains of one type of molecule, or chains of different types of molecules linked together in a regular pattern as shown in Figure 1. In a polymer, a single repetition of the pattern of molecules is called a monomer (even if the polymer is made up of only one type of molecule). The process of making a polymer is called polymerization, which describes the transformation of many individual monomer molecules into large chains or three-dimensional networks. There are many types of polymers, each having a different look or feel depending on what they are made of. Synthetic polymers are man-made and derived from materials such as oil, whereas natural polymers occur in nature and are made of renewable materials such as cellulose from wood or starch. A collective key property of all plastics is that they can be molded into many shapes. How different plastics behave and which products they are used for depends on the molecules they are made of. The name of the plastic also gives information about its chemical structure. For example, the name "polystyrene" (which Styrofoam® is made of) means many ("poly") of "styrene", which is the monomer of this polymer. Polypropylene (PP), on the other hand, is made of many repeat units of propylene.
/-/https/www.sciencebuddies.org/Files/8885/8/milk-plastic-polymers.png)
Figure 1. Polymers are made up of repeated patterns of molecules, called monomers. Monomers can be made up of one type of molecule (such as the top polymer) or multiple different molecules (such as the bottom polymer).
What does milk have to do with polymers? Besides water, fat, and lactose, milk contains many proteins called casein (case-een). Normally, the caseins form spherical shapes to stay in solution, but these spheres can easily be changed, and once changed, cannot re-form into spheres. For example, when milk is heated and combined with an acid, such as vinegar, the casein molecules undergo polymerization and unfold into long chains, forming curd. Each casein molecule is a monomer and the chain of casein monomers is a polymer—a natural plastic is created! The polymer can be scooped up and molded, which is why plastic made from milk is called casein plastic. From the early 1900s until about 1945, galalith, a casein plastic made with the chemical formaldehyde, was quite common. It has been used to make buttons, decorative buckles, beads and other jewelry, fountain pens, the backings for hand-held mirrors, and fancy comb and brush sets (Figure 2).
/-/https/www.sciencebuddies.org/Files/8886/8/milk-plastic-casein-buttons.jpg)
Figure 2. Buttons made from galalith, a casein plastic made from milk and formaldehyde. (Image credits: by Tyranny Sue, via Wikimedia Commons)
In this lesson plan, students will conduct their own polymerization experiment and use hot milk, vinegar, a cup, paper towels, and a spoon to make their own casein plastic.
Additional Background Links
- How Plastics Are Made, American Chemistry Council
- How Can We Differentiate Natural Polymers from Synthetic Polymers?, BYJU'S
- Milk Composition: Proteins, ANSC Department of Animal Sciences
- Casein, Plastics Historical Society
Prep Work (20 minutes)
- Heat 1 cup of milk for each classroom demo or small group. Heat the milk in a pan on a stovetop until the milk is steaming. Alternatively, you can microwave the milk in a microwaveable container by warming it at 50% power for five minutes and watching to make sure it does not overflow. It should be about the same temperature as you would want milk to be for making hot cocoa. If it is not heated enough, microwave it for two minutes at 50% power and repeat this until the milk is hot.
- Store the hot milk in a thermos until it is needed. It should stay warm enough for at least two hours.
- Right before doing the classroom demo or small group exploration, add 4 teaspoons (tsp.) of white vinegar to a mug or cup. Each demo or group should have one cup with vinegar.
Teacher Tool Box
Engage (15 minutes)
- Have several objects made out of plastic ready (such as plastic bags, plastic bottles, a plastic button, a mobile phone case, or any other plastic household item) and show them to your students. Pass the objects around so each student can look at them and feel them. Then ask the following questions.
 What do you think all these objects have in common?
 All these objects are made of plastic. Most plastics are synthetic materials that are man-made and do not occur in nature. If you look around you, you will notice that many objects are made of plastic. Can you point some out in the classroom? [If the students do not get the right answer, you might need to point them in the right direction with questions such as "Can you find these objects in nature?" or "What are these objects made of?"]Can you think of a reason why all these objects are made of plastic? What are some unique properties of this material?The word plastic is derived from the Greek word plastikos which means "capable of being shaped or molded." Plastic is also relatively easy to make, water resistant, and very durable, so it is used to make a lot of things we use every day.Does anybody have an idea what these plastics are made of?Most plastics are derived from petrochemicals (oil), but some plastics are also made from renewable materials like cellulose from wood or starch. The chemical process of making plastic is called polymerization. In this reaction, a plastic is generated by forming very long chains of molecules. These long chains are called polymers. Each chain consists of thousands of repeated units of single molecular units called monomers. The molecular structure of the monomers and how they are connected determine the properties of the resulting plastic.
 - Tell your students that they will now perform their own polymerization reactions to create a polymer themselves. Instead of using oil as a starting material for their plastic, they will use milk. Do a quick demonstration of the experiment (just adding the vinegar to the warm milk to make curd) before explaining it to your students. If you did the experiment yourself before the lesson, you can also show your students the resulting casein plastic. Then ask the following questions to introduce the experiment.
You can also show your students this introductory video.
Create AssignmentEmbed Link Google Classroom
 Microsoft Teams
 Canvas
 Schoology
 OtherWhat do you think happens to the milk during the experiment? Why does it turn into a plastic? Which components of milk could function as the monomer of the milk polymer?Milk consists primarily of water, fat, lactose and lots of proteins called casein. The casein proteins normally form spherical shapes, which float around in the liquid milk. When you add vinegar (an acid) to the milk, these spherical structures break apart. The casein molecules unfold and rearrange into long chains to build a polymer (remember that a polymer is a long chain made up of many individual monomers). You can see that this polymerization reaction results in a white semi-solid product, also called curd, or casein polymer. The casein polymer then can be molded and formed into various shapes before drying.
/-/https/i.ytimg.com/vi/D17eWH-cS9c/maxresdefault.jpg)
/-/https/www.sciencebuddies.org/Files/20511/4/google-classroom.png)
/-/https/www.sciencebuddies.org/Files/20512/4/ms-teams.png)
/-/https/www.sciencebuddies.org/Files/20469/4/Canvas_Bug_Color_RGB.png)
/-/https/www.sciencebuddies.org/Files/20470/5/Schoology-Logo.png)
/-/https/www.sciencebuddies.org/Files/20471/4/lms.png)
/-/https/www.sciencebuddies.org/Files/20469/4/Canvas_Bug_Color_RGB.png)
/-/https/www.sciencebuddies.org/Files/20470/5/Schoology-Logo.png)
/-/https/www.sciencebuddies.org/Files/20471/4/lms.png)
Explore (30 minutes)
- Divide the class into groups of 2–4 students and inform them that each group will conduct their own polymerization experiment. Within each group, students should share and rotate through tasks.
- Walk the students through the experimental procedure described below. (A slide show is available that you can use to guide your students through the experiments.)
- Help students measure out 1 cup of hot milk from the thermos and let the students add the hot milk to the mug or other heat-resistant cup with vinegar. When the hot milk is added to the vinegar, the milk should form white clumps (curds) as shown in Figure 3. Have students mix the mug of hot milk and vinegar slowly with a spoon for a few seconds. Ask them to write down their observations in their worksheets.
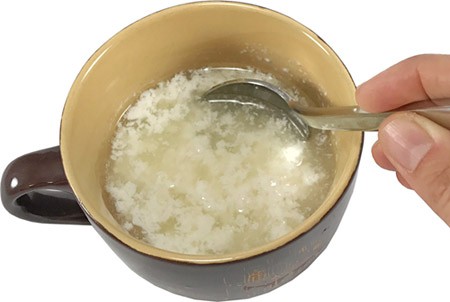
Figure 3. Adding the hot milk to the vinegar results in the formation of white clumps (curd) - Each group needs to stack four layers of paper towels on a surface that is safe to get damp.
- Once the milk and vinegar mixture has cooled a bit, have students use a spoon to scoop out the curds. Direct them to tilt the spoon against the inside of the mug to let excess liquid drain out while retaining the curds in the spoon. Have them collect as many curds as they can in this way and put the curds on top of the paper towel stack (Figure 4). Ask them to describe the consistency of the curd in their worksheet.
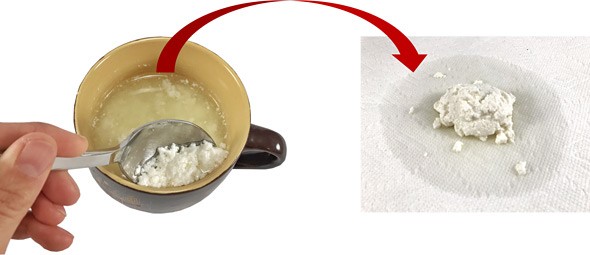
Figure 4. Collect the curd on a stack of paper towels - Direct students to fold the edges of the paper towel stack over the curds and press down on them to absorb excess liquid from the curds. Two more paper towels can be pressed down on top of the curds to soak up the rest of the extra liquid.
- Have students knead all of the curds together in a ball of dough as can be seen in Figure 5. This is the casein polymer. Again, ask your students to describe the feel of the casein polymer while they are kneading it and to write down their observations in their worksheet.
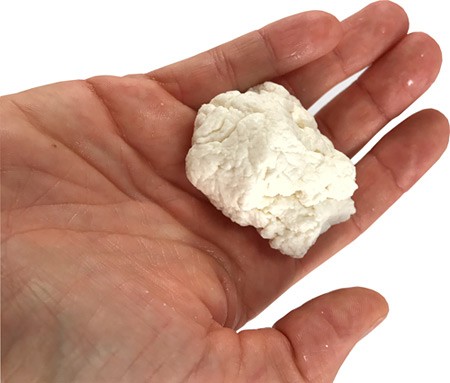
Figure 5. Knead the curd together in a ball of dough with your hands. - If students want to make the casein plastic into something, they can color, shape, or mold it now (within an hour of making the plastic dough) and leave it to dry on paper towels for at least 48 hours. To shape the plastic, students must knead the dough well before shaping it. Molds and cookie cutters work well, or, with more patience, the dough can be sculpted. Food coloring, glitter, or other decorative bits can be added to the wet casein plastic dough, and dried casein plastic can be painted or colored with markers. Once it has dried, the casein plastic will be hard. Examples of molded casein plastic are shown in Figure 6. Drying time varies depending on the thickness of the final item (thicker pieces take longer), but plan on at least two days.
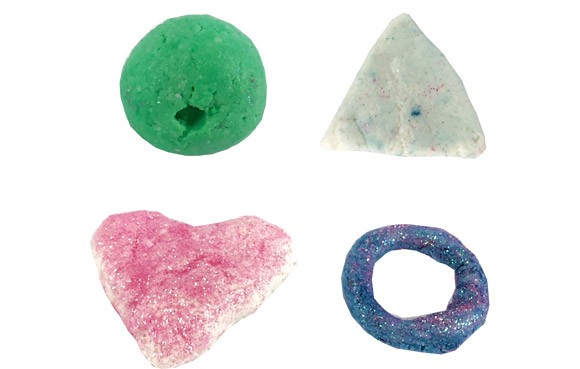
Figure 6. Examples of molded casein plastic.
/-/https/www.sciencebuddies.org/Files/8887/8/milk-plastic-stirring-curd.jpg)
/-/https/www.sciencebuddies.org/Files/8888/8/milk-plastic-collecting-curd-on-paper.jpg)
/-/https/www.sciencebuddies.org/Files/8889/8/milk-plastic-curd-in-hand.jpg)
/-/https/www.sciencebuddies.org/Files/8883/8/milk-plastic-molded-plastic.jpg)
Reflect (15 minutes)
Once each group is done molding their casein plastic and the objects are starting to dry, gather all students for a class discussion to reflect on their experimental results. You can use following questions for your discussion.
/-/https/www.sciencebuddies.org/Files/14174/23/note-question-mark-30.png) | When you look at your molded casein plastic objects, can you tell which properties of the reactant (milk) changed during the polymerization reaction? How is the end product different from the starting material? |
/-/https/www.sciencebuddies.org/Files/14175/24/conversation-bubbles-30.png) | The milk turned from a liquid into a solid. This happened because when we added vinegar, the casein molecules rearranged from spheres (which were floating around in a liquid) to form long chains that connected together and made a solid. |
| What would happen if we switched to making all of our plastic from milk instead of oil? |
| We would need tons of milk! There is probably not enough milk being produced to make all the plastic we need. People would probably rather use milk as a food source and not for making plastics, especially if its supply is limited. In this case, the priorities (making plastic or using milk as food) have to be carefully considered. [This, together with the next question, are a good starting point for a discussion about the availability of natural resources and their scarcity]. |
| Most of the plastics we use today are made from oil and not milk. What type of impact do you think this has on the environment and society? |
| Oil, like other natural resources, are limited on our planet. We have to carefully consider how we use them. If natural resources get scarce, people might start fighting over them to keep their supply. Depleting natural resources has a whole range of geological, political, and environmental impacts on the earth and society. For example, most of the plastic materials we make today are very difficult to degrade, which means once they are thrown away, they will be present for a long time. This accumulates a huge amount of plastic waste that can threaten the environment (for example, plastic bags in the ocean can kill animals). Additionally, as we use plastics for a lot of products that come in close contact with our body (such as food containers, drinking bottles, etc.), there are potential harmful effects on our health from long-term exposure to potential toxic chemicals that are used in the process of making plastics. |
| Are there any alternative materials that could be used instead of plastic? What are their advantages and disadvantages? |
| Let your students come up with their own answers. You can prompt them by telling them to think about what some of the plastic objects we know were made of before plastic was invented such as wood, metal, ceramic, or ivory. Alternatives also include recycling the plastic that we already have instead of throwing it away. |
Lesson completion
Tell you students that the casein plastic will need to dry for about 48 hours. Once the objects are dry, you can let them pick up their molded products and explore the properties of the final casein plastic. For example, they can try to bend it, crush it, break it, etc.
Assess
You can use this quiz to assess student learning after the activity:
- Online quiz, assignable in any LMS
- Quiz (pdf) and answer key (PDF)
Make Career Connections
Discussing or reading about these careers can help students make important connections between the in-class lesson and STEM job opportunities in the real world.
/-/https/careerdiscovery.sciencebuddies.org/cdn/Files/1107/19/pexels-photo-3938023.jpg)

/-/https/careerdiscovery.sciencebuddies.org/cdn/Files/1429/17/unsplash-4pM4nhHyo9M.jpg)
/-/https/careerdiscovery.sciencebuddies.org/cdn/Files/20209/5/chemical-engineer-citgo.jpg)
Lesson Plan Variations
- Let your students optimize the polymerization process by varying the amount of acid that they add to the milk or changing the starting temperature of milk. Can they increase the yield of casein plastic by using different experimental conditions? Do other acids besides vinegar, such as lemon juice, also result in the production of casein polymer? How do the properties of the resulting casein plastic compare?
- Explore other ways of making polymers, using different starting materials such as Elmer's® school glue and Borax. The procedure is described in this Science Buddies' project Slime Chemistry.
- How does casein plastic, a natural polymer, differ from a synthetic polymer such as those used for plastic bottles or plastic toys? You can investigate the different polymer properties by designing some tests to compare the different plastics. You could, for example, measure how easy it is to break the casein polymer versus a similar-shaped object made of a different plastic, or look at the biodegradability of casein plastic compared to a plastic bottle by burying both materials and observe them over time.
- Find out with your students if different types of milk—fat free, whole, 2%, or almond and soy milk—work equally well for making casein plastic. Does it work for all of them? Discuss your results and let the students find reasons and arguments to explain their findings.
/-/https/img.youtube.com/vi/UupWNWZPR_Y/0.jpg)
/-/https/img.youtube.com/vi/cHsBr9v2YBw/0.jpg)
/-/https/img.youtube.com/vi/QGhpCU-96Ic/0.jpg)