/-/https/www.sciencebuddies.org/Files/21464/5/sb-logo.png)
/-/https/www.sciencebuddies.org/Files/21464/5/sb-logo.png)
Summary
/-/https/www.sciencebuddies.org/Files/16620/10/mirror-mirror-overview-flip.jpg)
Overview
We see ourselves in a mirror because mirrors reflect light. Light interacts with materials in different ways; for instance, shiny surfaces like mirrors are able to change the direction of light. In this lesson plan, students will demonstrate how light bounces off a reflective surface by redirecting a light beam from a flashlight to different locations within the classroom. Students will then be challenged to use their knowledge about mirrors to find a way to guide a light beam to a specific target using multiple mirrors.
Learning Objectives
- Understand that some materials redirect light.
- Describe how a mirror works.
- Investigate how you can redirect a light beam using reflective materials.
NGSS Alignment
This lesson helps students prepare for these Next Generation Science Standards Performance Expectations:- 1-PS4-3. Plan and conduct investigations to determine the effect of placing objects made with different materials in the path of a beam of light.
|
Science & Engineering Practices
Planning and Carrying out Investigations.
Plan and conduct investigations collaboratively to produce evidence to answer a question.
|
Disciplinary Core Ideas
PS4.B: Electromagnetic Radiation.
Some materials allow light to pass through them, others allow only some light through and others block all the light and create a dark shadow on any surface beyond them, where the light cannot reach. Mirrors can be used to redirect a light beam.
|
Crosscutting Concepts
Cause and Effect.
Simple tests can be designed to gather evidence to support or refute student ideas about causes.
|
Materials
/-/https/www.sciencebuddies.org/Files/16621/8/lp-mirror-mirror-materials.jpg)
Per student group of 2:
- Three small square mirrors (4"x4"). Note: The glass edges of the mirrors might be sharp. Cover them with tape to prevent students from cutting themselves. Alternatively, you can use other highly reflective materials, such as old CDs or squares of heavy-duty flat aluminum foil.
- 6 clothespins or binder clips
- Flashlight, ideally with a narrow beam
- Marker or pen
- Printed target
For teacher:
- Flashlight
- Mirror
- Tape
- White cardstock paper
Background Information for Teachers
This section contains a quick review for teachers of the science and concepts covered in this lesson.Light mostly travels through space in straight lines. This is why the concept of light rays is commonly used in physics. A light ray is represented as a straight line or arrow pointing away from the light source that indicates the direction of light (Figure 1, left). A bundle of parallel light rays is called a beam of light (Figure 1, right). Picturing light as lines makes it possible to illustrate what happens if light hits an object that is in its way.
/-/https/www.sciencebuddies.org/Files/16580/6/light-ray.png)
Figure 1. A straight line or arrows traveling from a light source depicts a light ray (left) or a light beam (right).
Materials can interact with light in different ways. Once light hits a material, the light can either be absorbed, transmitted, or reflected. Often, a combination of absorption, transmission, and reflection happens. How we see a material depends on how the light interacts with the object. We can only see materials that reflect or bounce back at least some light, or materials that emit light themselves. The reflection of light is similar to the bouncing of a ball in that the angle at which the light hits the reflecting surface is identical to the angle at which it bounces back (Figure 2). This circumstance is called the law of reflection. Additionally, the reflected ray, the incident ray, and the normal line all lie in the same plane, the plane of incidence (Figure 2).
/-/https/www.sciencebuddies.org/Files/16581/6/law-of-reflection-3D.jpg)
A grey trapezoid represents a plane mirror. A line perpendicular to the mirror depicts the normal line. Two arrows pointing at an angle towards the mirror and away from the mirror represent the incident ray and the reflected ray. The angle of incidence and angle of reflection are equal. A rectangle illustrates the plane of incidence.
Figure 2. The law of reflection states that when a light ray hits a reflective surface, its angle of incidence is equal to its angle of reflection.
A mirror is a perfect example of reflection on a smooth material. Because it is so smooth, all light reflects at the same angle (Figure 3, middle) giving the material a shiny appearance. Materials that do not have a smooth surface reflect light in a diffuse way (Figure 3, right). Bumps on their surface cause light to reflect in many different directions. These materials appear matte.
/-/https/www.sciencebuddies.org/Files/11971/5/model-reflection.png)
Figure 3. Illustrations of how light reflects on shiny (middle) and matte (right) surfaces.
Using the law of reflection, you can predict where a light ray will go after hitting a smooth, reflective surface such as a mirror. In fact, you can draw a diagram of the light's path through a mirror maze if the incident angle for the first mirror is known. An example of such a diagram is shown in Figure 4.
/-/https/www.sciencebuddies.org/Files/16582/6/light-path-diagram.jpg)
Figure 4. A diagram showing the path of light through a mirror maze.
The fact that light reflects off a smooth surface is the reason why we can see ourselves in a mirror. We see objects when they reflect light that then enters our eyes. If we stand in front of a mirror, some of the light that bounces off of us hits the mirror. The mirror reflects this light back into our eyes, and we see an image of ourselves! Mirrors are extremely smooth. This makes light bounce back in a regular pattern and leads to a clear image of objects seen in a mirror. Aluminum foil's surface is not as smooth, making light reflect in a slightly diffuse way. This explains the blurry image of objects seen in aluminum foil.
In this lesson plan, students will first investigate how mirrors can change the direction of light. Then they will use their gained knowledge to redirect a light beam onto a specific target using reflective surfaces.
Additional Background Links
- The Awesome Physics Behind How Mirrors Work, Science Alert
- The Law of Reflection, the Physics Classroom
Prep Work (5-10 minutes)
- For each student pair, print out the target template (preferably on cardstock paper) and fold it in half. The target should be visible on one side and the other side should be blank.
- If the glass mirrors have very sharp edges, cover the edges with tape to prevent your students from cutting themselves with the mirrors.
Teacher Tool Box
Engage (10 minutes)
- Start the lesson by getting students curious about how a mirror works. Give each student or student pair one of the square mirrors and asked them to look into the mirror.
 What do you see when you look into the mirror?
 Listen to students' replies. Elicit responses that mention how you can see yourself in a mirror or other objects that are in front of a mirror.Why do you think a mirror does that?Have students share their ideas. Do not give an answer to this question as this is part of their own investigation.
 - Tell students that today they will do an investigation to find out how a mirror works.
/-/https/www.sciencebuddies.org/Files/14174/23/note-question-mark-30.png)
/-/https/www.sciencebuddies.org/Files/14175/24/conversation-bubbles-30.png)
Explore (45 minutes)
- Start the exploration with a brief demonstration. Have students look at the mirror and describe its appearance.
What do you notice about how the mirror looks?Let students describe the appearance of the mirror. They will most likely mention that the mirror is flat, very smooth, and looks very shiny.
- Take the flashlight, switch it on, and point it at a wall so that the spot of light is visible on the wall. You might want to switch off the lights in the classroom for this demonstration. Point out the spot of light on the wall to your students and then ask:
What do you think will happen when I put the mirror into the beam of light? (Show students what you are about to do.)Have students speculate what will happen to the light and the spot of light on the wall.
- Hold the mirror into the light beam so it shines onto the shiny mirror surface. Make sure the reflected beam shines on the ceiling, floor, or wall, not into the eyes of the students. Ask students to observe what happens.
What do you notice? Is there still a light spot on the wall? Is there a light spot on a different wall? Why did this happen?What happens when the light hits the mirror?Collect students' observations. They might have noticed that the spot of light on the wall has disappeared or that there is a dark shadow of the shape of the mirror on the wall. Prompt them to think about where the light went. Did the mirror block all the light or did the light go somewhere else? How do we know? Encourage students to look around the room to see if they can find the spot of light somewhere else.
- Help students find the redirected light spot on the wall, floor, ceiling, etc.
What does this spot of light tell us about what the mirror does?Have students share their ideas. Use their replies to point out that the spot of light now being visible at a different place in the classroom means that the light beam has been redirected from one place to another. Guide students to conclude that the mirror must have changed the direction of the light.
- Tell students that now it is their turn to investigate how a mirror interacts with the beam of light from a flashlight. Split the class into groups of two students. Then provide each group with all the materials they need.
- Instruct students to use the flashlight and one of the mirrors to redirect the light of the flashlight to different places in the classroom. One student will hold the flashlight and the other student will hold the mirror. Remind students to use the flashlight responsibly and not shine light into another student's eyes. They should follow the instructions as described in the Student Worksheet and record their observations in the space provided. Demonstrate each of these steps with one student group, so they know what to do:
- Student 1: Switch on the flashlight and point it toward the wall.
- Student 2: Hold the mirror in between the flashlight and the wall. The light should hit the mirror.
- Student 2: Move the mirror to change the direction of the light (student 1 should not move the flashlight).
- Try to hit the targets listed on the worksheet with the light. Be careful not to target other people's eyes!
- Switch roles and repeat steps a.-d.
- Once the students have finished their initial investigation and have an understanding of how they can change the direction of light with a mirror, introduce the mirror challenge to the students. Again, start with a short demonstration of the challenge setup (Figure 5).
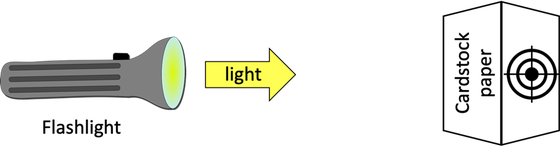
Figure 5. Setup of the mirror challenge.
- Shine the light on the blank side of the cardstock and explain to students that their task is to redirect the light so that the light beam illuminates the target sign on the other side of the cardstock. They cannot move the flashlight, but they can use three mirrors to change the direction of light three times.
- Give students a brief demonstration of how they can use the binder clips or clothespins to make the mirrors stand up (Figure 6).
Then let each student group work on the challenge independently for 10–15 minutes. While students are working, walk around and check in with them. Listen to their discussions and provide support where needed. Engage students by asking them about their thoughts and observations. Questions you can ask them are:
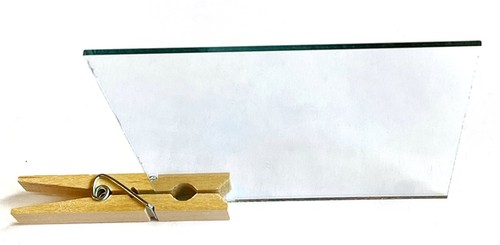
Figure 6. Clothespins or binder clips can be used to make the mirrors stand up.
How do you think the light can go around the paper to the target?Where do you think you need to put the first mirror?Do you think it matters how the mirrors are angled?If students get stuck, give them a hint by asking:What changes if you change the angle of the mirror?Can you bounce the light from one mirror to another? How? - Once students have found a solution that illuminates the target, ask each group to draw their mirror setup on their worksheet. If groups are done early, ask them to move the target to a different location and try again.
/-/https/www.sciencebuddies.org/Files/16622/8/setup-mirror-challenge.png)
/-/https/www.sciencebuddies.org/Files/16586/6/standing-mirror.jpg)
Reflect (20 minutes)
- Gather the whole class to discuss students' observations. Ask them to leave their final mirror setup on their table. Focus on the initial investigation first.
What did you have to do with the mirror to make the light go to different places?Listen to students' replies. Focus on responses that mention how students had to hold the mirror in different ways (at different angles) to make the light go to different places.
- Use students' replies to explain that the scientific term for what the mirror does is called reflection. Reflection means that the light hits the surface of the mirror and then bounces off the mirror in a different direction. Where the light goes after it hits the mirror is dependent on how (at what angle) the light hits the mirror. This is why they had to hold the mirror at different angles to redirect the light to different places in the classroom.
- Next, focus on the mirror challenge. Ask student groups if they were able to solve the challenge:
Were you able to redirect the light from the flashlight onto the target?Have student groups signal by raising their hands if they were able to solve the challenge or not. Ask one of the student groups to demonstrate their setup.
- Then discuss the mirror challenge with your class.
What was easy or difficult about redirecting the light to the target on the other side of the cardstock?How many mirrors did you need to solve the mirror challenge?How can you get light to bounce from one mirror onto another?How can you get light to go around a target?How did your observations from the previous investigation help you to solve the mirror challenge?Have students share their experiences. Let them describe how they solved the challenge and how they made the light bounce from one mirror to another until it finally hit the target. Prompt them to talk about their strategies for how to find out where the light went after it hit a mirror and how they knew where and at what angle to position the mirrors.
- Wrap up the lesson by having students summarize what they have learned about mirrors and light in this lesson.
What did you learn about mirrors and light during your investigations?Students should mention that if light hits a mirror, the mirror changes the direction of light. The light bounces off of the mirror in the same way as balls do. In addition, they should remember that the way you hold the mirror (the angle) determines where the light is going.After all of your investigations with mirrors and light, do you now have an idea of how a mirror might help us see ourselves?Have students use their knowledge about mirrors to answer this question. Help them to conclude that the fact that light is reflected from a mirror is the reason why we see ourselves in a mirror. Explain that we see objects when they emit or reflect light that then enters our eyes. If we stand in front of a mirror, some of the light that bounces off of us hits the mirror. The mirror reflects this light back into our eyes, and we see an image of ourselves. You can then end the lesson by showing your students the "How Do Mirrors Work?" video (stop the video at 0:58 minutes).
/-/https/i.ytimg.com/vi/9MxKpI0JXIc/maxresdefault.jpg)
/-/https/www.sciencebuddies.org/Files/20511/4/google-classroom.png)
/-/https/www.sciencebuddies.org/Files/20512/4/ms-teams.png)
/-/https/www.sciencebuddies.org/Files/20469/4/Canvas_Bug_Color_RGB.png)
/-/https/www.sciencebuddies.org/Files/20470/5/Schoology-Logo.png)
/-/https/www.sciencebuddies.org/Files/20471/4/lms.png)
/-/https/www.sciencebuddies.org/Files/20469/4/Canvas_Bug_Color_RGB.png)
/-/https/www.sciencebuddies.org/Files/20470/5/Schoology-Logo.png)
/-/https/www.sciencebuddies.org/Files/20471/4/lms.png)
Make Career Connections
Discussing or reading about these careers can help students make important connections between the in-class lesson and STEM job opportunities in the real world.
/-/https/careerdiscovery.sciencebuddies.org/Files/1429/17/unsplash-4pM4nhHyo9M.jpg)

/-/https/careerdiscovery.sciencebuddies.org/Files/1640/26/Fyysikot_tyossaan.jpg)
Lesson Plan Variations
- Have students investigate what happens when light hits non-reflective surfaces. You can also use Science Buddies' lesson Can You See Through Me? to investigate transparent, translucent, and opaque materials.
- Tell students that besides mirrors, there are many other objects or materials that can reflect light. Ask students what other shiny objects or materials they know that might reflect light. Can they find some other objects in the classroom that reflect light? Let them go on a scavenger hunt to gather reflective objects and investigate how they can change the direction of light, or how they can mirror themselves onto the surface.
/-/https/img.youtube.com/vi/0DwHz0zRIGM/0.jpg)
/-/https/img.youtube.com/vi/9Fv0-501msc/0.jpg)
/-/https/img.youtube.com/vi/SjNR8mQKDqo/0.jpg)