/-/https/www.sciencebuddies.org/cdn/Files/21464/5/sb-logo.png)
/-/https/www.sciencebuddies.org/cdn/Files/21464/5/sb-logo.png)
Summary
/-/https/www.sciencebuddies.org/cdn/Files/15258/5/ocean-river-lake-models.jpg)
Overview
In this lesson plan, students investigate different types of water bodies on Earth by making models of lakes, oceans, and rivers inside an aluminum pan using various materials and real water. By describing each water body and sharing their observations about their differences and similarities, students will be able to identify the typical characteristics of each water body.
Learning Objectives
- Identify different bodies of water from pictures or maps
- Describe how water bodies differ from each other
- Develop a model representing a specific water body
NGSS Alignment
This lesson helps students prepare for these Next Generation Science Standards Performance Expectations:- 2-ESS2-2. Develop a model to represent the shapes and kinds of land and bodies of water in an area.
- 2-ESS2-3. Obtain information to identify where water is found on Earth and that it can be solid or liquid.
|
Science & Engineering Practices
Developing and Using Models.
Develop a model to represent patterns in the natural world
Obtaining, Evaluating, and Communicating Information. Communicate information or design ideas with others in oral form using models that provide detail about scientific ideas. |
Disciplinary Core Ideas
ESS2.C: The Roles of Water in the Earth's Surface Processes.
Water is found in the ocean, rivers, lakes, and ponds. Water exists as solid ice and in liquid form.
|
Crosscutting Concepts
Patterns.
Patterns in the natural world can be observed.
|
Materials
/-/https/www.sciencebuddies.org/cdn/Files/15257/5/water-bodies-materials-lesson-plan.jpg)
- Aluminum pan or another shallow dish
- Sand
- Pebbles
Note: If you do not have any sand or pebbles, you can substitute these with other materials such as rice, grains, Lego®, or blocks. If you use other materials, make sure they are not able to dissolve in water or float. - Water
- Water jug
- Cup or bottle with a narrow opening
- Aluminum foil
- Paper towels
- Printed example water body images
Background Information for Teachers
This section contains a quick review for teachers of the science and concepts covered in this lesson.There is lots of water on our planet! About 71% of the Earth's surface is covered by water. Any significant accumulation of water on a planet's surface is called a body of water or water body. Water bodies range from huge oceans to tiny ponds, and from large rivers to small streams. The table below lists different types of water bodies and includes their definitions based on Wikipedia. You will find a more comprehensive list in the referenced article in the Additional Background section.
| Type of water body | Definition [cited from Wikipedia] |
|---|---|
| Ocean | "A major body of salty water." |
| Lake | "A body of water, usually freshwater, of relatively large size contained inside a body of land." |
| Pond | "A body of water smaller than a lake, often of artificial origin. (Note: a pond is similar to a lake but smaller.)" |
| River | "A natural waterway usually formed by water derived from either precipitation or glacial meltwater, which flows from higher ground to lower ground." |
| Stream | "A body of water with a detectable current, confined within a bed and banks. (Note: a stream is similar to a river but smaller.)" |
| Puddle | "A small accumulation of water on a surface, usually the ground." |
All these water bodies are distinct from one another in various ways. They can hold freshwater or saltwater, vary in size or shape, and have different water movements. The table below provides a non-exhaustive list of some typical characteristics of different water bodies.
| Type of water body | Characteristics |
|---|---|
| Ocean |
|
| Lake |
|
| River |
|
In this lesson plan, students investigate different types of water bodies on Earth by making models of lakes, oceans, and rivers inside an aluminum pan using various materials and real water. By describing each water body and sharing their observations about their differences and similarities, students will be able to identify the typical characteristics of each water body.
Additional Background Links
- Different Types of Water Bodies, from Sciencing
- Body of Water, from Wikipedia
- How Much Water is There on Earth, from United States Geological Survey (USGS)
Prep Work (20 minutes)
- Print out the example water body images.
- Prepare a workstation for each group of 4 students that includes all the materials they need.
- Fill the water jug and one cup of water for each group.
Teacher Tool Box
Engage (10 minutes)
- First, ask students to find a partner. Then have them tell their partner about a time when they have been somewhere in nature where there was lots of water. Have students describe to each other what that place looked like.
- Ask a few students to give an example to the whole class about a place with lots of water. Then discuss with the whole group where you can find water on Earth.
 Where can we find water in the natural world?
 Collect students' responses. Make a list of all the places students name. Elucidate responses that mention that there is water in the oceans, in rivers, lakes, or ponds, etc.
 - Explain to students that a place with a lot of water on the Earth's surface is called a water body or body of water. Point to the list and mention that there are many different types of water bodies on Earth.
- Encourage students to ask questions about these bodies of water.
What questions do you have about these water bodies?What do you want to know about water bodies?What do you wonder about when you think of the different water bodies on our planet?Write down all the questions students come up with to be able to address them later.
- Tell students that they will investigate different types of water bodies by making a model of some of them.
/-/https/www.sciencebuddies.org/cdn/Files/14174/23/note-question-mark-30.png)
/-/https/www.sciencebuddies.org/cdn/Files/14175/24/conversation-bubbles-30.png)
Explore (30 minutes)
/-/https/www.sciencebuddies.org/cdn/Files/11870/13/icon-experiment-45.png)
- Show students the example water body pictures. Explain that each of the pictures shows a different type of water body. Ask students to name them or name them yourself while showing the corresponding picture and have them fill out the first section of their student worksheet.
- Tell students that they have the choice to model either a lake, an ocean, or a river. Have each group choose the water body they want to model or assign a water body to each group.
- Note: Have all groups with the same water body next to each other as it will be easier to assess the models of one type of water body later.
- Explain to students that they will build their model inside the aluminum pan. Provide each group with the materials they will need and point out how some of the materials can be used; for example, show how aluminum foil can be folded to make a riverbed. Note: Alternatively, you can have one central table with all the materials where students can go to and get what they need for their model.
- Ask each group to first discuss how they want to build their water body before they start building. Encourage them to think about the following questions:
What is special about this water body?What are the shores of this water body like?How much water is in this water body? Is it big or small?
- Once students have an idea of how to build their model, have them start building their water bodies inside the aluminum pan. Advise them to first finish building the landscape with dry materials before adding the water to the pan, and to use the aluminum foil to contain the water if possible (this applies mainly to the groups that build a lake or river). Note: It is recommended to just give one cup of water to each group in order to limit water spills. Tell students that they can ask for more if they need more.
- Give each group 15 minutes to finish their model. Make sure students divide tasks such as pouring water, handling the different materials, or cleaning up, within their group.
Reflect (30 minutes)
- Gather all groups around the river models. Have students describe what they see in each model.
Ask one group to explain how they made their model.
Then discuss:
How do you know that these are all models of a river?What are the unique properties/characteristics of a river?Listen to students' responses. Make a list of all the river attributes on the board or a poster sheet. If students have difficulties naming river characteristics, use the table of attributes in the background section to prompt them. Discuss the water movement of a river with the students.How does the water move in a river?Do you have an idea of how we can mimic this water movement in the model?Have students share their ideas. Use their replies to point out that the water in a river is constantly moving and flowing from its source (where the river starts) to its mouth (where the river ends).
- Demonstrate this water movement using one of the river models (with permission of the student group that made the model). Poke holes into the aluminum pan where the river ends and set up a container to collect the water that flows out of the pan. Incline the aluminum pan to make the water flow down the river. Then have one student pour some water into the start of the river using a bottle with a narrow opening, so the water flows through the riverbed into the collection container as shown in Figure 1. Have students describe what they observe and point out where the source and the mouth of the model river is.
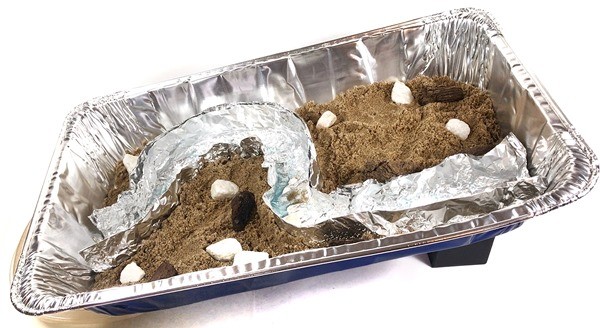
Figure 1. Setup of how to demonstrate water flow in a river model.
- Gather all groups around the ocean models. Have one group explain their model. Then ask the same questions as before and make a list of characteristic attributes of an ocean.
- Again, ask how the water in the ocean moves and demonstrate this water movement using one of the ocean models. Create some ocean waves by gently pushing and pulling the aluminum pan.
- Finally, gather all groups around the lake models. Have them describe the lakes they see and ask one group to present their model. Then discuss the properties of a lake with the students. Again, make a list of all the mentioned characteristic attributes of a lake.
- Have students think about the water movement in lakes. Guide them to conclude that lakes usually have very little water movement.
- Finally, let students describe the similarities and differences of each of the water bodies and
point out any natural patterns that they observe.
Then have them fill out the second part of their student worksheet.
Looking at the lists we just made, can you tell how each of the water bodies is different or similar?Have students name the major differences and similarities. Use the list in the background section to help students if they have difficulties.What patterns do you notice when comparing all the different water bodies?One pattern students could mention is the shape of the different water bodies. It is most likely that all rivers are long, narrow, and curvy, which means they have a meandering channel pattern. The lakes, on the other hand, should have a rounder shape. Point out that these are patterns that can also be observed in the real world. You can show the patterns of real rivers and lakes on a map. Then explain that certain river channel patterns or the shapes of lakes can be explained by their formation history. Another pattern students could notice is the water movement in each water body. While rivers are classified as flowing water, the water in a lake does not move much. This is because the water level in a lake is the same in all parts, whereas a river mostly flows downhill. Encourage students to find an explanation for these patterns themselves.
- Come back to the list of questions that students made in the beginning about the different types of water bodies. Have students answer these questions by using the knowledge they gained during the lesson. If they cannot answer a question, help them find an answer or explanation, or provide it to them.
- Conclude the lesson by asking students to name some local water bodies that they can find in their neighborhood.
Where are the lakes, rivers, or oceans that are closest to us?Can you name them?
/-/https/www.sciencebuddies.org/cdn/Files/15256/5/setup-river-model.jpg)
Make Career Connections
Discussing or reading about these careers can help students make important connections between the in-class lesson and STEM job opportunities in the real world.
/-/https/careerdiscovery.sciencebuddies.org/cdn/Files/1378/17/iStock-1170131622.jpg)

/-/https/careerdiscovery.sciencebuddies.org/cdn/Files/1775/17/iStock-1156278309.jpg)
Lesson Plan Variations
- Together with students, research where different water bodies are found in the world. Have them find lakes, rivers, oceans, etc. on a map and let them write down the names of the water bodies they find.
- Explore some specific water bodies in more detail. For example, have students research to find out which is the biggest lake, the largest ocean, or the longest river on Earth.
- Discuss with students how we use different water bodies. What do they do when they go to the ocean, river, or lake? Are there things that you can do in one water body but not the other?
- Point out that some water bodies are not natural but artificial, which means they are made by humans. Discuss what kind of water bodies are human-made and have students investigate why humans made these.
/-/https/img.youtube.com/vi/rbhzoCb0xWM/0.jpg)
/-/https/img.youtube.com/vi/NV6YHZ2RAqc/0.jpg)
/-/https/img.youtube.com/vi/YdVwjqPa7M8/0.jpg)