/-/https/www.sciencebuddies.org/cdn/Files/21464/5/sb-logo.png)
/-/https/www.sciencebuddies.org/cdn/Files/21464/5/sb-logo.png)
Designs in Nature: Investigate the Branching Structure of Trees
Summary
/-/https/www.sciencebuddies.org/cdn/Files/15843/7/tree-branching-structure-overview.jpg)
/-/https/www.sciencebuddies.org/cdn/Files/15855/5/tree-branching-structure-thumbnail.jpg)
Overview
Nature is full of objects with many different shapes. Some of these shapes display obvious regularities or distinct patterns, such as stripes, waves, symmetry, or spirals. Each of these natural patterns has evolved over a very long time and serves a specific function that usually helps a plant, animal, or other organism to survive. In this lesson plan, students explore the branching pattern of trees, plants, and leaves. They will make drawings and a leaf rubbing to compare different branching patterns and do an experiment to investigate why this structure could be useful for a tree or other organisms.
Learning Objectives
- Identify common shapes and patterns that occur in nature.
- Make drawings of branching patterns based on a natural object.
- Explain the function of branching patterns in trees and other living organisms.
NGSS Alignment
This lesson helps students prepare for these Next Generation Science Standards Performance Expectations:- K-2-ETS1-2. Develop a simple sketch, drawing, or physical model to illustrate how the shape of an object helps it function as needed to solve a given problem.
|
Science & Engineering Practices
Developing and Using Models.
Develop a simple model based on evidence to represent a proposed object or tool.
Analyzing and Interpreting Data. Use and share pictures, drawings, and/or writings of observations. Use observations (firsthand or from media) to describe patterns and/or relationships in the natural and designed world(s) in order to answer scientific questions and solve problems. |
Disciplinary Core Ideas
LS2.A: Interdependent Relationships in Ecosystems.
Plants depend on water and light to grow.
|
Crosscutting Concepts
Structure and Function.
The shape and stability of structures of natural and designed objects are related to their function(s).
Patterns. Patterns in the natural and human designed world can be observed, used to describe phenomena, and used as evidence. |
Materials
/-/https/www.sciencebuddies.org/cdn/Files/15844/5/tree-branching-structure-materials.jpg)
Materials for educator:
- Example tree pictures
- Example pictures of branching structures in nature
- Example pictures of shapes and patterns in nature
- One tree leaf with prominent veins for each student
- Colored pencils or crayons for students to share
Materials for each group of 2 students:
- Two branched stems of curled parsley
- Flashlight (can also be shared between groups)
- Tape
- Two sheets of white printer paper or graph paper
Background Information for Teachers
This section contains a quick review for teachers of the science and concepts covered in this lesson.Nature creates fascinating shapes and patterns. Spirals, stripes, dots, symmetry, waves; these are all forms and regularities that we can observe in nature (Figure 1). Animals and plants have evolved to have these forms and patterns as they serve a special function that usually increases their chances of survival. Stripe or dot patterns, for example, can help camouflage animals or plants so they are not easily spotted by predators.
/-/https/www.sciencebuddies.org/cdn/Files/15845/5/patterns-in-nature.jpg)
Figure 1. Shapes and patterns that can be found in nature include symmetry, spirals, fractals, dots, stripes, meandering, waves, and many more.
One very interesting pattern is the branching pattern that can be found in several living organisms in nature. The branching structure of trees, for example, include its trunk, branches, twigs, and leaves. The fascinating part about this branching pattern is that it repeats itself at different scales. The trunk of a tree splits into branches, each of these branches then splits into new branches, and each of these new branches splits again into newer branches, etc. At each split, you could cut off a branch, hold it up, and see a smaller version of the original tree. Similar branching patterns can be observed in a tree's leaves and roots, as shown in Figure 2.
/-/https/www.sciencebuddies.org/cdn/Files/15846/5/tree-leaf-root-structure.jpg)
Figure 2. Trees show characteristic branching patterns in their branches, leaves, and roots.
Why have all of these different patterns evolved in nature? The branching structure in trees is crucial for their survival. To be able to grow, trees need resources such as water, carbon dioxide (CO2)— the gas we breathe out—and sunlight. The leaves of a tree are doing photosynthesis, which is a process that converts light, CO2, and water into energy used to fuel all its growth. In the search for sunlight and water, a tree stretches out over a larger surface, both above ground and underground. This is why it creates branches that grow outward from its trunk, to allow the tree to access more resources, which increases its chances of survival. Branching is a common strategy in nature to capture more resources. It can also be found in the leaves of a tree. The veins that run through the leaf and create its branching pattern provide structural support for the leaf and transport water, minerals, and energy through the leaf and the rest of the plant. This means a branching structure is not only advantageous for accessing resources, but also for distributing resources to many different places. The roots of a tree, on the other hand, have to absorb water and nutrients from the soil, which the tree needs to grow. Again, branching of the roots allows the tree to spread out in different directions and access more water and nutrients from its surroundings.
Branching as a way to obtain more resources from the environment is not limited to trees. You can observe this phenomenon in other plants, fungi, animals, and even within in our body (Figure 3).
/-/https/www.sciencebuddies.org/cdn/Files/15847/5/human-body-branching-structure.jpg)
Figure 3. Branching also occurs in the vascular system and nervous system within a human body.
Many designs that can be found in nature can also be useful in the human world. Biomimetics is a specific discipline in which engineers, researchers, and other scientists develop designs and technologies inspired by nature to solve complex human problems. The branching structures of trees or leaves, for example, has been copied from nature to build infrastructure networks, such as highways, pipelines, or support arches in architecture.
In this lesson plan, students will explore the branching structures in a tree, a plant, and within a leaf. They will make a drawing and leaf rubbing of the different branching patterns and investigate how branching helps the tree to solve its problem of accessing enough resources to survive.
Additional Background Links
- Branching Patterns, Plant Evolution & Paleobotany
- Patterns in Nature (part two), Rhyne designs Landscape
- Branching Fractals, Fractal Foundation
- What is Biomimicry?, Fast Company on YouTube
Prep Work (10 minutes)
- Print out the Example Tree Pictures.
- Print out the example pictures of branching structures in nature.
- Print out the example pictures of shapes and patterns in nature.
Teacher Tool Box
Engage (20 minutes)
-
Tell students that today they will learn about designs and patterns in nature. Patterns in nature are "visible regularities of form" found in the natural world.
Point out some patterns in the classroom, such as dotted or striped clothes that a student is wearing. Show students the slide with examples of different shapes and patterns in nature. Briefly have students describe the patterns they can see on the pictures.
 What shapes or patterns do you notice on the different pictures?Can you describe one of the patterns in more detail?Do you know other patterns or shapes that you can observe in nature?
 Listen to students' replies. Point out how many of the patterns shown in the pictures are occurring at many different places in nature. For example, dots or stripes can be found in many different animals or plants.
 - Give each student one of the leaves and ask them to make a leaf rubbing on the first page of their student worksheet. Do a quick demonstration of how to make a leaf rubbing. To do the leaf rubbing, place the leaf, bottom side (the side with the protruding veins) facing up, underneath the sheet of paper. The leaf should be positioned upright, with the tip(s) of the leaf facing up. Then rub the side of a pencil or crayon gently on the area over the leaf (Figure 4).
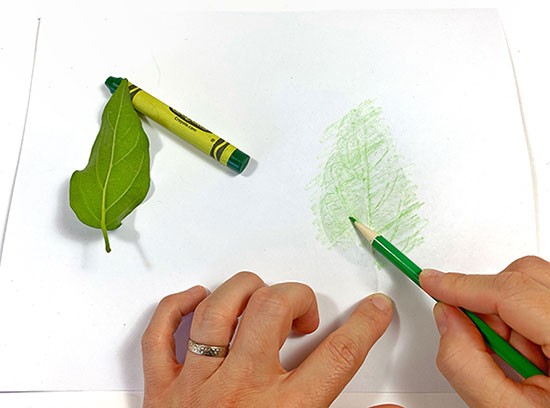
Figure 4. A leaf rubbing reveals the branching structure of the leaf veins.
- Let students examine their own leaf rubbing and the leaf rubbing of other students and discuss with your class:
What do you notice when looking at the leaf rubbing?How does the structure of the leaf look?How are the individual leaf rubbings similar or different?Can you find a pattern within the leaf rubbing?Collect students' observations. In the leaf rubbing, the veins of the leaf should be pretty prominent. Elicit responses that mention how all the leaves show a similar pattern in their veins. Explain that the pattern that they see is called a branching pattern.
- Continue the discussion.
Why do you think all the leaves show the same pattern?Have students state their hypotheses and write them down on the board or paper. You will come back to them at the end of the lesson. Do not give them an answer to the question yet, but let them know that they will do an investigation to find out more about the occurrence and function of branching patterns in nature.
/-/https/www.sciencebuddies.org/cdn/Files/14174/23/note-question-mark-30.png)
/-/https/www.sciencebuddies.org/cdn/Files/14175/24/conversation-bubbles-30.png)
/-/https/www.sciencebuddies.org/cdn/Files/15848/6/leaf-rubbing.jpg)
Explore (60 minutes)
- Show students the example tree pictures that clearly illustrate the structure of a tree (without leaves), including its trunk, branches, and twigs. Ask children to describe the trees on the picture.
Can you describe what these trees look like?If you look at the tree structure more closely, can you see a pattern within the tree that repeats itself from the trunk all the way to its tip?What does the tree pattern remind you of?Prompt students to describe and name the different tree parts (trunk, branches, twigs, etc.). Use students' replies to point out that the repeating pattern within a tree is also a branching structure similar to the pattern they saw in the leaf. The tree branches off into many different branches. The branches then branch off into different branches and then into many small twigs. This branching pattern continues all the way to the tree's tips. If you look at the tree very closely, at each tree branch, from the trunk to the tips, is like a copy of the one that came before it.
- Divide students into pairs. Have each student draw a tree similar to the one they see on the picture on their student worksheet. Make sure their drawing includes the trunk, branches, and twigs. They can add some leaves, as long as the branching structure is still visible. Ask them to label each tree part that they have identified on the picture and highlight the branching pattern within the tree. Students could, for example, use different colors to highlight the trunk, branches, and twigs.
- Give each student pair two stems of parsley. Choose parsley stems that also show a branching pattern. Ask them to investigate the parsley plant first and then discuss within their groups.
Do you recognize what kind of plant this is?What do you notice about the plant?Which plant parts do you recognize?Some students might be able to recognize the plant as parsley. If not, tell them that the plant is called parsley and mention that this is an herb plant. Point out that the parsley has a stem, branches, and leaves.
- Have each student make a drawing of the plant on their Student Worksheet. Ask each group to compare the plant and the tree pictures.
How are the tree and the plant similar or different?Do you see similar patterns in both plants?Students will probably state that the plant (parsley) is much smaller in size than a tree. They might mention other differences, such as that parsley is edible or that a tree has different colors, whereas the parsley is all green. At the same time, students should notice that the parsley plant also has a branching structure similar to a tree. Have students highlight the branching pattern in both of their drawings if they have not done so yet.
- Have students compare their leaf rubbing with the two drawings.
What is similar between all three of your pictures?Students should notice that the leaf, the tree, and the parsley plant all show a branching pattern.
- Have students speculate on the function of the branching structure.
Why do you think this branching pattern occurs in nature again and again?What advantage could a tree or the plant have from growing branches?Have students share their thoughts. Prompt them to think about if the branching could help the tree to better survive. Ask students what a tree needs to survive and remind them that plants need water, sun, air, and soil to survive.
- Tell students that they will model two different trees to find out how branching could help a tree to better survive. Make sure each student pair still has their two branched parsley plants, and provide them with a flashlight, and the two white sheets of paper.
- Instruct each student pair to take one of the parsley plants and remove all its branches so that only the main stem remains. Students should also trim the stem of the parsley plants so they are the same height (Figure 5).
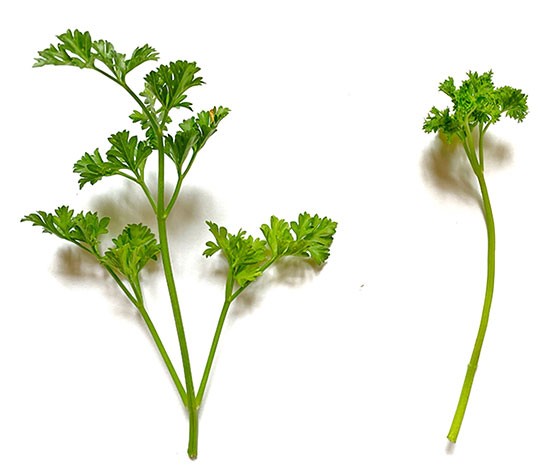
Figure 5. A branched and unbranched parsley plant.
-
The two parsley plants represent a tree with branches and a tree without branches. The flashlight represents the sun.
Explain to students that they will compare what happens when the sun shines on a tree with and without branches. Have students tape one plant on each sheet of white paper using the clear tape. They should tape the plants so that they stand upright in the center of each piece of paper, like a tree would grow (Figure 6). Note: Students can also use graph paper instead of white printer paper. Graph paper allows students to quantify the size of the parsley's shadow by counting the number of squares that have shade.
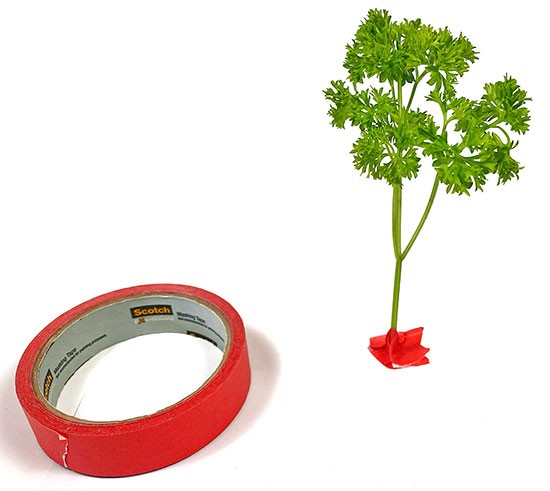
Figure 6. The parsley is taped to the sheet of paper so it stands upright like a tree.
- Once both plants are standing, students should take the flashlight and hold it about 4 inches above the first plant and shine it straight onto the plant from above, like the sun would shine on a tree at noon. Tell students not to hold the flashlight at an angle, but aim it straight down at the top of the plant from above, so the branches of the parsley plant cast a shadow on the paper, as shown in Figure 7.

Figure 7. The flashlight needs to be held so it shines straight onto the parsley from above.
- While students are shining the light onto the plant, ask them to pay attention to how much light is captured by the plant. They can measure that by looking at the size of the plant's shadow on the paper. The size of the shadow tells students how much light gets blocked (or captured) by the tree.
- Let students roughly outline the plant's shadow with a pencil or marker while shining the light onto the plant. This way they can still see its size when the light is switched off (Figure 8). If students use graph paper, have them count and write down the number of squares that are within the marked area. This allows them to quantify the size of the plant's shadow.
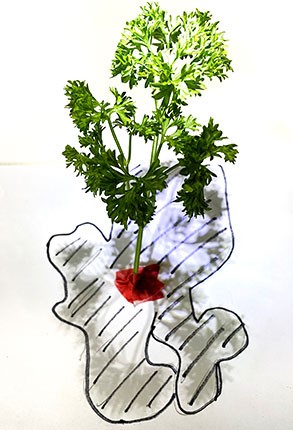
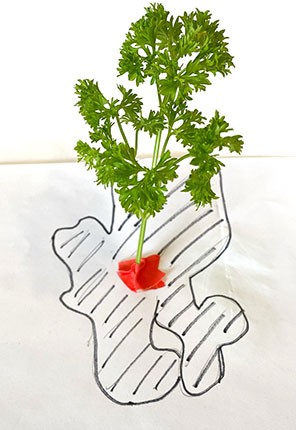
Figure 8. The shadowy areas on the sheet of paper underneath the parsley "tree" are traced with a pencil or marker.
- Have students repeat the same experiment with the second plant. Remind them to shine the flashlight onto the plant at the same angle (straight down onto the plant) and same height (about 4 inches above the tip of the plant) to get comparable results. If students use graph paper ask them again to count and write down the number of squares within the marked area.
- After students have finished their experiment, ask them to compare their results and discuss within their group.
Which of the model trees (parsley plants) made the larger shadow?Why were the shadows a different size?What does it mean for the plant if it makes a larger shadow? What happens to the (sun)light that hits the leaves of the tree?Is it good or bad for the plant to have more sunlight hitting the leaves? Why?
/-/https/www.sciencebuddies.org/cdn/Files/15849/5/branched-unbranched-parsley.jpg)
/-/https/www.sciencebuddies.org/cdn/Files/15850/5/taped-parsley-plant.jpg)
/-/https/www.sciencebuddies.org/cdn/Files/15851/7/shining-light-on-parsley.jpg)
/-/https/www.sciencebuddies.org/cdn/Files/15852/5/shadow-tracing-light-on.jpg)
/-/https/www.sciencebuddies.org/cdn/Files/15853/7/shadow-tracing-light-off.jpg)
Reflect (20 minutes)
- Gather all students. Select two or three groups and ask them to share their results with the rest of the class. Have them address all the questions they discussed within their groups. Students should mention that the branched tree made a larger shadow. Help students realize that this means that the branched tree is able to collect more light from the sun (flashlight). If students used graph paper for their experiments you can also encourage them to make a graph that represents their results. The graph should show the branched and unbranched plant on the x-axis and the number of squares that reflect the size of the plant's shadow on the y-axis. The data should clearly demonstrate that the branched tree is able to collect more light. Then draw conclusions from their experiment with the whole class.
What did the experiment teach you about how the branching structure of a tree can help it to survive better?Use students' responses to point out that in order to survive trees want to collect as many resources (such as sunlight) as possible from their surroundings. This means a tree needs to stretch out over a larger surface. Because trees cannot move, they create branches that grow outward from their trunks, which allows the trees to capture more sunlight through the leaves on the branches. As a visual analogy you could tell students that if they wanted to have as many raindrops fall on them as possible in the rain, they would probably spread out their arms so that the rain could also fall on their arms. This is similar to what the tree does with its branches to collect more sunlight. Together, conclude that branching is the tree's strategy to capture more light to live and better survive.
-
Expand the discussion beyond trees and plants and review other branching structures that occur in nature.
Now that we have seen that a branching structure can be very useful for a tree and parsley plant, can you think of other places where branching structures can be found in nature?Do you know any animals or other structures within living organisms that have a branching structure?Collect students' responses. They might say that many other plants (bushes, flowers, etc.) have branches as well, or realize that trees do not only have a branching structure above ground but also underground in their root systems. Some might have seen corals or fungi that have a branching structure, etc.
- Show students the pictures in the example pictures of branching structures in nature document. For each one, have students describe what they see and let them explain their reasoning for why a branching structure would benefit that organism.
How do you think the branching structure helps this organism?Discuss how a branching structure is not only advantageous for collecting resources from the surroundings, but also for distributing resources to many different places at the same time. For example, this is true for the blood vessels and veins in our body, as well as the leaf. They have to reach all of our organs to supply each one of them with blood and oxygen, although they are all in different places. The best way to reach all of them is by creating a branching pattern of blood vessels, which can be seen in one of the pictures on the slide. The same is true for a leaf. The veins that run through the leaf create a branching pattern to provide structural support for the leaf and to transport water, minerals, and energy through the leaf and the rest of the plant.
- To wrap up the lesson, revisit what students said in the beginning about why all the leaves show a similar branching pattern. Point out where students were right and have students reiterate what they learned during the lesson to be able to answer this question now.
Make Career Connections
Discussing or reading about these careers can help students make important connections between the in-class lesson and STEM job opportunities in the real world.
/-/https/careerdiscovery.sciencebuddies.org/cdn/Files/1662/17/unsplash-oz1NzV2xWXU.jpg)

/-/https/careerdiscovery.sciencebuddies.org/cdn/Files/1147/17/unsplash-fJebhGIP0P4.jpg)
Lesson Plan Variations
- If you have extra time and the location allows, take students outside to observe other shapes and patterns in nature. Do they find organisms or objects with clear symmetry, that are dotted, striped, wavy, or spiraled?
- Show students a video about biomimicry and challenge them to think about where they can find branching structures in the human-made world? Where did humans copy the branching structure from nature, and can they think of reasons why? Examples could be the branching structure of highways or the branching structure of support arches in architecture. What other shapes and patterns from nature inspire humans to copy them and why?
/-/https/img.youtube.com/vi/nCLHMmkFth8/0.jpg)
/-/https/img.youtube.com/vi/u0P40Pd9EMU/0.jpg)
/-/https/img.youtube.com/vi/Q7FXhuBYmxM/0.jpg)