/-/https/www.sciencebuddies.org/cdn/Files/21464/5/sb-logo.png)
/-/https/www.sciencebuddies.org/cdn/Files/21464/5/sb-logo.png)
Summary
/-/https/i.ytimg.com/vi/9Fv0-501msc/maxresdefault.jpg)
/-/https/www.sciencebuddies.org/cdn/Files/20511/4/google-classroom.png)
/-/https/www.sciencebuddies.org/cdn/Files/20512/4/ms-teams.png)
/-/https/www.sciencebuddies.org/cdn/Files/20469/4/Canvas_Bug_Color_RGB.png)
/-/https/www.sciencebuddies.org/cdn/Files/20470/5/Schoology-Logo.png)
/-/https/www.sciencebuddies.org/cdn/Files/20471/4/lms.png)
/-/https/www.sciencebuddies.org/cdn/Files/20469/4/Canvas_Bug_Color_RGB.png)
/-/https/www.sciencebuddies.org/cdn/Files/20470/5/Schoology-Logo.png)
/-/https/www.sciencebuddies.org/cdn/Files/20471/4/lms.png)
Overview
Aircraft carriers are much shorter than a typical airport runway. How do airplanes manage to gain enough speed for takeoff over such a short distance? A catapult gives them an extra boost! In this lesson, your students will practice engineering design as they build their own paper airplane launchers, while learning about kinetic and potential energy.
Learning Objectives
- Use the engineering design process to design, build, and test a paper airplane launcher
- Understand how potential energy is converted to kinetic energy when using the launcher
NGSS Alignment
This lesson helps students prepare for these Next Generation Science Standards Performance Expectations:- MS-PS3-2. Develop a model to describe that when the arrangement of objects interacting at a distance changes, different amounts of potential energy are stored in the system.
- MS-ETS1-4. Develop a model to generate data for iterative testing and modification of a proposed object, tool, or process such that an optimal design can be achieved.
|
Science & Engineering Practices
Constructing Explanations and Designing Solutions.
Apply scientific ideas or principles to design, construct, and test a design of an object, tool, process or system.
|
Disciplinary Core Ideas
PS3.A: Definitions of Energy.
A system of objects may also contain stored (potential) energy, depending on their relative positions.
PS3.B: Conservation of Energy and Energy Transfer. When the motion energy of an object changes, there is inevitably some other change in energy at the same time. ETS1.B: Developing Possible Solutions. A solution needs to be tested, and then modified on the basis of the test results, in order to improve it. |
Crosscutting Concepts
Energy and Matter.
Energy may take different forms (e.g. energy in fields, thermal energy, energy of motion).
The transfer of energy can be tracked as energy flows through a designed or natural system. |
Materials
/-/https/www.sciencebuddies.org/cdn/Files/14228/6/paper-airplane-launchers.jpg)
Paper airplane launchers made from different materials. Left: cardboard. Center: LEGO® bricks. Right: Wooden board and screws.
- Paper
- Paper clips
- Tape
- Rubber bands
- Tape measures
- Stapler
- Construction materials to make paper airplane launchers. You can use different materials depending on what you have available, for example:
- Corrugated cardboard and duct tape
- Wooden craft sticks and a hot glue gun
- Building toys like LEGO® or K'NEX®
- Wooden boards and nails or screws
- Open space to throw the airplanes. A hallway or large room like a gymnasium or cafeteria work well. This project works best indoors unless there is almost no wind outside.
Background Information for Teachers
This section contains a quick review for teachers of the science and concepts covered in this lesson.Aircraft that take off from airport runways accelerate under their own power. The planes must get going fast enough to generate enough lift to get off the ground. So especially for large, heavy planes, airport runways are typically very long (over a mile) to make sure the planes have enough room to get up to speed.
This poses a problem for aircraft carriers. The largest aircraft carrier is just over 1,000 feet long, or just under a quarter of a mile. That's really big for a ship—but not that long for a runway! In order to take off from such a short runway, planes need some help to get enough speed. They are assisted by a catapult, which provides extra energy from an outside source (like compressed air or electromagnets) to help the plane go faster.
/-/https/www.sciencebuddies.org/cdn/Files/14229/6/aircraft-carrier.jpg)
/-/https/www.sciencebuddies.org/cdn/Files/14230/6/airport-runway.jpg)
Figure 1. An aircraft carrier (left) and an airport runway (right). Palm Springs International Airport photo D Ramey Logan.jpg from Wikimedia Commons by D Ramey Logan, CC-BY 4.0.
This scenario provides a great real-world example that you can use to teach your students about both physics and engineering design. In this lesson, your students will build rubber-band powered paper airplane launchers. A stretched rubber band stores elastic potential energy* (the energy an object stores when it is stretched or compressed). When the rubber band is released, that stored potential energy is converted to kinetic energy (the energy an object has due to its motion) of the paper airplane (Figure 2). The large amount of potential energy stored in the stretched rubber band allows you to launch the paper airplane over a short distance compared to how far you would move the airplane when launching it by hand—just like the catapult on an aircraft carrier allows an airplane to take off on a short runway!
/-/https/www.sciencebuddies.org/cdn/Files/14231/6/paper-airplane-KE-PE.png)
Figure 2. Diagram showing how the potential energy of a stretched rubber band (PE) is converted to kinetic energy of the paper airplane (KE).
This project also helps students practice the engineering design process, because building a good paper airplane launcher requires some thought. It must be sturdy enough to withstand the forces from the stretched rubber band. They must also make sure the paper airplane does not get caught or collide with the launcher itself as it is launched.
*Elastic potential energy is the type stored in a stretched or compressed material, like a rubber band or spring. There are other types of potential energy, like gravitational potential energy (the energy stored due an object's height off the ground) or electrical potential energy (the energy stored due to separation of electrical charges). Depending on the context, it may be necessary to specify which type of potential energy you are talking about. In this lesson we are mainly talking about the elastic potential energy of the rubber band. However, the paper airplane also has gravitational potential energy when it is raised off the ground or flying through the air.
Additional Background Links
- How Aircraft Carriers Work, HowStuffWorks
- Work, Energy, and Power, The Physics Classroom
- The Engineering Design Process, Science Buddies
Prep Work (5 minutes)
- Print the student worksheets.
- Print the paper airplane instructions if you will need them as a guide for your less-experienced students.
- Make sure your students have an open area to safely launch paper airplanes (aimed away from other students). A hallway or large room like a cafeteria or gymnasium will work best. Set up one or more tape measures on the ground so students can easily measure flight distance.
Teacher Tool Box
Engage (10 minutes)
Show your students these pictures of an aircraft carrier and a regular airport runway. Explain that a regular airport runway is much longer than an aircraft carrier. The biggest aircraft carrier is just over 1,000 feet long, but airport runways can typically be more than 6,000 feet long (over a mile!). You can show your students the pictures in this slideshow or they can search online.
Figure 3. An aircraft carrier (left) and an airport runway (right).
/-/https/www.sciencebuddies.org/cdn/Files/14174/23/note-question-mark-30.png) | How do airplanes take off from aircraft carriers if they are so much shorter than regular runways? |
/-/https/www.sciencebuddies.org/cdn/Files/14175/24/conversation-bubbles-30.png) | Let students discuss this among themselves, but do not give away the answer yet. Explain that today we will do an experiment to find out how airplanes can take off over such a short distance. |
Explore (100 minutes)
Safety note: make sure your students do not throw paper airplanes at each other, especially when using the rubber band launchers!
- Working in pairs, each group of students should make a paper airplane. It is not critical that all students use the same type of airplane for this lesson, so students who have experience making paper airplanes can make their own designs. Less-experienced students can use the paper airplane instructions as a guide.
- Students should test to make sure that their paper airplane flies well (it goes relatively straight and does not nosedive or loop). If it does not reliably fly straight, they should make another one. Students who have never made a paper airplane before might need a few tries.
- Now, each pair of students should test how far they can throw their paper airplane when throwing with their entire arm. Each student should throw the plane 10 times and record results in their student worksheet.
- Next, students should test how far they can throw their plane when only using their wrist (the should not move their shoulder or elbow when throwing). Again, each student should throw 10 times and record results in their worksheet.
- Bring the class together for a discussion.
 What did you observe when you threw the plane with only your wrist compared to throwing with your entire arm? How could we make the planes fly farther if we can only launch them over a short distance, like on an aircraft carrier?
 Students probably observed that they could throw the planes farther when using their entire arm. It's difficult to throw the plane far when you can only move your wrist. Students might have a variety of ideas about how to build a paper airplane launcher. Make sure they understand that those ideas aren't "wrong," even if that's not what you will be doing in class today.
 - Demonstrate how you can make a simple paper airplane launcher using a rubber band and a pencil.
- Staple a paper clip to the nose of a paper airplane, as shown in Figure 4.
- Hook the paper clip through one end of the rubber band.
- Loop the other end of the rubber band around the tip of the pencil.
- Hold the pencil vertically with one end. Use your other hand to pull back the paper airplane, stretching the rubber band, and then release it. Make sure you do not aim towards your students. Watch this introductory video if you need help figuring out how to launch the plane.
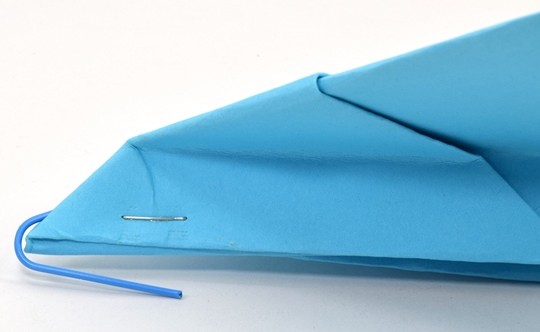
Figure 4. A paper clip attached to the nose of a paper airplane.
- Discuss what is happening with the launcher in terms of energy (how you do this will depend on whether you have already covered kinetic and potential energy in your class. An explanation of the rubber band airplane launcher in terms of potential and kinetic energy can be found in the background section).
What happens when we pull back the rubber band?The stretched rubber band stores potential energyWhat happens when we release the rubber band?The potential energy of the rubber band is converted to kinetic energy of the airplane.
- Now, explain that your students will build their own paper airplane launchers using the materials you have available. They will need to
account for what they know about the rubber band and kinetic and potential energy.
Students should use the engineering design process to build their launchers:
- First, students should sketch design ideas individually.
- Then, they should compare designs with their partner. They should discuss the potential pros and cons of each design, and decide on a single design to build and test. Their final design can be a combination of ideas from their individual designs.
- Each group should build a prototype of their launcher and do some initial tests to make sure it works. Does it have any major problems, like the paper airplane getting snagged or colliding with the launcher when it is launched, or the launcher not being sturdy enough to support the stretched rubber band?
- Now it is time to iterate. Engineers rarely get things perfect on the first try! Based on their observations, students should make changes or improvements to their launcher.
- After making improvements, students should test their launcher. Each student should use the launcher 10 times and record results in their worksheet.
- If there is time remaining, students can do another iteration where they make more improvements to their launchers and do another set of measurements.
- After completing all testing, students should calculate an average distance for each type of launch (by hand using entire arm, by hand using only wrist, and using rubber band launcher), and make graphs of their results in their worksheets.
/-/https/www.sciencebuddies.org/cdn/Files/14234/6/paper-airplane-nose-paperclip.jpg)
Reflect (10 minutes)
Discuss the results of your experiment as a class.
| How did the paper airplane flight distances compare between the three different launching methods? |
| Your students probably found that they could throw the airplanes pretty far when using their entire arm, but it is very difficult to throw a paper airplane far using only your wrist. Your wrist cannot move as much, so it is difficult to get the airplane going fast enough over such a short distance. Using the rubber band launcher allows you to make the plane go much farther using a very short launch distance. |
| How is the rubber band launcher similar to an aircraft carrier catapult? |
| The rubber band lets us store a lot of energy even when it is only stretched a relatively short distance. This energy is converted to the kinetic energy of the paper airplane, so the paper airplane can get going very vast over a very short distance. |
Assess
- Collect your students' worksheets and use them as an assessment of the activity.
- Ask each group to make a poster or do a short presentation to the rest of the class about their launcher.
Make Career Connections
Discussing or reading about these careers can help students make important connections between the in-class lesson and STEM job opportunities in the real world.
/-/https/careerdiscovery.sciencebuddies.org/cdn/Files/835/18/msfc-202000343.jpg)

/-/https/careerdiscovery.sciencebuddies.org/cdn/Files/1450/21/iStock-1227179796.jpg)
Lesson Plan Variations
- You can use paper airplanes to teach even more about the engineering design process, for example defining an engineering problem.
- Can students build a paper airplane launcher with a focus on accuracy instead of distance? Set a target distance (for example, 5 meters) and see which group can repeatedly land closest to the target. Alternatively, you could build a hoop that the planes have to fly through.
- How much variability is there between copies of the same plane? Have students build multiple copies of the same paper airplane model and test each one multiple times. Is the average flight distance the same for each plane?
/-/https/img.youtube.com/vi/ptmM5xRpeNY/0.jpg)
/-/https/img.youtube.com/vi/KQH2UhHss6c/0.jpg)
/-/https/img.youtube.com/vi/Sfu1UUmF2jA/0.jpg)
