/-/https/www.sciencebuddies.org/Files/21464/5/sb-logo.png)
/-/https/www.sciencebuddies.org/Files/21464/5/sb-logo.png)
Skydive Into Forces
Summary
/-/https/www.sciencebuddies.org/Files/12781/6/parachute-falling-thumbnail.jpg)
/-/https/www.sciencebuddies.org/Files/12782/6/several-parachutes-diy.jpg)
Overview
Forces, which we might instinctively describe as pushes and pulls, are acting on us at all times, but we cannot always see them. This hands-on lesson offers a fun opportunity to explore "invisible" forces like gravity and air resistance. Students will build parachutes and investigate how they allow skydivers to safely land.
Learning Objectives
- Use an arrow to represent a force.
- Make a schematic drawing of a falling object indicating gravity, air resistance, and speed.
- Predict how and explain why changing the air resistance of an object affects how fast it falls.
- Explain how parachutes can create safer landings.
NGSS Alignment
This lesson helps students prepare for these Next Generation Science Standards Performance Expectations:- 3-PS2-1. Plan and conduct an investigation to provide evidence of the effects of balanced and unbalanced forces on the motion of an object.
|
Science & Engineering Practices
Planning and Carrying out Investigations.
Make observations and/or measurements to produce data to serve as the basis for evidence for an explanation of a phenomenon or test a
design solution.
Analyzing and Interpreting Data. Compare and contrast data collected by different groups in order to discuss similarities and differences in their findings. |
Disciplinary Core Ideas
PS2.A: Forces and Motion.
Each force acts on one particular object and has both strength and a direction. An object at rest typically has multiple forces acting on it, but they add to give zero net force on the object. Forces that do not sum to zero can cause changes in the object's speed or direction of motion.
|
Crosscutting Concepts
Cause and Effect.
Cause and effect relationships are routinely identified, tested, and used to explain change.
|
Materials
/-/https/www.sciencebuddies.org/Files/12323/7/diy-parachute-materials.jpg)
For each group of 2 students, you will need:
- Tissue paper or a plastic bag
- Scissors
- Ruler
- Tape
- Hole punch
- Twine
- Small action figure or miniature doll that may be dropped on the floor. If you do not have an action figure, use any small, dense object such as a piece of clay, an eraser, a measuring spoon, etc.
Background Information for Teachers
This section contains a quick review for teachers of the science and concepts covered in this lesson.Scientists refer to a push or pull as a force. Forces can change the movement of an object (its speed and/or direction), but they do not always do so. Imagine a grocery cart standing still. You can push on the handlebar to make it move (Figure 1, top left). If it is already moving, and you push it, you can make it move faster (Figure 1, top right).
/-/https/www.sciencebuddies.org/Files/12780/5/cart-push-examples.png)
Figure 1. Pushing on a shopping cart can change its motion. Red lines indicate the cart's speed, and blue arrows indicate a push. A push can make a cart move (top left), and an additional push can make it speed up (top right). Pushes in opposite directions can cancel each other out (bottom).
It gets a little more complicated when more than one force acts on an object. Imagine pushing the grocery cart again, but this time, another person is pushing equally hard on the opposite side of the cart. The two opposing forces would cancel each other out, and the cart's movement would not change (Figure 1, bottom). Most often, objects have many forces acting on them. We often do not realize this because some forces are canceled out by others and thus do not affect the motion of the object. For example, the shopping cart has mass, so gravity pulls it down—but the cart does not fall, because the ground pushes back with equal strength in the opposite direction.
In this lesson, students will study how forces can affect the speed of a falling object by looking at a skydiver. Without an open parachute, the skydiver is in free fall. Gravity pulls him or her down, and almost nothing is pushing back up to slow down or prevent the fall. The situation changes when the parachute opens. Suddenly, a lot of air particles need to move out of the way to let the open parachute pass. The air pushes the parachute—and the skydiver hanging from it—up, as shown in Figure 2. This push, or force, is called air resistance or drag. It has a direction opposite to the movement. In this case, this force acts in the opposite direction to gravity. As a result, the force of gravity is partially cancelled out and the skydiver does not gain speed as quickly. The skydiver falls at a slower pace and is able to safely land.
/-/https/www.sciencebuddies.org/Files/12783/5/parachute-gravity-explained.jpg)
Figure 2. Forces acting on a skydiver coming down with a parachute.
As shown in Figure 2, scientists represent forces with directional arrows. The arrow points to where the force pulls or pushes. Gravity always pulls objects down, and air resistance always points against the motion of the object it acts upon.
Additional Background Links
- Forces of Nature, Physics4Kids
- Forces and motion, BBC bitesize
Prep Work (5 minutes)
- Watch this video and consider practicing making a parachute yourself.
Teacher Tool Box
- Parachute video (in English) (in Spanish)
- Student worksheet (PDF)
- Worksheet answer (PDF)
- Slideshow (PDF)
Engage (5 minutes)
Show the students Figure 3, which is also included in the slideshow.
/-/https/www.sciencebuddies.org/Files/12784/5/parachute-skydiving.jpg)
Figure 3. Skydivers jumping into the sky.
/-/https/www.sciencebuddies.org/Files/14174/23/note-question-mark-30.png) | What do you think when you see this picture? How can the skydivers land safely? Do you know other ways they might be able to land safely?
If students do not mention parachutes, give them hints until parachutes are among the options. |
/-/https/www.sciencebuddies.org/Files/14175/24/conversation-bubbles-30.png) | Write down students' ideas on how to safely land, but do not correct them at this point. You will come back to these answers later in the lesson. |
In this lesson, we will study how parachutes work by making and testing parachutes in class. Hopefully, this new information will also allow us to find out if the other ideas we mentioned could work to help skydivers land safely.
Explore (60 minutes)
- Before we test how to safely land, we need to understand why a skydiver falls when he or she steps out of the plane.
 Any ideas?
 Gravity pulls the skydiver down. Gravity is a force, and forces have the ability to change the speed of objects.
On your worksheet, draw the skydiver falling.
Ask a few students how you can tell that the skydiver is falling in their drawing.Students should have indicated that their skydiver moves and has speed. Falling is moving down, and gravity is the cause of this motion.If students had no prior exposure to how pushes and pulls (or forces) affect the way objects move, you might want to see the Variations section and dig a little deeper before continuing this lesson.
- Establish a convention for how to represent speed and a force like gravity on drawings.
This lesson uses lines to represent speed and arrows to represent forces. Figure 4 shows an example. More lines represent a higher speed. A longer arrow represents a bigger force. Note the arrow points in the direction of force.
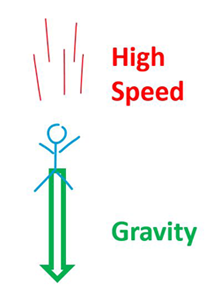
Figure 4. The green arrow represents the force (gravity) acting on a falling person, while the red lines represent the person's speed.Draw Figure 4 on the whiteboard as you explain to the class that in the drawings, you will use lines to indicate speed, with more lines representing a higher speed. You will use arrows to represent forces, with a longer arrow representing a bigger force, or a bigger push or pull.
Where should the arrow indicating gravity point to?It should point down. It always points in the direction of force.Explain that your students should use this same convention for this lesson.
Optional: If students need more practice representing forces and speed in a schematic drawing, show them Figure 3 (the first slide in the slideshow ) and discuss with the class what gravity and speed looks like for the two skydivers in the picture. Figure 5 shows the schematic drawing for the situation.
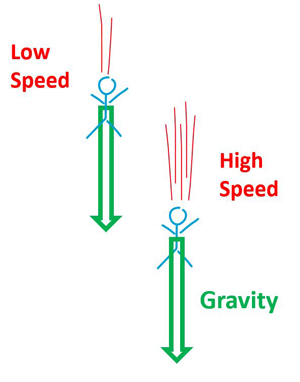
Figure 5. Schematic drawing of gravity acting on the skydivers and their speeds.The following points explain the drawing in more depth:
- The green arrow represents gravity. They are about the same in length for both skydivers because gravity pulls on them with roughly the same strength, assuming they both weigh about the same.
- The red lines represent the speed of the skydivers. They are different because the skydiver who just stepped out of the plane is still gaining speed, and is not quite as fast as the skydiver who stepped off the plane earlier.
- Time to look into parachutes and to find out why and how they can make a skydiver fall more slowly! We will work in groups of two.
Pair up students and display Figure 6, also included in the slideshow to the class.
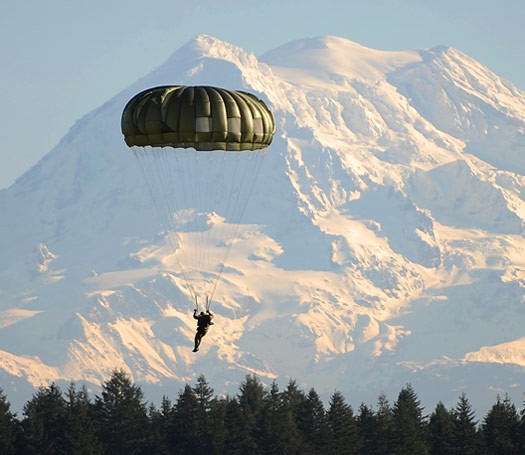
Figure 6. Picture of a parachute.
A possible answer to this question is provided in the student worksheet answer key.
Provide each group with materials to make parachutes (plastic or tissue paper, ruler, scissors, twine, and an action figure).
 Google Classroom
 Microsoft Teams
 Canvas
 Schoology
 Other
Other - Have a class discussion on how students can use their parachutes and action figure to explore how a parachute changes the fall of a skydiver.
Below are a few points to consider:
- You need to compare and contrast the fall of the figure with and without the parachute.
- You are mainly interested in seeing how hard or softly the figure lands. Qualitative measures can describe how the figure lands (e.g. a soft, medium, or hard landing). Discuss with students how you can observe if the landing was soft or hard. What can you hear? What do you see?
- The figure without a parachute should fall from the same height as the figure with the parachute.
- You need to figure out how to drop your figure equipped with the parachute the same way each time. One good way is to fold the canopy in four so the holes where the suspension lines are attached lay on top of each other. Always check that the suspension lines are not tangled. Pick the parachute up from the corner diagonally opposite to the strings. The figure should now hang under the parachute, ready to fall.
- Encourage students to let their figures fall from as high as they can safely reach. If possible, allow students to stand on a chair to increase the distance the figure falls.
- Perform several trials. Drop the figure from the same height each time.
Students' results will probably look similar to the data listed in the student worksheet answer key. Occasionally, a parachute might not open during a fall and the figure might land hard, even though it is equipped with a parachute.
Gather the class to discuss the test results. By a show of hands, ask which groups conclude that equipping the figure with a parachute allowed for a softer or safer landing, and which groups conclude that equipping the figure with a parachute made the landing harder or more dangerous. All groups will likely have concluded that the parachute makes for a safer landing.
Ask whether any groups encountered the case where the figure equipped with a parachute made a hard landing. If any groups did, ask them to describe the fall. Most probably, the parachute did not open during the fall. From this, one might suspect that the parachute needs to open to create a safer landing.
- As a class, we can conclude that the parachutes improve the safety of the landing if they opened up. Why would this be? What else did you observe during the fall? What was different when the figure was equipped with a parachute?Some expected answers are:
- The fall with a parachute takes more time.
- The parachute slows the fall down.
- The figure sometimes sways to the side during a fall with a parachute, while without a parachute, it falls straight down.
The speed at which the person reaches the ground is crucial to create a softer and safer landing. To demonstrate this, choose one figure with and one without a parachute, preferably two similar figures. Stand on a chair or hold the figures as high as possible. It is important to let the figures drop from a considerable height, so students clearly see that one figure falls faster (or takes less time). Let students check that both figures are at the same height before you drop them. Drop both simultaneously and let the students observe that the figure with the parachute takes more time to reach the ground. It falls slower and lands more softly.
If you are done early, design experiments with your parachutes to verify your idea. If you need to borrow a parachute from another group, you can ask.
What are some ideas for why a parachute slows down a fall, thus allowing a softer landing?Below are some possible answers students might have, and why these play a role in slowing down the fall with a parachute:- When the parachute is open, it catches a lot of air. This slows down the fall.
- A person is more aerodynamic than a person with an open parachute.
- Air can easily pass around a person, but not an open parachute. This slows the fall of the person with the parachute.
Explain to students that these answers describe the effect of air resistance, or drag. Air resistance is the push of air against a moving object. This slows the object down. This push is a force, just like gravity.
Have you ever noticed how difficult it is to walk through deep water? This is because you need to push a lot of water particles out of the way to move through it. When we move around in air, we have to move air particles out of the way. Normally, we cannot feel the air much when we move through it. However, a parachute is very big and has to move a lot of air particles out of the way, so there is a lot of air resistance. Although gravity still pulls the skydiver down, there is a lot more air resistance pushing up when they use a parachute, and this slows down their fall.
Let students experience how forces work in opposite directions.
Ask them to pull the action figure down with one hand (representing gravitational force), and pull the figure up with the other hand (representing the air resistance). What happens if the upward pull is small? What happens if it is large?
This is a good time to break the lesson into two lessons. -
We have a lot of different parachute designs in this class.
How can we use what we have made to test our conclusion that more air resistance creates a slower fall?Students might notice that the class has bigger and smaller parachutes. When open fully, bigger parachutes should create more air resistance than smaller ones, so the drop should be slowed down more by a big parachute.
It is not obvious how the shape of a parachute impacts the air resistance as long as the surface area is identical. Students might like to test and conclude that the drops are similar. Students can test what happens if you try to reduce air resistance by making holes in a parachute.
Ask this pair of teams to test the effect of parachute size on the speed with which the figure falls.
Team up groups that have roughly the same size parachute and a similar action figure. Ask them to study the effect of adding holes in the canopy on the speed with which it falls. Encourage students to add quite a few holes, so an effect—if it exists—is clearly visible.
Note that in order to compare speeds, it is easiest to drop the parachutes simultaneously and note which figure reaches the ground first.
Bring the class together and ask students to present their findings to the class. Allow students to add and/or correct ideas and explanations where needed.
- How can we add air resistance to our drawings?
Walk the students through drawing Figure 9 on the whiteboard, or let a student draw it. It is important that students grasp the following points:
- The green arrow represents gravitational force. Its length represents how strong gravity pulls on the skydiver. It points downward.
- Air resistance is a force (a push or pull), so it is represented by an arrow too. It pushes against the movement of the skydiver, so it is pointed upwards. Air resistance is much bigger (and the arrow representing it is longer) when the parachute is open than when there is no parachute.
- The red lines represent the speed of the skydivers. Less air resistance means higher speed. More air resistance indicates lower speeds.
Note: Students may put the air resistance arrows on the parachute or skydiver, or draw one arrow for air resistance.
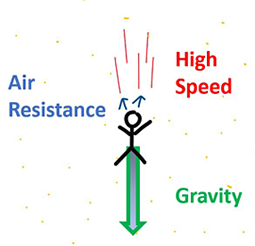
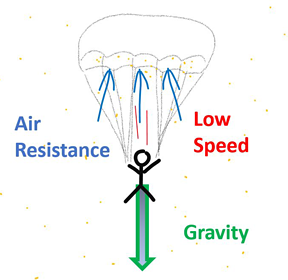
Figure 9. Comparison of gravity, air resistance, and speed with and without the parachute.Ask students to change the last drawing on their worksheet or make a new one to include the arrows representing air resistance.
/-/https/www.sciencebuddies.org/Files/12785/6/free-fall-gravity-speed.png)
/-/https/www.sciencebuddies.org/Files/12786/5/high-low-speed-same-gravity.png)
/-/https/www.sciencebuddies.org/Files/12787/5/parachute-paratrooper.jpg)
/-/https/www.sciencebuddies.org/Files/11870/13/icon-experiment-45.png)
/-/https/i.ytimg.com/vi/6RA9x4wlnW8/maxresdefault.jpg)
/-/https/www.sciencebuddies.org/Files/20511/4/google-classroom.png)
/-/https/www.sciencebuddies.org/Files/20512/4/ms-teams.png)
/-/https/www.sciencebuddies.org/Files/20469/4/Canvas_Bug_Color_RGB.png)
/-/https/www.sciencebuddies.org/Files/20470/5/Schoology-Logo.png)
/-/https/www.sciencebuddies.org/Files/20471/4/lms.png)
/-/https/www.sciencebuddies.org/Files/20469/4/Canvas_Bug_Color_RGB.png)
/-/https/www.sciencebuddies.org/Files/20470/5/Schoology-Logo.png)
/-/https/www.sciencebuddies.org/Files/20471/4/lms.png)
/-/https/www.sciencebuddies.org/Files/8346/30/clock-purple-32.png)
/-/https/www.sciencebuddies.org/Files/12788/7/free-fall-gravity-air-resistance-speed.png)
/-/https/www.sciencebuddies.org/Files/12789/5/parachute-fall-gravity-air-resistance-speed.png)
Reflect (10 minutes)
| What have we learned about parachutes? |
| Parachutes allow a safe landing because they slow down a fall. Gravity still pulls the skydiver down in the same way, but the open parachute adds air resistance, which is a large force directed upwards. Because this force points up (opposite to gravity), it slows down the skydiver's fall. |
A picture of how parachutes work is shown in Figure 10. This figure is also included in the slideshow.
Figure 10. Arrows help explain how a parachute works.
| What were some other ideas we had that would allow a skydiver to fall safely? Can we explain how those work too? |
| Answers will vary. Below are some ideas and how they work.
|
Assess
- Question 2 and 6 of the worksheet can illustrate how a student's understanding changes over the course of the lesson.
- Use the notes and explanations provided while comparing different sizes and types of parachute to evaluate a student's understanding.
- Do the following demonstration and ask students to use what they learned to explain what they observe. Encourage students to make drawings and to use the terms "gravity" and "air resistance" in their explanations.
Take two identical sheets of paper. Fold one twice, and the other eight times. Hold both horizontally and drop them simultaneously from the same height. Let the students observe and explain their observations. How is this similar and different from the parachute experiment? (This can be used as assessment question.) Students should come to following conclusions:
Observation: The larger the horizontal surface of the falling paper, the slower it falls.
Explanation: Both pieces of paper feel gravity pulling them down with the same strength. The paper with the larger horizontal surface catches more air and thus, feels more air resistance. It gets a bigger push upward, canceling more of the gravitational pull downward. As a result, if it falls slower, it does not gain as much speed.
Make Career Connections
Discussing or reading about these careers can help students make important connections between the in-class lesson and STEM job opportunities in the real world.
/-/https/careerdiscovery.sciencebuddies.org/Files/835/18/msfc-202000343.jpg)

/-/https/careerdiscovery.sciencebuddies.org/Files/933/17/iStock-1022905102.jpg)
Lesson Plan Variations
- To explain how a push or pull (a force) can make things move, allow students to push a pen on their desk and observe how the pen moves. Be mindful not to choose items that create a lot of friction. Let students experience how a push or pull can speed up or slow down the motion of objects. This kindergarten lesson might give you more ideas on how to introduce forces.
- Elaborate on the comparisons of different parachutes designs. Let students make a hypothesis, state their dependent, independent, and control variables, let them organize their data in a table, and describe the trend they see.
- In addition to comparing different designs, ask students to draw each situation, including indications of speed and forces.
- Instead of parachutes, use paper airplanes with different air resistance to study how forces can add up and influence the speed of an object. The activity Paper Airplanes: Why Flaps and Folds Matter or the project idea How Far Will It Fly? Build & Test Paper Planes with Different Drag are good starting points. A disadvantage of working with paper airplanes is that throwing paper airplanes in a consistent way is more difficult.
/-/https/img.youtube.com/vi/PszGCm1PqSo/0.jpg)
/-/https/img.youtube.com/vi/sjHCztFSxTw/0.jpg)
/-/https/img.youtube.com/vi/E2OZssB_W7M/0.jpg)