/-/https/www.sciencebuddies.org/Files/21464/5/sb-logo.png)
/-/https/www.sciencebuddies.org/Files/21464/5/sb-logo.png)
Study Photosynthesis with the Floating Leaf Disk Assay
Summary
/-/https/www.sciencebuddies.org/Files/15940/9/leaf-disk-assay.jpg)
Overview
Plants carry out photosynthesis to produce sugars that they need as an energy source to live and grow. During photosynthesis, oxygen—a gas that many living beings need to survive—is released. This makes photosynthesis one of the most important biological processes on Earth. In Part 1 of this lesson plan, students will utilize the floating leaf disk assay to demonstrate the production of oxygen gas during photosynthesis. They will then continue to design and conduct their own experiments in Part 2 of the lesson in order to investigate variables that affect the rate of photosynthesis in plants.
Remote learning adaptation: This lesson plan can be conducted remotely. The Engage section of the lesson can be skipped or done over a video call, then students can work independently during the Explore sections, using the Student Worksheet and the Leaf Disk Assay Video as a guide. Students will need to obtain their own materials such as a light source and a plastic syringe. For Part 2 of the lesson, students can adjust the independent variable they will investigate according to the materials available to them. The data analysis in the Reflect sections and the presentations of the results can be done over a video call, or by sharing a poster or slides on a class drive.
Learning Objectives
- Explain what happens during photosynthesis.
- Design and conduct an experiment to investigate variables that might affect the rate of photosynthesis.
- Graph and analyze experimental results to interpret and compare photosynthesis rates.
NGSS Alignment
This lesson helps students prepare for these Next Generation Science Standards Performance Expectations:- MS-LS1-6. Construct a scientific explanation based on evidence for the role of photosynthesis in the cycling of matter and flow of energy into and out of organisms.
|
Science & Engineering Practices
Planning and Carrying Out Investigations.
Plan an investigation individually and collaboratively, and in the design: identify independent and dependent variables and controls, what tools are needed to do the gathering, how measurements will be recorded, and how many data are needed to support a claim.
Conduct an investigation and/or evaluate and/or revise the experimental design to produce data to serve as the basis for evidence that meet the goals of the investigation. Collect data about the performance of a proposed object, tool, process, or system under a range of conditions. Analyzing and Interpreting Data. Analyze and interpret data to determine similarities and differences in findings Engaging in Argument from Evidence. Construct, use, and/or present an oral and written argument supported by empirical evidence and scientific reasoning to support or refute an explanation or a model for a phenomenon or a solution to a problem. |
Disciplinary Core Ideas
LS1.C: Organization for Matter and Energy Flow in Organisms.
Plants, algae (including phytoplankton), and many microorganisms use the energy from light to make sugars (food) from carbon dioxide from the atmosphere and water through the process of photosynthesis, which also releases oxygen. These sugars can be used immediately or stored for growth or later use.
|
Crosscutting Concepts
Energy and Matter.
Within a natural system, the transfer of energy drives the motion and/or cycling of matter.
|
Materials
/-/https/www.sciencebuddies.org/Files/15928/6/photosynthesis-disk-leaf-assay-materials.jpg)
For each student group of 3:
- Green plant leaves, such as spinach or ivy
- Single hole puncher or sturdy straw
- Transparent cups, 5 or more (large enough to hold 300 mL)
- Baking soda (1/8 teaspoon)
- Tap water (room temperature)
- 1/4 or 1/8 teaspoon
- Measuring cup
- Liquid dish soap
- Plastic syringe, 10 mL or bigger (without the needle)
- Light source. Note: Any lamp with a CFL, halogen, incandescent, fluorescent, or LED bulb should work. The brighter the light, the better. With incandescent lightbulbs you have to be careful not to generate too much heat! You can also use direct sunlight outside. The type of light source will affect the rate at which photosynthesis happens. This is one variable that can be tested by students.
- Aluminum foil
- Permanent marker
- Paper towels
- Timer
- Lab notebook
- Pencil or pen
- Calculator
- Paper
For teacher:
- Bowl
- Aluminum foil
Extra materials for independent student investigations:
- To investigate the following:
- Different light sources: LED, CFL, incandescent, halogen, sunlight
- Different light intensities: Ruler or measuring tape
- Different light colors: Colored cellophane sheets, tape
- Water temperature: Thermometer, microwave, ice cubes
- Different leaf colors: Yellow, red, and green leaves
- Different plant types: Leaves from different plant species
Background Information for Teachers
This section contains a quick review for teachers of the science and concepts covered in this lesson.Every living organism needs energy to survive, to grow, and to reproduce. Humans and animals eat foods with carbohydrates, proteins, and fats to produce the energy they need to survive. But plants do not eat. They make their own energy source in the form of energy-rich carbohydrates (sugars) through a process called photosynthesis. Photosynthesis is a multi-step, enzyme-mediated process that converts light energy into chemical energy. During photosynthesis, plant cells use light energy (such as light emitted from the Sun), water (H2O), and carbon dioxide (CO2) as reactants to produce sugar molecules (C6H12O6) and oxygen (O2) (Figure 1):
/-/https/www.sciencebuddies.org/Files/15939/10/photosynthesis-3498260_1920.jpg)
Figure 1. During photosynthesis, plants convert water (H2O), carbon dioxide (CO2), and light into oxygen (O2) and sugars like glucose (C6H12O6).
Photosynthesis takes place in the chloroplasts within the plant's cells. The chloroplasts contain special pigments that react to light. Chlorophyll is one of the pigments that can absorb light in the blue and red spectrum from the visible light spectrum. Chlorophyll does not absorb light in the green spectrum of light, but reflects it instead. This is why leaves with chlorophyll usually appear green. During the first part of photosynthesis—the light-dependent reaction—chlorophyll and other pigments harness the light energy to produce NADPH and ATP, which are two types of energy-carrier molecules. At the same time, water is split into oxygen (O2) and protons (H+). The next stage is light-independent and is often referred to as the dark reaction. In this step, the two energy-carrier molecules NADPH and ATP are utilized in a series of chemical reactions called the Calvin cycle. In the Calvin cycle, the plants take carbon dioxide (CO2) from the air and use it to ultimately make sugars such as glucose or sucrose. These sugars can be stored for later use by the plant as an energy source to fuel its metabolism and growth.
Photosynthesis is responsible for replenishing Earth's atmosphere with oxygen that we breathe. Thus, it is not only crucial for plants, but also for all organisms that rely on oxygen for their survival. Many factors affect how quickly plants are able to conduct photosynthesis. Without enough light or water, for example, a plant cannot photosynthesize very quickly. Similarly, the concentration of carbon dioxide—another reactant in photosynthesis—affects how fast photosynthesis can occur. Temperature also plays a significant role, as photosynthesis is an enzyme-mediated reaction. This is because at high temperatures, enzymes can get damaged and thus become inactivated. Other factors that affect the rate of photosynthesis are the light intensity, the amount of chlorophyll or other color pigments in a plant, and the color of light.
Similar to any other chemical reaction, the rate of photosynthesis can be determined by either measuring the decrease of its reactants or the increase of its products. You could, for example, measure the consumption of carbon dioxide or the production of oxygen over time. Without the use of extensive laboratory equipment, the rate of photosynthesis can be determined indirectly by conducting a floating leaf disk assay to measure the rate of oxygen production (Figure 2). In the floating leaf disk assay, 10 or more leaf disk samples are punched out of a leaf. In the next step, a vacuum is used to replace the air pockets within the leaf structure with a baking soda (bicarbonate) solution. The dissolved baking soda provides the carbon dioxide that the leaf needs for photosynthesis. The leaf disks are then sunk in the baking soda solution and exposed to light. As the plant leaf photosynthesizes, oxygen is produced that accumulates as oxygen gas bubbles at the outside of the leaf disk. The attached oxygen gas changes the buoyancy of the leaf disk and once enough oxygen has been produced the leaf disk will rise to the surface of the baking soda solution. The time from exposure to light until the leaf disk rises to the top of the solution is a measure of how much oxygen has been produced and thus a proxy for the rate of photosynthesis.
Figure 2. The floating leaf disk assay allows to indirectly determine the rate of photosynthesis.
In this lesson plan, students will place 10 disks in the baking soda solution at the same time. A good way to collect data is to count the number of floating disks at the end of a fixed time interval; for example, after every minute until all disks are floating. The time required for 50% of the leaves to float represents the Effective Time (ET50). ET50 can be determined by timing when the fifth leaf floats, or by graphing the number of disks floating over time, as shown in Figure 3. An ET50 of 11.5 minutes (min), for example, as shown in Figure 3, would mean that after 11.5 min 50% of the leaves (5 out of the 10) floated on top of the baking soda solution. In the context of oxygen production, you could also say that an ET50 value of 11.5 min means that it took 11.5 min to produce enough oxygen to make 50% of the leaf disks float.
/-/https/www.sciencebuddies.org/Files/15941/9/example-graph-leaf-disk-assay.jpg)
The x-axis shows time in minutes. The y-axis shows the number of floating leaf disks. After 7 minutes the first leaf disk floats, after 11 minutes 4 leaf disks float, at 12 minutes 7 leaf disks float, at 13 minutes 8 leaf disks float, and after 14 minutes all 10 leaf disks float. A red line indicates at what time 50% (5) leaf disks float (at about 11.5 minutes). This time is labeled Effective Time ET50.
Figure 3. Example results for the floating leaf disk assay. The graph shows the time on the x-axis and the number of floating leaves on the y-axis. The Effective Time (ET50) represents the time required for 50% of the leaves to float. By extrapolating from the graph, the 50% floating point in this graph is about 11.5 min.
Reaction rates are usually expressed as the concentration of reactant consumed or the concentration of product formed per unit of time. As mentioned above, we can use the ET50 as a proxy for how much oxygen has been produced to make half of the leaf disks float. This means that the ET50 value is proportional to the inverse of the rate of oxygen production, or proportional to the inverse of the rate of photosynthesis. The reciprocal of ET50 or 1/ET50 can thus be used as a simple measure of the rate of photosynthesis.
This lesson plan has two parts. In the first part, students use the leaf disk assay to explore how plants make energy using photosynthesis. In the second part, students design and conduct experiments that use the leaf disk assay to investigate several variables that have the potential to affect the rate of photosynthesis. This allows students to apply and review scientific concepts involved in photosynthesis, such as cell structure and function, enzyme activity, energy use and storage, and reaction rates.
Additional Background Links
- Photosynthetic Cells, Scitable by Nature Education
- The light-dependent reactions, Khan Academy
- The Calvin Cycle, Khan Academy
- What happens during photosynthesis?, BBC Bitesize
Prep Work (15 minutes)
- If you decide not to let your students make their solutions themselves, prepare the solutions for them ahead of class. For each student group:
- Label one cup with "with baking soda" and one cup "without baking soda."
- Fill both cups with 300 mL of water. To the "with baking soda" cup, add about 1/8 teaspoon of baking soda and 1 drop of liquid dish soap. To the "without baking soda" cup, just add 1 drop of liquid dish soap. Gently stir the solutions until everything has dissolved. Try not to create too many bubbles.
- Place the green plant leaves in a bowl and cover the bowl with aluminum foil. Store the bowl in a cool place to keep the leaves fresh until you use them.
- Watch the Leaf Disk Assay video to familiarize yourself with the procedure.
Create AssignmentEmbed Link
 Google Classroom
 Microsoft Teams
 Canvas
 Schoology
 Other
Other - Test the leaf disk assay once with the light sources you will be providing to your students to gauge how long it will take for all the leaves to float in the "with baking soda, light" cup. If it takes too long, consider switching to a light source with a higher light intensity. Ideally, the leaf disks in the "with baking soda, light" cups should all float within 10–15 min.
/-/https/i.ytimg.com/vi/gCHW7f88bAc/maxresdefault.jpg)
/-/https/www.sciencebuddies.org/Files/20511/4/google-classroom.png)
/-/https/www.sciencebuddies.org/Files/20512/4/ms-teams.png)
/-/https/www.sciencebuddies.org/Files/20469/4/Canvas_Bug_Color_RGB.png)
/-/https/www.sciencebuddies.org/Files/20470/5/Schoology-Logo.png)
/-/https/www.sciencebuddies.org/Files/20471/4/lms.png)
/-/https/www.sciencebuddies.org/Files/20469/4/Canvas_Bug_Color_RGB.png)
/-/https/www.sciencebuddies.org/Files/20470/5/Schoology-Logo.png)
/-/https/www.sciencebuddies.org/Files/20471/4/lms.png)
Teacher Tool Box
Engage (10 minutes)
- Begin the lesson by reviewing what plants need to survive. Show them the picture of the sunflower field. Alternatively, you can show them the Positive Phototropism Demonstration video. Then discuss:
 What do you notice about the picture/video?What are the plants in the picture/video doing? Can you explain why they behave that way?
 Have students describe what they see in the picture or in the video. They should notice that all the sunflowers are facing in the same direction, which is toward the Sun. In the video, the plants are moving left and right, depending on where the light is. Guide students to conclude that plants often follow the light because they need sunlight to survive. [Fun fact: young sunflowers track the Sun from east to west during the day; as they grow taller and thicker stalks, older sunflowers stop their movement and simply point their heads to the east.]
 - Continue the discussion:
Besides light, what other things do plants need to survive?Listen to students' replies. Then tell students that today they will do an experiment to investigate this question. Specifically, they will explore photosynthesis. Photosynthesis is a process that plants carry out to make energy for themselves. During their experiment they will investigate what plants need to be able to photosynthesize. Note: Do not provide an equation for photosynthesis or discuss the reactants and products of photosynthesis at this point. Give students the opportunity to make observations about photosynthesis during their experiment and discuss the details of the reaction later.
/-/https/www.sciencebuddies.org/Files/14174/23/note-question-mark-30.png)
/-/https/www.sciencebuddies.org/Files/14175/24/conversation-bubbles-30.png)
Part 1: Exploring Photosynthesis with the Leaf Disk Assay
Explore (45 minutes)
- Introduce the leaf disk assay as a way to investigate photosynthesis. Explain to students that they will put pieces of a plant leaf into different cups of water, one with and one without baking soda. The baking soda turns into carbon dioxide (the gas we breathe out) in the water. They will shine light on some of the cups and then observe what happens.
- Divide your class into groups of 3 and provide each group with all the materials they need to do the experiment.
- Walk students through the leaf disk assay procedure by demonstrating each step. Have them follow along as you demonstrate each step to do the experiment. Alternatively, you can show the Measure Photosynthesis with Floating Leaves video to your students to guide them through the individual steps of the procedure. Start the video at 0:23 min and end the video at 3:02 min so as not to give away any results! Ask the students questions after each step so they can reflect on and discuss the purpose of specific steps so they better understand the procedure.
- Label your five cups as follows:
- With baking soda
- Without baking soda
- With baking soda, light
- With baking soda, no light
- Without baking soda, light
- To the "with baking soda" cup, add 300 mL water, 1/8 teaspoon of baking soda and 1 drop of liquid dish soap. Gently stir the solution until everything has dissolved. Try not to create too many bubbles.
- To the "without baking soda" cup, add 300 mL water and 1 drop of liquid dish soap. Gently stir the solution until everything has dissolved. Try not to create too many bubbles.
- Punch out 30 leaf disks from the spinach or ivy leaves using the hole puncher or the straws. Avoid cutting through major leaf veins.
- Remove the plunger of the syringe and place 10 leaf disks into the syringe barrel.
- Place the plunger back into the syringe and push it down until only a small volume of air is left in the syringe. Be careful not to crush the leaf disks.
- Suck up a small volume of the baking soda solution into the syringe with the leaf disks.
What do you notice about the leaf disks in the syringe?Have students share their observations. The leaf disks should all float on the surface. Use students' replies to point out that leaves have small air pockets inside their structure that make them float.
- Carefully push out all the air from the syringe.
- Close the opening of the syringe with a finger and draw back on the plunger to create a vacuum. Hold the vacuum for 10–15 seconds and swirl the leaf disks to suspend them in the solution.
What do you think the vacuum does?Have students speculate about the purpose of the vacuum. Then continue with the next question.What do you notice about the leaf disks now? Why would this happen?Students should notice that the leaf disks start to sink to the bottom of the syringe. This is because the vacuum sucks out the air from the air pockets within the leaf and replaces it with the surrounding solution.
- Release the plunger and remove your finger from the syringe opening to release the vacuum.
- Repeat applying a vacuum until all leaf disks have sunk to the bottom of the solution.
- Remove the plunger from the syringe and pour all 10 leaf disks with the solution into the cup labeled "with baking soda, light." Fill the cup with baking soda solution up to a depth of about 3 cm and cover the cup with aluminum foil so no light can get in the top. You want to keep these leaf disks in the dark until all your other cups are ready.
- Repeat steps e.-l. with the second 10 leaf disks and the baking soda solution. Pour the 10 leaves into the cup labeled "with baking soda, no light" and fill the cup with baking soda solution up to a depth of about 3 cm. For this cup, cover the top and sides of the cup with aluminum foil to prevent any light from getting into the cup. These leaf disks should be in the dark during the whole experiment.
- Repeat steps e.-l. one more time with the last 10 leaf disks. This time, though, use the water-soap solution (the solution without the baking soda) to fill the syringe. Pour the 10 leaves into the cup labeled "without baking soda, light" and fill the cup with the dish soap solution (without baking soda) up to a depth of about 3 cm.
- Remove the aluminum foil from the "with baking soda, light" cup. Place the "with baking soda, light" and "without baking soda, light" cups under the light source. Make sure the light shines straight onto the cups from above.
- Keep the "with baking soda, no light" cup covered with aluminum foil.
- Start a timer. At the end of each minute, record the number of floating disks in the table provided in the worksheet section "Record and Analyze Your Data." Briefly swirl the cup to prevent the leaf disks from getting stuck to the bottom or sides of the cup.
- Observe closely what happens to the leaf disks in all three cups. Focus on how the surface of the leaf disks changes. Write your observations down in the worksheet section "Record and Analyze Your Data."
What changes about the leaf disks in all three cups over time?How do the leaf disks look on the outside or on the surface over time?Have students pay attention to how the surface of the leaf disks looks. They should notice tiny oxygen bubbles accumulating on the outside and sides of the leaves in the cup with baking soda and light. Have them record their observations in their worksheet.
- Continue the experiment until all the leaf disks are floating in one of the cups.
- Label your five cups as follows:
- Make sure students follow the procedure properly. If they get stuck, provide help where needed. Encourage students to discuss the following questions within their groups before and during the procedure.
What do you think will happen with the leaf disks?How do you think the results might differ in the three cups? Why?Based on your observations, what do you think happens during photosynthesis?Do you think the leaf disk assay can also be used to measure how quickly plant leaves carry out photosynthesis? How?
Reflect (45 minutes)
- Once all student groups have finished their experiment, gather them for a class discussion.
Have students share their observations and let them speculate why the leaves started floating.
What did you notice during your experiment?Why do you think the leaf disks started to float over time?Students most likely observed that the leaf disks in the "with baking soda, light" cup all started to float after a while. If they took a closer look at the leaf disk surface, they might have noticed gas bubbles accumulating over time. The leaf disks in the "without baking soda cup, light" and "with baking soda, no light" should not have floated. In case students do not mention the gas bubbles, ask them "Did anybody notice gas bubbles accumulating on the leaf surface over time?". Point out that the gas bubbles change the leaf's buoyancy. The more gas bubbles accumulate over time, the more buoyant the leaves get. Eventually they will float to the top.
- Together with your students, develop an idea of how the photosynthesis reaction might look. Use students' observations during their experiment to determine the reactants and products of photosynthesis. Start with the products of photosynthesis.
Where do you think the gas bubbles on the leaf disks come from?What kind of gas could it be?Let students speculate on where the gas came from and what kind of gas it could be. Elicit responses that mention how the gas must have been produced during a chemical reaction. The reaction here is photosynthesis. Tell students that, in fact, the gas bubbles are a result of photosynthesis. The gas that is produced is oxygen, the gas we need to breathe.
- In the next step, focus on the reactants of photosynthesis. Mention that the leaf disk assay demonstrated that oxygen gas is one product of photosynthesis. Now you are going to look into the reactants, or the things that are needed for photosynthesis. Why do you think the leaf disks only floated in the "with baking soda, light" cup and not in the other two?What do your results tell you about what is needed for photosynthesis? (What are the reactants of the photosynthesis reaction?)Listen to students' replies. Again, students can use their observations from the experiment as evidence for what some of the reactants of photosynthesis are. They should have noticed that the leaves did not float in the cup without baking soda under the light. Also, the leaves should not have floated in the cup with baking soda in the dark. Prompt students that they can use these observations as evidence that the photosynthesis reaction requires light and baking soda. Point out to students that the baking soda is converted into carbon dioxide in the water and that this is actually the reactant needed for photosynthesis. Usually, plants get the carbon dioxide from the air.
- Write a reaction equation for photosynthesis on the board that includes all reactants and products that you have identified with your students. Write the reactants, on one side (carbon dioxide and light) and oxygen as a product on the right side.
What else do we know about photosynthesis that we can add to the reaction equation?Students might remember that plants carry out photosynthesis to generate energy so they can live and grow. Tell students that the energy that plants make during photosynthesis is stored as sugar (glucose) inside the plant. Add sugar (energy) as a product to the photosynthesis reaction. Then mention that plants also need water for photosynthesis and add it to the reactants.
- Look at the finalized reaction equation for photosynthesis together and summarize that plants are able to take the CO2 from the air, water from the ground, and (sun)light to generate oxygen gas and energy in the form of sugar molecules. This means that during photosynthesis, plants convert light energy into chemical energy (sugar).
- Discuss how the leaf disk assay can be used to measure the rate of photosynthesis.
Knowing now how the leaf disk assay works, can you think of a way that you could measure the rate of photosynthesis with this procedure?Have students share their thoughts. Use their responses to point out that the time it takes the leaf disks to float to the top is a measure of how fast oxygen is produced during photosynthesis. Mention that this time can be used to calculate the rate of photosynthesis, as for any chemical reaction the rate can be expressed as the concentration of product (oxygen) formed per unit of time.
- Demonstrate how students can derive the photosynthesis rate from their data. Tell them that they need to graph their data to find the time at which 50% of their leaf disks floated. This time, also called the Effective Time (ET50), is a measure for how long it takes to produce enough oxygen to make 50% of the leaf disks float. Make an example graph with students and show them how to derive the ET50 value from their graph. You can find an example graph and more information on how to make the graph in the Background Information for teachers .
- Have each student group make a graph of their data on their worksheet and determine the Effective Time for their experiment. Students can also use spreadsheet software to graph their data if they have access to a computer.
- In the next step, ask students to calculate the reciprocal of their determined ET50 value, or 1/ ET50. Explain to students that this number is a measure of the rate of photosynthesis. Its unit is 1/min or min-1.
- Ask each student group what the photosynthesis rate for their experiment was and write each result on the board for everyone to see. Then discuss the results:
How similar or different are the results from each group?Can you explain why the results differ from each other?Have students point out the differences in their results. Most likely the photosynthesis rates are not exactly the same for each student group. The results would be (almost) the same only if all the experimental conditions were exactly the same for each group. However, any variation in environmental conditions can change the results. Point out to students that there are many factors that affect how fast plants can photosynthesize. Tell students that they will explore these in the next part of this lesson.
Part 2: Investigating Factors that Affect Photosynthesis
Explore (60 minutes)
- Now that students know how the leaf disk assay and photosynthesis work, challenge them to conduct their own independent investigations to find out what factors affect photosynthesis. Note: Students can scoop out the floating leaf disks in their cups and re-use the solutions they prepared during the first part of the lesson.
- Explain to students that they will determine the rate of photosynthesis with the leaf disk assay to find out what factors affect photosynthesis.
- Together with your students, brainstorm variables that they could test.
What are some variables that you think could affect photosynthesis?Why do you think they would affect it?Make a list of all variables that students come up with. Factors that affect photosynthesis can be divided into environmental variables and plant variables. Environmental variables include the light intensity (brightness or distance from the light source), the kind of light source, light color, temperature, CO2 concentration, and the direction of incoming light. Some plant variables are the type of plant, leaf color, leaf size, leaf age, and how long the leaf has been light-starved before the experiment. In addition to these variables, students can also vary the leaf disk assay method, such as the size of the leaf disk, the depth of the CO2 solution in the cup, the method of cutting the disks, etc. However, these variables are less likely to affect the rate of photosynthesis.
- Once you have collected enough variables, have each student group choose one variable that they want to investigate. Alternatively, you can assign variables to each group.
- Tell students that they should think about how they could test the effect of their variable on photosynthesis using the leaf disk assay. Give students 10 minutes to outline the experiments they are planning to do to investigate their variable on their worksheet.
- Before students start their experiments, briefly check each group's outline to ensure it makes sense and provide feedback where necessary.
- Once all student groups are ready to start, tell them that at the end of the lesson, each group has to present the results of their investigation to the rest of the class. Instructions on how to prepare their presentations are given in their worksheet.
- Then provide each group with the materials they need and give students about 30–45 minutes to conduct their experiments independently. Remind students to collect and record their data for each experimental condition they test. While students are working, walk around and check in with them. Listen to their discussions and provide support where needed. Engage students by asking them about their thoughts and observations. Note: Students do not have to do replicates for each of their trials. To save time, they can also set up several cups to test different variations in parallel, when possible. Students should test at least three different variations to be able to see a trend in their data.
- Once students have finished their experiments, have them do their data analysis. This includes determining the Effective Time ET50 and calculating the rate of photosynthesis (1/ET50) for each of their tested experimental conditions.
Advise students to visualize their results in a graph, as shown in Figure 4. The graph makes it easier to compare and interpret their results.
Again, students can either use spreadsheet software to make their graphs or draw their graphs on paper. If there is not enough time during class, the data analysis and presentation preparation can be assigned as homework.
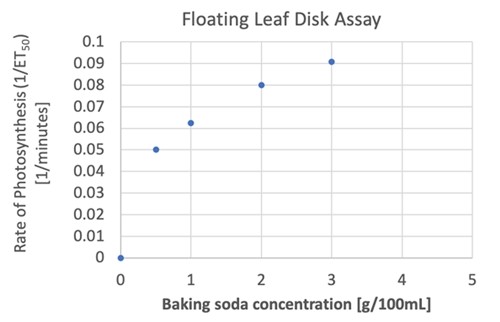
The x-axis shows the baking soda concentration in grams per 100 mL. The y-axis shows the rate of photosynthesis, or 1/ET50 in minutes-1. The rate of photosynthesis is 0.05 minutes-1 at 0.5 g/100 mL baking soda, 0.0625 minutes-1 at 1 g/100 mL baking soda, 0.08 minutes-1at 2 g/100 mL baking soda, and 0.09 minutes-1at 3 g/100 mL baking soda.
Figure 4. Example graph that shows the calculated photosynthesis rates for different baking soda concentrations. The x-axis shows the baking soda concentration in g/100 mL, the y-axis shows the rate of photosynthesis or 1/ET50. Note: This data is hypothetical and does not reflect the results of real experiments.
- After students have finished their data analysis, have them work on their presentations. If students do not have a computer or spreadsheet software available, you can also ask them to prepare their presentation on paper.
/-/https/www.sciencebuddies.org/Files/15961/8/example-graph-1ET50.jpg)
Reflect (45 minutes)
- Have each group present the results of their investigation. A single presentation should not exceed 3 minutes. After each presentation allow the class to ask a couple of questions. Some questions you can ask are:
What was easy or difficult about your experiment(s)?How did you make sure your experimental conditions stayed the same except for the variable you tested?Did you expect these results? Was there anything surprising about your results?What do your results mean? Can you explain your results?Based on your results, what other variable(s) would you like to investigate next?What new questions about photosynthesis came up during your investigation?
- Wrap up the lesson by reviewing what students have learned about photosynthesis. Come back to the Positive Phototropism Demonstration video or the Sunflower Field image that you showed in the beginning. If students cannot remember them, show the video or image again. Then ask:
Can you now explain why plants always move toward the light?Listen to students' explanations. Ask for details if they just say that the plant needs light to survive. Prompt them to apply their newly gained knowledge about photosynthesis to explain what the plants do with the light and how they convert the light into energy for them to live.
- To end the lesson, ask students why photosynthesis might be one of the most important biochemical processes for life on Earth.
Why do you think photosynthesis might be one of the most important biochemical processes for life on Earth?Have students share their thoughts on this question. You can also pose this question as homework.
Assess
You can use the student presentations and this quiz to assess student learning:
- Quiz (pdf) and Answer key (pdf)
- Online quiz, assignable in any LMS
Make Career Connections
Discussing or reading about these careers can help students make important connections between the in-class lesson and STEM job opportunities in the real world.
/-/https/careerdiscovery.sciencebuddies.org/Files/1662/17/unsplash-oz1NzV2xWXU.jpg)

/-/https/careerdiscovery.sciencebuddies.org/Files/947/17/pexels-photo-3825412.jpg)
Lesson Plan Variations
- Make a connection between photosynthesis and cellular respiration. Have students cover their cup containing the floating leaves with aluminum foil. Then let the cup sit for about 30 minutes and have students observe what happens. After a while, all the leaf disks sink to the bottom of the cup again. In the dark, plants cannot do photosynthesis due to the lack of light. Because they still need energy to sustain their growth, they switch to cellular respiration to create the energy they need. During cellular respiration, plants use the sugar they produced during photosynthesis as an energy source, together with the oxygen, to create carbon dioxide and water. This means the oxygen bubbles that make the leaf disks float get consumed over time and the leaf disks sink. Use this additional experiment to help students realize that cellular respiration is basically the reverse reaction of photosynthesis.
- Instead of a short presentation, have students create a mini poster for their investigation. During a peer-review poster session, students can assess each other's posters using a predefined poster rubric.
/-/https/img.youtube.com/vi/0QQAU5gB0fI/0.jpg)
/-/https/img.youtube.com/vi/De3f9_TyF3E/0.jpg)
/-/https/img.youtube.com/vi/8ptiSuskdtU/0.jpg)