/-/https/www.sciencebuddies.org/cdn/Files/21464/5/sb-logo.png)
/-/https/www.sciencebuddies.org/cdn/Files/21464/5/sb-logo.png)
Water Transport in Plants
Summary
/-/https/www.sciencebuddies.org/cdn/Files/13940/7/bi-colored-carnation.jpg)
Overview
Your students might know that plants need water to survive. But how does a plant "drink" and get water from the soil all the way up to its' leaves? In this lesson plan, students will observe how plants (flowers and celery) suck up dye-stained water, which makes the petals and leaves change color! This allows students to visualize the process of how water moves through a plant.
Learning Objectives
- Name the basic needs of a plant
- Conduct an investigation to find out how water moves through a plant
NGSS Alignment
This lesson helps students prepare for these Next Generation Science Standards Performance Expectations:- 2-LS2-1. Plan and conduct an investigation to determine if plants need sunlight and water to grow.
|
Science & Engineering Practices
Planning and Carrying Out Investigations.
Plan and conduct an investigation collaboratively to produce data to serve as the basis for evidence to answer a question.
Make predictions based on prior experiences. Analyzing and Interpreting Data. Record information (observations, thoughts, and ideas). |
Disciplinary Core Ideas
LS2.A: Interdependent Relationships in Ecosystems.
Plants depend on water and light to grow.
|
Crosscutting Concepts
Structure and Function.
The shape and stability of structures of natural and designed objects are related to their function(s).
|
Materials
/-/https/www.sciencebuddies.org/cdn/Files/13941/6/materials-plant-water-lesson-plan.jpg)
Materials for each student:
- White flower such as carnations
- Celery stalk with leaves attached
- Cups that can hold the flower and the celery stalk
- Water
- Paper
- Colored pencils
Materials that can be shared:
- Teaspoons
- Food coloring (red or blue, 10 drops per student)
- Timer
- Camera (optional)
Materials for teacher:
- Sharp knife
- Measuring Cup
Background Information for Teachers
This section contains a quick review for teachers of the science and concepts covered in this lesson.All plants, even those living in deserts, need water to survive. Plants use water to keep their roots, stems, leaves, and flowers healthy and it prevents them from drying out and wilting. Water in a plant is also used to carry dissolved nutrients throughout the plant. Most of the time, plants get their water from the ground. This means that the plant has to transport the water from its roots up throughout the rest of the plant as shown in Figure 1. How do plants do this? The first step is taking up water from the soil through their roots, which are permeable, meaning they are great for absorbing water. From the roots, the water moves through various cell layers into the part of the plant, called xylem, that is specialized for water transport. The xylem tissue looks like open tubes similar to a garden hose, through which the water can move easily over longer distances.
/-/https/www.sciencebuddies.org/cdn/Files/13942/8/lp-water-path-plant.jpg)
Figure 1. Water path through a plant driven by transpiration and capillary action.
The driving factors that make water move through the xylem are transpiration and capillary action (Figure 1). Transpiration is when the water from the leaves and flower petals evaporates. The water leaving the plant creates a suction force that pulls more water upward. However, for water molecules to travel up the xylem, they have to overcome gravity. This is possible due to capillary action. Capillary action happens when the forces binding the water molecules together (cohesion and surface tension) and the forces attracting the water to the xylem surface (adhesion) are greater than the force of gravity. As a result, the combined cohesion and adhesion forces create a constant chain of water molecules moving up the plant. As more water evaporates, the plant pulls up more and more water. This process allows plants to move water to tree canopies more than to 100 meters above the soil surface!
In this lesson plan, students will be able to observe this water movement through the stem of a plant. They will let a white flower and a leafy celery stalk sit in dyed water. Then they will be able to watch how the flower and leaves change color as the water moves through the plant. As they observe the flower and celery leaves change color over time, they will realize that plants meet their need for water by transporting it up from their roots, through tiny tubes in their stem, to the leaves, and the top of the plant.
A simple way to demonstrate capillary action is to take a teaspoon of water and gently pour it in a puddle on a surface, as shown in Figure 2 on the left below. You will notice that the water stays together in the puddle, rather than flattening out across the surface. This happens because of cohesion and surface tension. Cohesion is the attractive force that pulls similar substances together. In this case, the individual water molecules are being pulled together. The force of the pull is strongest at the edge of the puddle. The water molecules at the edge have fewer neighboring water molecules, so they cling more tightly to those around them; this is known as surface tension. Now gently dip the corner of a paper towel in the puddle of water. The water is attracted to the paper and "climbs" up the paper towel—this is capillary action, as shown in Figure 2 on the right below.
/-/https/www.sciencebuddies.org/cdn/Files/13869/10/surface-tension-capillary-action.jpg)
Figure 2. A demonstration of capillary action. Surface tension (which is caused by cohesion) holds the water puddle together (left). Adhesion forces allow the water to "climb up" the paper towel (right).
Additional Background Links
- Water Uptake and Transport in Vascular Plants, Nature Education
- Capillary Action and Water, U.S. Geological Survey (USGS)
Prep Work (15 minutes)
- Prepare one cup with about half a cup of water for each student.
- Place the food coloring and the teaspoons on a table accessible to all students.
- Print out a worksheet for each student.
- Cut the stems of the flower and the celery stalks to a length of about 6 inches with a sharp knife.
- Optional: Prepare a multi-colored flower to show your students at the end of the lesson. To do this, take a white flower and cut its stem in half vertically with a sharp knife. Then place each half in a cup with differently colored water. Let the flower sit there over night or until its petals have changed color.
Teacher Tool Box
Engage (15 minutes)
- Start the lesson by showing students this video:
This time-lapse video shows a coleus plant wilting over three days, and then recovering from wilting about three hours after being watered.Create AssignmentEmbed Link
 Google Classroom
 Microsoft Teams
 Canvas
 Schoology
 Other
Other - Ask students questions based on the video.
 What did you notice about the plant in the video?
 Students might point out that the plant looks droopy, unhealthy, or even sad at the beginning. Throughout the video, the stems and leaves rise up and the plant starts to look healthier.Why do you think the plant looked like that in the beginning?Have students share their ideas. Elicit responses that mention that the plant might need some water or nutrients, etc.
 - Talk about what plants need to live and grow (what their basic needs are).
What does a plant need to grow and stay healthy?Collect students' answers on the board. Then use their responses to point out that plants need water, nutrients/soil, air, and light to live and grow. Write these four needs on the board for everyone to see.
- Continue to discuss the following questions with your students. Listen to students' answers, but don't tell them how a plant moves water from their roots to the leaves yet.
What would you do with a plant that needs water?Where do plants get their water from?Which parts of the plants do you think are helping the plant taking up the water?Have students exchange their ideas. Students might wonder why plants can't absorb rainwater through their leaves. Plants need to absorb water through their roots. It is sort of like saying people need to drink through their mouths, they can't drink through their skin.How do you think the water gets from the roots into the flower or the leaves at the top of the plant?Do you think plants are able to take up water without their roots? How could they do that?
- Tell your students that they will do an experiment to find out how water gets into the plant and its flower or leaves—even if they do not have roots anymore.
/-/https/i.ytimg.com/vi/t4RkOgcwWsg/maxresdefault.jpg)
/-/https/www.sciencebuddies.org/cdn/Files/20511/4/google-classroom.png)
/-/https/www.sciencebuddies.org/cdn/Files/20512/4/ms-teams.png)
/-/https/www.sciencebuddies.org/cdn/Files/20469/4/Canvas_Bug_Color_RGB.png)
/-/https/www.sciencebuddies.org/cdn/Files/20470/5/Schoology-Logo.png)
/-/https/www.sciencebuddies.org/cdn/Files/20471/4/lms.png)
/-/https/www.sciencebuddies.org/cdn/Files/20469/4/Canvas_Bug_Color_RGB.png)
/-/https/www.sciencebuddies.org/cdn/Files/20470/5/Schoology-Logo.png)
/-/https/www.sciencebuddies.org/cdn/Files/20471/4/lms.png)
/-/https/www.sciencebuddies.org/cdn/Files/14174/23/note-question-mark-30.png)
/-/https/www.sciencebuddies.org/cdn/Files/14175/24/conversation-bubbles-30.png)
Explore (30 minutes)
- Provide each student with a white flower, a celery stalk and a glass or cup filled with 1/2 cup of water.
- Have each student pick a color (red or blue) and let them add about 10-15 drops of food coloring to their water. They should stir the water until the color is uniformly distributed.
- Go around from student to student and use a knife to cut about one inch of the stems of their flower and the bottom of the celery stalk at a 45° angle. Make sure to not use scissors to do that as they can crush the stem (xylem), reducing their ability to absorb the water. The flowers and celery stalks should now be approximately 5 inches long.
- Instruct students to put their freshly cut flower and celery stalk into the glass with the colored water.
-
Have students make predictions of what is going to happen with the flower and celery stalk.
Let them write down their predictions in their worksheet.
What do you think will happen to the flower or celery stalk when you let it sit in the colored water?What do you think will happen to the food coloring in the water?What will happen to the water?How long do you think it will take until you see anything happen?
- Ask your students to take a picture with a camera if you have one, or draw the flower and the celery stalk, especially paying attention to the color of the petals or leaves.
- Leave the flowers and the celery stalk in the dyed water for at least 24 hours. Have students check on them after 2 hours, 4 hours if possible, and then again the next day (after about 24 hours). Every time you check on the plants, let your students record their observations and have them take a picture or draw a color picture of the flower and celery stalk.
Reflect (15 minutes)
- Once the flower and the celery leaves have clearly changed color (for best results wait 24 hours), gather your students for a group discussion. Ask them to compare the pictures or drawings they made at the beginning and the end of the experiment.
What do you notice about the flower and celery stalk when you look at the different images?Have students describe the changes they observed. At the beginning of the experiment, the flower leaves should have been white, and the celery stalk leaves green. At the end, they both should have changed to the color of the food coloring, as shown in Figure 3.
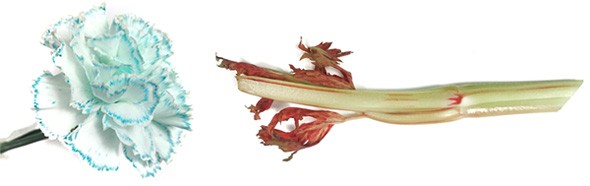
Figure 3. Experimental results after about 24 hours. Blue-colored carnation (on the left), and a red-colored celery stalk (on the right). - Discuss with you students following question.
Why do you think the flower or celery leaves changed color?Listen to students' ideas. Guide them to conclude that the water, including the food coloring, must have gotten from the cup into the flower or leaves somehow.
- Take one of the celery stalks, wipe the colored water off at the end, and then cut about one inch from the bottom. Pass the celery stalk around so students can have a closer look.
When you look closely at the bottom of the celery stalk, what do you notice?Have students point out that there are colored little dots on the bottom of the celery stalk, as shown in Figure 4.

Figure 4. When cut, tube-like structures (xylem) that transport water within the celery plant can be seen as colored dots and lines within the celery plant. - Discuss with children,
What do you think these colored dots are?What do you think we will see if we cut the celery open lengthwise?
- Cut the celery open lengthwise, so that you can see a colored line that shows the xylem. Have students describe what they see and discuss,
What do these colored dots and lines tell us about how the dyed water gets into the plant?Guide children to conclude that the colored line means that there is colored water inside the plant. Explain to students that the dots and lines are like little tubes that run all the way from the bottom of the celery to the top. These tubes help plants move water through their stem.
- Ask students,
What do you think would happen if you split the stem of the plant in half vertically and put one half in water with one color and the other half in water with another color?Have students make their predictions based on the results they got from their investigation.
- Then show them the image of the bi-colored carnation flower provided in the example picture document. Encourage students to make multicolored flowers at home with their parents. If you have prepared a multi-colored flower before the lesson, show these to your students again and explain how you made the flower multi-colored.
- Conclude the lesson by coming back to the initial video.
Based on what you have done and learned in this lesson, can you now explain what is happening to the plant in this video?The plant in the beginning was wilted because it didn't have enough water. Just before the video was taken, the plant was watered. Over the next three hours (the video is a time lapse that turns three hours into seven seconds), the plant absorbs the water from the soil through its roots and moves it through the stems all the way up into its leaves. This makes the plant rise and look healthy again.
- Finally, see if your students can now explain water flow through a plant with a drawing. Have them draw the water flow through a plant, showing the roots, the stem, and the leaves, using arrows to represent water flow. The picture does not have to include transpiration (shown in Figure 1) as it was not covered in this lesson.
/-/https/www.sciencebuddies.org/cdn/Files/13943/6/plant-water-transport-results.jpg)
/-/https/www.sciencebuddies.org/cdn/Files/13944/6/celery-cut-open.jpg)
Make Career Connections
Discussing or reading about these careers can help students make important connections between the in-class lesson and STEM job opportunities in the real world.
/-/https/careerdiscovery.sciencebuddies.org/cdn/Files/1662/17/unsplash-oz1NzV2xWXU.jpg)

/-/https/careerdiscovery.sciencebuddies.org/cdn/Files/967/17/unsplash-d4KQc-ZqBrc.jpg)
Lesson Plan Variations
- To make this activity more challenging and engaging for older children, include additional experiments. Provide two more flowers and celery stalks to your students. Then put one set in a second cup with just water, and the other set in a third cup with no water at all. Let students observe and compare how the plants look in these cups over time. Then discuss the meaning of their results, especially the differences between the three cups.
- Use different food colors to see which color works best and fastest for coloring the plant.
- Find out if the length of the stem or celery stalk matters. Use multiple flowers of the same kind and repeat the experiment, but in this instance, cut the stem of each flower into a different length. How does this affect your results?
- What kind of plants can you color this way? Try different types of plants. Lightly colored plants work best to see the change of color such as cauliflower, white roses, etc.
/-/https/img.youtube.com/vi/41RzGwZINOk/0.jpg)
/-/https/img.youtube.com/vi/Kfvt5zs2se8/0.jpg)
/-/https/img.youtube.com/vi/v0oaTHb2u0Y/0.jpg)