/-/https/www.sciencebuddies.org/Files/21464/5/sb-logo.png)
/-/https/www.sciencebuddies.org/Files/21464/5/sb-logo.png)
How Rain Gardens Fight Pollution and Flooding
Summary
/-/https/www.sciencebuddies.org/Files/18187/6/rain-garden-testing-thumbnail.jpg)
Overview
Students might think rain gardens are only there to make an urban area look nice. In this lesson, students will make mini rain gardens and discover how these can filter out pollution and soak up excess rainwater. Will they find how rain gardens help prevent natural disasters? Try out this fun lesson and see!
Learning Objectives
- List the problems runoff creates and understand how rain gardens mitigate these problems.
- Use data from a rain garden experiment as the one done in the lesson to support the claim "Rain gardens reduce runoff."
- Use data from a rain garden experiment as the one done in the lesson to support the claim "Rain gardens filter some pollutants out of runoff."
NGSS Alignment
This lesson helps students prepare for these Next Generation Science Standards Performance Expectations:- 3-ESS3-1. Make a claim about the merit of a design solution that reduces the impacts of a weather-related hazard.
|
Science & Engineering Practices
Developing and Using Models.
Use a model to test cause and effect relationships or interactions concerning the functioning of a natural or designed system.
Planning and Carrying Out Investigations. Make observations and/or measurements to produce data to serve as the basis for evidence for an explanation of a phenomenon or test a design solution. Engaging in Argument from Evidence. Construct and/or support an argument with evidence, data, and/or a model. Make a claim about the merit of a solution to a problem by citing relevant evidence about how it meets the criteria and constraints of the problem. |
Disciplinary Core Ideas
ESS3.B: Natural Hazards.
A variety of natural hazards result from natural processes. Humans cannot eliminate natural hazards but can take steps to reduce their impacts.
|
Crosscutting Concepts
Cause and Effect.
Cause and effect relationships are routinely identified, tested, and used to explain change.
Connections to Engineering, Technology and Applications of Science Influence of Science, Engineering and Technology on Society and the Natural World. Engineers improve existing technologies or develop new ones to increase their benefits, decrease known risks, and meet societal demands. Connections to Nature of Science Science is a Human Endeavor. Science affects everyday life. |
Materials
/-/https/www.sciencebuddies.org/Files/18188/6/materials-mini-rain-garden-classroom-experiment.jpg)
For the teacher:
- Utility knife
- Hole punch
- Plastic cup
For each group of 1-4 students, and one extra for the teacher:
- One container, e.g., gallon jug, 2-liter soda bottle, disposable loaf pan, etc. The containers of all groups should be similar.
- A bottle cap or object of similar height like a rectangular eraser, a granola bar, etc.
- Clear disposable cup, 12–16 oz. Try to have all cups identical. Small plastic water bottles from which the top has been removed work well, too.
- Cup, similar in size to the disposable one.
- Metric ruler
- Clay (about 1 lb for the students, 2 lbs for the teacher)
- Rope or yarn (40 cm long)
For the class:
- Rain garden supplies. If substitutes are used, it is best to stay with organic materials as this will make it easy to dispose of the rain garden content in the compost bin.
- Potting soil or loose dirt from the garden
- Pebbles, small rocks, or substitutes such as corn kernels or dry beans
- Materials to make polluted water:
- Water
- Measuring spoon
- Cooking oil (1 cup)
- Liquid food coloring, preferably blue
- Food that floats on water, such as some cereals or popcorn (1 cup)
Background Information for Teachers
This section contains a quick review for teachers of the science and concepts covered in this lesson.Urbanization increases runoff, the excess rain-, storm-, or meltwater that flows across impervious surfaces. Runoff is caused by surfaces like concrete and asphalt (roads, sidewalks, parking lots, the roofs of buildings, etc.) that do not absorb water. Since the water cannot soak into the ground, this water runs off and picks up pollutants such as dust and dirt particles, oil (e.g., oil from leaking cars), litter, chemicals (e.g., fertilizer), and bacteria. Storm drains or lakes and rivers collect runoff. From the storm drain, it flows directly to nearby lakes and rivers, polluting these nearby bodies of water. Pollution is not the only problem with runoff; excessive runoff also leads to flooding.
Urban developers include rain gardens to mitigate the problems created by runoff. Rain gardens are designed to soak up runoff temporarily and filter out many of the pollutants. They also beautify the area.
/-/https/www.sciencebuddies.org/Files/17866/10/rain-garden-overview.jpg)
Figure 1. Rain garden, picture from Wikimedia Commons user Rogersoh, licensed under Attribution-ShareAlike 3.0 Unported (CC BY-SA 3.0) license.
Rain gardens are typically created on the downside of a slight slope. They are usually layered: mulch at the top, planting soil to support vegetation, a sand bed, and a rock base as illustrated in Figure 2. Rain gardens typically include native plants. Plants beautify the rain garden and have roots penetrating down into the soil, making it easier for water to flow downward. The roots also suck up some of the water into the plants.
/-/https/www.sciencebuddies.org/Files/18189/6/rain-garden-cross-section.png)
Figure 2. Cross section of a layered rain garden.
The students will create two types of mini rain gardens in this lesson, one with loose potting soil and another with pebbles. The variations section lists more options, but even these simple gardens allow the students to observe the effect of adding a rain garden. The video Build a Mini Rain Garden shows how the students will make a mini rain garden with soil.
/-/https/i.ytimg.com/vi/qFefTN5vyMM/maxresdefault.jpg)
/-/https/www.sciencebuddies.org/Files/20511/4/google-classroom.png)
/-/https/www.sciencebuddies.org/Files/20512/4/ms-teams.png)
/-/https/www.sciencebuddies.org/Files/20469/4/Canvas_Bug_Color_RGB.png)
/-/https/www.sciencebuddies.org/Files/20470/5/Schoology-Logo.png)
/-/https/www.sciencebuddies.org/Files/20471/4/lms.png)
/-/https/www.sciencebuddies.org/Files/20469/4/Canvas_Bug_Color_RGB.png)
/-/https/www.sciencebuddies.org/Files/20470/5/Schoology-Logo.png)
/-/https/www.sciencebuddies.org/Files/20471/4/lms.png)
Additional Background Links
- Rain Garden, Dauphin County Conservation District.
- All About Rain Gardens, The Groundwater Foundation.
Prep Work (15 minutes)
- Prepare rain garden containers:
- You will need one container per group and an additional one to be used as control.
- Choose similar containers, for example, four 1-gallon jugs and not two 1-gallon jugs combined with two 2-liter bottles. This similarity allows the students to compare measurements taken from different gardens.
- For each container: place the container flat on a surface with the spout pointing to the side and cut the top third of the container off. Figure 3 shows two examples. This step is not needed when you use disposable loaf pans.
- If you are using disposable loaf pans, make an opening on one narrow side panel of the pan, about 1 cm above the bottom edge of the pan. Cut two short slits in the rim to hang a collection cup.
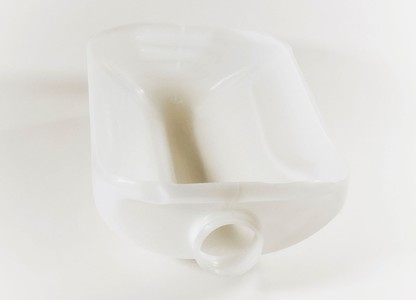
A gallon jug (left) and a 2-liter soda bottle (right) of which the top third has been cut off.
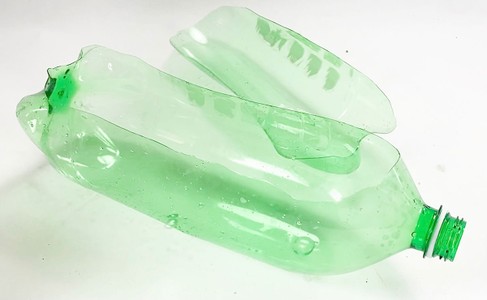
A gallon jug (left) and a 2-liter soda bottle (right) of which the top third has been cut off.
Figure 3. An example of a prepared rain garden container. - Prepare the garden that only has pavement.
- One container will only have pavement, no rain garden. This will serve as control. You can make this container in advance or when the students prepare their rain gardens.
- Cover the length of the container with clay pavement (see Figure 4).
- To reduce spills while testing, it is best to keep the pavement at least 3 cm below the container edge.
- Keep this container in a large plastic bag with a moist paper towel or sponge. This will prevent the clay from drying out and cracking.
- If the clay cracked or formed gaps near the edges while drying, fill the cracks and crevices before testing so water does not flow into the cracks, but flows over the surface.
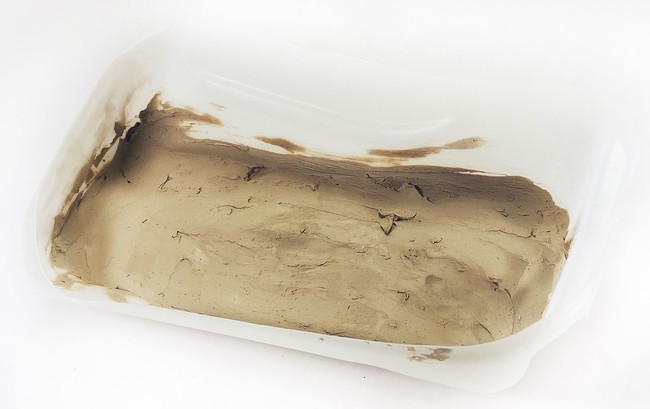
Figure 4. A container prepared with an impermeable surface to serve as control. - Prepare runoff collection cups:
- You need one cup per group and an additional one for the instructor.
- Identical clear cups are preferred as these allow to easily compare the height of the water inside.
- For each cup: make two holes in the cup on opposite sides and near the rim as shown in Figure 5.
/-/https/www.sciencebuddies.org/Files/17872/11/container-for-rain-garden.jpg)
/-/https/www.sciencebuddies.org/Files/17873/10/bottle-cut-for-rain-garden-experiment.jpg)
/-/https/www.sciencebuddies.org/Files/17874/10/container-pavement-only.jpg)
/-/https/www.sciencebuddies.org/Files/18191/6/cup-with-holes.jpg)
Figure 5. A clear cup prepared to be used as collection cup.
Teacher Tool Box
Engage (10 minutes)
- Introduce Storm Drains.
Watch the Drain video.
 Do you know what this is?Where have you seen them and what do they do?
 What you see in the video is a storm drain, also called a storm sewer.
Guide students towards noticing that storm drains appear in gutters at the side of paved streets or on parking lots. Maybe you have some on the school grounds next to a paved surface.
Why do you think we have storm drains in these locations? What might happen if we did not have them?Listen to the students' answers.Help students conclude that storm drains are there to collect rainwater. If there were no storm drains, rainwater would pile up on the streets, parking lots, and play areas and occasionally create flooding.
- Introduce Runoff
Explain that the water that runs down the street when it rains is called runoff. It is water that does not soak into the ground because surfaces like sidewalks, roads, and roofs do not absorb water, so it "runs off" and flows away. Storm drains are there to catch runoff.
Tell students that sometimes, there is so much runoff that the storm drains cannot collect the rainwater fast enough and flooding still occurs.
Would runoff be clean water? Would it be as pure as the water that falls from the sky? Why do you think this? (If needed, repeat the definition of runoff.)Listen to the students' answers.Guide students to the fact that runoff is usually not pure but polluted. Runoff flows over roofs, streets, driveways, or gardens. On its way, it picks up dust, soil, and many other pollutants like candy wrappers, oil leaked from cars, etc.
Explain that runoff flows so fast that it carries most of the pollutants to streams, lakes, and oceans. This pollutes our lakes, streams, and oceans.
- Introduce Rain Gardens
As we cannot prevent storms from happening, people who plan and build cities and neighborhoods found ways to reduce the impact heavy rainstorms have on us. They use small gardens called rain gardens to reduce the damage runoff can create. Rain gardens also make the area look nicer. An example of two rain gardens is given in Figure 6.
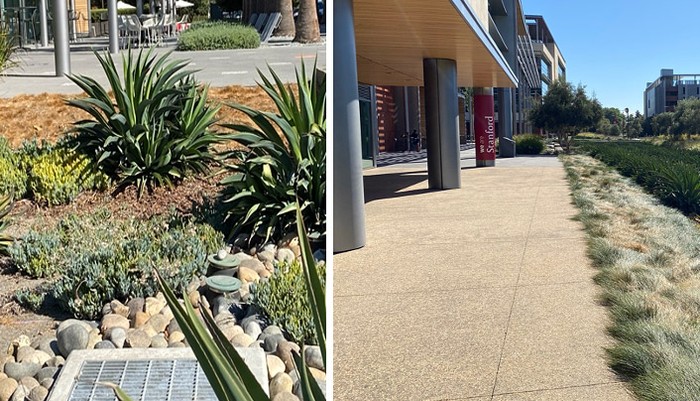
Figure 6. Two examples of rain gardens.Show students slide 2 and give them some time to discuss with a partner how rainwater would flow in these areas. Then, explain that the water runs from the pavement into the garden and then, if there is still too much water, into the storm drain (slide 3).
Explain that today, they will experiment to see how rain gardens can:
- reduce runoff pollution (to reduce pollution in streams, lakes, and oceans)
- reduce runoff (to reduce the frequency and severity of flooding)
/-/https/www.sciencebuddies.org/Files/18197/6/example-rain-gardens.jpg)
Explore (45 minutes)
- Create Groups
Each group will create one rain garden, some will make a soil mini rain garden and others will make a pebbles mini rain garden. Limit the number of groups to eight. More might make it hard to manage all the rain gardens.
- Distribute Materials
Each group should have one prepared container and a cup with two holes near the edge.
- Explain the Experiment
We will make mini rain gardens and explore how they change the amount and pollution of runoff.
Show a picture of a rain garden and what the students will make (Figure 7, slide 4). Point out the similarities:
- The hard surface near the rain garden is like the clay surface in the mini rain garden.
- The dirt or rocks in the garden is like the dirt area of the mini rain garden.
- The storm drain in the garden is like the spout in the mini rain garden.
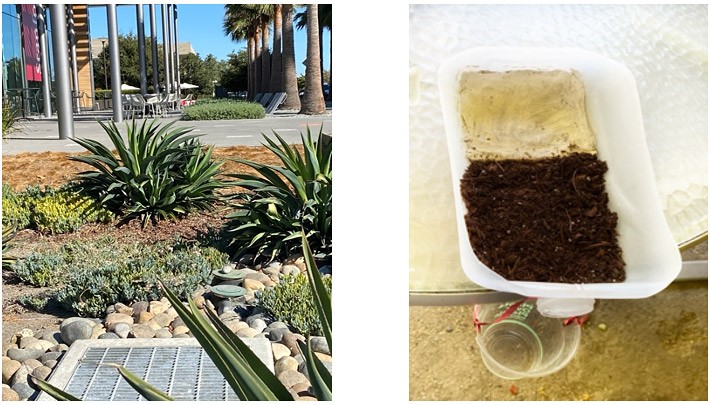
Figure 7. A rain garden (left) and a miniature rain garden (right). - Students Create Pavement
Tell the students they will use clay to create pavement because clay is almost impermeable; it only lets a little water leak through.
Show the students Figure 8 (slide 5) and give students directions.
- Make clay pavement in the area farthest away from the spout.
- Make it about 10 cm long.
- To reduce spills while testing, it is best to keep the pavement at least 3 cm below the container edge.
- The open area between the spout and the pavement will become your rain garden.
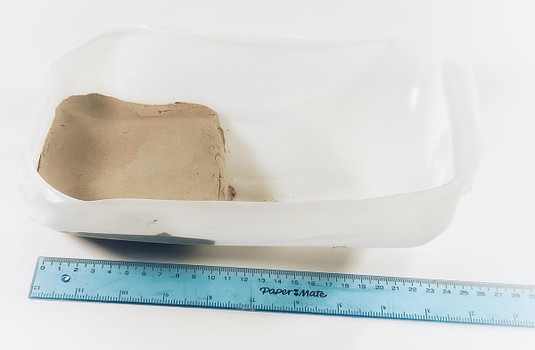
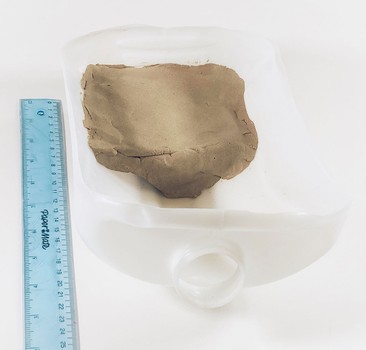
Figure 8. Rain garden container with a raised platform modeling pavement.If you did not make it in advance, this is a good time to create a pavement-only container yourself. (Directions are in the teacher prep work section.)
- Assign Rain Garden Types
Explain that the class will make two types of rain gardens to see how each one performs. Assign each group one type of garden:
- Soil
- Pebbles
If more variation is desired, the Variations section has a longer list of rain gardens students can explore.
- Students Create Rain Gardens
Show Figure 9 (slide 6) and ask groups to create their assigned garden.
Give the following directions:
- Create the garden between the clay (pavement) and the spout (storm drain).
- Use the materials listed in your garden type.
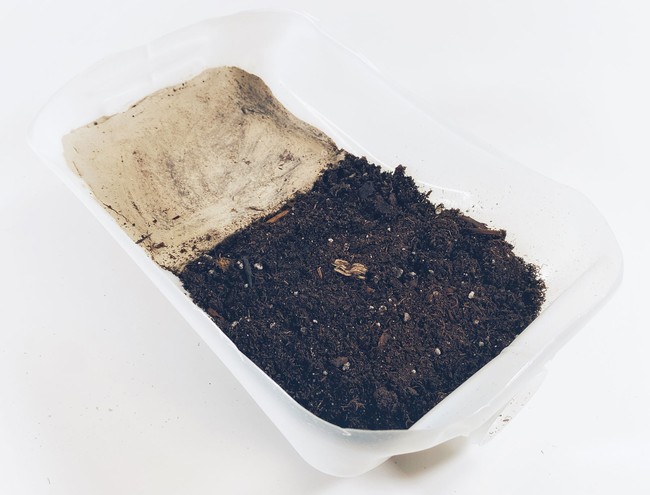
Figure 9. Mini soil rain garden. A garden with pebbles will look similar, with pebbles replacing the soil.While some students creating the garden, other students can attach a string to the cup as shown in Figure 10 (slide 7). The string will allow the cup to hang from the spout and collect runoff. The cup will hang from the pan in case you are using baking pans.
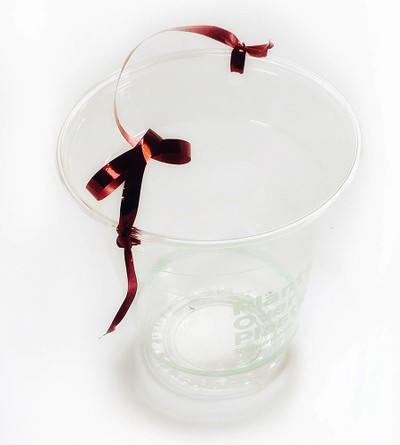
Figure 10. Collection cup with string attached.Walk around and help students where needed.
- Set up and explain the experiment.
Perform the experiment outside or over a floor that can get wet.
Figure 11 (slide 8) will help you setup the rain gardens. Do the following for each rain garden (including the pavement only one):
- Place the container near the edge of a table with the spout or opening hanging over the edge.
- Place a small item like a bottle cap or an eraser under the container, elevating the far side of the container. This should create a slight incline towards the spout.
- Hang a runoff collection cup from the spout of the container or, when using baking pans, from the slits in the baking pan. The cup should hang under the spout or opening.
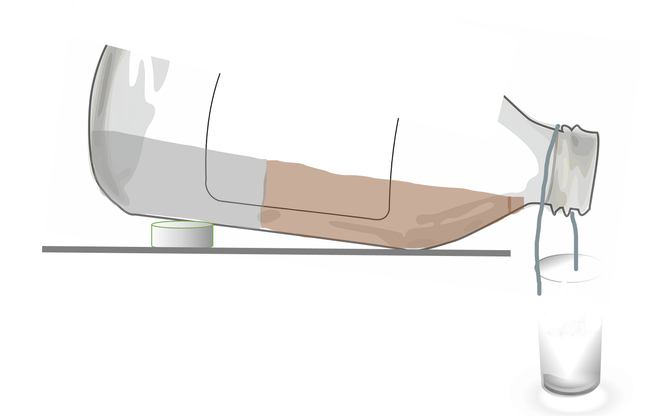
Figure 11. Rain garden experiment setup.Does anyone remember why people who plan and build cities and neighborhoods add rain gardens to their designs? What problems do they like to solve by adding these rain gardens?Listen to the student's responses, and guide them towards:- Rain gardens filter pollution out of runoff.
- Rain gardens reduce runoff.
- Rain gardens make the area look nicer.
Give students time to fill in question 1 of the worksheet.
Tell students that engineers and scientists sometimes use smaller models of proposed solutions to test if the solution will work.
How can we use these mini rain gardens to test if rain gardens reduce the amount of runoff? Let students discuss this question with a partner.How can we use these mini rain gardens to test if rain gardens can remove pollution out of runoff? Let students discuss this question with a partner.Give students time to fill in question 2 of the worksheet.
Ask for some ideas, and if needed explain what the class will do.
We will pour a cup of water on the pavement of each garden. This is like a rainstorm. Then, we will measure how much water comes out of the spout. This is like measuring how much runoff reaches a storm drain after a storm. The garden that has less runoff is better at reducing runoff. Because we also want to know if a garden reduces pollution, we will use polluted water and look if the collected runoff is less polluted. Cleaner runoff water means the garden filters out more pollution. Figure 12 (slide 9) can be used to clarify the experiment.
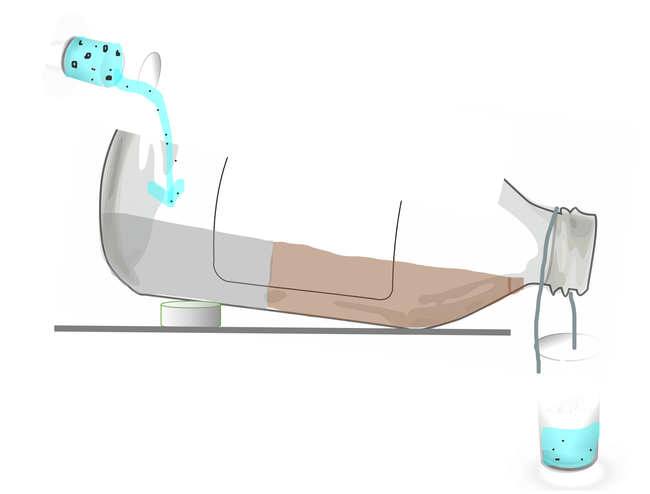
Figure 12. Drawing of how the rain garden experiment will be executed. - Make polluted water.
Make the polluted water in plastic cups similar or identical to the runoff collection cups. Make one per garden, one for the pavement-only container, and one extra as control.
Before we can test, we need polluted water.
What kind of pollution might be in the runoff? What do you expect to find in it? To find out, draw runoff on your worksheet (question 3) and draw any pollutants the water might pick up along its way.Listen to the student's answers as you make the homemade runoff.Recipe:
- Clean water represents rainwater. Start by filling the cup halfway (to avoid spills) and add water at the end to fill it up to about 1 cm from the rim.
- 1 tsp cooking oil to represent oil leaking from cars.
- 1 Tbsp crumbled up soil represents sediment suspended in the water when it runs over gardens.
- 2 drops of blue food coloring represent pollution that is too small to see with the naked eye, such as plant fertilizer.
- A few pieces of food that float on water, e.g., a few pieces of cereal or popcorn. This represents trash.
The result of this recipe for homemade polluted water is shown in Figure 13.
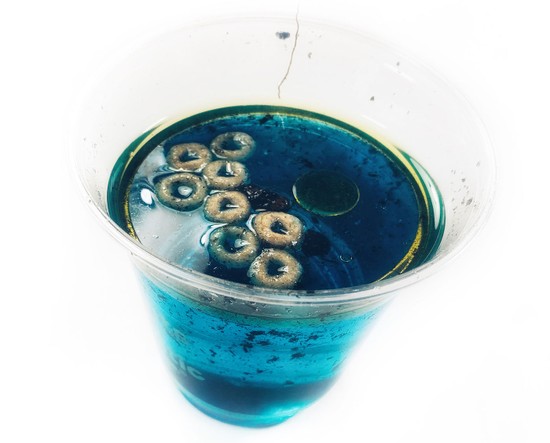
Figure 13. Homemade polluted water. - Students make a prediction (hypothesis).
Do you think our rain gardens will fulfill their goals? Do you think one will outperform the other? If so, which one will perform best?
Let students select an option on their worksheet.
- Students perform the test.
- Let students pour the homemade polluted runoff (one cup) on the pavement of their mini rain garden simultaneously or one after the other, with little time in-between.
- The teacher or a student should pour it on the pavement-only container. Note that the collection cup might overflow for this container. If it does, it can show how flooding can occur.
- Set a timer to two minutes. Tell the students that they will measure how much runoff water reaches the storm drain in two minutes. While they wait, students can describe what they notice.
- Remind students to look at the pollution and the amount, or how fast runoff collects.
- After two minutes, remove the cups collecting runoff and place them close to their garden.
- Remove the prop that makes the gardens tilt, so they stop leaking.
-
Students make measurements.
- Ask students to measure the height of the water in the collection cups. Note: If not all cups are identical, pour the liquid in a measuring cylinder or measuring cup to measure volume or height.
- Copy the table like Table 1 onto the whiteboard.
- Line by line, fill in students' height measurements while showing the collection cup for the garden listed. If several gardens of the same type were used, calculate the average height measurement, and write that down in the table.
- Circle the pollutants visible in the collection cup.
- Ask students to copy the data to their worksheet.
/-/https/www.sciencebuddies.org/Files/18198/6/comparison-real-rain-garden-and-model-rain-garden.jpg)
/-/https/www.sciencebuddies.org/Files/17875/10/rain-garden-pavement-side.jpg)
/-/https/www.sciencebuddies.org/Files/17876/10/rain-garden-pavement-front-view.jpg)
/-/https/www.sciencebuddies.org/Files/17877/10/rain-garden-container-with-clay-pavement-soil.jpg)
/-/https/www.sciencebuddies.org/Files/17878/10/rain-garden-cup-with-string.jpg)
/-/https/www.sciencebuddies.org/Files/17879/10/rain-garden-experiment-setup-drawing.png)
/-/https/www.sciencebuddies.org/Files/17881/10/rain-garden-experiment-drawing.png)
/-/https/www.sciencebuddies.org/Files/17880/10/homemade-polluted-water.jpg)
| Rain Garden Experiment: Measurements of Collected Runoff |
||
|---|---|---|
| Rain Garden Type | Height (cm) | Pollution (Circle if present) |
| No rain garden | trash/cereal dirt oil food coloring | |
| Soil | trash/cereal dirt oil food coloring | |
| Pebbles | trash/cereal dirt oil food coloring | |
Note: There is still a control cup of homemade runoff. This cup can be used if students want to compare what is poured to what is collected.
Reflect (15 minutes)
/-/https/www.sciencebuddies.org/Files/14174/23/note-question-mark-30.png) | Look back at your prediction (hypothesis). Does the data the class collected support your prediction, does it prove it wrong, or is it not possible to tell from the data the class collected? |
Give the students some time to discuss their ideas with a partner and write down their answers on their worksheets (question 6).
|
Can the data support the claim that rain gardens filter pollutants out of runoff?
|
/-/https/www.sciencebuddies.org/Files/14175/24/conversation-bubbles-30.png) | The data will probably show that rain gardens reduce the pollution of runoff. This can be seen in pollution noticed in the collected runoff. Most likely, the students will see less pollution in the runoff collected for the soil and pebble rain gardens compared to the runoff from the container that did not include a rain garden. They will probably also notice that all cups still have the food coloring, indicating that rain gardens are not filtering out all pollution. |
Help students find the data that supports this claim and help them formulate the connection.
|
Can the data support the claim that rain gardens make flooding less likely?
|
| The data will probably show that rain gardens reduce runoff. This can be seen in the height of collected runoff. The height of collected runoff was most probably lower for soil and pebble rain gardens compared to the container that did not include a rain garden. As less water needs to be collected by the storm drain when rain gardens are present, flooding is less likely. |
Help students find the data that supports this claim and help them formulate the connection.
| Rain gardens make the area look nicer by supporting plant life. Can all our rain gardens sustain plants? |
| Soil contains the nutrients plants need; rocks or pebbles do not. The rain gardens without soil would not be able to support plant life. |
Note: Students might think a rock garden is possible in the pebbles mini rain garden. Explain that rock gardens still have soil mixed in with the rocks.
| Do you know of any rain gardens in this area?
If there are none, could we benefit from one if it was created? What does/could rain gardens mean for us?
|
| The answer will depend on the climate and urbanization of the area.
Some possible answers are:
|
Assess
At the end of the lesson, ask students to look back at their worksheet questions 1–3 and question 6 and ask to make any changes they would like to make in a different color. Then, use the worksheet to evaluate student understanding.
You can use this quiz to assess student learning after the activity:
- Online quiz, assignable in any LMS
- Quiz (pdf) and answer key (pdf)
Make Career Connections
Discussing or reading about these careers can help students make important connections between the in-class lesson and STEM job opportunities in the real world.
/-/https/careerdiscovery.sciencebuddies.org/cdn/Files/1832/17/iStock-1158126977.jpg)

/-/https/careerdiscovery.sciencebuddies.org/cdn/Files/1396/17/iStock-473199834.jpg)
Lesson Plan Variations
- Other rain garden types can be tested, for example mulch or sand, or layered gardens with a base layer of pebbles and a top layer of soil, soil with a top layer of mulch, a base sand layer with soil on top, etc.
- Students can grow fast-germinating plants in their rain garden and see if adding plants makes a difference in the amount and pollution of runoff. Figure 14 shows a miniature rain garden with wheat grass.
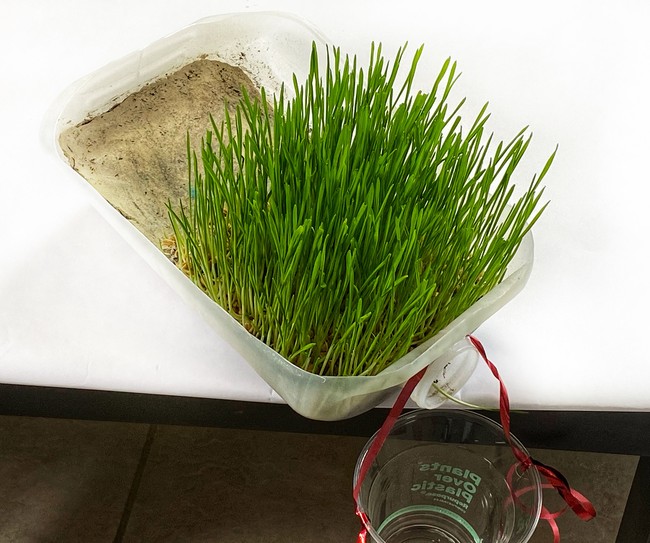
Figure 15. Mini rain garden with plants. - Students can look up how to make a real rain garden and create one near a spout in school.
/-/https/www.sciencebuddies.org/Files/18199/6/milk-jug-mini-rain-garden-grass.jpg)
/-/https/img.youtube.com/vi/lYITnkFxa5A/0.jpg)
/-/https/img.youtube.com/vi/OfG4Ex83BiM/0.jpg)
/-/https/img.youtube.com/vi/RgT1dzIwpWY/0.jpg)