Satellite Shield
Summary
/-/https/www.sciencebuddies.org/cdn/Files/18749/10/tech-interactive.png)
/-/https/www.sciencebuddies.org/cdn/Files/19769/5/SatelliteShield-Images-02.png)
Overview
Learners explore the properties of materials by designing a barrier that will protect a satellite from colliding objects. They test out multiple combinations of materials and collect data on the results to determine which materials are the most effective at shielding the satellites from the hazards of space debris.
Learning Objectives
Students will:
- Design a barrier that can protect the satellite from high-velocity impacts with space debris.
- Explore design considerations based on material characteristics.
- Collect data on each material combination they test.
NGSS Alignment
This lesson helps students prepare for these Next Generation Science Standards Performance Expectations:- 3-5: Engineering Design: 3-5-ETS1-1. Define a simple design problem reflecting a need or a want that includes specified criteria for success and constraints on materials, time, or cost.
- 3-5: Physical Science: 4-PS3-1. Use evidence to construct an explanation relating the speed of an object to the energy of that object.
- 6-8: Engineering Design: MS-ETS1-1. Define the criteria and constraints of a design problem with sufficient precision to ensure a successful solution, taking into account relevant scientific principles and potential impacts on people and the natural environment that may limit possible solutions.
- 6-8: Physical Science: MS-PS2-1. Apply Newton's Third Law to design a solution to a problem involving the motion of two colliding objects.
Common Core State Standards
- 4-8 Speaking and Listening x.1: Engage effectively in a range of collaborative discussions, etc.
Materials
- Satellite Shield Observation Sheet (1 per team)
- Pencils (2 per team)
- Optional: Device to project a video
Building Materials
Look for items that match the categories. See the suggestions below for ideas. Try to provide several different types of items for each category.
Use the table below for inspiration. Don't limit yourself to the items on this list — be creative!
| Building Materials (per class of ~32 students) | |
|---|---|
| Lightweight, Flexible Materials (50+ total) | Connectors (100+ total) |
|
|
Tip: Don't use tape or glue. This allows for faster iteration, more reuse of materials, and less mess.
| Tools & Test Item (One set per team) | Test Area Supplies (per class) |
|---|---|
|
|
Background Information for Teachers
Vocabulary
For more tips on vocabulary and common engineering terms see The Tech Interactive's Tech Tip: The Language of Engineering.
- Collision: An event in which two or more bodies exert forces on each other
- Energy: The capacity or power to do work
- Impact: The resulting force or energy when two or more objects collide
- Orbital debris: Space debris in the Earth's orbit
- Space debris: Defunct human-made objects in space
- Speed: The rate of motion at which an object is moving along a path
- Velocity: The rate and direction of an object's movement
For more lesson plans, videos and other facilitation resources see thetech.org/resources.
Prep Work
Test Area Set-Up
- Follow the instructions below to create the testing items:
- Make the launch tube by taping cardboard tubes together, creating one long tube around 2 ft (.61 m) long.
- Create the space debris testers by using tape or rubber bands to attach the item with a sharp end to the writing utensil.
- Create the satellites by using rubber bands to secure a piece of penetrable material over the open end of each container.
Testing Items
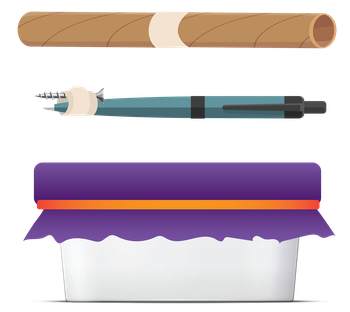
three illustrations showing cardboard tube with tape in the middle, pen with screw taped to the end, container with purple cover held on top with rubber band
- Place space debris testers and launch tube on a testing table.
- To ensure safe prototyping practices, the testing table should be located at least 10 ft (3.05 m) away from the building and material tables.
- When teams are ready to test, they will bring their satellite to the testing table, position the launch tube directly over their satellite, and drop one space debris tester down the tube.
/-/https/www.sciencebuddies.org/cdn/Files/19770/6/satellite-shield-3-testing-items.png)
Testing Variations | |||
| Balloon Astronaut
Another way to approach this design challenge is to ask teams to build a protective suit for a balloon "astronaut." We recommend using a 7 ft (2.13 m) PVC pipe for testing, as it generally takes more kinetic energy for the space debris to pop the balloon. |
/-/https/www.sciencebuddies.org/cdn/Files/19771/5/satellite-shield-4-balloon-astronaut.png) Illustration of testing set-up for Balloon Astronaut version. At the top a pen has a screw taped to it. The pen is over a 7 ft PVC pipe. The PVC pipe is over a ballon which is labeled 'Balloon astronaut' with protective shield |
Testing Without the Tube
If desired, this activity can be also conducted by dropping the space debris directly down on the test item without the tube. To ensure consistency when testing, place a piece of tape on a wall 2 ft (.61 m) from the ground and ask learners to drop the space debris tester from that height. |
/-/https/www.sciencebuddies.org/cdn/Files/19772/7/satellite-shield-9-cardboard-tube.png) Two illustrations. One shows a cardboard tube with a red circle over it, the second shows a two foot measurement |
This design challenge involves dropping a space debris tester (an item with a slightly sharp end) down a tube. To prioritize safety during prototyping, make sure that students are aware that they should...
- wait for the team before them to finish before approaching the testing area.
- always hold the space debris tester sharp side down.
- only drop one space debris tester per test.
- never remove the space debris testers from the testing area.
In some settings, it may be necessary for students to be supervised at the testing area for this challenge. The facilitator can offer support to groups as they come up to test or call teams over to test and check in if it seems like more support is needed.
Lesson Preparation
- Collect, organize, and set up building materials.
- Print the Satellite Shield Observation Sheets.
- Build a solution (or solutions) yourself, with other educators, or with kids you know. This will allow you to practice with the materials and tools and to anticipate student questions.
Lesson Instructions
| Lesson Outline | |
|---|---|
| Frame the Challenge | 15 min total |
| Activate Prior Knowledge | 10 min |
| Introduce the Challenge | 5 min |
| Activity | 45 min |
| Materials Investigation | 10 min |
| Prototype (Build and Test) | 20 min |
| Share Solutions | 10 min |
| Debrief | 5 min |
Frame the Challenge
Activate Prior Knowledge (10 min)
- Start by exploring what learners already know about space debris, or human-made space junk.
- What do you think the word "debris" means?
- What do we know about space debris? How is it made?
- What kinds of items make up space debris?
- Where is most space debris located?
- Inform learners that most space debris is orbital debris, revolving around the Earth's orbit.
- If learners need more context, see Additional Resources: Orbital Debris.
- Optional: Project this NASA video to visually show what the debris currently looks like around the Earth.
- Ask Guiding Questions to explore the problems caused by orbital debris.
- Why might orbital debris be dangerous for spacecrafts, satellites, or an astronaut doing a spacewalk?
- What could happen if orbital debris collides with a spacecraft or satellite at high speeds?
- What could help decrease the damage of high velocity impact from orbital debris?
- Have them consider what could be done to protect the more than 5,465 satellites in space as of April 2022. (Want to know the current number? Check out the Union of Concerned Scientists website, which tracks space traffic.)
As of 2021, there are more than 25,000 pieces of debris larger than a softball orbiting the Earth. Orbital debris travels at high speeds (approximately 15,700 mph in low Earth orbit), creating a high potential for catastrophic collisions with spacecraft and satellites. In fact, the International Space Station has to maneuver its position a couple times every year just to avoid being hit by orbital debris.
Check out the resources below to learn more about the problems with orbital debris.
- "Space Debris and Human Spacecraft," National Aeronautics and Space Administration (NASA) website
- "NASA Orbital Debris Program Office," NASA website
- " 'We've left junk everywhere': why space pollution could be humanity's next big problem," The Guardian
- "McKinsey for Kids: Space junk - it's out of this world," McKinsey & Company website
- "Space collision: Chinese satellite got whacked by hunk of Russian rocket in March," SPACE.com
In this design challenge, students are exploring how to minimize the impact of two colliding objects: space debris and a satellite. A collision is an event in which two or more bodies exert forces on each other. Damage to the satellite occurs when it is unable to absorb the impact energy resulting from the space debris colliding with it at high speeds. For other real-world examples, consider crumple zones in cars, padding in football helmets, or even packing materials in shipping boxes.
Introduce the Design Challenge (5 min)
- Introduce the design scenario:
You and your team of satellite engineers are tasked with designing a protective barrier that can shield a satellite from orbital debris. Your team will need to collect data on different material combinations to see which properties are most successful at preventing colliding debris from damaging the satellite. - Introduce the design problem, criteria, and constraints.
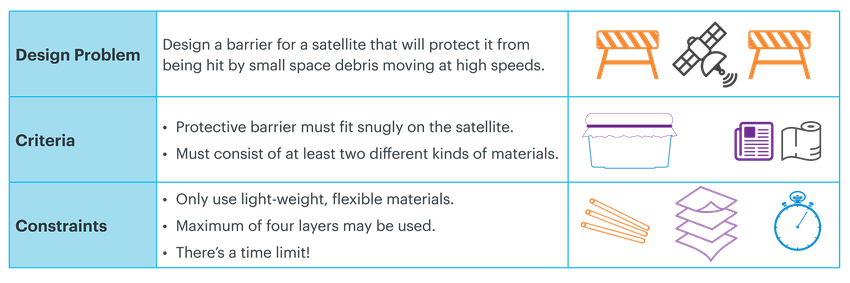
Design problem: Design a barrier for a satellite that will protect it from being hit by small space debris moving at high speeds. Criteria: Protective barrier must fit snugly on the satellite. Must consist of at least two different kinds of materials. Constraints: Only use light-weight, flexible materials. Maximum of four layers may be used. There's a time limit!
- Turn learners' attention to the testing area. Demonstrate a test on a "satellite" without any protective barrier by placing the tube on top of it and sending the space debris testers down the tube.
- Review the safety procedures with learners to ensure best practices during testing.
- Show learners the Observation handout where they will record each material combination they test.
- Emphasize that rather than continuing to adjust and retest the same design, their goal is to test multiple materials combinations they believe could be potentially effective at preventing damage from the space debris testers.
- Let learners know that they will spend the first few minutes exploring the materials and discussing what properties they think they should include in their design before they get their satellites.
/-/https/www.sciencebuddies.org/cdn/Files/19773/5/satellite-shield-5-design-problem.png)
Exploring materials is an important aspect of engaging in an engineering project. Spending time investigating the properties of the materials can help learners make informed decisions about what they are creating.
Considering materials carefully is uniquely important for engineers working on satellites and other items going into space, which has extremely harsh conditions and requires costly fuel during the launch phase. Try these tips for encouraging learners to deeply explore their materials:
- Ask learners to do a materials investigation brainstorm before they start building. Have each person select a different material and share ideas for how it could be used in their group's solution.
- Encourage learners to "think with their hands" by tinkering with and manipulating materials while they come up with ideas and imagine solutions.
- Create real-world connections by introducing learners to careers in Materials Science. These scientists investigate materials to develop new products and solve problems.
Check out The Tech Interactive's Tech Tips for more strategies for materials and brainstorming.
Design Challenge
Materials Investigation (10 min)
- Divide students into teams of three or four.
- Have teams collect materials. Ask them to spend this time playing with the materials to learn more about their physical components, properties or characteristics.
- While teams are exploring the materials, encourage them to be curious about which properties may be most effective for solving this problem:
- Is the material stretchy or stiff? How flexible does it need to be?
- Do you think this material might be good at absorbing impact? Why?
- When they are ready, have teams call you over and share a couple of observations they made about the materials and why they think they will be effective at protecting the satellite.
- Once the team shows they are ready to proceed, give them a satellite and a Satellite Shield Observation Sheet.
Prototype (Build and Test) (20 min)
- As teams build and test, ask open-ended questions to encourage learners to reflect on how they are using the materials:
| Just Getting Started |
|
| Problem-Solving After Testing |
|
| Pushing Design Further |
|
- Encourage teams to test as often as possible. Help them make observations during testing.
- Remind learners to record their results for each test on their Satellite Shield Observation Sheet.
- Have teams continue testing throughout the entire prototyping time, even if they are successful. Remind them that their goal is to explore as many types of materials combinations as possible.
- Provide ten and five minute warnings. Bring the whole class back together when the time is up.
Share Solutions (10 min)
- Have the teams take turns sharing what they discovered during their material properties testing. Possible Sharing Questions could include:
- Which material combinations were the most successful? Why do you think this combination worked well?
- Which material combinations were the least successful? Why do you think these combinations did not work as well?
- Was there anything else you would want to test if you had more time?
- After each team shares, invite the other students to give positive feedback on their designs and encourage them to share suggestions.
Debrief (5 min)
- Lead a short debrief with some of these questions. Possible Debrief Questions could include:
- Was anything consistently successful or unsuccessful in different team tests?
- How would your team adjust your design if the space debris were bigger?
- What material properties did we find are important for protecting the satellite?
- Would you make changes to your design if the space debris was approaching faster (i.e., tested using a longer tube)?
- Weight: Consider adding weight to the space debris test items to see if the team's barriers can withstand various types of impact.
- Distance: Include different lengths of tube to see if their designs can withstand different drop heights. This can also be an opportunity to discuss how changes in distance affects the object's energy.
- Compact and Attached: Sophisticated satellites might be able to deploy protective barriers once they are in orbit. In this situation, the barrier would not need to fit snugly, but might need to be something that stays attached and does not increase the dimensions of the satellite significantly. Challenge teams to create barriers that don't increase the dimensions of the satellite by more than .79 in (2 cm).
- Non-Newtonian Fluids: Explore other methods for absorbing impact. Try launching the space debris into non-Newtonian fluids like shampoo or oobleck, a non-Newtonian liquid that acts like a liquid when at rest and like a solid when put under pressure.
/-/https/img.youtube.com/vi/WRKQGwh_Mw0/0.jpg)
/-/https/img.youtube.com/vi/Ar78O1hl7TE/0.jpg)
/-/https/img.youtube.com/vi/WtP7sxWSF9c/0.jpg)