/-/https/www.sciencebuddies.org/cdn/Files/21464/5/sb-logo.png)
/-/https/www.sciencebuddies.org/cdn/Files/21464/5/sb-logo.png)
Plant Seed Design Challenge
Summary
/-/https/www.sciencebuddies.org/cdn/Files/14201/7/seed-design-lesson-plan.jpg)
Overview
In this small group activity, students will build a plant seed (burr) from a Styrofoam® ball and other crafts materials. The seed needs to be designed in a way that it can be dispersed by attaching to a mockup animal (wool glove). Students will first test if their seed attaches to the wool glove and then carry their attached seed along an obstacle course inside the classroom. As students design their plant seed and mimic its dispersal via an animal, they will realize how some plants grow specialized seeds and employ animals to disperse their seeds in order to increase their chances of successful reproduction.
Learning Objectives
- Name at least two modes of seed dispersal.
- Explain why plants grow seeds with hooks and spikes.
- Design and build a plant seed that fulfills certain requirements.
NGSS Alignment
This lesson helps students prepare for these Next Generation Science Standards Performance Expectations:- MS-LS1-4. Use argument based on empirical evidence and scientific reasoning to support an explanation for how characteristic animal behaviors and specialized plant structures affect the probability of successful reproduction of animals and plants respectively.
- MS-ETS1-2. Evaluate competing design solutions using a systematic process to determine how well they meet the criteria and constraints of the problem.
|
Science & Engineering Practices
Constructing Explanations and Designing Solutions.
Apply scientific ideas or principles to design, construct, and/or test a design of an object, tool, process or system.
Undertake a design project, engaging in the design cycle, to construct and/or implement a solution that meets specific design criteria and constraints Optimize performance of a design by prioritizing criteria, making tradeoffs, testing, revising, and retesting. Engaging in Argument from Evidence. Evaluate competing design solutions based on jointly developed and agreed-upon design criteria. |
Disciplinary Core Ideas
LS1.B: Growth and Development of Organisms.
Plants reproduce in a variety of ways, sometimes depending on animal behavior and specialized features for reproduction.
ETS1.B: Developing Possible Solutions. A solution needs to be tested, and then modified on the basis of the test results, in order to improve it. There are systematic processes for evaluating solutions with respect to how well they meet the criteria and constraints of a problem. |
Crosscutting Concepts
Structure and Function.
Structures can be designed to serve particular functions by taking into account properties of different materials, and how materials can be shaped and used.
|
Materials
/-/https/www.sciencebuddies.org/cdn/Files/14202/6/seed-design-materials-lesson-plan.jpg)
For each student group:
- Styrofoam® balls, 3 cm diameter (2)
- Wool glove
- Scissors
- Tape
- Glue
- Craft materials: Toothpicks, pipe cleaners, paper clips, metal wire, rubber bands, paper, etc. Note: Velcro tape is another option, but this might result in all seeds looking the same and being successful in the obstacle course.
For teacher:
- Printed example pictures of seed designs
- An example burr (self-made or from nature)
- Measuring tape
- Stopwatch
Background Information for Teachers
This section contains a quick review for teachers of the science and concepts covered in this lesson.Most plants have to make seeds to reproduce. But it is not just enough to make the seeds, a plant also has to ensure that its seeds find a place where they can grow and start a new plant. The process of moving, spreading or transporting seeds away from the parent plant is called seed dispersal. As plants are usually immobile, they have to engage in other strategies to make sure their seeds are spread. Dispersal of seeds is very important for the survival of plant species. If plants grow too closely together, they have to compete for light, water and nutrients from the soil. Seed dispersal allows plants to spread out from a wide area and avoid competing with one another for the same resources.
/-/https/www.sciencebuddies.org/cdn/Files/14204/6/example-seeds.jpg)
Figure 1. Some examples of seeds that are dispersed via animals, wind, and water.
Plant seeds, such as shown in Figure 1, are dispersed in several different ways. In some plants, seeds are housed within a fruit (such as apples, oranges, or berries). These fruits, including the seeds, are eaten by animals who then disperse the seeds when they defecate. Some fruits can be carried by water, such as a floating coconut. Other seeds are dispersed by the wind—such as the "winged" seeds from a maple tree that spin and "helicopter" through the air as they fall or the light feathery seeds from a dandelion that can catch on the breeze. The longer a seed stays in the air, the farther it can be blown by the wind, helping the plant species widely scatter its offspring.
Yet another clever dispersal strategy is used by plants that cover their seeds in hooks or spines as shown in Figure 2. These so-called burrs are designed in a way that they attach to an animal's fur as it passes by. Eventually, the seed will fall off and grow into a new plant. Burdock, Sea Holly, and Cocklebur are some plant species that disperse their seeds this way.
/-/https/www.sciencebuddies.org/cdn/Files/14205/7/example-burrs.jpg)
Figure 2. Examples of plant seeds that have hooks and spines.
In this lesson, students will design their own plant seed. Their seed has to be able to attach to a mockup animal (wool glove) and has to stay attached while students carry it through an obstacle course. By designing the seed, students will notice how certain structures on a plant seed are designed to serve a particular function. At the same time, students will realize that many plants are dependent on animals for seed dispersal and successful reproduction.
Additional Background Links
- Plant reproduction, from BBC
- Seed Dispersal, from theseedsite.co.uk
- Seeds - Hooks and Spikes, from globalzoo at YouTube
- Bur, from Wikipedia
Prep Work (15 minutes)
- Print out the example pictures of seed designs.
- Students will need to carry their seeds back and forth. To make this more fun, you can set up an obstacle course in your classroom. You could for example make students go around chairs or up and down a ramp, etc. The whole course should cover a distance of at least 10 m.
- If possible, design and build your own seed before the lesson, using the same materials the students will have available in the classroom. This allows you to provide the necessary support for students during their designing and building phase.
Teacher Tool Box
Engage (30 minutes)
- Tell students that in this lesson they will focus on how plants disperse their seeds. Start by discussing the purpose of plant seeds.
 Why does a plant make seeds? What do they need them for?
 Guide students to conclude that plants make seeds, so they can reproduce.
 - Show some examples of plant seeds and discuss their design. Show the first slide of the seed design example pictures. Mention that all of these images show some kind of plant seed.
What do you notice when looking at and comparing all of these seeds?Students should notice that all the seeds look different. For example, they have different shapes, colors, and sizes. Have students describe the different features of the plant seeds and make notes of their attributes (feathery, spiky, looks like a wing, attached to a fruit, etc.)Why do you think these seeds all look different?Have students share their thoughts.
- Show students the Seed Dispersal video. Pause at 0:20 after the question "So, how does it happen?"
Create AssignmentEmbed Link
 Google Classroom
 Microsoft Teams
 Canvas
 Schoology
 OtherWhy do you think a plant's seed needs to move away from its parent plant?Listen to students replies. Help students realize that new plants need their own space, nutrients and light. If plants grow too close to each other they compete for these resources and some of them might die.With seed dispersal in mind, can you now explain why all the seeds in the example pictures look so different? How does their structure serve the purpose of seed dispersal?Revisit the first slide of the example pictures and have students speculate how each of the seeds is dispersed.
 - Finish watching the Seed Dispersal video. Review the video briefly.
What are some techniques mentioned in the video that plants use to disperse their seeds?Listen to student's answers. They should mention seed dispersal by animals, by wind, and by water.
- Have students fill out the first section of their worksheet.
/-/https/www.sciencebuddies.org/cdn/Files/14174/23/note-question-mark-30.png)
/-/https/www.sciencebuddies.org/cdn/Files/14175/24/conversation-bubbles-30.png)
/-/https/i.ytimg.com/vi/TpzHF5arzj4/hqdefault.jpg)
/-/https/www.sciencebuddies.org/cdn/Files/20511/4/google-classroom.png)
/-/https/www.sciencebuddies.org/cdn/Files/20512/4/ms-teams.png)
/-/https/www.sciencebuddies.org/cdn/Files/20469/4/Canvas_Bug_Color_RGB.png)
/-/https/www.sciencebuddies.org/cdn/Files/20470/5/Schoology-Logo.png)
/-/https/www.sciencebuddies.org/cdn/Files/20471/4/lms.png)
/-/https/www.sciencebuddies.org/cdn/Files/20469/4/Canvas_Bug_Color_RGB.png)
/-/https/www.sciencebuddies.org/cdn/Files/20470/5/Schoology-Logo.png)
/-/https/www.sciencebuddies.org/cdn/Files/20471/4/lms.png)
Explore (90 minutes)
- Tell students that today they will build their own plant seed. Specify the requirements for their plant seed design. They have to design their seeds in a way that they can easily be carried away by animals just the way some plants do. Show students the burrs on slide 2 of the example pictures. Point out their spiky features. Then show and name some example plants (slide 3 in the example pictures) that grow their seeds this way.
- Tell students that to test their plant seed design they will use a wool glove to simulate the animal. They will have to carry their attached seed for a certain distance and through an obstacle course to see if it is able to stay attached.
- Divide students into groups of three. Then hand out a Styrofoam® ball to each group and explain to students that this will be the core of their seed. They have to use the available materials to change the Styrofoam® ball in a way that it is able to attach to a piece of wool. Show students all the materials that are available to them.
- Demonstrate to students how to test their seed.
- Put on the wool glove.
- Hold your hand with extended fingers parallel to the ground.
- Attach your example seed (either self-made, or from nature) to the glove and show students how the burr manages to stay attached using its spikes and hooks (see Figure 3).
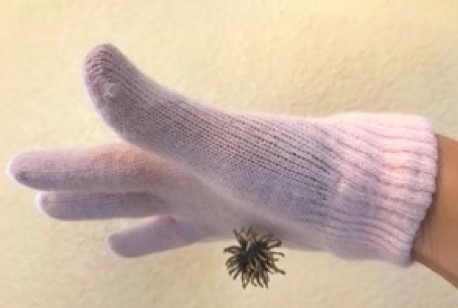
Figure 3. The burr holds on to the wool glove with its spikes and hooks.
- Walk through the obstacle course while keeping your hand extended and parallel to the ground with the seed still attached.
- Mark the place (with tape on the floor) where the seed falls off the glove. The goal is to keep the seed attached to the glove until the end of the obstacle course.
-
Give students 20-30 minutes to follow the instructions on the worksheet about brainstorming their own design solutions, choosing a team design as well as building and testing their seed. During their design and building phase, students should keep following questions in mind.
What structures or features does a natural burr have that make it stick to animal fur?How can we recreate these structures or features with the materials we have?
- Remind students to test their seed design frequently. Provide wool gloves to any group that wants to test their seed. Based on their test results students should identify the characteristics of their design that worked and didn't work. Then they should use this information to modify and optimize their design. If students like they can also time their test runs through the obstacle course with a stopwatch.
- Once all seeds are finished, gather the groups. Test how each group's seed performs in the obstacle course. Have each group go through the obstacle course one at a time. Create a start line at which students have to attach their seed to the glove. After that they are not allowed to touch the seed anymore. Remind the student going through the obstacle course that he/she needs to extend his/her hand the whole time and keep it parallel to the ground as shown in Figure 3. If you have time, do three separate runs so each student within a group can have a turn. In each run, have the student represent a different way that an animal moves when dispersing the seed.
- Round 1: The student walks through the obstacle course.
- Round 2: The student walks fast (indoor run) through the obstacle course.
- Round 3: The student hops through the obstacle course.
/-/https/www.sciencebuddies.org/cdn/Files/14209/6/burr-on-glove.jpg)
Reflect (30 minutes)
- Have each group present their seed. Guide each group's presentation.
How did your design perform in the obstacle course?Which features of your seed allows it to attach to an animal's fur?Let students evaluate each design solution based on the design requirements and its performance in the obstacle course. Have them make notes about the different designs in their worksheet.What animals do you think could carry your seed?
- Conclude the activity by having students summarize what they did and what they learned about plant dispersal strategies in nature.
Assess
You can use this quiz to assess student learning after the activity:
- Online quiz, assignable in any LMS
- Quiz (pdf) and answer key (PDF)
Make Career Connections
Discussing or reading about these careers can help students make important connections between the in-class lesson and STEM job opportunities in the real world.
/-/https/careerdiscovery.sciencebuddies.org/cdn/Files/1662/17/unsplash-oz1NzV2xWXU.jpg)

/-/https/careerdiscovery.sciencebuddies.org/cdn/Files/1450/21/iStock-1227179796.jpg)
Lesson Plan Variations
- Let students find out what type of plants make burrs in nature. Have them find pictures of these seeds and compare them between plants.
- If you can, go outside and let students collect burrs or plant seeds that can be dispersed by animals.
/-/https/img.youtube.com/vi/w8j1ZHAhu3g/0.jpg)
/-/https/img.youtube.com/vi/QCZISwDi_Qo/0.jpg)
/-/https/img.youtube.com/vi/o-afrQfaRy0/0.jpg)