/-/https/www.sciencebuddies.org/Files/21464/5/sb-logo.png)
/-/https/www.sciencebuddies.org/Files/21464/5/sb-logo.png)
Explore Shadows with a Shadow Play
Summary
/-/https/i.ytimg.com/vi/yqmXAm1Cw3k/maxresdefault.jpg)
/-/https/www.sciencebuddies.org/Files/20511/4/google-classroom.png)
/-/https/www.sciencebuddies.org/Files/20512/4/ms-teams.png)
/-/https/www.sciencebuddies.org/Files/20469/4/Canvas_Bug_Color_RGB.png)
/-/https/www.sciencebuddies.org/Files/20470/5/Schoology-Logo.png)
/-/https/www.sciencebuddies.org/Files/20471/4/lms.png)
/-/https/www.sciencebuddies.org/Files/20469/4/Canvas_Bug_Color_RGB.png)
/-/https/www.sciencebuddies.org/Files/20470/5/Schoology-Logo.png)
/-/https/www.sciencebuddies.org/Files/20471/4/lms.png)
/-/https/www.sciencebuddies.org/Files/16813/6/shadow-play-puppets-overview.jpg)
Overview
Everybody and everything that is opaque has a shadow. Shadows are fun to play with because you can change their shape and size or even make them disappear. In this lesson, students will first explore how shadows are made and how their appearance can be changed. Then students will use their gained knowledge to create and perform a shadow play.
Remote learning: Part 1 on this lesson plan can be conducted remotely. The Engage section of the lesson can be done over a video call, then students can work individually and independently during the Explore section of Part 1, using the Student Worksheet as a guide. Students might need a helper that holds the shadow puppet for them while they move the flashlight. A set of materials can be prepared in advance or students can use materials found around the house. End the lesson with a discussion over a video call during the Reflect section. You can encourage students to come up with a story for a shadow play, but it might be challenging for them to perform the play by themselves.
Learning Objectives
- Explain, with evidence, that opaque objects block light and cast a shadow.
- Understand how the size and shape of a shadow can be manipulated.
- Collaboratively create and tell a story using shadow puppets.
NGSS Alignment
This lesson helps students prepare for these Next Generation Science Standards Performance Expectations:- 1-PS4-3. Plan and conduct investigations to determine the effect of placing objects made with different materials in the path of a beam of light.
|
Science & Engineering Practices
Planning and Carrying out Investigations.
Plan and conduct an investigation collaboratively to produce data to serve as the basis for evidence to answer a question.
Analyzing and Interpreting Data. Use observations (firsthand or from media) to describe patterns and/or relationships in the natural and designed world(s) in order to answer scientific questions and solve problems. Engaging in Argument from Evidence. Construct an argument with evidence to support a claim. |
Disciplinary Core Ideas
PS4.B: Electromagnetic Radiation.
Some materials allow light to pass through them, others allow only some light through and others block all the light and create a dark shadow on any surface beyond them, where the light cannot reach. Mirrors can be used to redirect a light beam.
|
Crosscutting Concepts
Cause and Effect.
Simple tests can be designed to gather evidence to support or refute student ideas about causes.
|
Materials
/-/https/www.sciencebuddies.org/Files/16820/6/shadow-play-lesson-plan-materials.jpg)
Materials per Student Group of 2–4:
- Light source, such as a flashlight or spotlight
- Blank wall
- Dim room
- Cardstock
- Pencil
- Scissors
- Wooden skewers or craft sticks (5)
- Clear tape
- Optional: Printed Shadow Puppet Template
Materials for Educator:
- Two opaque objects with different shapes that completely block the light
Optional - For Shadow Puppet Theater Option 1:
- Door frame or other space (ceiling) from which to hang a shadow screen
- Shadow screen: White sheet, cloth, or white drawing paper roll
- Large piece of cardboard to cover students behind the screen
- Safety pins or tape
Optional - For Shadow Puppet Theater Option 2:
- Large cardboard box
- Utility knife
- White drawing paper roll or parchment paper
- Tape
Background Information for Teachers
This section contains a quick review for teachers of the science and concepts covered in this lesson.The saying "where there is a shadow, there must be light" tells us that you need some kind of light source to generate a shadow. For example, a person's shadow that constantly follows it around on a sunny day is generated by the Sun (Figure 1). But shadows do not necessarily disappear with the Sun. Other light sources like the headlights of a car, a table lamp, or a simple flashlight can cast shadows, too. The brighter the light source, the sharper the shadows will be.
/-/https/www.sciencebuddies.org/Files/16821/6/shadows-of-people-on-street.jpg)
Figure 1. On a sunny day, everybody and everything casts a shadow.
Every light source emits light that travels away in a straight line called a ray. To cast a shadow, you need an object that can block the light rays. Whether or not the object casts a shadow depends on its material. Materials that are opaque, such as people or cardstock, block all incident light and result in dark and sharp shadows. Materials that are translucent, like frosted plastic, let some light through and might result in blurry or lighter shadows. Materials that are transparent, such as glass, let almost all light through and barely cast any shadow at all.
How can the size and shape of a shadow be changed? This can be done by either moving the light source or by moving the object within the light beam. Most light spreads out the farther it moves away from the light source (Figure 2).
/-/https/www.sciencebuddies.org/Files/16822/6/light-rays-radiating.png)
Figure 2. Light rays spreading out from two different light sources.
The closer an object is to this type of light source, the more light rays it will block, resulting in a larger shadow. Changing the angle of the light source can change the length and shape of the shadow. A steeper angle results in a longer shadow. This is why shadows outside are very long near sunrise or sunset, but very short when the Sun is directly overhead at noon (Figure 3).
/-/https/www.sciencebuddies.org/Files/16823/6/shadow-comparison-noon-sunset.png)
Figure 3. The appearance of a shadow changes with the position of the Sun.
The fact that the appearance of a shadow can easily be manipulated is exploited in shadow plays. Shadow play or shadow puppetry is an ancient form of storytelling. It involves cut-out figures or shadow puppets that are held between a light source and a translucent screen. By moving the puppets within the light beam, the shadow puppets can be animated so that they appear to walk, dance, or fight (Figure 4).
/-/https/www.sciencebuddies.org/Files/16824/6/shadow-play-puppeteer.jpg)
Figure 4. A puppeteer animates shadow puppets behind a screen.
In this lesson, students will first explore how shadows are made and how their appearance can be changed. Then students will use their gained knowledge to create and perform a shadow play.
Additional Background Links
- Light and Shadows, from toppr
- Light does appear to travel in straight lines, from University of Leicester, UK
- Playing with Shadows, from The Kennedy Center
Prep Work (5-30 minutes)
- Print one Shadow Puppet Template on cardstock for each student group.
- Make one shadow puppet yourself for demonstration purposes.
- Optional: If you want to make a proper shadow puppet theater for your students, you can follow the steps below to build one of the two theater options.
- Shadow Puppet Theater Option 1:
- Use safety pins or tape to secure a white sheet of cloth or a large sheet of white paper on the ceiling or door frame, as shown in Figure 5. Make sure that the screen is flat and that there is enough space behind the screen for students to operate their puppets. Leave room for the audience in front of the screen.
- For the shadow play, set up a flashlight or spotlight that is large enough to light up the whole (or most of the) screen from behind. To mask students that are sitting on the floor operating their puppets, you can set up a large cardboard piece at the bottom part of the screen (Figure 5, left).
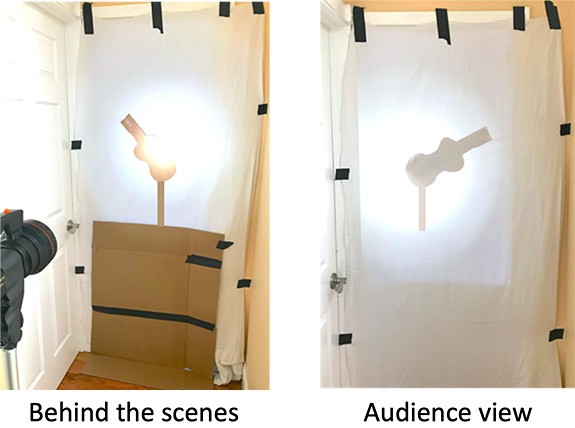
Figure 5. A white sheet is hung up in a doorframe and used as a screen for a shadow play theater.
- Shadow Puppet Theater Option 2:
Use a large cardboard box to make your shadow screen, as shown in Figure 6.
- Turn the box upside down, with the larger side facing the audience.
- Cut a large rectangle out of the front side of the box, but be sure to keep a 1-inch margin on each side to serve as a frame.
- Cut a rectangle out of both sides of the box, through which students will insert their puppets.
- On the back side, cut another hole through which to shine the light.
- Use parchment paper or paper from a drawing roll to cover the front hole. Tape it to the box on the inside and make sure it is flat.
- Optional: Students can decorate the box frame on the front to make it look like a theater.
- Set up the light behind the screen so it shines through the hole of the back wall (Figure 6).
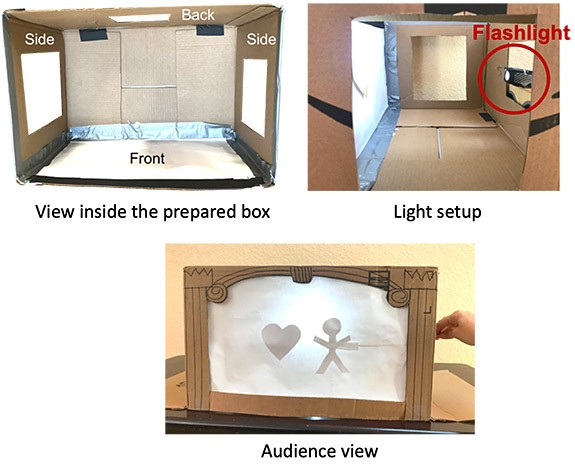
Figure 6. Cardboard box shadow play theater. The back hole will hold the light source, and side holes allow access for the puppets.
- If you choose option 2, instruct students to prepare their shadow puppets as follows:
- Cut out the shadow puppets from the template or draw your own object/person on the cardstock and then cut it out.
- Lay the tip of a wooden skewer or craft stick partway up a piece of tape and fold the rest of the tape over, as shown in Figure 7. With another piece of tape, attach the folded part of the tape to the back of the puppet/object. This setup provides more flexibility and allows students to put the puppets closer to the screen.
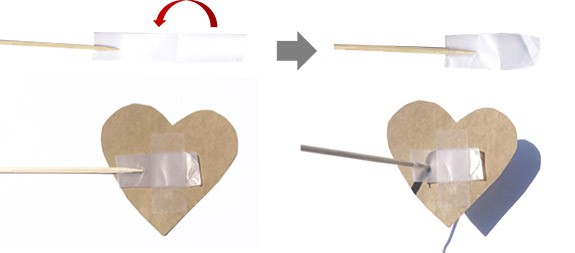
Figure 7. Instructions on how to make the shadow puppets for Shadow Puppet Theater Option 2.
- Shadow Puppet Theater Option 1:
/-/https/www.sciencebuddies.org/Files/16825/7/shadow-theater-setup-option1.jpg)
/-/https/www.sciencebuddies.org/Files/16826/6/shadow-theater-setup-option2-marked.jpg)
/-/https/www.sciencebuddies.org/Files/16827/6/shadow-puppet-preparation.jpg)
Teacher Tool Box
Engage (15 minutes)
- Tell students that in today's lesson they will explore and play with shadows. Ask students to look around them and discuss the following questions.
 Do you notice any shadows around you?What kinds of shadows do you see?Where do you see the shadows?What do the shadows look like?
 Let students describe their observations.
 - If the students have difficulties finding visible shadows in the classroom, ask:
Why do you think it is difficult for us to see any shadows around us (or inside)?Where were you the last time you saw shadows, such as your own shadow?When is a good time or place to see shadows?If we look very closely, can we still find some shadows?Have students share their ideas. Focus on responses that mention that you need light to create a shadow and an object onto which the light shines.
- Dim the room and switch the flashlight on and point it at a wall. Then show students one of the opaque objects (that completely blocks the light) and put it on a table close to a wall. Shine the light on the wall, next to the object and ask students:
What do you think will happen when I place the object into the path of the light?Have students share their predictions.
- Then place the object into the light path of the flashlight so that it casts a shadow on the wall that clearly has the shape of the object. Direct students' attention to the shadow on the wall and start a discussion.
What do you notice?What does the shadow look like (dark/light, vague /sharp, big/small, what shape, etc. )How do you think the shadow was made?Why did the shadow appear on the wall?Why do you think the shadow has that shape?Listen to students' replies. Elicit responses that point out that the shadow has the shape of the object.
- Show students the second opaque object that blocks all light.
What do you think happens if I exchange the first object with the new one?Let students make their predictions.
- Then replace or have one student replace the object and discuss:
What do you notice about the shadow with a different object?How and why has the shadow changed?Let students discuss their observations. Help them to conclude that any object that is able to block all the light (an opaque object) will cast a dark area behind itself when placed in a light beam; we call this dark area the object's shadow. As the light cannot pass through the object, light cannot reach the spot behind the object, so that spot appears dark. This dark spot—the shadow—has the shape of the object. If you change the object, the shape of the shadow changes, too.
- Show students this shadow time lapse video and have students describe what they see.
What did the video show?What did you notice about the shadow of the chair?Can anybody explain why the shadow of the chair changed this way?Listen to students' responses. They will likely mention that the shadow of the chair was moving and changing its shape over time. Have students wonder why this happens, but do not provide an answer to this question yet, as students will do their own investigations to find out how they can change a shadow's appearance.
- Tell students that they will now do their own investigation to find out how they can change the shape and appearance of a shadow.
/-/https/www.sciencebuddies.org/Files/14174/23/note-question-mark-30.png)
/-/https/www.sciencebuddies.org/Files/14175/24/conversation-bubbles-30.png)
/-/https/i.ytimg.com/vi/Lvhjbrr5GI8/maxresdefault.jpg)
Part 1: Exploring Shadows
Explore (20 minutes)
- Divide students into pairs. Provide each group with a pencil, cardstock, scissors, a wooden skewer or craft stick, tape, and a flashlight. Then ask each group to make a simple shadow puppet or shape. They can either choose a shape from the Shadow Puppet Template or make their own. Students will have to cut these out and tape them to the end of a skewer or craft stick.
- Tell students that they will use their shadow puppet to investigate shadows. Demonstrate the activity to the group: Have one student hold the flashlight and point it at the wall so you can clearly see a spot of light on the wall. Take the shadow puppet and place it into the beam of light to create a shadow of the shape on the wall. Point out the shadow and challenge them to make as many different shadows with their single puppet as they can.
What are the different types of shadows you can make with your shadow puppet?Can you change its size, shape, color, etc.?
- Ask every group to find a spot on the wall and have students investigate with their materials for a few minutes. Caution them not to shine the flashlight into each other's faces. Have them draw some of the shadow shapes they were able to make on their Student Worksheet.
- Next, have students follow the directions on their worksheet to investigate in more detail how the shape and appearance of a shadow can be changed. Ask them to observe what happens to the shadows if they change how they hold the flashlight or their shadow puppets.
Reflect (15 minutes)
- Bring all groups back together and have students share what they have noticed during their initial investigation.
What are some different shadows you could make? How did they look?What were you able to do with your shadows?How could you make them look different?Haves students share their observations. Focus on students' ideas of how to make shadows big or small, blurry or sharp, dark or light, or long and short, etc.
- Continue the discussion in which students share their observations. This time, be more specific with your questions:
How could you make your shadow big or small?How could you make your shadow tall or short?How could you change the location of the shadow on the wall (move it to the right, left, up, or down)?How can you turn your shadow into a line?What can you do to make the shadow disappear?Based on your observations, did you notice any patterns or relationship between how the shadow looks and how you hold the flashlight?Ask individual groups to demonstrate how they could change the shape or size of the shadow. Encourage students to explain what they did and how they moved their puppet or flashlight to change the appearance of the shadow. Guide students to conclude that you can change the shape or size of the shadow by either moving the flashlight in relation to the puppet or by moving the puppet in relation to the flashlight. The shape and size of a shadow depends on how you hold the flashlight in relation to the shadow puppet. Shadows grow in size if the flashlight and the object are closer together and shrink if the flashlight and the object are farther away. Shadow shapes and locations change if the flashlight is pointed at the object in different angles (if you move the flashlight or the object). Shadows disappear if you remove them from the path of light.
- Optional: Play a game of "Simon Says" with shadows to reinforce how the shape of a shadow can be changed. Use commands such as:
- Make your shadow grow.
- Make your shadow shrink.
- Make your shadow disappear.
- Make your shadow longer.
- Make your shadow shorter.
- Change the shape of your shadow.
- Make your shadow move to the right.
- Make your shadow move to the left.
- Make your shadow move up.
- Make your shadow move down.
- Make your shadow blurry.
- Come back to the shadow time lapse video that you showed in the beginning (or show it again) and ask your students if they can now explain the shadow's behavior.
With everything you now know about how shadows are created and how they can change, can you now explain the shadow's behavior in the video?Have students share their ideas. Using their replies, point out that the Sun shines on objects similar to how the flashlight shone on the shadow puppet in their investigation. As the Sun moves during the day, it shines on an object from different angles. As a result, the object's shadow changes positions and also gets longer or shorter or changes its shape in other ways, depending on how the Sun shines on the object. You can also demonstrate the movement of the Sun with a flashlight by moving it in a half-circle around an object on the table. Have students observe and describe how the shadow of the object changes.
- Tell students that now that they know how to make shadows and change their appearance, they will use their knowledge to make a shadow play.
Part 2: Creating a Shadow Play
Explore (at least 60 minutes)
Note: Depending on how much time your students need for each step, you can also spread the build, practice, and the actual performance over several lessons.
- Tell students that in this part of the lesson they will create a shadow play in groups and then perform it for their fellow students at the end. The play should take about 1–2 minutes. They are free to make up their own story, but explain that it needs to include following components:
- At least one person or object growing over time.
- At least one person or object somehow shrinking.
- At least one person or object suddenly disappearing and reappearing at another time.
- Divide the students into groups of 3–4 and give each group a couple of minutes to come up with a short story. Have them think about and decide on the events that happen at the beginning, the middle, and the end of their story. They should also think about the characters, objects, and settings in the play and what different characters say to each other. Advise them to make one or two students the storyteller while the others manipulate the shadow puppets or the flashlight. Remind them about the story requirements. If students have difficulty coming up with a storyline, provide some examples, such as a story about a person who finds a magic object that turns him/her into a giant and he/she needs to find a way to break the spell, or a story about a baby animal in the forest and its adventures as it grows into an adult animal, or they could make a play about a joke they heard. Let each group write an outline of their story on their worksheets, along with a list of characters or objects in the story (puppets). Walk around and guide students to keep their stories short, simple, and interesting. If students want to have too many puppets, encourage them to think about how they will hold all of the puppets in front of the screen.
- Hand out materials to each group (cardstock, scissors, pencils, skewers or craft sticks, and tape) and have them work on their shadow puppets. Remind students how to create a shadow puppet. Each group can make their own shadow puppets or use the puppets from the provided Shadow Puppet Template.
- Next, have the students practice their story with their characters. It might be best if each student within a group operates one puppet or object at a time (two if one object stays still). Allow 10–15 minutes for the students to practice the story several times with just the puppets and not their shadows. This way they can practice the sequence of events for their story and the narration or dialogue without having to focus on the shadows of the puppets.
- Then tell the students to practice with the puppets' shadows as they tell the story. They can practice by shining a flashlight or spotlight onto the wall and holding their puppets into the path of light. Remind students that the puppets or objects need to change size and disappear and reappear in the story.
- Once all groups are ready, have each group perform their play in front of the other groups. They can either do it on the wall or use a shadow puppet theater setup. Note that when you use a shadow puppet theater, the shadows look most clear if the puppets are held very close to the screen. The farther away from the screen the puppets are, the fuzzier and larger the shadows get. How the shadows look also depends on the light source; the more directed the light source, the clearer the shadows will be. If you use a shadow puppet theater, ideally, all groups should practice at least once using the actual theater before they do their performance.
Reflect (15 minutes)
- Once every group has performed their play, conclude the activity by congratulating all groups on their performance. Then reflect on how they manipulated their puppets and shadows during their play.
How did you make your puppet's shadow shrink or grow?Did you see the shape of a shadow puppet change during any of the plays?Let students share their observations and list a few examples of where this happened in the plays.
- As a reward for their fantastic performances, complete the lesson by showing students the video below (a shadow play with real people).
/-/https/i.ytimg.com/vi/gK2QfoP7EdM/maxresdefault.jpg)
Make Career Connections
Discussing or reading about these careers can help students make important connections between the in-class lesson and STEM job opportunities in the real world.
/-/https/careerdiscovery.sciencebuddies.org/Files/1640/26/Fyysikot_tyossaan.jpg)

/-/https/careerdiscovery.sciencebuddies.org/Files/1429/17/unsplash-4pM4nhHyo9M.jpg)
Lesson Plan Variations
- Make more shadow puppets with your students! Have them cut out different shapes or other figures from the cardstock and see how their shadows look. Can they make a puppet that has several connecting pieces?
- Let students explore what happens if they place translucent or transparent objects in the light. Do these make shadows, and if so, how and why are these shadows different from the shadows made by opaque objects?
- Let students explore what happens to a shadow if they use multiple light sources? Have them test two or three light sources at the same time. Ask them to place them all at different positions and observe how their shadow(s) change.
- Can you find a way to make colored shadows with your students? Look at this Colored Shadows activity to find out how it works.
- To integrate the lesson better with the language arts lessons, let students make a shadow puppet play of a section of a book they are reading, a poem, or any other literature piece they are studying.
/-/https/img.youtube.com/vi/W-5Z6S6Csjg/0.jpg)
/-/https/img.youtube.com/vi/u0P40Pd9EMU/0.jpg)
/-/https/img.youtube.com/vi/XNB3Ch-RIIU/0.jpg)