/-/https/www.sciencebuddies.org/Files/21464/5/sb-logo.png)
/-/https/www.sciencebuddies.org/Files/21464/5/sb-logo.png)
What Factors Affect the Strength of an Electromagnet?
Summary
/-/https/www.sciencebuddies.org/Files/12451/9/electromagnet-lesson-thumbnail.jpg)
Overview
Making an electromagnet from a battery, nail, and wire is a classic science demonstration. But instead of just demonstrating this for your students, let them explore it themselves! In this lesson they will discover how different variables affect the strength of an electromagnet.
Learning Objectives
- Build a working electromagnet from supplied materials
- Ask a scientific question about electromagnets that can be answered with an in-class experiment
- Plan and conduct an experiment to determine how a certain variable affects the strength of an electromagnet
NGSS Alignment
This lesson helps students prepare for these Next Generation Science Standards Performance Expectations:- MS-PS2-3. Ask questions about data to determine the factors that affect the strength of electric and magnetic forces.
|
Science & Engineering Practices
Planning and Carrying Out Investigations.
Plan and conduct an investigation individually and collaboratively, and in the design: identify independent and dependent variables and controls, what tools are needed to do the gathering, how measurements will be recorded, and how many data are needed to support a claim.
|
Disciplinary Core Ideas
PS2.B: Types of Interactions.
Electric and magnetic (electromagnetic) forces can be attractive or repulsive, and their sizes depend on the magnitudes of the charges, currents, or magnetic strengths involved and on the distances between the interacting objects.
|
Crosscutting Concepts
Cause and Effect.
Cause and effect relationships may be used to predict phenomena in natural or designed systems.
|
Materials
/-/https/www.sciencebuddies.org/Files/12452/9/electromagnet-lesson-materials.jpg)
Materials used to create an electromagnet include: a straw, a wooden pencil, metal nails of various sizes, alligator clips, paper clips, sandpaper, a spool of copper wire, tape, a D cell battery, a battery holder and scissors. These items can be used test the strength of the electromagnet based on how many paperclips it can lift.
For each group of students:
- D battery
- Battery Holder, available from our partner Home Science Tools®
- Alligator Clips (2), available from our partner Home Science Tools®
- Small piece of fine-grit sandpaper, roughly 3×3 cm
- Scissors
- Tape (any type is OK)
- Magnet wire, available from our partner Home Science Tools®
- Assorted Nails
- Other cylindrical items to use as magnet cores, like wooden pencils and plastic straws
- Paper Clips, available from Amazon.com (one box can be shared among several groups). Note that plastic-coated metal paper clips are OK, but do not use clips that are entirely plastic.
For classroom demonstration (optional):
- Strength of an Electromagnet Kit, available from Home Science Tools®
Disclaimer: Science Buddies participates in affiliate programs with Home Science Tools®, Amazon.com, Carolina Biological, and Jameco Electronics. Proceeds from the affiliate programs help support Science Buddies, a 501(c)(3) public charity, and keep our resources free for everyone. Our top priority is student learning. If you have any comments (positive or negative) related to purchases you've made for science projects from recommendations on our site, please let us know. Write to us at [email protected].
Background Information for Teachers
This section contains a quick review for teachers of the science and concepts covered in this lesson.Watch this video for an introduction to magnetism and electromagnetism:
/-/https/i.ytimg.com/vi/V-Gus-qIT74/maxresdefault.jpg)
/-/https/www.sciencebuddies.org/Files/20511/4/google-classroom.png)
/-/https/www.sciencebuddies.org/Files/20512/4/ms-teams.png)
/-/https/www.sciencebuddies.org/Files/20469/4/Canvas_Bug_Color_RGB.png)
/-/https/www.sciencebuddies.org/Files/20470/5/Schoology-Logo.png)
/-/https/www.sciencebuddies.org/Files/20471/4/lms.png)
/-/https/www.sciencebuddies.org/Files/20469/4/Canvas_Bug_Color_RGB.png)
/-/https/www.sciencebuddies.org/Files/20470/5/Schoology-Logo.png)
/-/https/www.sciencebuddies.org/Files/20471/4/lms.png)
The second half of the video demonstrates how electrical current creates a magnetic field. Electrical current flows through a wire connected between the two terminals of a battery. However, the magnetic field around a single, straight piece of wire is fairly weak. You can make the magnetic field much stronger by wrapping the wire into a coil, also called a solenoid. As long as each turn of the coil goes in the same direction, the magnetic fields around each turn will add up, resulting in a stronger field. This is important; if two turns go in opposite directions, their fields will cancel out instead of adding up!
You can make the field even stronger by wrapping the wire around a ferromagnetic core, like a nail. A solenoid with a ferromagnetic core is commonly called an electromagnet. Unlike a permanent magnet, an electromagnet can be turned on and off using electrical current.
Many variables affect the strength of this electromagnet, and there are some variables that do not affect the strength. While the underlying physics are more advanced (see Additional Background section), middle school students can still do an experiment to identify the relationships between these variables and the strength of the electromagnet. Table 1 provides a summary of some variables and how they do or do not affect the strength of the magnet, but this list is not exhaustive.
| Variable | Relationship |
|---|---|
| Number of times you wrap the wire around the core (referred to as "number of turns in coil") | More turns make the magnet stronger. |
| Amount of current flowing through wire | More current makes the magnet stronger. The amount of current can be increased by using multiple batteries or thicker wire (see variations—you will need to purchase additional materials to test this). |
| Core material | Ferromagnetic materials (iron, steel) make the magnet much stronger than non-ferromagnetic materials like paper, wood, or air. |
| Width of the nail | A wider nail will make the magnet stronger. |
| Length of the nail | Making the nail longer will not make the magnet stronger, unless you also add more turns to the coil. |
| Spacing of turns in coil | Tightly-spaced coils will make the magnet stronger |
| Surface coating of nail | Nails have different surface coatings (shiny, dull, smooth, rough, etc.), but this generally does not affect the strength of the magnet. |
| Location of coil on nail (in the middle vs. toward the end) | Assuming the coil does not take up the entire length of the nail, the magnet will be stronger if you place the coil near one end, and use that end to lift the paper clips. |
Figure 1 shows example data collected for the number of paper clips the magnet could lift vs. the number of turns in the coil (averages for three trials). Based on these data, adding more turns of wire makes the magnet stronger because it can lift more paper clips.
/-/https/www.sciencebuddies.org/Files/12453/10/electromagnet-example-data.png)
Figure 1. Example data.
Additional Background Links
- Electricity, Magnetism, & Electromagnetism Tutorial, Science Buddies
- Magnetism and Electromagnetism Tutorial (video), Science Buddies
- Wire Stripping Tutorial: How to Remove Insulation from Enamel-coated Magnet Wire, Science Buddies on YouTube
- What are the uses of electromagnets?, Universe Today
- Bar Magnet and Solenoid, HyperPhysics
- Solenoid, HyperPhysics
Prep Work (5 minutes)
If you purchased the Strength of an Electromagnet kit to use as a demonstration, set it up as shown in Figure 2.
- Wrap 50 turns of wire around one of the iron bolts. Make sure the turns are neatly parallel to each other and all go in the same direction. Cut the wire, leaving about 10 cm of extra wire on each end. Use a small piece of tape to hold the wire in place and prevent it from unraveling.
- Use a small piece of fine-grit sandpaper to remove the insulation from the last 2 cm on each end of the wire. Fold the paper in half, pinch the wire with it and pull the wire through, as shown in this video.
- Use the alligator clips to connect the ends of the wire to the battery terminals. This allows electrical current to run through the wire. In other words, it turns the electromagnet on.
- Dip the end of the bolt into a pile of paper clips, then lift it up. It should lift some of the paper clips.
- Disconnect one of the alligator clips for now. Leaving them connected when the electromagnet is not in use will drain the battery and can cause the wire and bolt to get hot. Your demonstration is now ready for the class.
/-/https/www.sciencebuddies.org/Files/12455/7/image005.png)
Figure 2. Strength of an Electromagnet demonstration kit.
If you did not purchase the Strength of an Electromagnet kit, follow the same steps using a D battery, battery holder, and a nail (Figure 3).
/-/https/www.sciencebuddies.org/Files/12454/9/electromagnet-nail-battery.jpg)
Figure 3. Smaller electromagnet with a D battery and a nail. This electromagnet will not be as strong as the one in Figure 2.
Teacher Tool Box
Engage (5 minutes)
- Show your students this video:
 What did we see in the video? What questions come up when you see this? Was anything surprising?
 We saw a large magnet attached to a crane lifting some scrap metal and then dropping it. Students might ask how the crane is able to drop the metal instead of the metal remaining stuck to the magnet.
 - Explain that the magnet in the video is an electromagnet. An electromagnet is a magnet that can be turned on and off using electrical current. This allows you to pick things up and then turn the magnet off to drop them, like the crane in the video.
- Demonstrate the electromagnet you made in the Prep Work section. Show the students how you can connect the alligator clips, use the magnet to lift some paper clips, and then disconnect an alligator clip to drop the paper clips. Make sure all students have a good view of the electromagnet.
How did I turn the magnet on? How did I turn it off?You turned the magnet on by connecting both alligator clips to the battery. This allows electrical current to flow. You turned the magnet off by disconnecting at least one of the alligator clips, which stops current from flowing. (Note: you can connect this to open and closed circuits if you have previously covered those topics in your classroom.)The magnet in the video was obviously much stronger than this magnet. It lifted huge chunks of metal and this one only lifts paper clips. How do you think they made the magnet in the video so strong? How could we make our magnets stronger?Possible answers include using a bigger piece of metal for the core, using more electricity, using more wire, etc. Students might have some answers that do not actually influence the strength of the magnet, but that is OK! They will do some experiments to find out what affects the strength of an electromagnet. For now, make a list of all the possible variables on the board.
/-/https/i.ytimg.com/vi/XBWy9gzGGd4/sddefault.jpg)
Explore (40 minutes)
- As a class, narrow the list down to variables that are feasible to test in the classroom given the materials you have available (e.g. if you only have one type of magnet wire, they will not be able to test different wire diameters). Students can follow along with this part on their worksheets.
- Break students into groups of 3–4 and assign one variable to each group. If you have more groups than variables, it is OK if some groups have the same variable.
- Show the class how to build a basic electromagnet (Figure 4). This will ensure that all students have a single "working" electromagnet initially so they can see how it works, and explore making changes from there.
- Wrap wire around a nail about 25 times. Start the wire at the flat end of the nail and make sure the turns are wound tightly against each other. Cut the wire, leaving about 10 cm of wire on both ends. Use a small piece of tape to hold the wire in place and prevent it from unraveling.
- Use sandpaper to remove the insulation from about 2 cm at both ends of the wire. Fold the paper in half, pinch the wire with it, and pull the wire through. Important: students might have trouble with this step. Their magnets will not work if they do not remove the insulation, as electricity will not be able to flow through the wire. Remember to refer to this video for instructions on how to remove the insulation.
- Press the D battery into the battery holder.
- Use the alligator clips to connect the bare wire ends to the clips on the battery holder.
- Try to pick up a paper clip with the end of the nail.
- Important: disconnect one alligator clip when the magnet is not in use. The electromagnet and battery can get hot if they are left connected. This will also prevent the battery from draining.
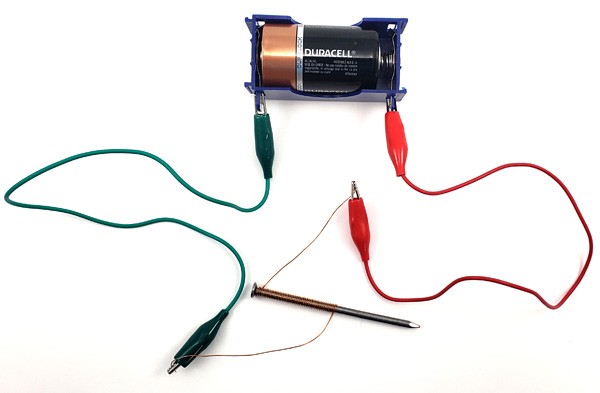
Figure 4. Electromagnet made with a nail and D battery.
- Now, let each group
come up with a plan
for how they will figure out whether the variable they have been assigned impacts the strength of the electromagnet. They will have to consider:
- What is their independent variable (what are they changing)? This will vary by group.
- What is their dependent variable (what are they measuring)? This should be the number of paper clips the magnet can lift (this is what you can measure with the materials you have available).
- What are their control variables (what do they need to keep constant)? This will be all the other variables except the independent variable they have been assigned.
- What values of the independent variable will they test? These values should be reasonable given the materials and time you have available (try to keep the number of turns to a maximum of 100).
- How many trials will they do for each value of the independent variable? Repetition is important for this experiment. Make sure students compare averages over at least three trials to make conclusions.
- For example, the group investigating the number of wire turns in the coil might decide to test 10, 20, 30, and 40 turns. They could build four separate magnets, each with a different number of wire turns, but otherwise identical (e.g. same size nail, same coil spacing), and do three trials with each magnet. It is important to perform each trial in the same manner (i.e., the motion to touch the end of the nail to the paper clips should be the same each time).
- Let the groups carry out their experiments and collect their data.
- Each group should analyze their data and determine what, if any, relationship there is between their dependent and independent variables.
Reflect (10 minutes)
Ask each group to report their findings to the class:
- What variable did they investigate?
- Did this variable affect the strength of the electromagnet? In other words, what, if any, was the relationship between the dependent and independent variables?
- Can you think of an explanation for why this variable does (or does not) affect the strength of the electromagnet?
- If your results are inconclusive (you cannot tell whether there is a relationship between the independent and dependent variables), can you suggest further experiments to clarify this? (For example, doing more trials or trying different values for the independent variable.)
Now circle back to the video you saw at the beginning of class.
/-/https/www.sciencebuddies.org/Files/14174/23/note-question-mark-30.png) | Collectively, what variables did we discover that can affect the strength of an electromagnet? How do we need to change those variables to make the electromagnet stronger? Why do you think the magnet in the video was so strong? |
/-/https/www.sciencebuddies.org/Files/14175/24/conversation-bubbles-30.png) |
Your students might have discovered that a wider nail, more coils of wire, and tightly wound coils could all make the electromagnet stronger.
The magnet in the video had a much larger metal core than our tiny nails. It probably had a lot of tightly wound coils (although these were not visible in the video). Big electromagnets can have hundreds or even thousands of turns of wire. It also probably had a much more powerful source of electricity than a single battery, which can also make the magnet stronger (see Variations section). |
Assess
Use your students' worksheets and group presentations as assessments for this lesson.Make Career Connections
Discussing or reading about these careers can help students make important connections between the in-class lesson and STEM job opportunities in the real world.
/-/https/careerdiscovery.sciencebuddies.org/Files/1242/20/iStock-113511101.jpg)

/-/https/careerdiscovery.sciencebuddies.org/Files/1223/17/iStock-971549326.jpg)
Lesson Plan Variations
- Purchase additional battery holders and let students explore how combining multiple batteries in series or parallel affects the strength of the electromagnet.
- Purchase wire with different diameters and let students explore how wire diameter affects the strength of the magnet.
- Electromagnets are a critical part of speakers. Your students can build their own speakers using some simple materials, as shown in the Build a Paper Speaker activity.
/-/https/img.youtube.com/vi/wkbIZ9NgC3o/0.jpg)
/-/https/img.youtube.com/vi/6vWprI6OPJo/0.jpg)
/-/https/img.youtube.com/vi/CuUS2429KT4/0.jpg)