Summary
/-/https/i.ytimg.com/vi/liSEwqdq7aA/maxresdefault.jpg)
/-/https/www.sciencebuddies.org/cdn/Files/7450/11/paper-speaker.jpg)
Introduction
Do you think you can build a working speaker out of paper? If you like listening to music, this project is for you!
Materials
- Paper Speaker Kit, available from our partner
Home Science Tools®. You will need these items from the kit:
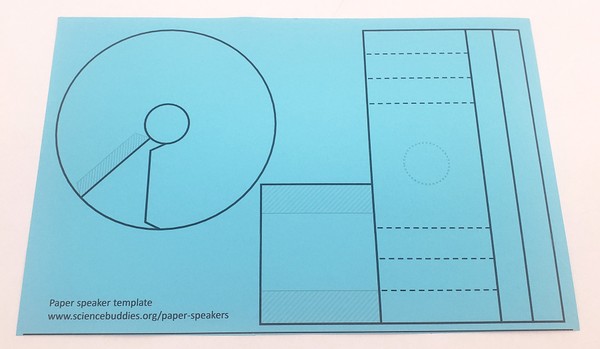
- Paper speaker template, printed on cardstock
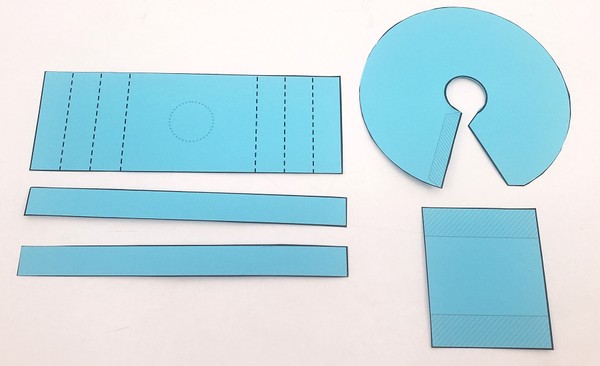
- Paper speaker cones, printed on cardstock
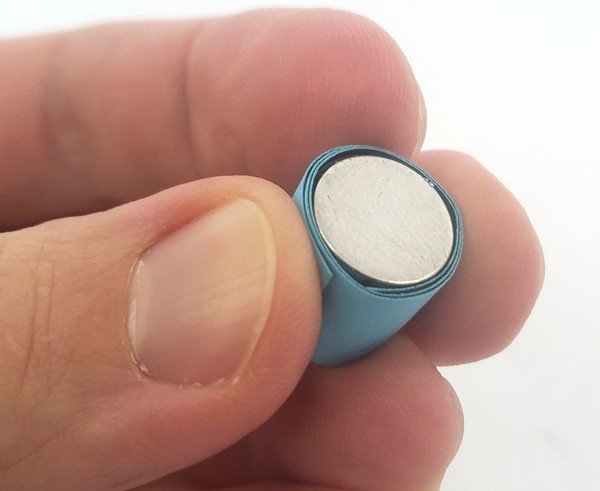
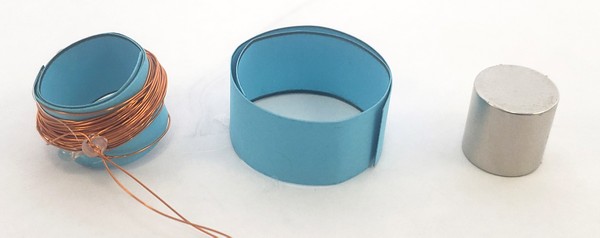
- 1/2 inch by 1/2 inch neodymium magnet
- 28 AWG enameled magnet wire
- 2-position spring wire connector
- 3.5 mm audio cable with bare wire ends
- Fine-grit sandpaper
- You will also need to gather these items not included in the Paper Speaker Kit:
- Computer, tablet, or smartphone with 3.5 mm "headphone" jack. If you have a newer phone without a headphone jack, you will need an adapter.
- Scissors
- Hot glue gun or school glue
/-/https/www.sciencebuddies.org/cdn/Files/19277/10/kit-paper-speaker.png)
Disclaimer: Science Buddies participates in affiliate programs with Home Science Tools®, Amazon.com, Carolina Biological, and Jameco Electronics. Proceeds from the affiliate programs help support Science Buddies, a 501(c)(3) public charity, and keep our resources free for everyone. Our top priority is student learning. If you have any comments (positive or negative) related to purchases you've made for science projects from recommendations on our site, please let us know. Write to us at [email protected].
Instructions
Neodymium magnets are very strong. Adult supervision is recommended when using them. Be careful not to drop the magnets, and do not let them slam together or fall. They may pinch your fingers, crack, or shatter. Keep magnets away from small children, pets, credit cards, and pacemakers.
- Print the template on cardstock. Your speaker will work with regular printer paper, but it will not be as loud.
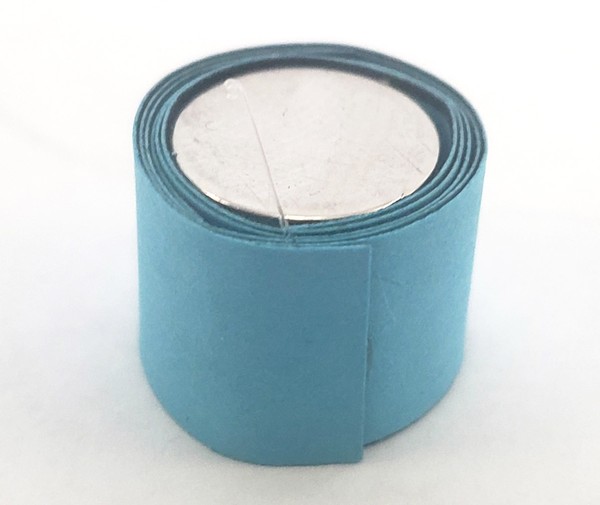
- Wrap one of the long, narrow strips of paper tightly around the magnet.
- Cut all the pieces of the template out along the solid lines.
- As you hold the paper-wrapped magnet firmly in place, begin wrapping the second long, narrow strip of paper around the first strip. Now use a dab of glue to hold the outer strip of paper in place so it does not unwind when you let go.
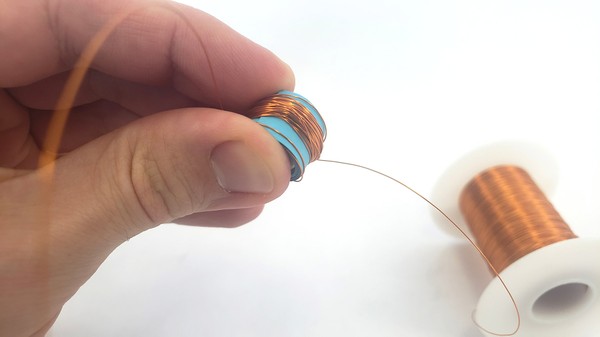
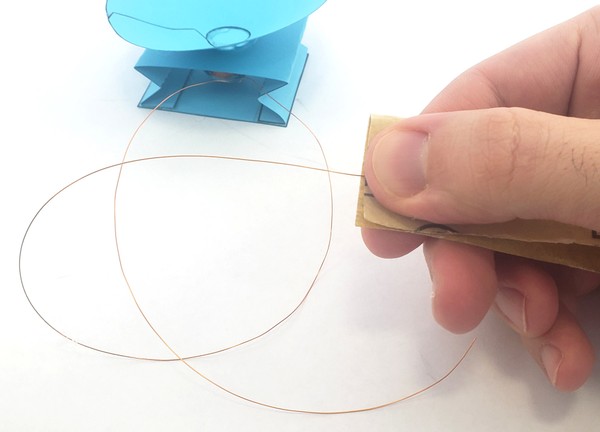
- Pull about 1 foot (30 cm) of wire from the spool of magnet wire. This extra length of wire will be used later to connect to the speaker.
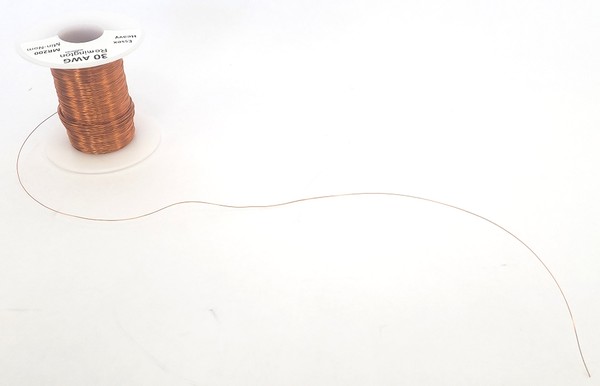
- Working away from this extra length of wire, carefully, and tightly wrap 50 turns of wire from the spool around the paper tube to create a coil. The measured foot of wire should be left free at the beginning of the coil.
- Measure out another foot of wire to leave free at the end of the coil and cut the wire.
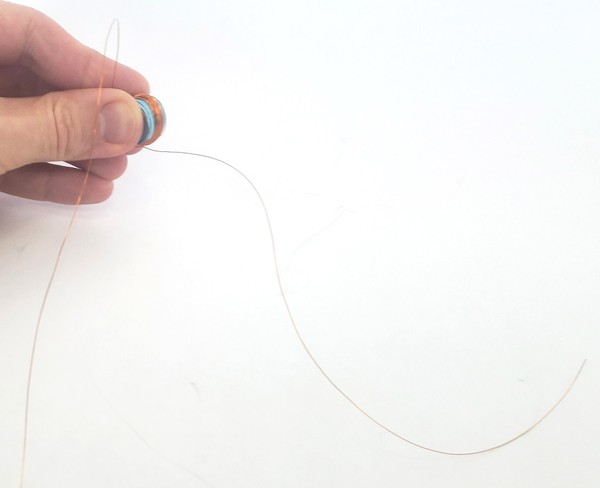
- Twist the two loose wires together and secure the coil with a few dabs of glue so it does not come unwound.
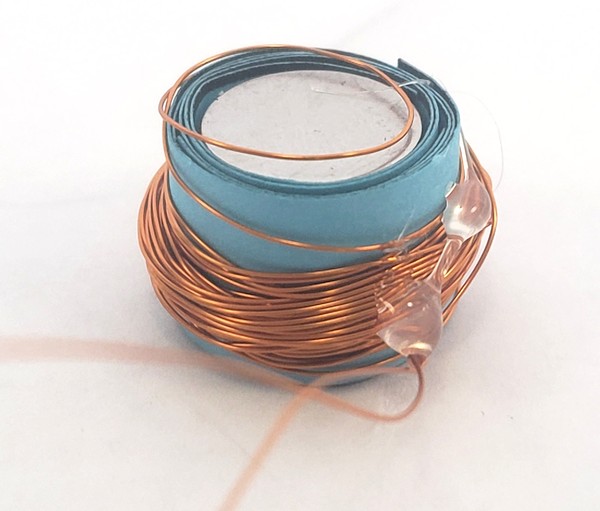
- After the glue has dried, push the magnet and the inner tube of paper out of the coil.
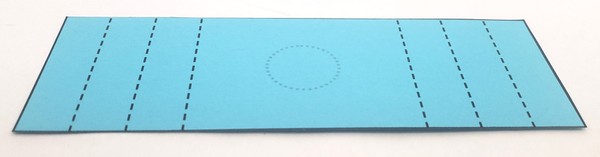
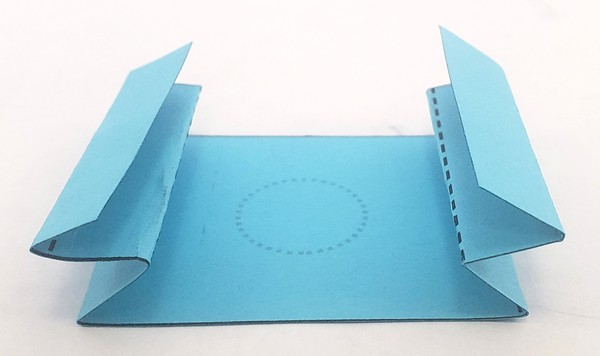
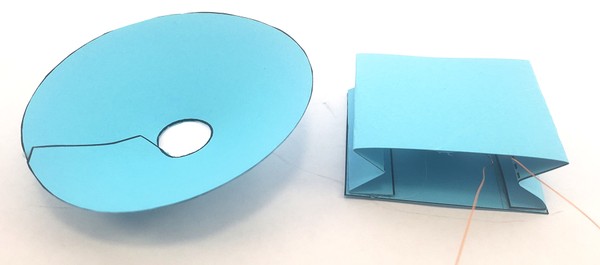
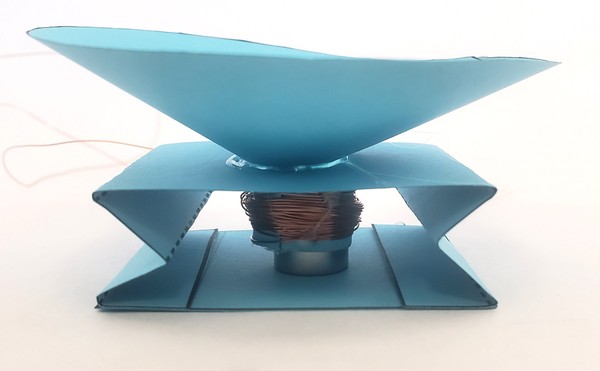
- Fold the large rectangular piece from the template along the dashed lines. Begin by folding the edges of the paper inwards and continue back and forth to form an accordion shape.
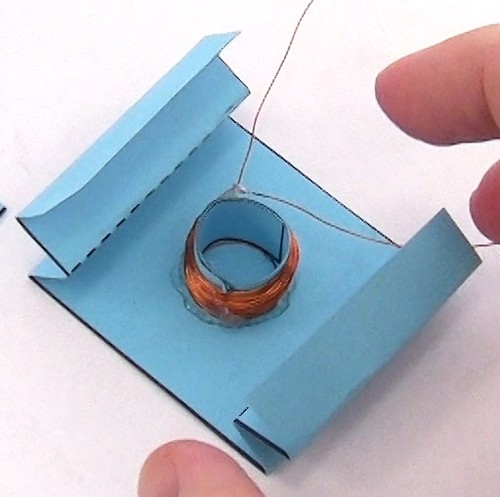
- Glue the coil to the dashed circle on the accordion piece. Allow the glue to dry.
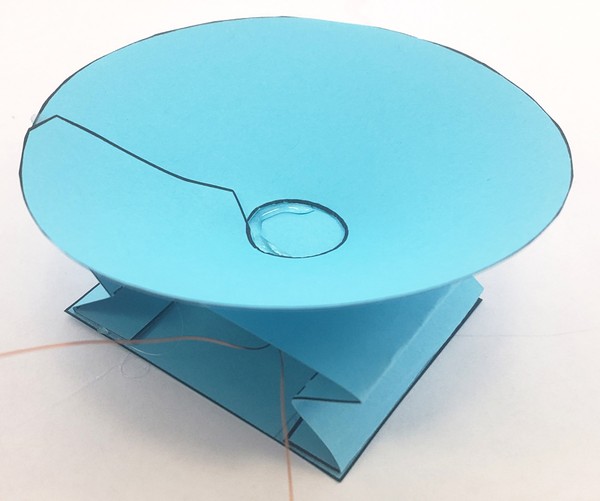
- Flip the accordion piece upside down. Using the small rectangle from the template as a base, glue the two accordion legs to the shaded areas of the rectangle. This completed piece will be the main body of the speaker.
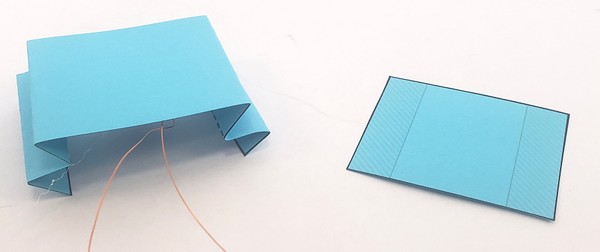
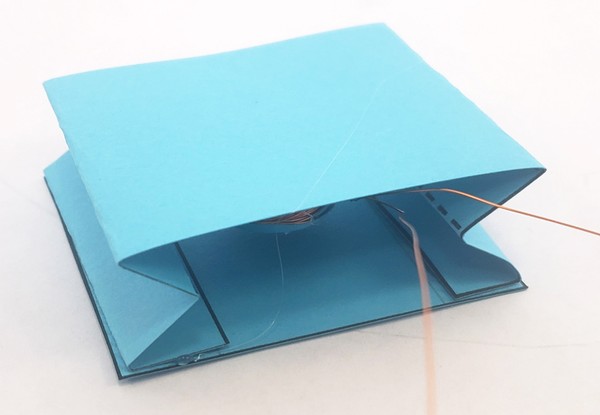
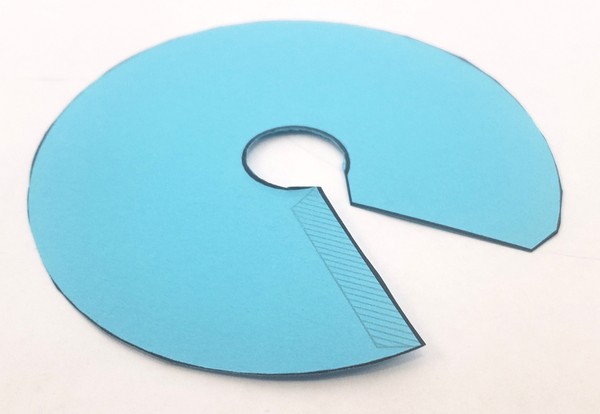
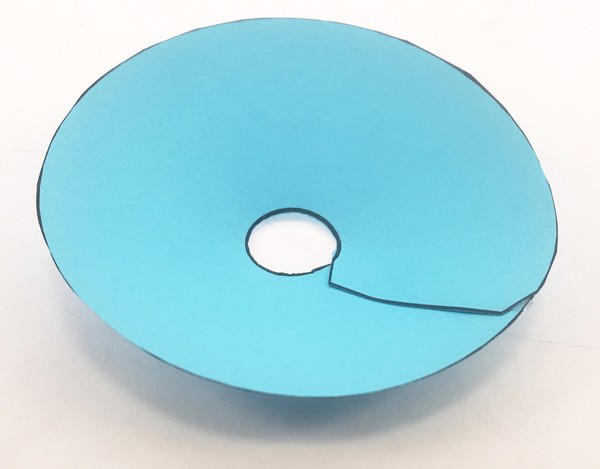
- Bend the cone slightly to glue the angled tab onto the shaded area. Allow the glue to dry.
- Glue the bottom, smaller opening of the cone to the top of the speaker.
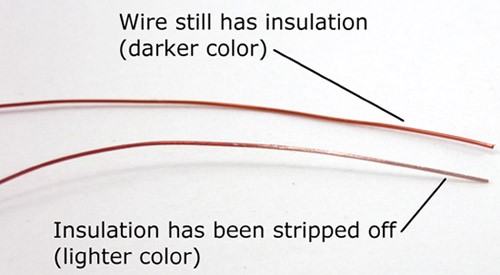
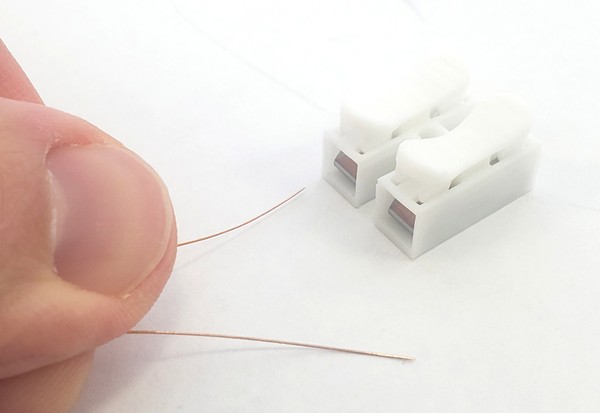
- Use sandpaper to strip the insulation from about 1 cm of each end of the wire. Fold the sandpaper in half, pinch the wire between the sides of the sandpaper with your fingers, and pull along the wire.
- Repeat this multiple times while you rotate the wire. It can be difficult to tell when the insulation is removed, but if you look very closely, you should see that the underlying wire is a different color than the insulation.
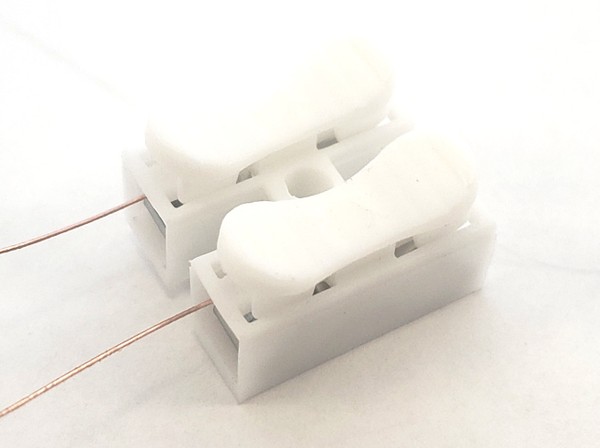
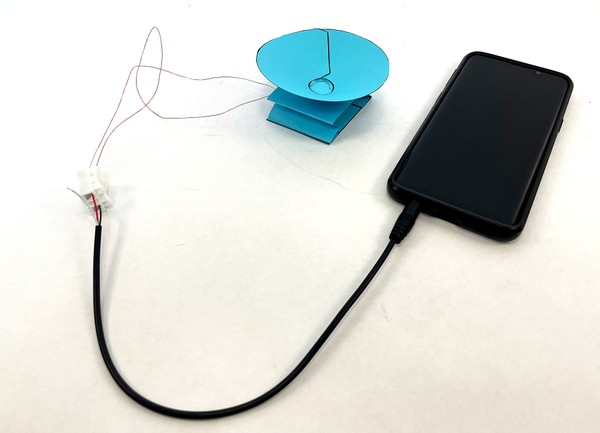
- One at a time, press down on a spring clip and insert one end of the magnet wire into the clip. Repeat for the other wire so they are next to each other.
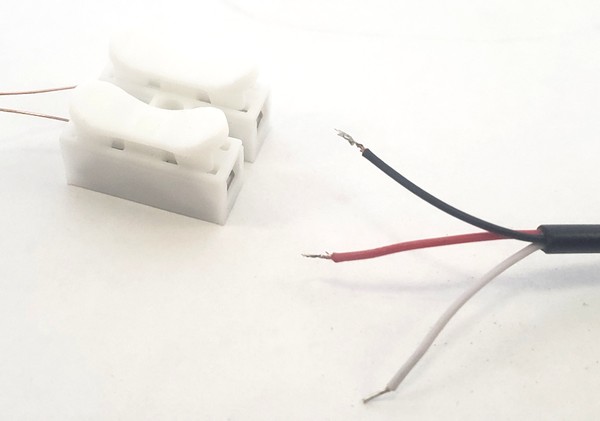
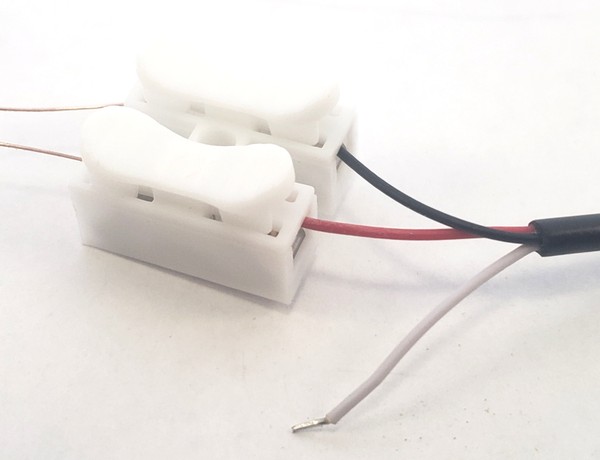
- Connect the loose wire ends of the audio cable to the other ends of the spring clips. There are three wires inside the audio cable: black (ground), red (left audio channel), and white (right audio channel). You need to connect the ground wire and one of the audio channels. Select the black wire and either the red or white wires, and connect them to the spring clips.
- Gently pull the top and bottom parts of the speaker apart, far enough that you can slide the magnet inside the coil, then let go and put the speaker down. The coil should sit over the magnet with the magnet resting on the base of the speaker. You do not need to glue the magnet in place—it is heavy enough that it will be held in place by its own weight. This allows you to easily remove it if you decide to test another speaker.
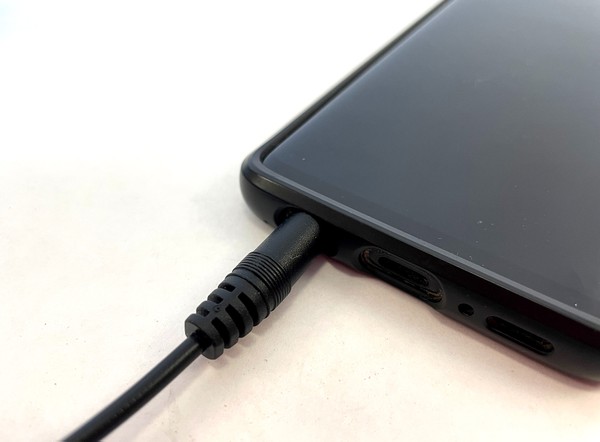
- Plug the 3.5 mm cable into the headphone jack of your phone, tablet, or computer.
- Make sure the volume on your device is all the way up, and try playing some music!
 Can you hear music coming from your speaker? How loud is it compared to a "regular" speaker?
 - If you do not hear any music, try these troubleshooting steps and follow along with the video:
- Make sure you have the correct sound source selected on your phone or computer. For example, make sure you are not connected to a Bluetooth headset or speakers.
- Check that the volume on your device is turned all the way up.
- Check that the 3.5 mm cable is firmly plugged into the headphone jack.
- Make sure the spring clips are gripping the exposed metal parts of the 3.5 mm cable, not the insulated parts.
- Make sure you fully stripped the insulation off of the ends of the magnet wire.
- Make sure the exposed parts of the two magnet wires are not touching each other. This will create a short circuit.
- Make sure the magnet is not rubbing against the inside of the paper tube, as this will add friction and decrease the speaker's vibrations.
- Align the wire coil so it is around the top of the magnet. Magnetic fields quickly get much weaker with distance. If the coil and the magnet are too far away from each other, your speaker will not work.
/-/https/www.sciencebuddies.org/cdn/Files/18212/7/paper-speaker-assembly-1.jpg)
/-/https/www.sciencebuddies.org/cdn/Files/18214/7/paper-speaker-assembly-3.jpg)
/-/https/www.sciencebuddies.org/cdn/Files/18213/7/paper-speaker-assembly-2.jpg)
/-/https/www.sciencebuddies.org/cdn/Files/18232/7/paper-speaker-assembly-4.jpg)
/-/https/www.sciencebuddies.org/cdn/Files/18233/7/paper-speaker-assembly-5.jpg)
/-/https/www.sciencebuddies.org/cdn/Files/18234/7/paper-speaker-assembly-6.jpg)
/-/https/www.sciencebuddies.org/cdn/Files/18235/7/paper-speaker-assembly-7.jpg)
/-/https/www.sciencebuddies.org/cdn/Files/18236/7/paper-speaker-assembly-8.jpg)
/-/https/www.sciencebuddies.org/cdn/Files/18237/7/paper-speaker-assembly-9.jpg)
/-/https/www.sciencebuddies.org/cdn/Files/18215/7/paper-speaker-assembly-10.jpg)
/-/https/www.sciencebuddies.org/cdn/Files/18216/7/paper-speaker-assembly-11.jpg)
/-/https/www.sciencebuddies.org/cdn/Files/18217/7/paper-speaker-assembly-11a.jpg)
/-/https/www.sciencebuddies.org/cdn/Files/18218/7/paper-speaker-assembly-12.jpg)
/-/https/www.sciencebuddies.org/cdn/Files/18219/7/paper-speaker-assembly-13.jpg)
/-/https/www.sciencebuddies.org/cdn/Files/18220/7/paper-speaker-assembly-14.jpg)
/-/https/www.sciencebuddies.org/cdn/Files/18221/7/paper-speaker-assembly-15.jpg)
/-/https/www.sciencebuddies.org/cdn/Files/18222/7/paper-speaker-assembly-16.jpg)
/-/https/www.sciencebuddies.org/cdn/Files/18223/7/paper-speaker-assembly-17.jpg)
/-/https/www.sciencebuddies.org/cdn/Files/18224/7/paper-speaker-assembly-18.jpg)
/-/https/www.sciencebuddies.org/cdn/Files/7464/7/stripped-magnet-wire.jpg)
/-/https/www.sciencebuddies.org/cdn/Files/18225/7/paper-speaker-assembly-19.jpg)
/-/https/www.sciencebuddies.org/cdn/Files/18226/7/paper-speaker-assembly-20.jpg)
/-/https/www.sciencebuddies.org/cdn/Files/18227/7/paper-speaker-assembly-21.jpg)
/-/https/www.sciencebuddies.org/cdn/Files/18228/7/paper-speaker-assembly-22.jpg)
/-/https/www.sciencebuddies.org/cdn/Files/18229/7/paper-speaker-assembly-23.jpg)
/-/https/www.sciencebuddies.org/cdn/Files/18230/7/paper-speaker-assembly-24.jpg)
/-/https/www.sciencebuddies.org/cdn/Files/18231/7/paper-speaker-assembly-25.jpg)
/-/https/i.ytimg.com/vi/UupWNWZPR_Y/maxresdefault.jpg)
What Happened?
It might not be as loud as the speakers on your phone or computer, but you should hear sound coming from your paper speaker! Check out the Digging Deeper section to learn more about how your paper speaker works.
Digging Deeper
When your phone or computer plays music, it sends an electrical current through the headphone cable. This current travels through the wire coil in your speaker. The wire coil acts as an electromagnet: when electrical current travels through it, it generates a magnetic field. This magnetic field interacts with the magnetic field of the permanent magnet inside the coil. The resulting magnetic forces push and pull the cone of the speaker up and down, causing it to vibrate. These vibrations pass to nearby air molecules, generating a sound wave that travels through the air to your ears so you can hear the music!
Ask an Expert
For Further Exploration
- Try making your own paper speaker instead of using the template. You can keep the same basic design but change parts, like making a bigger or smaller cone. You can also use different materials, like a paper or plastic cup for the cone. What speaker design gives you the best sound?
- What happens if you change the number of turns in your coil of wire? Does this change the loudness or sound quality of your speaker?
- How does your speaker sound when you play different types of music? Does it seem to do a better job playing low-frequency bass notes or higher-frequency treble notes?
- What happens to the frequencies from the speaker if you change the size of the speaker cone? Use the sheet of different size cones from the kit, or use this speaker cone template to print several sizes.
/-/https/www.sciencebuddies.org/cdn/Files/18240/5/paper-speaker-experiment-setup-thumbnail.jpg)
/-/https/www.sciencebuddies.org/cdn/Files/12342/5/paper-roller-coaster-thumbnail.jpg)
/-/https/careerdiscovery.sciencebuddies.org/cdn/Files/1223/17/iStock-971549326.jpg)
/-/https/careerdiscovery.sciencebuddies.org/cdn/Files/1801/18/pexels-photo-4988130.jpg)
/-/https/careerdiscovery.sciencebuddies.org/cdn/Files/916/17/unsplash-KGyzk-EvTwQ.jpg)
/-/https/careerdiscovery.sciencebuddies.org/cdn/Files/1233/17/unsplash-b28ac533a45f.jpg)
/-/https/careerdiscovery.sciencebuddies.org/cdn/Files/19459/5/technician-repairing-operating-microscope.jpg)
/-/https/img.youtube.com/vi/YZ0SOAFXVAQ/0.jpg)
/-/https/img.youtube.com/vi/xf4Bnm8edAg/0.jpg)
/-/https/img.youtube.com/vi/dk4Bg0dV5-w/0.jpg)