Summary
Active Time
45 minutes to 1 hour
Total Project Time
45 minutes to 1 hour
Key Concepts
circuit, electricity, conductor, insulator, battery, LED
Credits
This activity was inspired by the work of the High-Low Tech Group at the MIT Media Lab
Scotch® is a registered trademark of 3M.
Science Buddies is committed to creating content authored by scientists and educators.
Learn more about our process and how we use AI.
/-/https/www.sciencebuddies.org/cdn/Files/6868/6/paper-circuit-flowers.jpg)
/-/https/i.ytimg.com/vi/ZaTKVjxt_kQ/maxresdefault.jpg)
Introduction
Do you like arts and crafts projects like drawing, painting, cutting shapes out of construction paper, or origami? Instead of drawing that bright sun or lights in a house, imagine adding real lights to your artwork! This project will show you how, by introducing you to the world of electronics with "paper circuits." Paper circuits are made with just a few simple items; you can use a battery and some copper tape to add tiny lights to your project. The best part is that it is easy to do, and you do not need to know anything about electronics to get started!
This activity is not recommended for use as a science fair project. Good science fair projects have a stronger focus on controlling variables, taking accurate measurements, and analyzing data. To find a science fair project that is just right for you, browse our library of over 1,200 Science Fair Project Ideas or use the Topic Selection Wizard to get a personalized project recommendation.
Materials
Circuit materials, available from SparkFun Electronics:
- Copper tape (1 spool), part # PRT-10561
- 2032 coin cell batteries (2), part # PRT-00338
- LEDs (assorted 20-pack), part # COM-12062
Additional materials you will need from home:
- Construction paper
- Scotch® tape
- Scissors
- Paper clip or binder clip
- Optional: Markers, colored pencils, or crayons
- Optional: Use our printable unicorn headband template for your project
Instructions
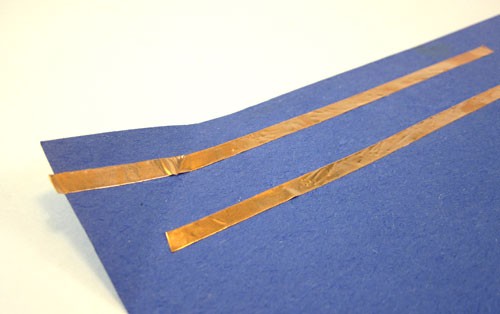
- Cut two long strips of copper tape. Remove the paper backing from the tape, and place them near the edge of a piece of paper, parallel to each other. The strips should be about half an inch apart, and one strip should not go all the way to the edge of the paper.
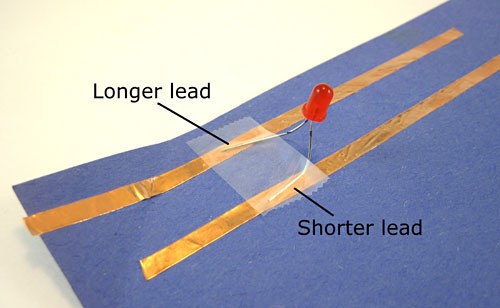
- Look closely at one of your LEDs. The LED has two legs, called leads (pronounced "leeds"). One of them is slightly longer than the other.
- Carefully bend the leads of the LED, and use Scotch tape to attach each lead to a strip of the copper tape. The LED should be pointing upward. Important: Make sure to place your LED's leads as they are labeled in the figure. The longer lead should be on the outer strip of copper tape (the one closer to the edge of the paper), and the shorter lead should be on the inner strip.
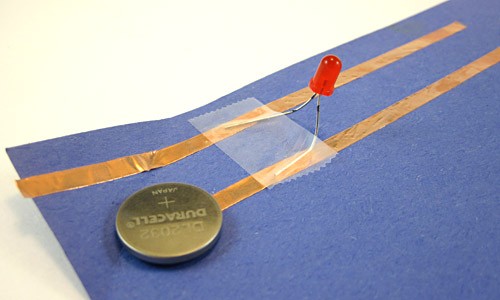
- Place the coin cell battery on top of the inner piece of copper tape (the one farther from the edge). The writing on the coin cell (the side with the "+" symbol) should be facing up
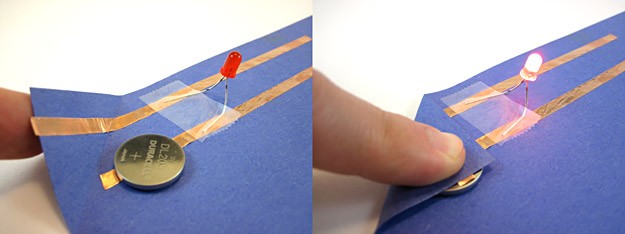
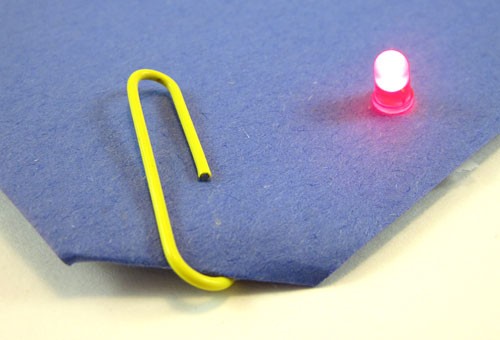
- Fold over the corner of the piece of paper so the second strip of copper tape contacts the top of the battery. This should cause your LED to light up.
- If your LED does not light up, you probably have either the battery or the LED leads backwards. Try flipping one of them around, then try again.
- If your LED still does not light up, try pressing down harder on the battery, and press down on the LED leads. The battery and LED leads must be in good contact with the copper tape to complete a circuit and cause the LED to light up.
- User a paper clip or a binder clip to hold the battery in place so the LED will stay lit. Congratulations! You just made your first paper circuit. Now you can expand your paper circuit into an art project. The following steps will show you how to make modifications so you can come up with your own creative project. This is an open-ended project, so you can decide what you want to do.

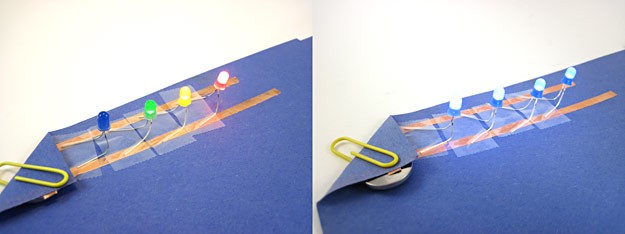
- To add more LEDs, simply tape them down the same way you taped down your first LED.
- Make sure the LED's long leads are all touching the same piece of copper tape, and the short leads are all touching the other piece of copper tape.
- If an LED does not light up, try flipping around its leads. If it still does not light up, make sure it is taped down securely so the leads are in firm contact with the copper tape.
- You can mix and match red, green, and yellow LEDs, and they will all light up. However, the blue LEDs will not light up if they are matched with red, green, or yellow LEDs. You can only use blue LEDs with other blue LEDs (this has to do with something called voltage; blue LEDs require more voltage than the other colors).
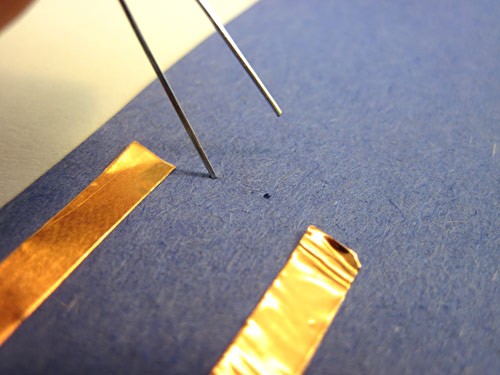
- The copper tape, Scotch tape, and metal LED leads might interfere with your artwork a bit. To make your artwork look less cluttered, you can poke holes in the paper so the LEDs stick through to the other side, and all the other parts are hidden on the back of the paper. Follow the sub-steps below to do this.
- Use the LED leads (or another sharp point, like a pencil or pen) to poke two small holes in the paper.
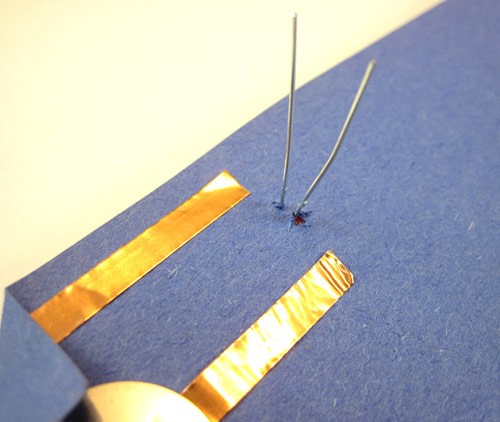
- Poke the LED leads through from the opposite side of the paper.
- Bend the LED leads down and tape them to the copper tape. Important: Remember that the LED's long lead should touch the outer piece of copper tape (the one closer to the edge of the paper), and the short lead should touch the inner piece of tape.
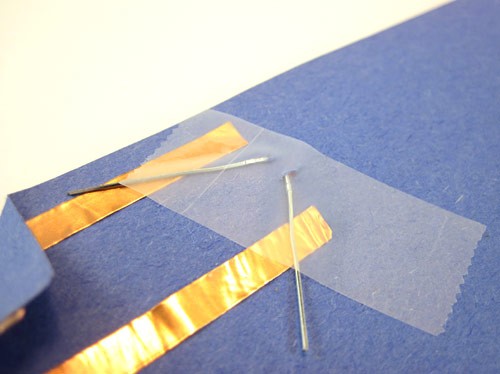
- Now, when you look at the paper from the other side, only the LED is poking through, with none of the other parts visible.

- Use a paper clip to hold your battery in place, just like you did before.
- If your LED does not light up, try flipping the battery around.
- Use the LED leads (or another sharp point, like a pencil or pen) to poke two small holes in the paper.
- Now, what if you want to spread your LEDs out, all around a piece of paper? You can do this by using longer pieces of copper tape. You can kink or bend the tape to create curved shapes. Just make sure the two pieces of tape do not touch each other (this will create a short circuit and prevent the LEDs from lighting up).
- Lay out copper tape so you can place LEDs where you want them. Attach the LEDs using the steps above. Remember that the longer lead of each LED should touch the outer piece of tape, and the shorter leads should touch the inner piece of tape.

- Now, when you flip the paper over, you will have multiple LEDs poking through.

- Lay out copper tape so you can place LEDs where you want them. Attach the LEDs using the steps above. Remember that the longer lead of each LED should touch the outer piece of tape, and the shorter leads should touch the inner piece of tape.
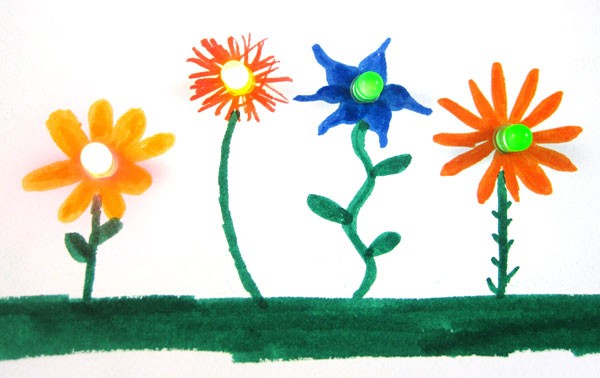
- Can you combine everything you learned in the previous steps to make a paper circuit art project of your own? For example, here is a picture with the LEDs in the centers of flowers.
- For a more-advanced project, try making a three-dimensional folded structure. This will require more planning for how you lay out your copper tape. For example, the birthday cake below has LED candles.

/-/https/www.sciencebuddies.org/cdn/Files/6869/6/paper-circuit-1.jpg)
/-/https/www.sciencebuddies.org/cdn/Files/6870/6/paper-circuit-LED.jpg)
/-/https/www.sciencebuddies.org/cdn/Files/6871/6/paper-circuit-2.jpg)
/-/https/www.sciencebuddies.org/cdn/Files/6872/6/paper-circuit-3.jpg)
/-/https/www.sciencebuddies.org/cdn/Files/6873/6/paper-circuit-4.jpg)
/-/https/www.sciencebuddies.org/cdn/Files/6874/6/paper-circuit-5.jpg)
/-/https/www.sciencebuddies.org/cdn/Files/6875/6/paper-circuit-6.jpg)
/-/https/www.sciencebuddies.org/cdn/Files/6876/6/paper-circuit-7.jpg)
/-/https/www.sciencebuddies.org/cdn/Files/6877/6/paper-circuit-8.jpg)
/-/https/www.sciencebuddies.org/cdn/Files/6878/6/paper-circuit-9.jpg)
/-/https/www.sciencebuddies.org/cdn/Files/6879/6/paper-circuit-10.jpg)
/-/https/www.sciencebuddies.org/cdn/Files/6880/6/paper-circuit-11.jpg)
/-/https/www.sciencebuddies.org/cdn/Files/6881/7/paper-circuit-12.jpg)
/-/https/www.sciencebuddies.org/cdn/Files/6882/7/paper-circuit-13.jpg)
/-/https/www.sciencebuddies.org/cdn/Files/6883/6/paper-circuit-cake.jpg)
Cleanup
If you will be away from your paper circuit for a long time, disconnect the battery. This will prevent the battery from draining.
What Happened?
You should have been able to get multiple LEDs to light up by connecting them to a battery using copper tape. This is because you built an electrical circuit. The battery provides electricity to the LEDs, causing them to light up. See the Explore More tab to learn more about circuits.Digging Deeper
When you connect an LED to the battery using copper tape, you complete a closed circuit. In a closed circuit, electricity can flow through a loop, from the battery, to the LED, and back again, causing the LED to light up. If one or more of the connections is broken (for example, one LED lead is not touching the copper tape), this creates an open circuit. Electricity cannot flow in an open circuit, so the LED goes out. Finally, if your two segments of copper tape touch each other, this creates a short circuit, which would also cause the LED to go out.When you connect multiple LEDs next to each other, you create a parallel circuit. A parallel circuit is useful because even if one LED becomes disconnected, the other LEDs will stay on. This is different from a series circuit, where if one LED goes out, all the other ones will go out, too.
Ask an Expert
Curious about the science? Post your question for our scientists.
For Further Exploration
- Can you try to create something that uses all four colors of LEDs? Hint: Use your second battery and a second set of copper tape to power the blue LEDs separately from the red, green, and yellow LEDs.
- What happens if you try to connect the LEDs in a series circuit instead of in a parallel circuit? Can you do more research and explain which is better for connecting LEDs?
Related Resources
Project Ideas
Do you like playing with play dough; or modeling clay? Wouldn't it be cool if you could add lights, sound, or even motion to your play dough creations? In this project, you will use play dough that conducts electricity, which will allow you to connect lights to your sculptures!
This project is the first in a three-part series on play dough circuits, which can all be done with the same materials. We recommend doing the projects in order.
Read more
/-/https/www.sciencebuddies.org/cdn/Files/8239/7/squishy-circuits-1-thumb.png)
Have you tried our first electric play dough project,
and now you are looking for more to do? Do you want to learn more about circuits and add even more lights? Check out this project for part 2 of our play dough circuits series!
Read more
/-/https/www.sciencebuddies.org/cdn/Files/7422/6/parallel-long.jpg)
Have you tried our first and second play dough circuits projects? Are you a master circuit artist, ready to try something even bigger and better? Try this project to see if you can build a three-dimensional light-up sculpture.
Read more
/-/https/www.sciencebuddies.org/cdn/Files/4897/13/squishy-circuits-LED-frog.jpg)
Careers
Career Profile
Electrical engineering technicians help design, test, and manufacture electrical and electronic equipment. These people are part of the team of engineers and research scientists that keep our high-tech world going and moving forward.
Read more
/-/https/careerdiscovery.sciencebuddies.org/cdn/Files/1233/17/unsplash-b28ac533a45f.jpg)
Career Profile
Have you always loved art? Do you have a good eye for beauty, balance, and form? How would you like to see your designs show up in toy stores? Or in a sporting goods store? Or at a car dealer? Commercial and industrial designers create the shape and form of every type of manufactured good that you can think of—from toys, sporting goods, and medical equipment to high technology products, furniture, toothbrushes, and toasters. They design the form of new products that are as beautiful and…
Read more
/-/https/careerdiscovery.sciencebuddies.org/cdn/Files/1147/17/unsplash-fJebhGIP0P4.jpg)
Career Profile
If you've ever watched a cartoon, played a video game, or seen an animated movie, you've seen the work of multimedia artists and animators. People in these careers use computers to create the series of pictures that form the animated images or special effects seen in movies, television programs, and computer games.
Read more
/-/https/careerdiscovery.sciencebuddies.org/cdn/Files/1907/18/pexels-photo-3153207.jpg)
Career Profile
Electricians are the people who bring electricity to our homes, schools, businesses, public spaces, and streets—lighting up our world, keeping the indoor temperature comfortable, and powering TVs, computers, and all sorts of machines that make life better. Electricians install and maintain the wiring and equipment that carries electricity, and they also fix electrical machines.
Read more
/-/https/careerdiscovery.sciencebuddies.org/cdn/Files/1242/20/iStock-113511101.jpg)
Career Profile
Have you ever seen an assembly line in a factory on TV? Or have you ever gone on a factory tour? Did you notice all of the conveyor belts and machines working so quickly together? Advanced manufacturing technicians make sure all of these machines keep running. They maintain and repair the electrical and mechanical parts of these machines. They know how fluid systems, like pumps, and gas systems work. Gas systems use compressed air to power machines to clamp, stack, and move items. Technicians…
Read more
/-/https/careerdiscovery.sciencebuddies.org/cdn/Files/17365/4/manufacturing-technician-main-Stock-1140837585.jpg)
/-/https/img.youtube.com/vi/53h1bFE64uQ/0.jpg)
/-/https/img.youtube.com/vi/r0UDLuV6058/0.jpg)
/-/https/img.youtube.com/vi/OfG4Ex83BiM/0.jpg)