Abstract
Noise is everywhere. From the clanking of a cowbell to the din of the lunchroom, we are surrounded by noise. Sometimes there's no way to get away from it, but there is a way to deal with it—constrained-layer damping. By simply creating a layered sandwich of somewhat flexible materials, what was once a noisy cowbell can become a "noise blanket." This science fair project shows you how to transform a noisy piece of metal into a sound-muffling constrained-layer damper. You'll record the sound of a controlled impact on a piece of metal with a microphone, a computer, and some free software. Then you'll create a constrained layer to muffle the sound. You're only limited by your imagination, so try this science fair project to dampen the din!Summary
Created by the following Seagate Technology staff members: Dave Koester, Scott Heiserman, Ed Neu, Brian Sudman, Mark Fahrendorff, Andre Liem, Silvia Pasqualini, Wolfgang Rosner, and Jason Zimmerman.
Tested by Luke Sudman.
Edited by Sandra Slutz, PhD, Science Buddies
- AudacityTMis a trademark of Dominic Mazzoni.
/-/https/www.sciencebuddies.org/cdn/Files/3465/5/ApMech_img044.jpg)
Objective
Understand and demonstrate the physics behind the concept of constrained layer damping for reducing acoustic emissions.
Introduction
How does striking an object, like a bell or a cookie sheet, cause sound? The noise is actually due to tiny vibrations, caused by the force of the hit. The impact causes the object to bend on a very small scale, often less than one-thousandth of an inch, so it can't be seen the by the naked eye. After the impact, the object returns to its starting shape, but the energy stored in the object by the impact is released and it deforms past the starting point. This energy storage is like what you observe when you compress a coil spring and release it. This phenomenon continues for a while as the object audibly "rings," gradually losing amplitude as it dies out. Air that surrounds the object is compressed by the vibration, which sets up a sound wave that travels to your ear—or in this science fair project, a microphone—and is interpreted as sound. The stronger the vibration, and the longer it lasts, the more sound you hear.
Constrained-layer damping (CLD) is a method of reducing vibration of structures, usually thin and somewhat flexible objects. Less vibration translates into less sound. To achieve CLD, a rigid layer, called the constraining layer, and a viscoelastic layer are attached to the object whose sound needs to be dampened (muffled). The viscoelastic layers are made of materials that behave physically like a combination of something that is viscous, such as peanut butter, and elastic, such as a rubber band. These types of materials dissipate (or give off) energy, rather than store it.
An example of a CLD setup is a thin piece of sheet metal (the constraining layer) attached to a cowbell (the object whose noise you want to dampen, like a cookie sheet) with double-sided carpet tape (the viscoelastic layer). In CLD, as the object to be quieted vibrates, there is relative motion between the object and the constraining layer, especially when placed where there is the largest curvature change. For instance, in the example of the cowbell, the sheet metal (the constraining layer) and the cowbell move together in the same direction. Take a look at Figure 1, below, and compare the two pictures. The top diagram (1) shows the undeformed condition of an object or surface with a constrained-layer damper. This is the condition of the items before hitting the object whose noise will be dampened. The bottom diagram (2) shows this same object while "bent," as it is vibrating after being hit (the deflection in this example is exaggerated so it is visible to you). The constraining layer and the object to be quieted move relative to each other as the object is bent, which is called shear. Take a stack of paper and curve it, you will see the same thing happen. This relative motion also causes shear in the damping, viscoelastic layer, which in this science fair project, is double-sided carpet tape.
/-/https/www.sciencebuddies.org/cdn/Files/3464/5/ApMech_img043.gif)
Diagram of three stacked boxes illustrates a layered object being deformed. The first diagram (Object before impact) shows the three layers of the object (top to bottom): object to be dampened, viscoelastic layer and constraining layer. In the second diagram (Object being deformed during vibration), the three boxes have been deformed and bend upward.
Figure 1. Diagram 1 shows a constrained-layer damping setup at rest. In diagram 2, you can see that when the object to be dampened is struck, the materials deform, causing shear.
As shear happens in the double-sided carpet tape, a small amount of energy is dissipated as heat since the tape is not purely elastic. Since some of the energy has dissipated into heat, there is less energy stored in the original object. With less energy stored, the object vibrates less, which, in turn, results in less sound. Why is it so important to use a viscoelastic material, like the double-sided carpet tape, to dissipate the energy? Well, elastic objects return the energy put into them. And while viscous objects dissipate the energy, imagine if you put a ball of a viscous material, like clay, between the object you want to dampen and the constraining layer. Although the vibrations would be well dampened the first time you hit the object, the force of the blow would also cause the clay ball to flatten. Then the next time you hit the object there would be a thinner clay layer to dampen the vibration. Eventually, the clay layer would be too thin to work to dissipate the energy and the noise would be just as loud as if you didn't have a CLD. So although viscoelastic materials don't dissipate as much energy as purely viscous materials, because they return to their original shapes (just as elastic objects do), they can be used many times over for dampening.
In this science fair project, you will indirectly measure the vibration level of an object with and without CLD by measuring sound. You'll experiment with different dampers to see how the size of the damper affects the vibration level. Is bigger better? Find out by trying your hand at this science fair project! There are many other variations to explore too, like temperature—if the tape is too hot, it will flow too easily and not result in much shear. You can explore what the best combination of variables is to reduce the vibration the most, but remember to change only one variable at a time. Let the clanging begin!
Terms and Concepts
- Vibration
- Energy
- Amplitude
- Sound wave
- Constrained-layer damping (CLD)
- Constraining layer
- Viscoelastic layer
- Viscous
- Elastic
- Dissipate
- Shear
Questions
- Why do some objects make a lot of noise when you strike them, while others do not?
- What are some materials that fall into the categories of elastic, viscous, or viscoelastic?
- What are some real-world applications of constrained-layer damping?
Bibliography
You might want to consult a physics textbook to learn more about the terms and concepts in this science fair project. In addition, these websites are good resources for more information about constrained-layer damping and its applications:
- Green Glue. (n.d.). About Sound Transmission. Retrieved February 19, 2015.
- Adhesives & Sealants Industry. (2002, May 29). Understanding Viscoelastic Damping and Treatments Using Typical Adhesive Materials. Retrieved February 19, 2015.
Materials and Equipment
- Computer
- Microphone, either internal on your computer or a stand-alone microphone, which can be connected to your computer
- Sound-recording software that shows audio traces, such as AudacityTM, which is available for download for free from http://audacity.sourceforge.net/
- Table or countertop
- Cookie sheet or other thin metal item that makes noise when struck
- String, 6 feet
- Tabletop vise
- Chair, rack, or other object that can be used to suspend a steel nut, see Figure 2 in the Experimental Procedure for details.
- Steel nut, 1/2-inch, or other similarly sized item for striking the cookie sheet to make noise
- Ruler
- Double-sided carpet tape
- Thin metal or plastic sheet that is smaller than your cookie sheet or metal item you will bang to make noise (1-2 large pieces that can be cut into at least 3 different-sized pieces); available at home-improvement stores. Make sure the sheet is of similar stiffness to the item whose noise you are going to dampen. See Figure 3, below, for a visual.
- Tin snips for cutting the metal sheets; available at home-improvement stores
- Lab notebook
Experimental Procedure
This science fair project requires the use of a computer, microphone, and sound-analysis software. The instructions below are for Audacity, a free sound software package, available for download from the link in the Introduction, or below in step 2. Other software packages will work equally well. For help with other packages, consult that software's "Help" function. If you need help setting up your computer or microphone, either consult your computer manual or ask a friend or adult who is good with electronics.
Also note that your computer should be in a place that is conducive for the rest of the setup; for instance, it should be in a place where the cookie sheet and nut can be hung. Read through the Experimental Procedure before you begin so you can make necessary adjustments to your workspace.
-
To start this science fair project, you will need either a computer with an internal microphone, or to attach an external microphone to your computer.
- Many computer models sold in recent years have internal microphones. Check your computer manual if you are unsure if yours does.
- If you need to attach an external microphone, check your computer manual and the microphone manual for how to do this. Note: Many web camera models have built in microphones, which would be fine for this experiment.
- Download and install a free version of the sound-analysis software Audacity from this website http://audacity.sourceforge.net, or use your own.
-
Once Audacity has been installed, you'll need to verify that it recognizes your microphone.
- Under the "Edit" menu, select "Preferences." Click on the "Audio I/O" tab and choose your microphone from the pull-down menu under the "Recording Device" heading. Now you are ready to record sounds.
- To record sounds using Audacity, click on the button with the red circle. To stop recording, click on the button with the yellow square.
- Try recording your voice. Play it back by pressing the green triangle. If it records and plays back fine, you know your microphone has been correctly set up and configured with the Audacity software. Note: If you can record, but can't hear the playback, check to see if your computer speakers are turned on!
-
Read the following instructions to set up the object whose noise you want to muffle—in this experiment, that will be the cookie sheet or other thin metal object of your choosing. You'll use a 1/2-inch steel nut to clang against it to generate the noise. See Figure 2 for an overview of how the experimental setup should look.
- Using a tabletop vise, hold the cookie sheet vertically above a table or countertop. See Figure 2 for a visual guide.
- Tie a piece of string around the steel nut. Suspend the nut from a chair, folding table, rack, or other small piece of furniture placed on the same table as the vertical cookie sheet. See Figure 2. Make sure that everything is positioned so when you pull the nut back and release it, it strikes the middle of the cookie sheet.
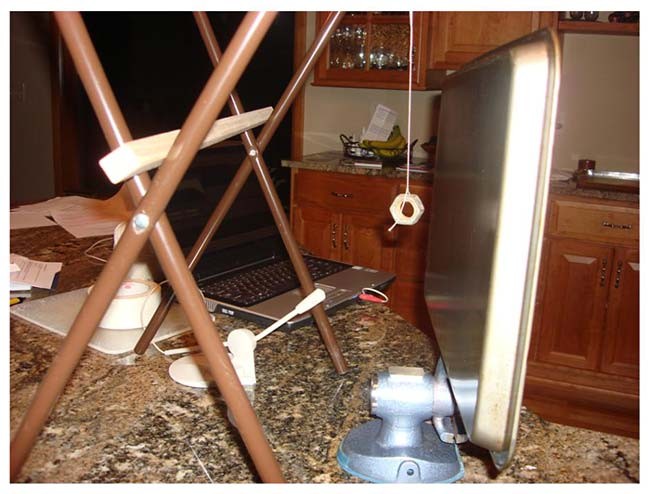
Figure 2. Your setup should look similar to the experimental setup in this photo.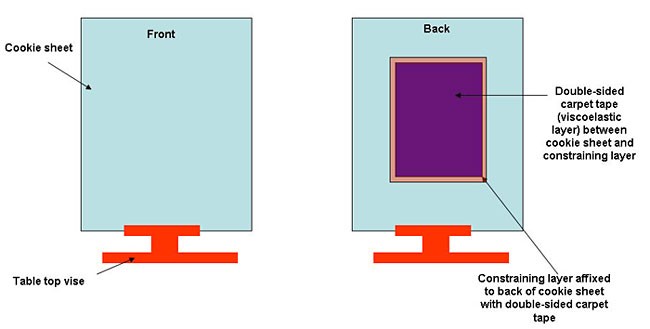
Figure 3. A viscoelastic layer and a constraining layer are added to the back of the cookie sheet to create a constrained-layer damping setup.
- Place the computer and microphone on a table on one side of the cookie sheet. The nut should be hanging on the same side of the cookie sheet as the computer and microphone, as shown in Figure 2.
- Click the record button (red circle) on the Audacity software. Using a ruler to measure the distance, release the nut 12 inches away from the cookie sheet. The nut will strike the cookie sheet and cause the sheet to "ring." Stop the nut before it can strike the cookie sheet again.
- When you can no longer hear the ringing of the cookie sheet, click the yellow square on the Audacity software to stop recording.
-
Look at the sound wave pattern you recorded. Write down the duration (length of time in seconds) of the ringing in your lab notebook.
- Advanced students may want to try measuring frequency response instead. To do this, use the software to calculate the sound amplitude versus frequency. Then pick the highest frequency peak amplitude above 1KHz for comparison with and without damping. Try to pick a peak that you think is a natural frequency of the pan.
- Repeat steps 6-8 at least 10 times to establish the repeatability of the measurement. Record all data in your lab notebook.
-
Using the tin snips, cut out at least three different sizes of dampers from the thin metal or plastic sheet.
- All three damping layers should be smaller than the cookie sheet. See Figure 3.
- The largest damping layer should be almost the same size as the cookie sheet, the next largest should be half the size of the first, and so forth until you have all the damper sizes (at least 3) you're going to try.
-
Apply your smallest damping layer to the other side of the cookie sheet—not on the side that will be hit by the steel nut.
- Use the double-sided carpet tape to affix the damping layer to the cookie sheet. Use enough tape to nearly coat the entire surface of the damping surface. Eliminate as many air bubbles as possible between the damping surface, the carpet tape, and the cookie sheet. See Figure 3. The double-sided carpet tape will serve as the viscoelastic layer.
- With the damping layer in place, repeat steps 6-9. Record your observations in your lab notebook.
- Repeat the experiment with the remaining damper sizes.
- Analyze the data to determine if the constrained-layer damping reduced the sound duration. If so, how large was the reduction? Which size damper caused the largest damping effect?
/-/https/www.sciencebuddies.org/cdn/Files/3465/5/ApMech_img044.jpg)
/-/https/www.sciencebuddies.org/cdn/Files/3466/5/ApMech_img045.jpg)
Ask an Expert
Global Goals
The United Nations Sustainable Development Goals (UNSDGs) are a blueprint to achieve a better and more sustainable future for all.
/-/https/www.sciencebuddies.org/cdn/Files/19752/5/E-WEB-Goal-09.png)
Variations
- There are a number of variables you can explore using the basic setup above. For example, try changing the size of the constraining layer, the thickness of the constraining layer, the type of material for the constraining layer or viscoelastic layer, or the temperature of the layers. Remember to change only one variable at a time!
- What happens if you use an elastic material or a viscous material instead of a viscoelastic material? Does the sound level change at all?
- Paul Macioce's scientific paper, linked to in the Bibliography, gives some equations that mathematically explain the damping effect. Use these calculations to predict the level of sound after damping. How do your predictions compare to the real data?
Careers
If you like this project, you might enjoy exploring these related careers:
/-/https/careerdiscovery.sciencebuddies.org/cdn/Files/1801/18/pexels-photo-4988130.jpg)
/-/https/careerdiscovery.sciencebuddies.org/cdn/Files/1429/17/unsplash-4pM4nhHyo9M.jpg)
/-/https/careerdiscovery.sciencebuddies.org/cdn/Files/1640/26/Fyysikot_tyossaan.jpg)

/-/https/img.youtube.com/vi/TDlbQy2NJaM/0.jpg)
/-/https/img.youtube.com/vi/KuA_tjYqODc/0.jpg)
/-/https/img.youtube.com/vi/AGZxMfAWGiE/0.jpg)