Abstract
Think it's a good idea to stream music, watch videos, or check social media while doing homework? Are you a thrill-seeker? Well, this is the science fair project for you! What makes a ride so thrilling that people want to ride it over and over again even though it scares them? Is it the speed, the twists and turns, the vertical drops? In this science fair project, you will build and use an accelerometer to figure out what makes a roller-coaster ride worth standing in line for. Oh, and if Mom and Dad ask what an amusement park visit has to do with school, let them know that it's all because you love science!Summary
Michelle Maranowski, PhD, Science Buddies
- Apple® is a registered trademark of Apple Inc.
- iPhoneTM is a trademark of Apple Inc.
- Scotch® is a registered trademark of 3M.
This project is based on a DragonflyTV episode.
/-/https/www.sciencebuddies.org/cdn/Files/3519/5/ApMech_img047.jpg)
Objective
To find out which parts of a roller coaster are the most exciting and why by building an accelerometer and using it to measure acceleration and gravity-induced reaction forces on a roller-coaster ride.
Introduction
How do cell phone and tablet screens automatically change between portrait and landscape modes when you turn them? Phones and tablets can do this because it has an accelerometer inside of it. An accelerometer is a device that measures acceleration and the effect of gravity on an accelerating object. So when phones and tablets are moved from a horizontal to a vertical position, for instance, the accelerometer tells the computer inside the phone to switch the view. Acceleration is a change in velocity. Another example of acceleration is when you are driving and start to speed up or slow down. You are changing your speed and thus, accelerating or decelerating (which means slowing down). Acceleration is expressed in units of meters/second2 (m/s2) or in g's (g-force). We are constantly feeling the influence of gravity as we go about our day. For example, just standing on Earth, humans experience 1 g! In addition, humans experience 2.9 g's when we sneeze and 3.5 g's when we cough.
Accelerometers are used in several applications. In cars, they detect impact and then deploy air bags. Accelerometers are used in washing machines and other equipment to detect vibration. They are also used to measure seismic activity. Accelerometers have recently been used in laptops as a way to guard against damaging the hard drive if the laptop falls to the ground. As the laptop is falling, the hard drive's read/write heads retract.
There are two types of accelerometers, single-axis (vertical or horizontal) and multi-axis. Within these there are many varieties, such as piezoelectric and capacitive accelerometers. Often these devices are very small, but in this science fair project you will build a simple handheld single-axis vertical accelerometer and use it to measure the g-force at different locations on a roller coaster.
Now it's time for you to head to the amusement park! Have fun learning about acceleration and gravity, and don't forget to take your accelerometer!
Terms and Concepts
- Accelerometer
- Acceleration
- Gravity
- Velocity
- g (g-force)
- Seismic
Questions
- How are acceleration and velocity related?
- In what kinds of applications are accelerometers used?
- What are the different kinds of accelerometers?
Bibliography
- TPT. (2006). Roller Coaster Design by Aditya and Tyler. DragonflyTV, Twin Cities Public Television. Retrieved June 30, 2008.
The following website describes acceleration in depth:
- Henderson, T. (1996). The Physics Classroom Tutorial: Acceleration. Retrieved June 30, 2008.
These resources discuss g's or g-forces and the safety of roller coasters:
- Wikipedia Contributors. (2008, June). g-force. Wikipedia: The Free Encyclopedia. Retrieved June 30, 2008.
For help creating graphs, try this website:
- National Center for Education Statistics. (n.d.). Create a Graph. Retrieved June 30, 2008.
Materials and Equipment
- Extension spring; available at hardware stores. Make sure that the spring is not too firm and not too elastic. You will have to experiment with springs of varying elasticity and different sizes of weights.
- Small lead or fishing weights, all of equivalent weight (5). Make sure that the weights don't stretch the spring too much.
- ScotchTM tape
- Large paper clip
- Rubber stopper with one hole in the top that fits in the plastic tube; available at science supply stores (such as The Science Shop) or hobby shops
- Plastic tube with end caps, 2-inch diameter and 18 inches long; available from TAP Plastics or from package delivery stores
- Paper (2 pieces)
- Optional: solid rubber stopper that fits in and seals the top of the plastic tube, available at science supply stores or at hobby shops
- Clear packing tape
- Permanent marker
- Heavy-duty rubber bands (2)
- Helper
- Optional: digital camera
- Lab notebook
Disclaimer: Science Buddies participates in affiliate programs with Home Science Tools®, Amazon.com, Carolina Biological, and Jameco Electronics. Proceeds from the affiliate programs help support Science Buddies, a 501(c)(3) public charity, and keep our resources free for everyone. Our top priority is student learning. If you have any comments (positive or negative) related to purchases you've made for science projects from recommendations on our site, please let us know. Write to us at [email protected].
Experimental Procedure
Building the accelerometer
- The first step is to build a simple accelerometer. Take the spring and hook one end of it onto the small weight. Use a small thin strip of Scotch tape to secure the weight onto the spring. Make sure that you just tape the hook at the end of the spring and the weight together—don't tape any part of the spring itself.
- Take the paper clip and unravel all of it except the smaller hook, which should be left in tact at one end.
- Push the hook end of the paper clip through the hole of the rubber stopper.
-
Hook the free end of the spring through the paper clip hook and then pull the paper clip back through the hole in the rubber stopper. Pull the paper clip through so that the end of the spring is firm (but not squashed) against the stopper. See Figure 1 to get an idea of how to do this. You can use a small and thin strip of the Scotch tape to close the end of the paper clip hook so that the spring doesn't fall off. Firmly place the stopper in the tube so that the spring and weight are in the tube as well. Bend the straightened end of the paper clip firmly over the stopper. Take a small piece of scotch tape and tape the end to the stopper.
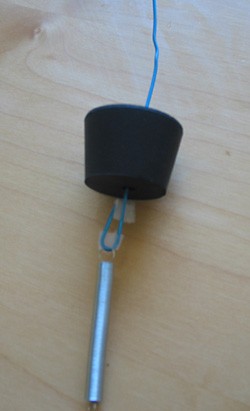
Figure 1. Pushing the paper clip through the hole in the stopper to hold the spring and weight. - Lay the tube on a flat surface and make sure that the spring and the weight are straight, but not stretched out. Using the permanent marker, mark little dash marks where the top of the spring and the bottom of the weight are on the outside of the tube. Label the bottom mark as the 0 g position.
- Now hold the tube vertically. Mark the position of the bottom of the weight now. Label this the 1 g position. Since it is hanging, the bottom of the weight should be below the 0 g mark.
- Remove the rubber stopper and the spring from the tube. Add a second and equivalent weight to the first weight. Use a small piece of tape to secure the weights together. Replace the stopper, spring, and weights into the tube. Hold the tube vertically and mark the bottom of the weights. Label this is the 2 g position.
- Repeat step 7, one weight at a time, until you get to 5 g. Mark the 5 g position.
- Now that your accelerometer is built, you are just about ready to begin trials. Remove the rubber stopper and take all but one of the small weights off of the spring. Carefully, slide the spring-and-stopper assembly into the plastic tube and firmly push the stopper into the tube. Then bend the end of the paper clip that is outside the tube over the rubber stopper and tube. Tape the end of the paper clip and the stopper to the tube with a piece of clear packing tape to hold it in place. This secures the accelerometer so that it is not a safety hazard on a roller coaster.
- In some cases, the plastic tube comes with two end caps. If your plastic tube came with two end caps you can use the second end cap to close the bottom end of the accelerometer. This is for safety, just in case the weight comes off the spring on a ride. If your tube did not come with end caps, you can plug the other end of the accelerometer with a solid rubber stopper. In both cases, use a piece of clear packing tape to secure whatever is closing the other end of the tube so the accelerometer is sealed tightly shut.
-
Now loop the rubber bands together by looping one around the other. If you're not sure how to do this, ask an adult to show you how. Then place one of the rubber band loops around the accelerometer at the bottom. Tape the rubber band to the accelerometer using a couple long pieces of clear packing tape. This will act as a wrist strap so that the accelerometer doesn't fly out of your hands when you are on the roller coaster. Be sure you are using heavy-duty rubber bands.
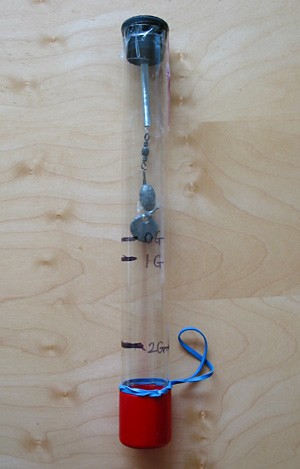
Figure 2. This is an example of a single-axis vertical accelerometer. The accelerometer is lying horizontally on a table and shows 0 g. If it were held vertically, it would show the weight at 1 g because of the effect of gravity.
/-/https/www.sciencebuddies.org/cdn/Files/3518/5/ApMech_img046.jpg)
/-/https/www.sciencebuddies.org/cdn/Files/3519/5/ApMech_img047.jpg)
Testing for g's
- When you get to the amusement park, choose one or two rides that you will investigate.
- Examine the first ride you are going to ride and decide where you are going to test the g-forces. You can take a picture of the ride to help you make your choices. Just like Aditya and Tyler, look for spots on the ride's path where there will be changes in direction or speed. Record your choices in your lab notebook in a data table like the one shown below.
- Ride the roller coaster with a helper and test the locations. Make sure to put your wrist through the wrist strap for safety. Hold the accelerometer vertically against something so that it doesn't fly around too much. One person can read the accelerometer and then both people can remember the information. As soon as you get off of the ride, write your results in your lab notebook.
- Repeat your measurements at each location at least three times and remember to note down all of your findings in your lab notebook. Always take a rest between rides. Take a break if you start to feel ill.
- How do the results compare with your predictions? Which locations had the higher g's? Why do you think that these locations had the higher g's? Was the ride with the most g's the most thrilling? Plot your data on a bar graph. Label the x-axis Location and the y-axis g-forces. If you need help or would like to make your plot online, visit the Create a Graph website.
| Ride | Location on the Ride | g-force |
| 1 | 1 | |
| 2 | ||
| 3 | ||
| 2 | 1 | |
| 2 | ||
| 3 | ||
Ask an Expert
Global Goals
The United Nations Sustainable Development Goals (UNSDGs) are a blueprint to achieve a better and more sustainable future for all.
/-/https/www.sciencebuddies.org/cdn/Files/19752/5/E-WEB-Goal-09.png)
Variations
- Use your accelerometer to see the different g-forces that you experience in your daily life. For example, trying running the 50-yard dash with your accelerometer. What happens when you accelerate off the starting block? What about if you jump up and down on a trampoline or go up and down in an elevator?
- Head to the gym with a bungee cord, a skateboard, and a friend. Have your friend sit on the skateboard holding the accelerometer and one end of the bungee cord. Take the other end of the bungee cord and move your friend around. What kind of g-forces does your friend experience?
Careers
If you like this project, you might enjoy exploring these related careers:
/-/https/careerdiscovery.sciencebuddies.org/cdn/Files/17329/6/automotive-technician-iStock-1157319426.jpg)
/-/https/careerdiscovery.sciencebuddies.org/cdn/Files/928/17/ThomasWallner.jpg)

/-/https/img.youtube.com/vi/xx5ou6n0GEU/0.jpg)
/-/https/img.youtube.com/vi/ItcTxWW3c5Q/0.jpg)
/-/https/img.youtube.com/vi/W3FUb_DQ7HM/0.jpg)