Abstract
What are some of the ways we keep track of time? We have alarm clocks, wristwatches, and cell-phone clocks, to name a few. Just a few hundred years ago, our ancestors did not have any of these conveniences, yet they found ways to tell time. How? By using devices such as water clocks. In this science project, you will follow in the footsteps of early engineers and build a water clock that tracks time for three hours.Summary
Michelle Maranowski, PhD, Science Buddies
/-/https/www.sciencebuddies.org/cdn/Files/4242/5/ApMech_img067.jpg)
Objective
To build a water clock that tracks three hours of time.
Introduction
Time marks most of the activities in our busy, everyday lives. An alarm clock rings in the morning to wake us up. When the wall clock shows 7:45 a.m., we finish our breakfasts and rush out the door to school or work. We eye the clock throughout the day to make sure we are on time and not late for some other activity. Day and night, our watches, clocks, and cell-phone clocks help us to manage our time. But how did people keep track of time before the discovery of electricity, used in present-day watches and clocks, and before the development of gears used in pocket watches and pendulums in pendulum clocks from the 1600s C.E.?
In ancient Egypt, the temple priests had to perform religious rituals at certain times of the day, so accurate timekeeping was necessary. Sundials kept track of time during daylight hours and as long as the sun was out. Because accurate timekeeping during the night was also a necessity, the Egyptians developed the water clock, called the clepsydra (literally, "water thief") in Greek, in the 16th century B.C.E. A water clock is a device in which time is measured by the flow of water into or out of a vessel. Since the water clock depends solely on the flow of water, it can operate at night or on days when the sun does not shine. The Greeks and Romans also came to depend on water clocks, and both cultures made improvements on the basic design.
The latter half of the 12th century C.E. saw the innovative work of the brilliant Islamic scholar, inventor, and engineer al-Jazari. Al-Jazari developed many cutting-edge devices; one of his most famous inventions was the elephant water clock. This clock was special not only for accurately keeping time, but also for its amazing engineering.
Modern engineers have also worked on creating accurate water clocks. In 1989, French physicist and artist Bernard Gitton designed and built the water clock at the Children's Museum of Indianapolis. It took five years to perfect the design of this remarkable timepiece. The following video describes how this water clock works.
/-/https/i.ytimg.com/vi/tdGEVZ6zdyM/maxresdefault.jpg)
In this mechanical engineering project, you will build a simple water clock — much simpler than the one shown in the video! Figure 1 shows an example of a simple water clock; it tracks three hours of time.
/-/https/www.sciencebuddies.org/cdn/Files/4239/5/ApMech_img065.jpg)
Figure 1. This image shows a possible design of a water clock. Notice the upper container, the lower container, the float, and the float stick (attached to the float).
Three major parts make up the water clock that you will build: (first) an upper container from which water flows due to gravity; (second) a lower container that catches the water as it flows out of the upper container; and (third) a "float stick" made from a cork and a wood dowel that enables a person to track time visually. As the water flows from the upper container to the lower container, the float stick rises. The distance the stick rises is linked not only to the amount of water in the lower container, but also to how much time has passed; it indicates how much time has elapsed since the lower container was empty. As the engineer in charge of the project, your job will be to experiment and determine the best containers to use in order to create a water clock to track the passage of three hours of time. The Experimental Procedure below provides a general design to build the water clock, but you should feel free to use Engineering Design Process to improve your own design and create a clock that appeals to you.
Terms and Concepts
- Gear
- Pendulum
- Water clock
- Gravity
- Buoyant
- Flow rate
- Calibrate
- Hydrostatic pressure
Questions
- What part does gravity play in the function of the water clock?
- A flush toilet uses water flow to dispose of waste. How does a siphon contribute to the function of a toilet?
- What kinds of materials make good float sticks? Why?
Bibliography
- American Association for the Advancement of Science. (2012). Building a water clock. Retrieved February 28, 2012.
- Wikipedia contributors. (2012, February 28). Water clock. Retrieved February 28, 2012.
- The Children's Museum of Indianapolis Inc.. (2011, February 7). This Week's WOW! (Ep. 11: Water Clock.) YouTube.. Retrieved March 16, 2012.
For help creating graphs, try this website:
- National Center for Education Statistics. (n.d.). Create a Graph. Retrieved June 2, 2009.
Materials and Equipment
- Ring stand or box sturdy enough to support the upper container (see Figure 1). You can purchase a ring stand online from Amazon.com.
- Containers (2). One for the water to drip out of and one to catch the flowing water; they do not have to be identical (see Figure 1). Part of the challenge of this project is to choose containers that work for you. Read the Procedure for more details.
- Plumber's putty
- Wood stake, 3/4 x 3/4 x 36 inches. This will be used to support the lower container and to record the time. You can purchase a wood stake at a hardware store.
- Adult volunteer, to supervise use of the tools
- Hacksaw
- Hammer
- Nail, 16-gauge
- Eyelet screws, No. 12 (2)
- Pencil
- Ruler
- Wood dowel, 1/8 x 36 inches (1). You can purchase a wood dowel at a hardware store, hobby shop, or online from Amazon.com.
- Cork, like one used to cap a bottle of wine (1)
- Packing tape, clear (1 roll)
- Pushpin
- Permanent marker with a fine tip
- Kitchen timer
- Lab notebook
Experimental Procedure
Designing the Water Clock
- In this engineering project, you will design, build, and test a water clock that can keep track of time for three hours. You will be given a general design, but part of the engineering challenge in this project is to find two containers that work well together to make the water clock. This includes deciding what containers to use and what size hole(s) to make in the upper container.
- Start by writing down the design requirements of the clock. Here we have suggested a few, but feel free to add others:
- The clock must keep track of three hours of time.
- Decide if you want the clock to be easy to pick up and move. If you do, what does that mean for size and weight?
- From what distance do you want to be able to see the clock to tell the time?
- Based on your design requirements, choose two containers. One will be the upper container and one will be the lower container. Here are some things to keep in mind:
- The containers can be the same or different.
- If you are making a clock that is easy to move, should the containers be large or small? Heavy or light?
- If you want to be able to read the clock from 10 feet away, should the containers be large or small?
- In order to read the clock (which you do by looking at the position of the float stick), does it matter if the bottom container is clear or solid?
- What will happen if the containers are made out of a material that can absorb water?
- Some types of containers you might want to consider include soup cans, flowerpots, buckets, and vases.
- Make sure that the bottom container has a flat bottom to prevent water from pooling in pockets at the bottom. A flat bottom quickly creates a uniform water level, which is important for your clock to keep time accurately.
Building the Water Clock
- When you have chosen your containers, you are ready to design the other parts of your clock and assemble them. You will put together the float stick, attach the float stick to the wood stake, and then tape the wood stake to the bottom container. Finally, you will test your water clock.
- First, prepare the upper container and test it to make sure that it is water-tight.
- Prepare the upper container by blocking any openings along the bottom. The water clock needs only one opening for the water to flow through, and you will make that opening later. The upper container in Figure 1 is a plastic flowerpot with several openings along the bottom. If your upper container has any openings like the flowerpot does, use the plumber's putty to block all of them. Figure 2 shows some of the openings blocked with a small plug of plumber's putty. If your upper container does not have any openings, then skip this step, and go on to step 3.
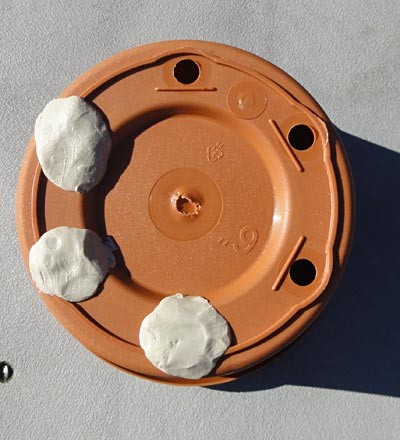
Figure 2. This image shows a flowerpot with some of the openings blocked with plumber's putty.
- If you had to block holes in the upper container, perform a water test to make sure that the holes are completely blocked and the container does not leak. Fill the upper container with water and let it sit for an hour, checking that there are no leaks. If you see no leaks after an hour, empty the water and set the upper container aside. Figure 3 shows a water test on the upper container.
- Prepare the upper container by blocking any openings along the bottom. The water clock needs only one opening for the water to flow through, and you will make that opening later. The upper container in Figure 1 is a plastic flowerpot with several openings along the bottom. If your upper container has any openings like the flowerpot does, use the plumber's putty to block all of them. Figure 2 shows some of the openings blocked with a small plug of plumber's putty. If your upper container does not have any openings, then skip this step, and go on to step 3.
/-/https/www.sciencebuddies.org/cdn/Files/4241/5/ApMech_img066.jpg)
/-/https/www.sciencebuddies.org/cdn/Files/4242/5/ApMech_img067.jpg)
Figure 3. Perform a water test on the upper container by filling it with water and making sure it does not leak after an hour.
- This water clock relies on the float stick to show time passing. A float must be attached to the end of the float stick. You must decide on a buoyant material to use for the float. Cork is one material that is easy to find and inexpensive. Since the float will be immersed in water, the float should not absorb water. Cork does not absorb water over time.
- You will use a wood dowel to make the float stick. Choose a dowel that is sturdy but not too heavy.
- Using eyelet screws to secure the stick part of the float stick to the wooden stake will decrease the amount of bobbing around that the float stick does. This will make the clock more precise and easier to read. Choose the correct size of eyelet screw (No. 12) so that the dowel can fit comfortably within the eyelet and you can easily screw them into the wood stake.
- Now assemble the float and stick together and attach it to the wood stake. As seen in Figure 1, one possible set of choices is to use a wine cork as the float and a wood dowel as the stick. Here are the steps if you are replicating the float stick in Figure 1:
- Using the hacksaw and a ruler, carefully cut the wood dowel down to a 2 ft. length. Ask your adult volunteer help you with this step.
- Gently hammer the nail into the center of the top circle of the cork to make an opening. After the nail is halfway in the cork, pull it out.
- Insert the wood dowel into the opening you just made, making sure that the dowel is straight, not tilted, and firmly attached. Set this float stick assembly aside.
- Using the hacksaw and a ruler, carefully cut the wood stake down to a 2 ft. length.
- Screw two eyelet screws into the wood stake so that it will hold the float stick assembly in place.
- Two eyelet screws will guide the float stick assembly as it rises, keeping it straight and not tilting. If the float stick assembly tilts, the water clock will not operate properly.
- The eyelet screws should be as far apart as possible from each other while still holding the float stick assembly in place.
- With the ruler and pencil, mark the centerline on the wood stake. Since the wood stake is ¾ inches wide, the center is at 3/8 inches.
- Set the wood stake against the lower container with the bottom of the stake level with the bottom of the lower container. With the ruler and pencil, make a mark on the centerline of the wood stake 1 inch above the top edge of the lower container.
- Place the float stick inside the lower container near the same side as you have set the wood stake. Make a mark on the centerline of the wood stake 1 inch below the top edge of the float stick.
- The two marks you have made on the stake are the spots where you will attach the eyelet screws. Remove the wood stake and the float stick from the lower container.
- To make holes for the eyelet screws, hammer the nail in a quarter of its length at the first mark. Remove the nail. Repeat this at the second mark. Screw an eyelet screw into each of the holes. This will take some effort, so ask your adult volunteer for help.
- Make sure that the eyelet holes are in line with each other.
- Insert the top end of the float stick (opposite the cork) through the eyelet screws. Then attach the stake to the lower container with strips of packing tape. Look at Figure 4 to see how to do this.
/-/https/www.sciencebuddies.org/cdn/Files/4243/5/ApMech_img068.jpg)
Figure 4. This image shows the float stick assembly inserted through the eyelets in the wood stake and the wood stake taped to the bottom container.
- Prepare the upper container by making a hole in the side of the container toward the bottom so that water can drain from it.
- Use the pushpin to make a hole through the side approximately 1/2 inch from the bottom.
- If you are using a metal can, you may need to use a nail instead of the pushpin. Use the thinnest nail you can find to make the hole.
- If you have plugged a previous hole with plumber's putty, do not make a new hole in the same place through the putty, which will change shape slightly over time, making your hole grow larger and changing the rate at which the water drips through it.
- Experiment with the size of the hole to make sure that it is big enough that the water can flow freely and small enough that the water does not run out in a few minutes. The flow rate is the number of drops of water per minute that leave the upper container and fall into the lower container.
- Fill the container with water and watch it drip through the hole. If the hole lets water out either too fast or too slow, simply block the opening on the inside with a marble-sized amount of plumber's putty. Make sure to press it firmly against the inside of the container to make a good seal. You can then make a new hole with a nail in a different location.
- Do not make the new hole go through the plumber's putty. The putty will change shape slightly over time, making your hole grow larger over time and changing the water flow rate
- The desired start flow rate should be about 50 to 100 drops per minute. The starting flow rate that you use depends on the size of the lower container. You can use a faster flow rate if the lower container is large. Do you think the flow rate will stay the same or change over time? Why?
- Once you have finished preparing the upper container, put all of the parts together so that it looks like Figure 1.
- Place the upper container on the ring stand (or box) above the lower container. The water should drip into the lower container without hitting the float stick.
- The float stick must be free to move up and down without sticking on the eyelet screws or hitting the upper container.
- Run a quick test to make sure that the water is flowing from the upper container consistently.
- You will now test and calibrate, or mark measurements on, your water clock so you can tell how much time has passed based on how far the float stick has risen.
- With the fine-tip marker, draw a small line on the float stick just above the bottom eyelet screw and a matching line on the wood stake. These lines indicate the starting point of the float stick.
- Set a kitchen timer for one hour but do not start it yet.
- Pour water into the upper container while blocking the hole with your finger. Use the fine-tip marker to draw a line showing the starting water level on the inside of the upper container.
- Start the timer at the same time you move your finger from the hole in the upper container. Make any minor adjustments needed to the positions of the containers. Figure 5 shows water dripping from the upper container into the lower container.
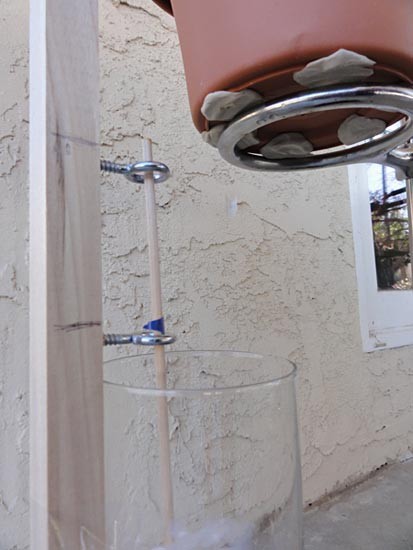
Figure 5. When you start your water clock, water should steadily drip from the upper container into the lower container, as shown in this image.
- The desired start flow rate should be about 50 to 100 drops per minute. Write the actual flow rate down in your lab notebook (in drops per minute). Record the data in your notebook in a table like Table 1.
Swipe left to see moreTrial 1-Hour Measure
(drops/minute)2-Hour Measure
(drops/minute)3-Hour Measure
(drops/minute)1 2 3 Table 1. Record the flow rate data in a table like this one.
- After an hour, you will notice that the float stick has moved up. Because cork is buoyant, it floats on the surface of the water and the float stick will rise as water fills the lower container. Use the marker to make a mark on the wood stake that matches the mark on the float stick.
- Measure the distance between the first mark on the wood stake and the second mark and record it in your lab notebook in a table like Table 2. This distance is the 1-hour measure.
Swipe left to see moreTrial 1-Hour Measure
(inches)2-Hour Measure
(inches)3-Hour Measure
(inches)1 2 3 Table 2. Record your time and distance data in a table like this one.
- While you measure the 1-hour distance, reset and start the kitchen timer for one hour and allow the water clock to keep dripping for a second hour. Record the flow rate in your lab notebook.
- After the second hour is complete, make a mark on the wood stake that matches the mark on the float stick.
- Measure the distance between the first mark on the wood stake and the third mark on the wood stake (the newest one) and record the distance in your lab notebook in Table 1. This distance is the 2-hour measure.
- While you are measuring the distance, reset and start the kitchen timer for one hour and let the water clock continue dripping for a third hour.
- Record the flow rate in your lab notebook.
- If your water clock did not track the second hour, review the Troubleshooting Notes for ideas on how to fix it.
- After the third hour is complete, make a mark on the wood stake that matches the mark on the float stick.
- Measure the distance between the first mark on the wood stake and the fourth mark on the wood stake and record the distance in your lab notebook in Table 1. This distance is the 3-hour measure.
- After three hours have elapsed, the experiment is complete. However, as in all experiments, you must redo the experiment two more times for a total of three trials.
- Redoing the experiment enables you to ensure that your results are repeatable. Record all of the data in your lab notebook.
- For each additional trial, make sure that you add enough water to meet the original water level mark.
/-/https/www.sciencebuddies.org/cdn/Files/4244/5/ApMech_img069.jpg)
Troubleshooting Notes
If you find, after any of the hourly measurements, that your water clock ran dry and thus could not track the whole three-hour time, it may be due to the upper container not being large enough, or the hole size being too large, or the wood stake being too short.- Stop the clock, and try to identify and fix the problem.
- Once you have a solution you want to try, restart the experiment at step 7b.
- Since it is probably the easiest problem to test and solve, you may want to try restarting the experiment using more water in the upper container first.
Analyzing the Data
- Review the data in Table 1. Does your data vary a lot over the three trials? If it does, what do you believe causes the variation? Graph all the data on one bar chart.
- You can make your graph by hand or you can make your graph online at CreateAGraph.
- Label the x-axis Hour and the y-axis Distance (inches).
- If you see variation between the trials, what do you think caused it? Did the flow rate change over time? Hint: Read the Variations for an explanation.
- Graph the flow rate data on one x-y plot. Label the x-axis Hour and the y-axis Flow rate (drops/min).
- Do you think that you could use a water clock in your daily life, perhaps to time tasks like doing homework?
Ask an Expert
Global Goals
The United Nations Sustainable Development Goals (UNSDGs) are a blueprint to achieve a better and more sustainable future for all.
/-/https/www.sciencebuddies.org/cdn/Files/19752/5/E-WEB-Goal-09.png)
Variations
- The change in hydrostatic pressure in the upper container as the water level decreases causes a change in the water flow or rate. The accuracy of the clock depends on a constant water flow. How does the shape of the upper container affect the constant water flow and the accuracy of the clock? Experiment with different container shapes.
- As you have seen, the accuracy of the water clock is dependent upon a constant water flow. How does the rate of water flow change over time in your water clock? Can you think of some ideas to keep the water level constant in the upper container? Put your ideas into action and see if the accuracy of your water clock improves.
- Can you add an alarm to your water clock design? Your alarm water clock should provide some kind of noise so that if you are not in the same room as the water clock you can hear when time is up.
- In this experiment, the water clock told time by the hour. Can you make the clock more accurate, such as telling time by every half hour? What about every 15 minutes? Use the kitchen timer to measure shorter periods of time and mark on the wood stake when the periods are up. Overall, how accurately can your clock tell time?
Careers
If you like this project, you might enjoy exploring these related careers:
/-/https/careerdiscovery.sciencebuddies.org/cdn/Files/1450/21/iStock-1227179796.jpg)
/-/https/careerdiscovery.sciencebuddies.org/cdn/Files/1457/17/pexels-photo-3861938.jpg)
/-/https/careerdiscovery.sciencebuddies.org/cdn/Files/1692/17/unsplash-G1Xk2C87Rb8.jpg)
/-/https/careerdiscovery.sciencebuddies.org/cdn/Files/1147/17/unsplash-fJebhGIP0P4.jpg)

/-/https/img.youtube.com/vi/wG3OVpaHGkc/0.jpg)
/-/https/img.youtube.com/vi/l-VWX6ndGpA/0.jpg)
/-/https/img.youtube.com/vi/FMcbAiTfx7A/0.jpg)